Diamonds for Dogs
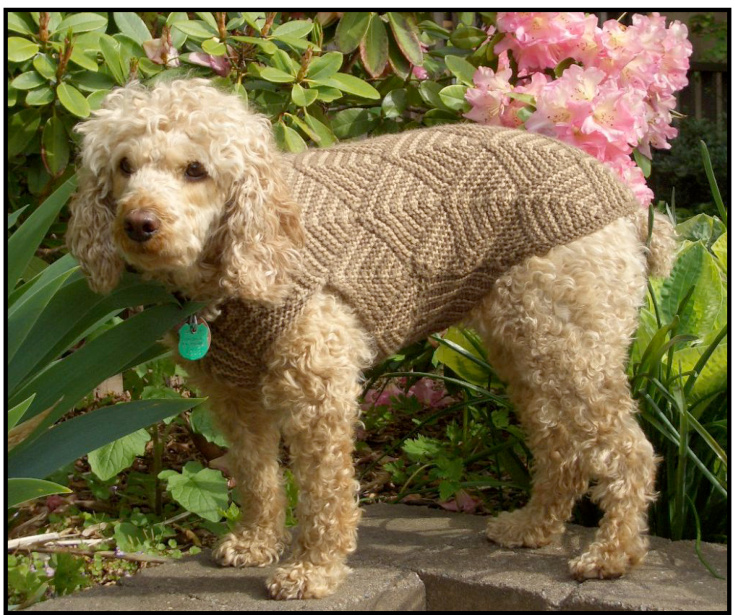
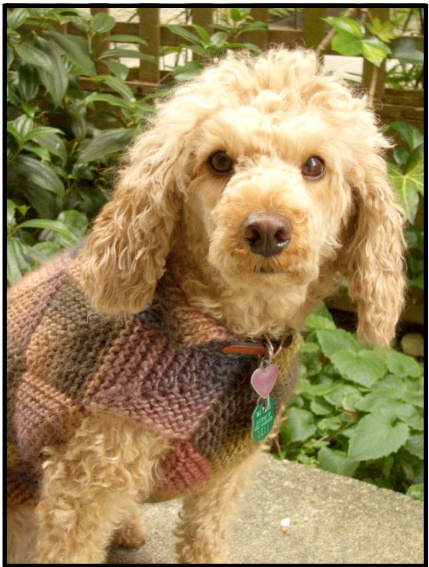
Diamond chic for your dog. This sweater looks elegant in two-color stripes or try a variegated yarn.
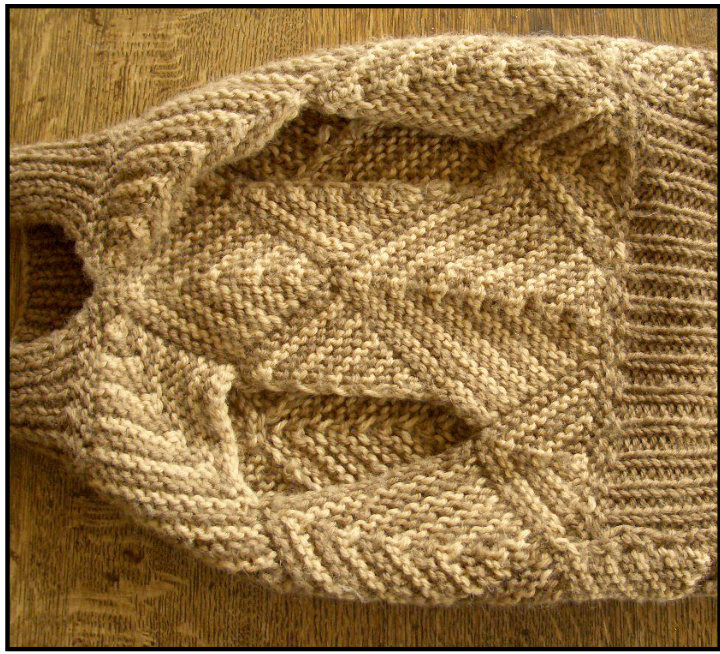
This is a close-fitting sweater. It has a slight V neck with a ribbed collar open at the front, for easy access to your dog's collar to attach the leash or just let the dog tags hang outside the sweater. The diamond shapes give a good fit in the chest and neck area. Ribbing for the waist portion of the belly provides a good snug fit but still lets you pull it on over the head. (There is also a no-belly-ribbing variation, for those who prefer ease of dressing and undressing over the best fit.) You knit the diamonds together as you go so there aren't a lot of ends to sew in. The whole sweater is knit continuously; there are no major seams. One of the nice things about the modular diamond construction is you can change the size of the sweater just by changing the size of the diamonds.
You can also make sweaters of the same size using different weights of yarn. This is the same dog, same pattern, heavier yarn. I just used fewer stitches for the diamonds. Although this pattern will fit dogs of different sizes, it won't fit dogs of all proportions. So the first step is to test viability.
Make sure it will fit your dog
Measure the chest just behind the front legs. Don't make it skin tight; allow a little ease. The sweater is five diamonds wide at this point, so: Width of one diamond $=$ chest measurement / 5. We also need to know how long one side of a diamond is: (Width of diamond) \* .707 will give you the length of one side. Example: Chest measurement is $22^{\bullet}$ The width of a diamond is $22\mid5=4.4^{\circ}$ . Never mind that 4/10ths of an inch isn't a convenient number, only round at the end. One side of a diamond will be $4.4~^{*}$ $707=3.11^{\circ}$ long. Take the tape measure or a piece of yarn and put it again around the chest, just behind the front legs, where you took the chest measurement, and note the spot where it intersects the spine. From there, measure towards the head, the width of one diamond, in the example above that would be $4.4^{\circ}$ (between $4^{3}/\mathrm{{s}}$ and 4.5). This is where the diamonds will end and the collar will start. It should be more or less at the base of the neck. It doesn't matter if it's a bit short but if it's too long it's not going to work. It shouldn't come any higher than where a dog collar would sit. I measured my friend’s stocky Maltese mix and it was part way up the back of her head. Next, the neck opening is (diamond width $^+$ diamond side) $^*\,\,2$ ; in the example above, $4.4+3.11=7.51\mathrm{~}^{*}\mathrm{~}2=$ essentially $15^{\circ}$ . First, just make sure this willfit over the head. 1 think it should, but check. Then, we want to check the overall neck width and shaping. Put the tape measure around the chest again, same place. From the point on that circumference that is on the underneath, “belly' part of the chest, midway between the two front legs, measure towards the head, one and a half diamond widths, so in our example, $4.4*1.5=6.6^{*}$ (That's a titch less than $6^{5}/_{8}$ . This may be easier in centimeters, if you're getting odd measurements and have a tape measure with both.) This point is the bottom of the Vneck opening. Now this is easier with two people. Take the tape measure and loop it from that point up and around the neck and bring it back to the same spot. Adjust it so the length is the neck opening length (our $15^{\circ},$ 0. It should fit comfortably around the neck and the mid point should hit the point you measured to earlier on the back, where the diamonds stop and the collar starts. A little loose is okay but too tight isn't. It will stretch a bit of course, and ifit's just a little snug you might try again with slightly larger diamonds, but if it's not even close, then this isn't the pattern you want. Back length not including the collar, as shown, is $4^{1}/_{2}$ diamond widths long, but you can leave out a row of diamonds or even add one. (See Variations, below.) The collar and belly ribbing sections are adjustable so that shouldn't be a problem.
Materials
Yarn
You can use whatever yarn you like. Wool is warmer than synthetic, and superwash is good if it's going to get a lot of hard use. If you knit a sample diamond and measure how much yarn it takes, you can estimate how much you'll need. There are the equivalent of $32^{1}/_{2}$ diamonds and then you need more for the collar, belly ribbing and back edging. The collar is maybe 3 diamonds-worth, unless you make it fairly long. The belly ribbing again will vary but say $2~\%$ to 3 for a female dog, less for a male. The edging is only about $^{1\!}/_{2}$ a diamond. If you're doing the two-color version, keep in mind that you'll need more of the main color (MC), brown in the photo. The collar, ribbing and edging are all MC and you'll use more of MC in the diamonds as well.
Needles
The diamonds are traditionally done on straights but you can use a circular. You will need a circular for the back edging and belly ribbing and I think the collar is easier on a circular as well. It's sometimes handy to have a crochet hook.
Notions
You'll need a tapestry nedle for the finishing.
Getting Started
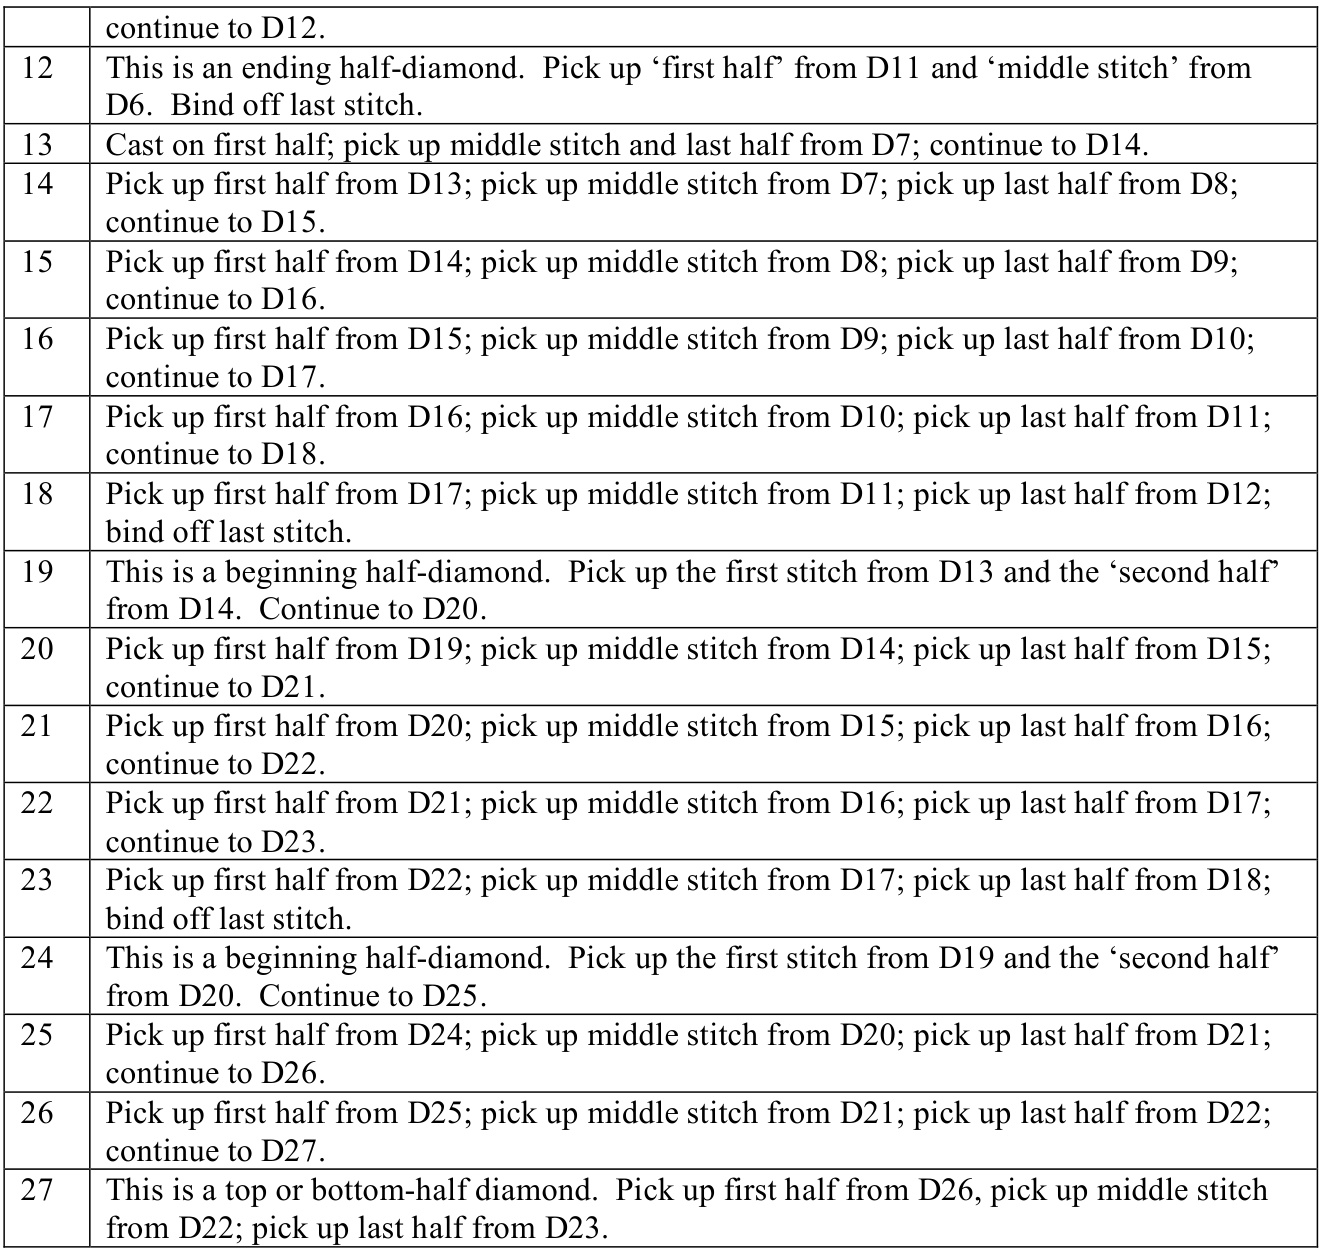
Do a garter stitch swatch in your chosen yarn so you know your stitches gauge. We don't care about row gauge. The cast on makes up the bottom two sides of a diamond, so (diamond side $^*\,2^{1}$ )is the approximate length to cast on. I say approximate because you have to have an odd number of stitches, so you may have to round up or down. Continuing with our example: Say your sample gauge is $18\ \mathrm{sts}=4^{\circ}$ One side of a diamond is $3.11^{\circ}$ long. So, you need to cast on for approximately $6.22^{\circ}$ (Don't round the number yet.) The number of stitches to make $6.22^{\circ}$ would be $6.22\mathrm{~/~}4\mathrm{~x~}18=27.99$ , so 28 stitches. It has to be an odd number, so either 27 or 29 stitches. It's probably best to do two test diamonds and then decide. Perhaps the tie breaker might be how generous you were with your ease. You could also check the chest measurement between the front legs; that's going to be one diamond wide - which choice fits better? For ilustration purposes, let's assume you've decided on diamonds with a cast-on of 29 stitches. DiamondsforDogs $\copyright$ 2009 Jane Salmon. All rights reserved. FOR PERSONAL USE ONLY. Page3
How to Knit the Diamonds
I am going to describe the process, but if you want more detailed, line-by-line instructions, I used Vivian Hoxbro's “Domino Knitting". The diamonds are knit in garter stitch. If you're making the striped version, change the yarn every two rows on the RS row, carrying the one not in use up the right side. The last row is a RS row. It should be the MC (brown in the photo), so if the previous two rows were MC, don't switch to the contrast color (camel) just for one row, do three in MC. The diamond shape is created by casting on enough stitches for two sides, and then decreasing by 2 stitches in the middle of every RS row. Diamonds are attached as you go by picking up stitches along the side(s) of (an) adjacent diamond(s) rather than casting on, so there is no sewing together of diamonds required. Note: $\mathrm{sl}1=\mathrm{sl}1$ knitwise.
The first diamond:
Cast on, with MC if you're using two colors, using a knitted cast-on. This gives a good edge for picking up stitches. As mentioned above, it must be an odd number of stitches. Knit in garter stitch except for the following directions: . Every row starts with sll except for the first WS row (the one after the cast on) in which you knit the first stitch. · Every row ends with pl, except the last row, which we'll get to in a moment. The purpose of these two instructions is to make a nice edge for picking up stitches for the adjacent diamond(s). .For the middle three stitches in every RS row you sll, k2tog, psso. This includes the last row in the diamond, which is a RS row and since it only has three stitches is therefore only sll, k2tog, psso. You now have one stitch on your needle. In most cases you don't bind off that last stitch because you're going to use it as the first stitch in the next diamond (which is why we want to end with MC). If you're new to knitting these diamonds, please stop and take a good look at the top of your first diamond; it will make things easier later on. The stitch on your needle is not the top of the diamond, the top of the diamond is the stitch you psso-ed, which is lying crosswise; notice that it is at the top of the pattern made by the decreases. Later you will be picking up a stitch there, through the two loops. It will be easier if it isn't too tight. In most cases, you will be continuing on to the next diamond in the diagonal row; its bottom right edge will abut the top left edge of the diamond you just finished. You need to pick up and knit (or sometime cast on) an equal number of stitches along each side plus one in the middle, which is the bottom of the diamond. So, let's continue on to the second diamond. Pick up and knit stitches for the first side: The number of side stitches is (total number of stitches - 1) / 2; in our example, $29-1\!=\!28\;/\;2=14)$ . There will be the right number of nice slipped stitches along the side of the diamond you just knit. However the one at the very top is a bit crowded by the psso stitch and in any case we're not going to use it. The stitch that's left on your needle takes its place. Start with the second one. Pick up and knit the stitches for the first side.
The middle stitch: . If there's already a diamond below your new diamond, then you pick up the middle stitch by putting the needle through both loops of that psso at the top of the diamond, the one I suggested you make note of earlier. If you pulled it so tight that you can't really get the needle through, use a crochet hook to pull that stitch through and do better from now on. .If there's no diamond below and no diamond on the far side to attach to, then you pick up the middle stitch by putting the needle into the last stitch of the cast on for the diamond you just completed. .If there is no diamond below but you're attaching to a diamond on both sides, then you pick up the middle stitch by going through the last stitch of both the existing diamonds, thereby hooking them together. This can be a little awkward; using a crochet hook may be easier. The other side: .If there is no diamond to attach to on the other side, cast on the same number of stitches you picked up on the first side, 14 in our example. If you are attaching to diamonds on both sides, then pick up the stitches from the far diamond.
Beginning Half-Diamonds:
When you start a new diagonal strip of diamonds, these half diamonds (triangles) make a straight edge. Pick up and knit the first stitch from the top of the diamond above and pick up and knit the usual number of side stitches from the adjacent diamond. The WS rows are the same as usual. For the RS rows: sll1, k2tog, knit to the last stitch, purl the last stitch. The last three rows are: RS: sll, p2tog WS: sll, p1 RS: sl1, kl, psso
Ending Half-Diamonds
These diamonds make a straight edge at the end of a diagonal strip of diamonds. Pick up and knit the first stitch from the top of the diamond above and pick up and knit the usual number of side stitches from the adjacent diamond. The WS rows are the same Diamonds forDogs $\copyright$ 2009 Jane Salmon. All rights reserved. FOR PERSONAL USE ONLY. as usual. For the RS rows: sl1, knit up to the last three stitches, sll, kl, psso, pl. The last three rows are: RS: sll, p2tog WS: sll, p1 RS: sl1, kl, psso
Top and Bottom Half-Diamonds:
These half-diamonds make a straight edge at the top and bottom. Leave a good long end before you start picking up stitches, enough to knit about one side of the diamond plus an extra inch or two; you may need it later (see Finishing). The pick up and knit row and the first WS row are the same as usual. At the end of every row after that you're going to leave one more stitch on the needle, un-knit (actually unpurled, since you always purl the last stitch of a row), so the number of active stitches gets smaller and stays in the middle. Usually for the RS rows you knit the same number of stitches on both sides of the middle decrease; instead you knit one less on the far side of the decrease and then pl as usual and turn. So on the first RS row (not counting the pick up and knit row) you leave one stitch on the needle and turn, and the following. (second) WS row you sll, knit up to the second last stitch, purl it and turn, also leaving a stitch on the needle. For the next two rows you purl and turn leaving two stitches on the needle, and then three, etc. Because we're abandoning two stitches at the ends for every ridge as well as decreasing two in the middle, in the RS rows the number of stitches you knit on either side of the middle decrease goes down by two every time, so if you knit 10 and 9 stitches in the previous row, it will be 8 and 7 in this one. For the WS rows, you knit 4 stitches less than you did in the last WS row, and you leave un-knit the same number of stitches as you did on the previous RS row. So before you start the WS row, look at how many stitches are already on the right needle. You want to leave the same number behind on the left needle so if there are 3 stitches on the right needle the last stitch, the purl stitch, will be the fourth one from the end. The last two rows depend on how many stitches you started with. If the number of stitches you picked up for one side (not both) is an even number then the last two rows are: WS: sll, k3, pl, turn RS: sll, sl1, k2tog, psso If it's an odd number, the last two rows are: WS: sll, kl, pl, turn RS: sll1, sll, kl, psso Put the active stitches on a stitch holder. Leave a good long end, enough to knit about one side of the diamond plus an extra inch or two. Break the yarn.
Sequence of Construction
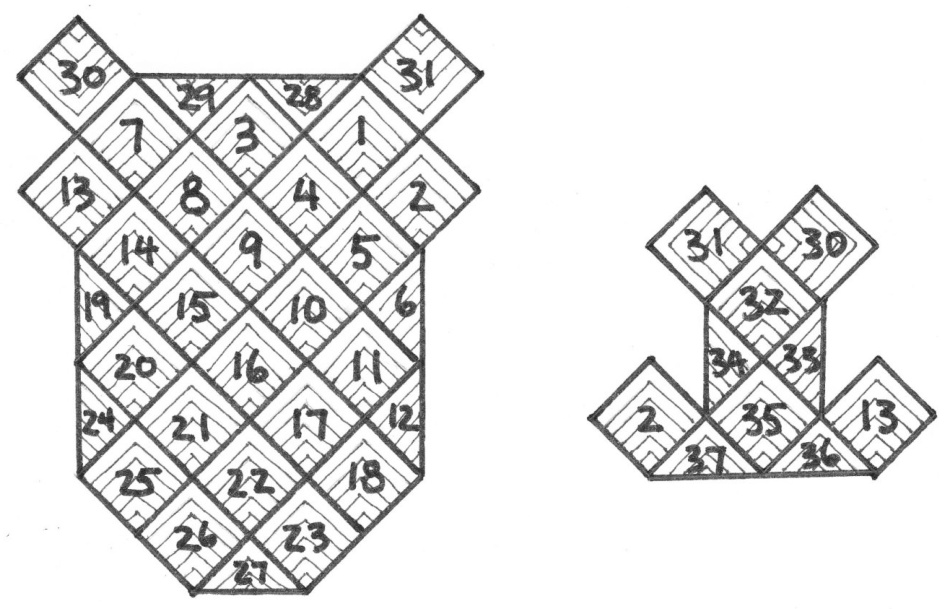
These are full diamonds unless specified. $\mathbf{D}=$ diamond. ${\bf M}{\bf C}=$ main color (brown). $\mathbf{CC}=$ contrast color (camel). For brevity, I used “pick up”’ to mean “pick up and knit? in this chart.
The Back
The Neckline
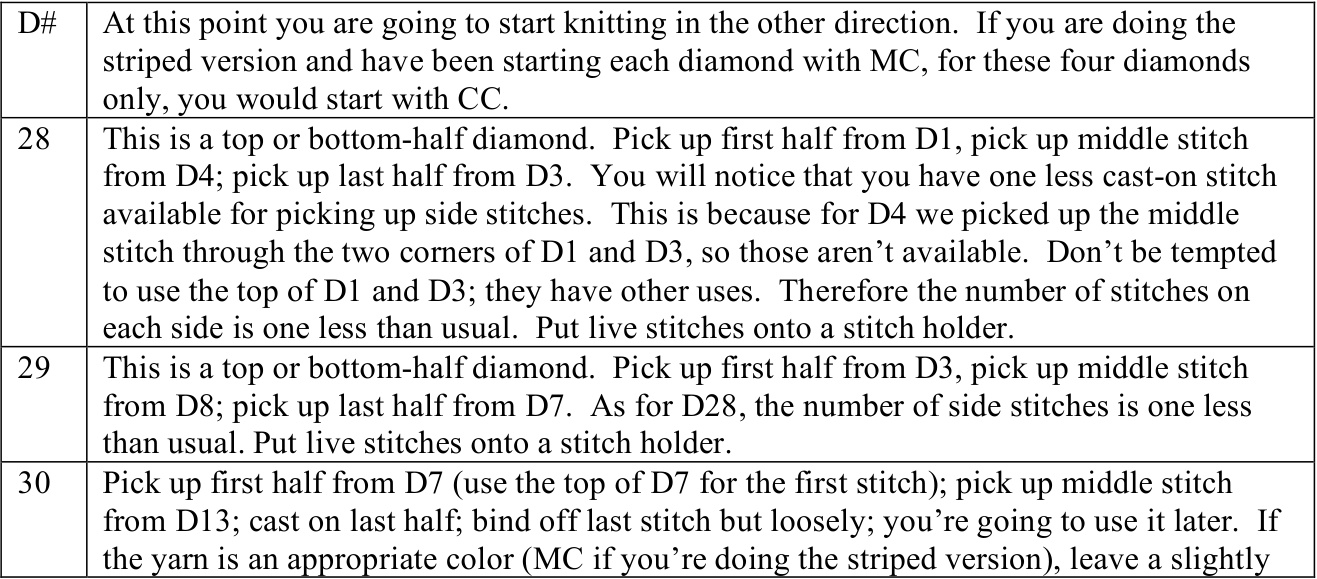

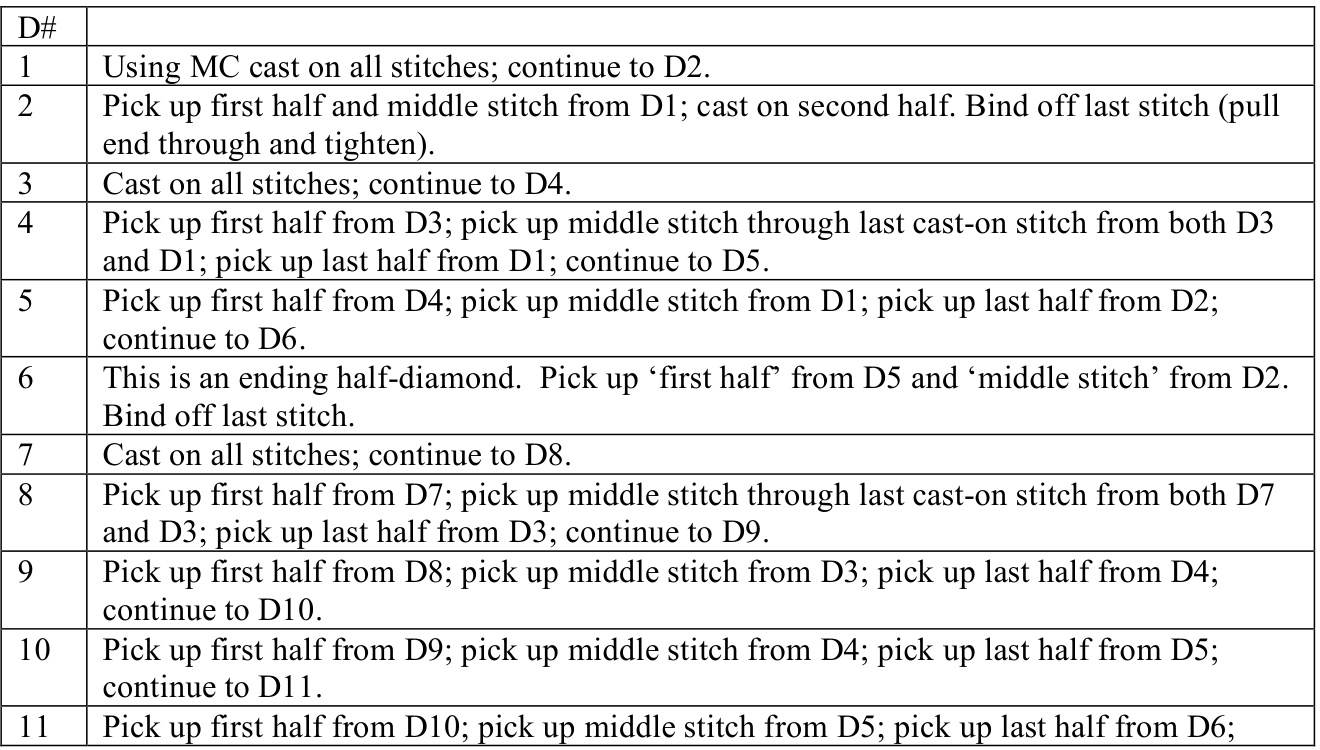
The Collar
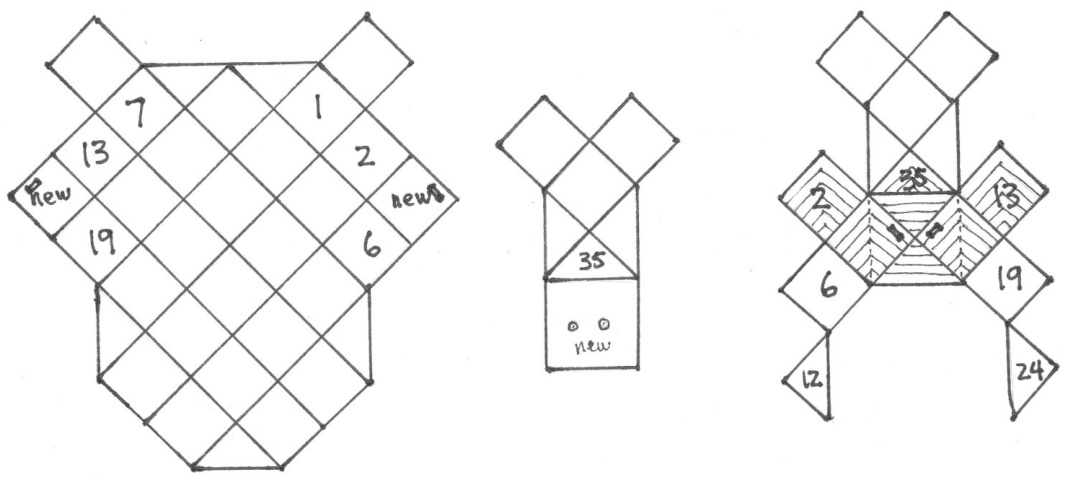
The collar has an edging similar to the back edging and then the rest is ribbing. The ribbing will pull in smaller, which for many dogs will be just right. If your dog has a large or very slender neck you might want to consider larger or smaller needles for the ribbing. You could even do some increases or decreases in the edging section. If you're doing the two-color version, the collar is MC. If you have been using straight needles this is a good time to switch to the circular. .Using the stitch on the needle from D31 as the first stitch, pick up and knit the usual number of side stitches from D31. · Put the live stitches from D28 on the other needle and knit them. If they are a little loose, knit them through the back loop to twist and tighten. If they still look loose don't worry, you can fix it when you sew in the ends (see Finishing). · Pick up and knit one stitch from the top of D3. This gives you an odd number of stitches so the front edges of the collar match. . Put the live stitches from D29 on the other needle and knit them; pick up and knit the usual number of side stitches from D30. . WS: knit all stitches RS: purl all stitches WS: $^{*1}\mathrm{k}1$ , $\mathsf{p}1^{*}$ to last stitch, knit last stitch. .Continue in kl, pl ribbing until the collar is as long as seems suitable for your dog. For my dog I do about $2^{\circ}$ of ribbing but neck lengths vary a lot. . Cast off loosely (or on a larger needle) in ribbing.
The Chest
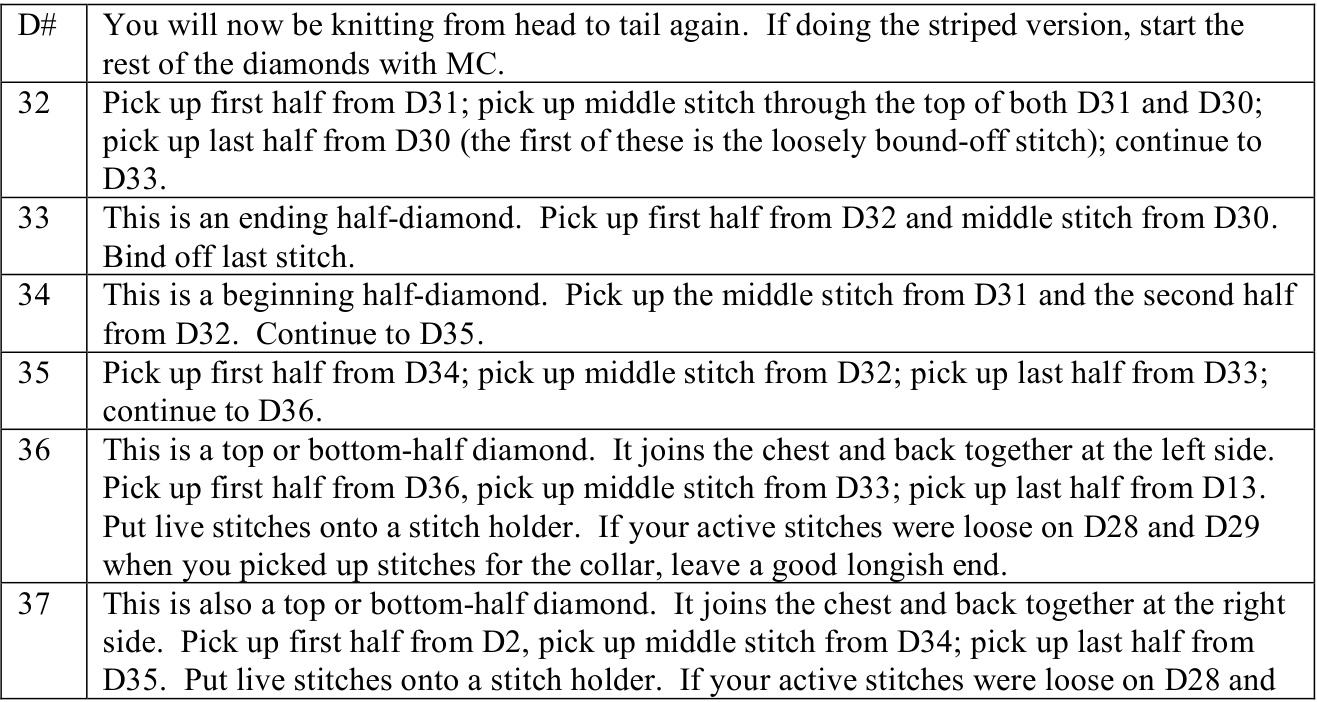

The Belly Ribbing
Try the sweater on your dog and decide how long you want the ribbing. It shouldn't go any farther than where the thigh joins the body. You'll want it shorter if you have a male dog. If you're doing the two-color version, use MC. . Put the active stitches from D36 and then D37 onto the circular. Using kl, pl ribbing, knit and purl the stitches from D37, pick up and knit one stitch from the top of D35, knit and purl the stitches from D36. The last one should be a knit. Put the right needle through the two loops of the edging stitch at the bottom of D19 and purl. .Kl, pl to the end of the WS row; knit the bottom edging loops of D6. .RS: $*_{\mathrm{p}1}$ , $k1^{*}$ to last stitch; slip the last stitch purlwise, put left needle through two edging loops of D19 from front to back, put slipped stitch back on left needle, purl the last stitch together with the edging loops. .WS: $^{*1}\mathrm{k}1$ , $\mathsf{p}1^{*}$ to last stitch; slip the last stitch knitwise, put left needle through two edging loops from D6 from front to back, put slipped stitch back on left needle, knit the last stitch together with the edging loops. . Repeat these two rows until the ribbing is the desired length. . Cast off loosely in ribbing, probably using a larger needle. The ribbing needs to stretch enough to get the sweater on easily over the chest, so try it on your dog before you break the yarn. Assuming you're casting off on the RS, purl the last stitch together with an edging loop, as you did for the other RS rows.
The Back Edging
.With MC (if you're using two colors), start with the first available edging stitch on D19 or D24, wherever you stopped the ribbing; pick up and knit through both loops of the edging stitches until you get to D27; at D27 knit the active stitches (through the back loop if they seem loose); continue to pick up and knit until you get to the ribbing. At the tips of D6 and D12, which are bound off, I pick up the top, psso stitch as usual and then instead of the left-on-the-needle, now bound offstitch (which is a bit lumpy) just for these two I use instead the edging stitch underneath. WS: knit to the end RS: cast-off in purl.
Finishing
Using mattres stitch, join the thr rows ofdging at thebase of the collar, using the d from D30. Unless it fits your dog better not joined. Usingthe ends from the back dging, sew thebeginning and end of the back edging t the ribing. Sew in the rest of the ends. This is relatively easy because you can just run them up the welts where the diamonds join. For some reason my active stitches at the end of the top and bottom half-diamonds are always too loose, even after twisting the stitches when I knit them. These half-diamonds have two ends and when I weave them in I use the ends to double up the loose stitches. This works fine. (It's only a dog sweater.)
Variations
No Belly Ribbing
Perhaps you like the design except you want something that's easier to put on your dog. I haven't actually tried this, but at one point I considered making a felted coat. I decided against it but got far enough to figure out what to do instead of the belly ribbing. The sweater would still pull over the head but the chest portion would not be attached to the back. The back would wrap around and attach to the chest with two buttons. . Instead of the half diamond D37, do an additional full diamond in row 1, after D2. . D6 would be a full diamond instead of a half. . Similarly, add a full diamond to the beginning of row 5, replacing D36, and make D19 a full diamond. . On the chest, make D35 a top half-diamond and then with the active stitches knit a slightly rectangular panel that's one diamond width long. . The two new diamonds would come together on top of this panel and button to it. They will need buttonholes and I think the place to put them is after the first few rows, in the second half of the row.
$\copyright$ 2009 Jane Salmon. All rights reserved. FOR PERSONAL USE ONLY.
Shorter (or Longer)
You can easily make the back one-diamond length shorter by leaving out one section of diamonds. Leave out D12, D18, and D23 through 27. Make D22 the bottom-half diamond instead of D27. And although it seems less likely that you'd need to, you could also add a section.
Oops (too small)
When I made the first sweater I didn't allow for ease because previous attempts at dog sweaters had stretched a lot. Before I did the connecting diamonds, I pinned it together for a try-on and realized the whole thing was a little small. I didn't want to start over, so I replaced D35 with one that started larger but was truncated, so the sides of the top half were the usual length (important for picking up stitches for the connecting diamonds). I gained some width and a little length as well. It looks a bit clunky but it's underneath where it's not very visible. If you have the same problem, for D35, cast on a few extra stitches at the beginning and the same number at the end. Knit as usual until the sides of the top half are the usual length and then switch to the top and bottom half-diamond instructions.