Sammy the Squirrel Amigurumi:

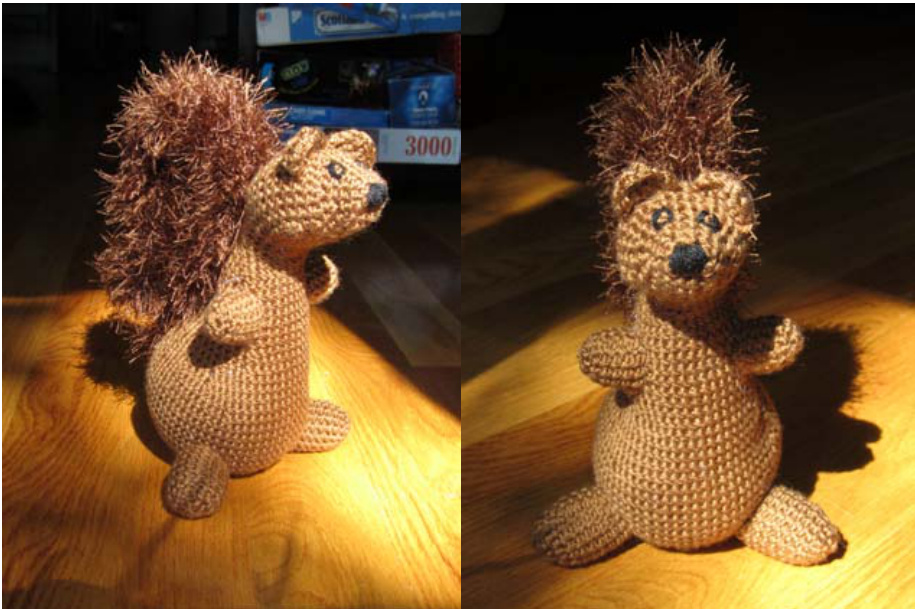
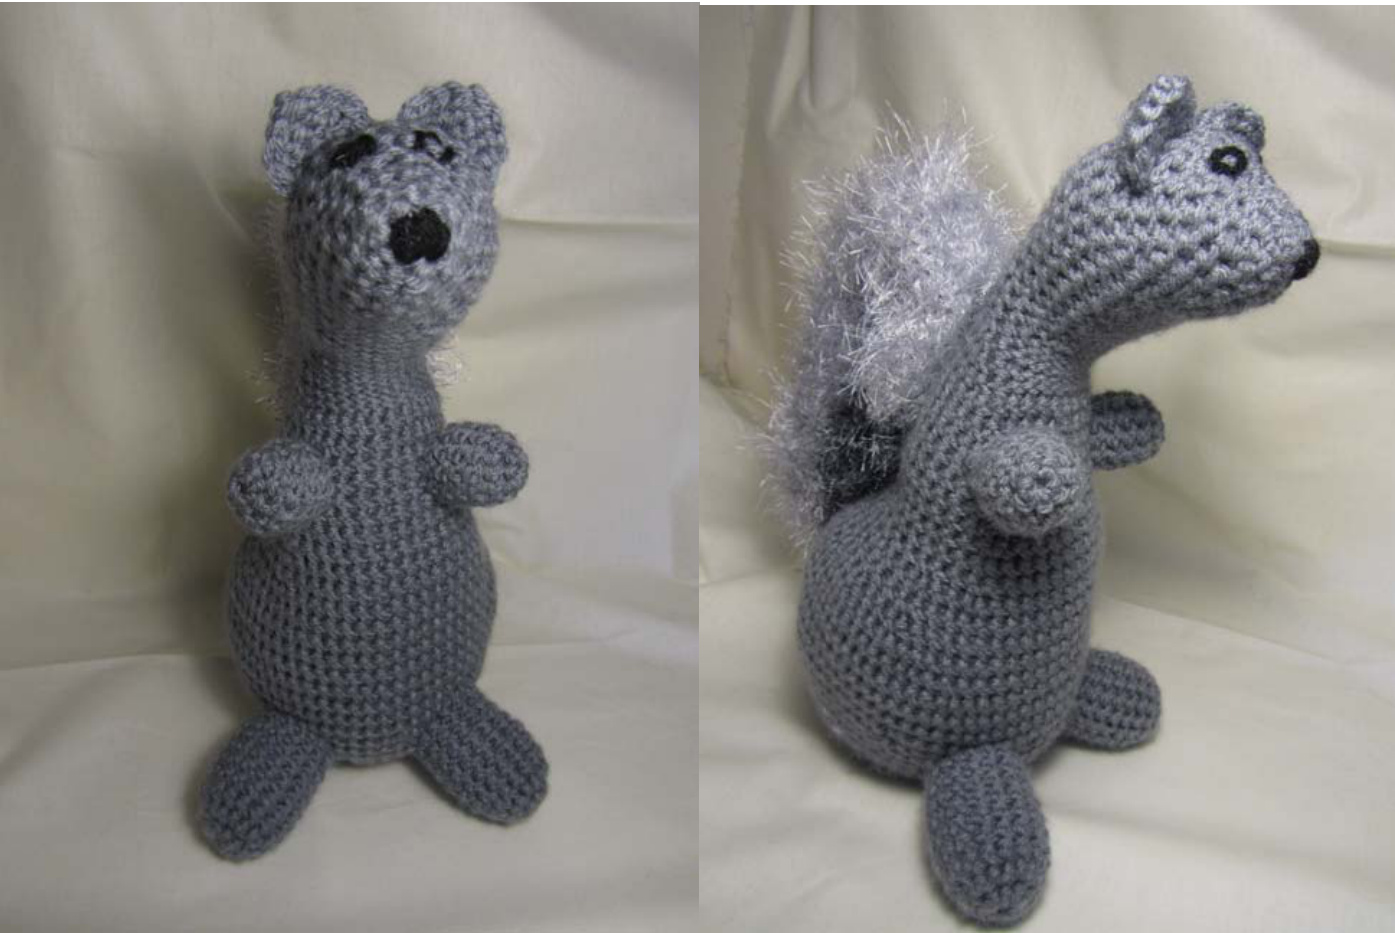
For more pictures, see the end of the PDF. Meet Sammy the Squirrel Amigurumi! Sammy is a real tough guy, the biggest and strongest squirrel in the park, and a lot of the other animals think he's a bully. But that's only ^cause they haven't gotten to know him! Sammy only got to be strong so that he could protect all his brothers and sisters from all of the predators, especially the big, mean dogs who spend all day chasing the squirrels. All the dogs are afraid of Sammy, though. He might be smaller than (most) of those cruel dogs, but he's so fast and brave that he leads them around in circles until they're totally exhausted, and then he taunts them until they promise not to bother his fellow squirrels ever again. In the squirrel community, Sammy is a hero!
Finished Size:
Body Length: 8 12 inches Body Width: 7 inches Height: 10 inches (from the bottom of the butt and feet to top of head)
Materials:
Worsted-Weight Yarn: About 100 yards. (for body and limbs) Bulky-Weight Yarn, Fur Style: 64 yards. (one 50 g ball, for tail) Worsted-Weight Yarn (Black): Scraps for eyes and nose. Crochet hook, size G (4 mm) Polyester fiberfill Yarn needle Abbreviations: Note that this pattern uses US definitions. Ch - Chain Sc - Single Crochet Slip st - Slip Stitch Ss - Slip stitch St - Stitch
Tips:
1. Use a marker to keep track of where each round of stitches ends. Make sure that you move the marker when you finish each round! 2. Unless otherwise specified, this amigurumi will be crocheted in rounds. When working in rounds, do not join with a slip stitch. Instead, each round starts in the first stitch of the previous round. 3. The format for these instructions is as follows: Round #: (instructions that you will follow to create that round): # of Sc in the round if you have done it correctly. 4. When you are crocheting this amigurumi, make sure you keep your tension even and do not work your stitches too tightly or too loosely. This is especially important when working making the tail. 5. It is essential that you work the slip stitches in the neck loosely, or else it will be very difficult to complete this part of the body. I also suggest that you only work the slip stitches through the top/back loop of each slip stitch, it's much easier. 6. The fun fur is quite difficult to work with. As an alternative method of completing the tail, consider combining the fun fur with a second, thin, yarn. If you do this, it will be easier to pick out the stitches, but you'll have to skip some of the rounds or else it will be too big. This is left to your discretion. 7. Some maker's find that their squirrel is looking to the left. This is because of differences between how I worked when I created the pattern and how others crochet. If you want to increase the chances that yours will NOT look left, note that I am right-handed, crochet in counter-clockwise rounds, and generally work in the top/back/outer loop only.
Body:
Complete the body in worsted-weight yarn. Round 1: Ch 2, 8 sc in second ch from hook. Place marker. Do not join. 8 st Round 2: (2 sc in next sc) around: 16 st Round 3: (2 sc in next sc, sc in next sc) around: 24 st Round 5: (2 sc in next sc, sc in next 3 sc) around: 40 st Round 6: (2 sc in next sc, sc in next 4 sc) around: 48 st Round 7: Sc around: 48 st Round 8: (2 sc in next sc, sc in next 5 sc) around: 56 st Round 9: Sc around: 56 st Round 10: (2 sc in next sc, sc in next 6 sc) around: 64 st Rounds 11 - 16: Sc around: 64 st Round 17: Sc in next 10 sc, decrease once, sc in next 12 sc, decrease once, sc in next 12 sc, decrease once, sc in next 12 sc, decrease once, sc in next 10 sc: 60 st Round 18: Sc around: 60 st Round 19: Sc in next 10 sc, (decrease once, sc in next 3 sc) 8 times, sc in next 10 sc: 52 st Round 20: Sc in next 10 sc, (decrease once, sc in next 2 sc) 8 times, sc in next 10 sc: 44 st Round 21: Sc around: 44 st Round 22: Sc in next 7 sc, (decrease once, sc in next 2 sc) 7 times, decrease once, sc in next 7 sc: 36 st Round 23: Sc around: 36 st Round 24: Sc in next 6 sc, decrease once, sc in next 20 sc, decrease once, sc in next 6 sc: 34 st Round 25: Sc around: 34 st Round 26: Sc in next 6 sc, decrease once, sc in next 18 sc, decrease once, sc in next 6 sc: 32 st Round 27: Sc around: 32 st Round 28: Sc in next 6 sc, decrease once, sc in next 16 sc, decrease once, sc in next 6 sc: 30 st Round 29: Sc around: 30 st Round 30: Sc in next 6 sc, decrease once, sc in next 14 sc, decrease once, sc in next 6 sc: 28 st Round 31: Sc around: 28 st Stuff body with fiber fill. Round 32: Sc in next 6 sc, decrease once, sc in next 12 sc, decrease once, slip st in next 6 sc: 26 St Round 33: Slip st in next 6 st, decrease once, sc in next 10 st, decrease once, slip st in next 6 st: 24 st Round 34: Slip st in next 6 st, decrease once, sc in next 8 st, decrease once, slip st in next 6 st: 22 St Round 35: Slip st in next 6 st, decrease once, sc in next 6 st, decrease once, slip st in next 6 st: 20 St Round 36: Slip st in next 6 st, sc in next 4 st, 2 sc in next st, sc in next 4 st, slip st in next 5 st: 21 St Round 37: Slip st in next 5 st, sc in next 5 st, 2 sc in next st, sc in next 5 st, slip st in next 5 st: 22 St Stuff neck with fiber fill. Round 38: Slip st in next 5 st, sc in next 13 st, slip st in next 4 st: 22 st Round 39: Slip st in next 4 st, sc in next 4 st, 2 sc in next st, sc in next 4 st, 2 sc in next st, sc in next 4 st, slip st in next 4 st: 24 st Round 40: Slip st in next 4 st, sc in next 5 st, 2 sc in next st, sc in next 4 st, 2 sc in next st, sc in next 5 st, slip st in next 4 st: 26 st Round 41: Slip st in next 4 st, sc in next 18 st, slip st in next 4 st: 26 st Round 42: Slip st in next 4 st, sc in next 6 st, 2 sc in next st, sc in next 4 st, 2 sc in next st, sc in next 6 st, slip st in next 4 st: 28 st Rounds 43 - 45: Slip st in next 4 st, sc in next 20 st, slip st in next 4 st: 28 st Round 46: Slip st in next 4 st, decrease once, sc in next 16 st, decrease once, slip st in next 4 st: 26st Round 47: Slip st in next 3 st, sc in next 20 st, slip st in next 3 st: 26 st Round 48: Sc in next 3 st, decrease once, sc in next 16 st, decrease once, sc in next 3 st: 24 st Round 49: Sc in next 5 sc, decrease once, sc in next 2 sc, decrease once, sc in next 2 sc, decrease once, sc in next 2 sc, decrease once, sc in next 5 sc: 20 st Round 50: Sc in next 3 sc, decrease once, sc in next 2 sc, decrease once, sc in next 2 sc, decrease once, sc in next 2 sc, decrease once, sc in next 3 sc: 16 st Round 51: Sc around: 16 St Stuff neck and head with fiberfill. Round 52: Sc in next 2 sc, decrease once, sc in next sc, decrease once, sc in next 3 sc, decrease once, sc in next sc, decrease once, sc in next sc: 12 st Round 53: Decrease around: 6 st Slip st in next sc, tighten yarn, and finish off To make the nose and eyes, thread a yarn needle with black yarn. Loop black yarn around the tip of the nose until all of the brown is covered. On the sloping part of the face, stitch the eyes in black around one stitch, so that a square is formed. Use the photographs for placement. Ears: (Make 2) Complete the ears in worsted weight yarn. Note that these are Rows, not Rounds! Row 1: Ch 5 Row 2: Starting in second ch from hook, sc in next 4 ch. Rows 3 - 6: Ch 1, sc in next 4 sc
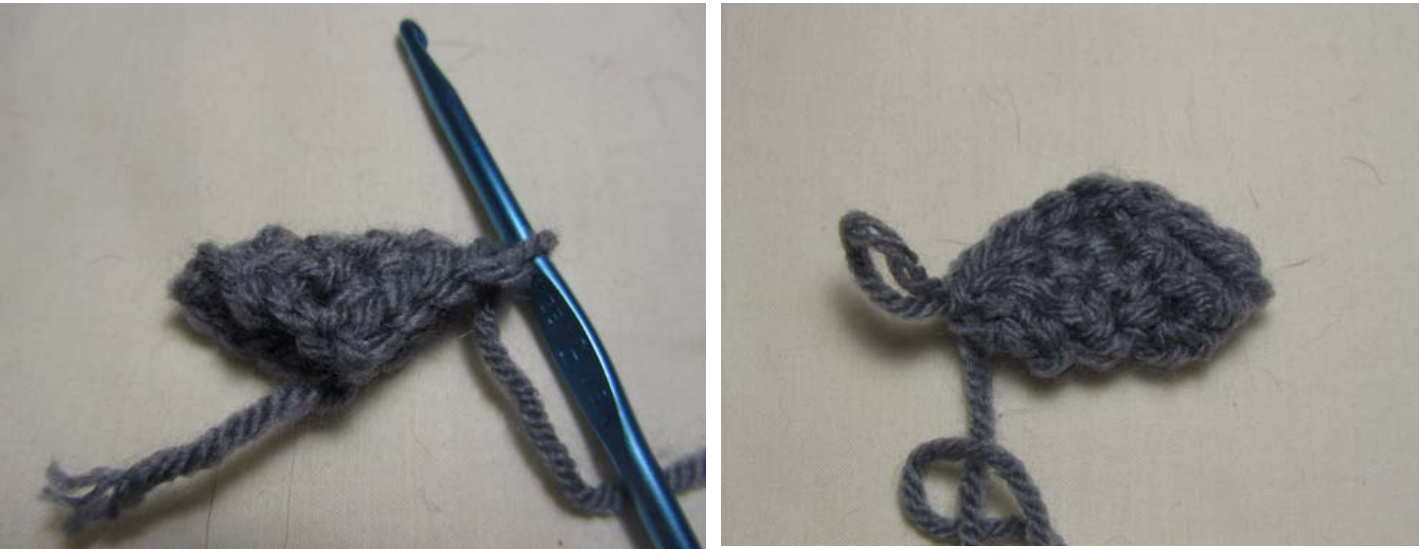
These two images show two of the steps involved in creating the ears. On the left, you can see the correct positioning for folding the ear in half, with the placement of the hook clear. On the right, you can see how the ear will look after you have crocheted it together as described. Do not finish off. Fold the ear in half so that the crochet hook is along the fold at one corner. Sc 3 times to join the loose sides. At top of triangle, ch 1, then sc 3 times down the other side. Slip st, tighten yarn, and finish off, leaving a long end for sewing. Sew the ears above the eyes as in the picture.
Tail:
The tail is done in fun fur. Be aware that this yarn can make it quite difficult to see where the stitches are. It can also be very difficult to undo stitches, especially multiple rows. On the plus side, it is very good at hiding minor errors. Keep careful count of how many stitches are in each row, and if you find that you are off by one, it won't show if you 2 sc in next sc or decrease once to correct the mistake. Round 1: Ch 2, 6 sc in second ch from hook. Place marker. Do not join. 6 st Round 2: (2 sc in next sc) around: 12 st Round 3: (2 sc in next sc, sc in next sc) around: 18 st Round 4: (2 sc in next sc, sc in next 2 sc) around: 24 st Round 5: (2 sc in next sc, sc in next 3 sc) around: 30 st Rounds 6 - 17: Sc around: 30 st Round 18: Decrease once, sc in next 28 sc: 29 st Round 19: Sc around: 29 st Round 20: Decrease once, sc in next 27 sc: 28 st Round 21: Sc around: 28 st Round 22: Decrease once, sc in next 26 sc: 27 st Round 23: Sc around: 27 st Round 24: Decrease once, sc in next 25 sc: 26 st Round 25: Sc around: 26 st Round 26: Decrease once, sc in next 24 sc: 25 st Round 27: Sc around: 25 st Round 28: Decrease once, sc in next 23 sc: 24 st Round 29: Sc around: 24 st Round 30: Decrease once, sc in next 22 sc: 23 st Round 31: Sc around: 23 st Round 32: Decrease once, sc in next 21 sc: 22 st Round 33: Sc around: 22 st Round 34: Decrease once, sc in next 20 sc: 21 st Round 35: Sc around: 21 st Round 36: Decrease once, sc in next 19 sc: 20 st Rounds 37 - 51: Sc around: 20 st Loosely stuff. Round 52: Decrease once, sc in next 18 sc: 19 st Round 53: Sc around: 19 st Round 54: Decrease once, sc in next 17 sc: 18 st Round 55: Sc around: 18 st Round 56: Decrease once, sc in next 16 sc: 17 st Round 57: Sc around: 17 st Round 58: Decrease once, sc in next 15 sc: 16 st Round 59: Sc around: 16 st Round 60: Decrease once, sc in next 14 sc: 15 st Round 61: Sc around: 15 st Round 62: Decrease once, sc in next 13 sc: 14 st Round 63: Sc around: 14 st Loosely stuff. Round 64: Decrease once, sc in next 12 sc: 13 st Round 65: Sc around: 13 st Round 66: Decrease once, sc in next 11 sc: 12 st Round 67: Sc around: 12 st Round 68: Decrease once, sc in next 10 sc: 11 st Round 69: Sc around: 11 st Round 70: Decrease once, sc in next 9 sc: 10 st Round 71: Sc around: 10 st Round 72: Decrease around: 5 st Slip st in next sc, tighten yarn, and finish off. Leave a long end for sewing.

The tail is attached to the body in three places, and the upper part of the tail is joined to the lower part of the tail in two places. All sewing should be done with the yarn used to make the tail. Pictures of each step are provided on the next page: Step 1. Sew the base (narrowest part) of the tail to the lower middle back of the body (about 6 rows from the bottom of the body). Step 2. Lay the tail along the body. On the upper part of the round base of the body, secure the tail to the body with several stitches. Step 3. Continue to lay the tail along the body. At the base of the neck on the back, secure the tail to the body with several stitches. Step 4. Bend the tail back. On the outer curve of the tail section you've just attached to the body, draw through a length of yarn, and sew through the rest of the tail. Sew through a few times. This will create a sharp pucker in the “bent over” part of the tail and will secure it in the folded over position. Note that at this stage, you can determine how high you want the tail to “stick up\* compared to the head - if you bend it a lot, it won't stick up much at all, whereas if you bend it a little, the tail might peak out higher than the head. The images at the end of the pattern show examples of the two styles.
Pictures of the four steps:
Step 1: The placement of the tail in relationship to the bottom of the squirrel's body.
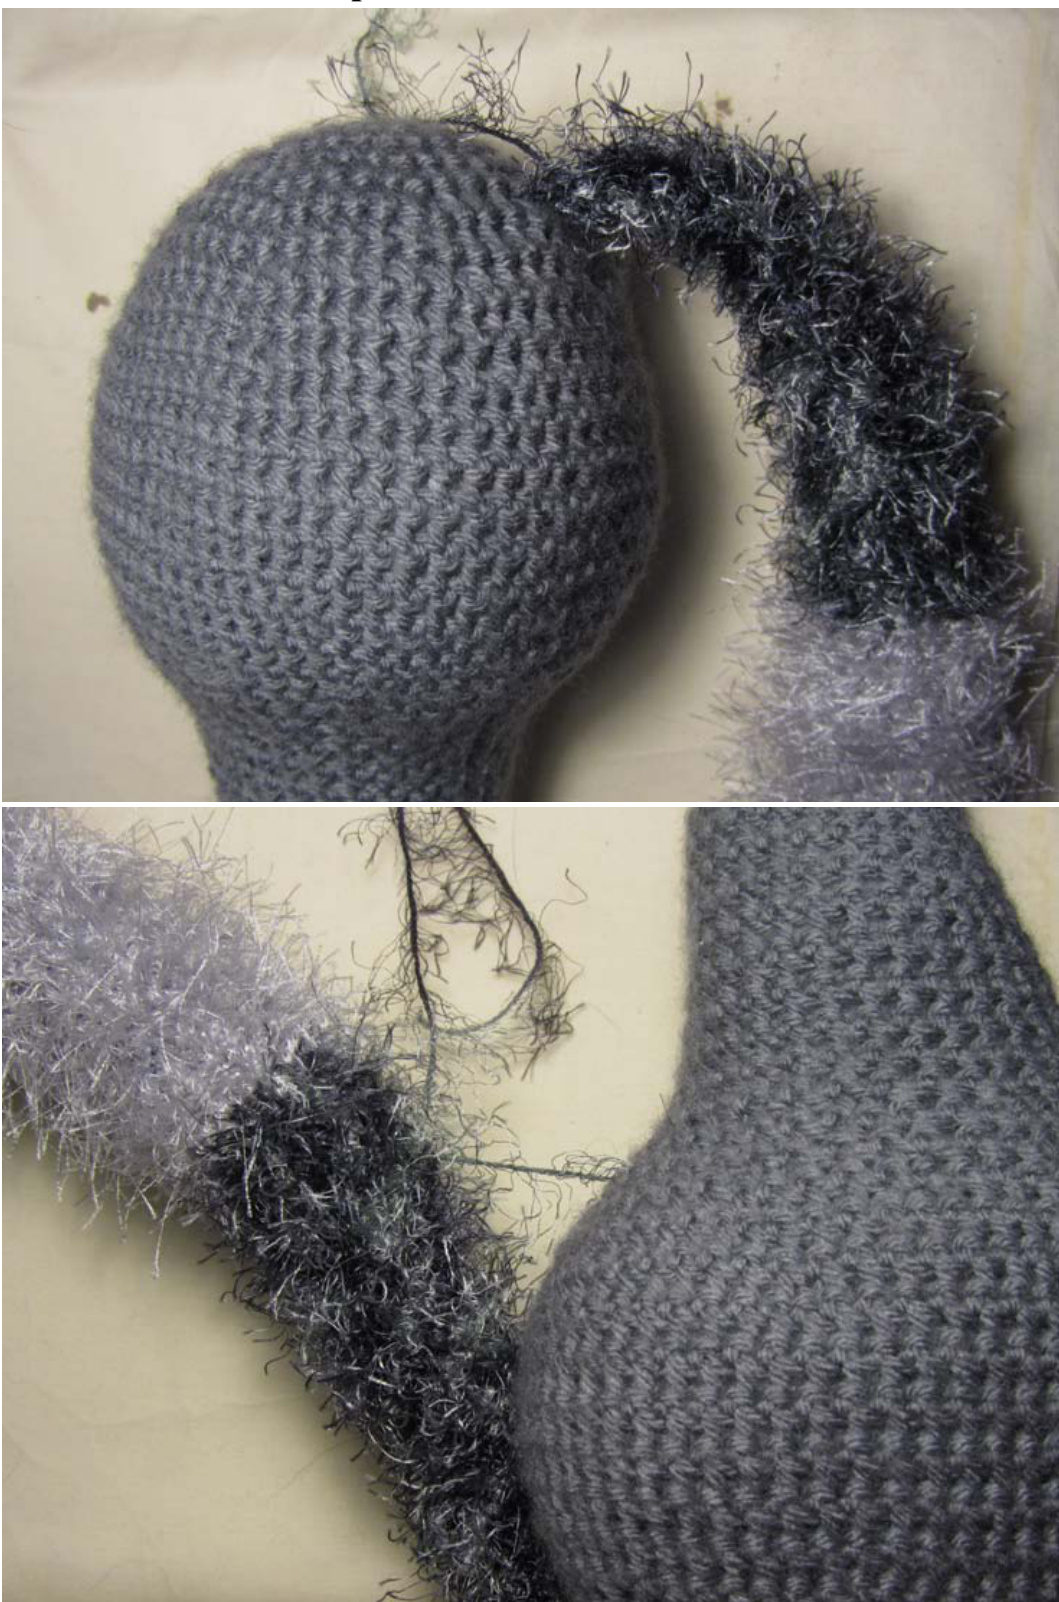
Step 2: The second place where the tail is attached to the body, along the curve of the “butt" of the squirrel's body.
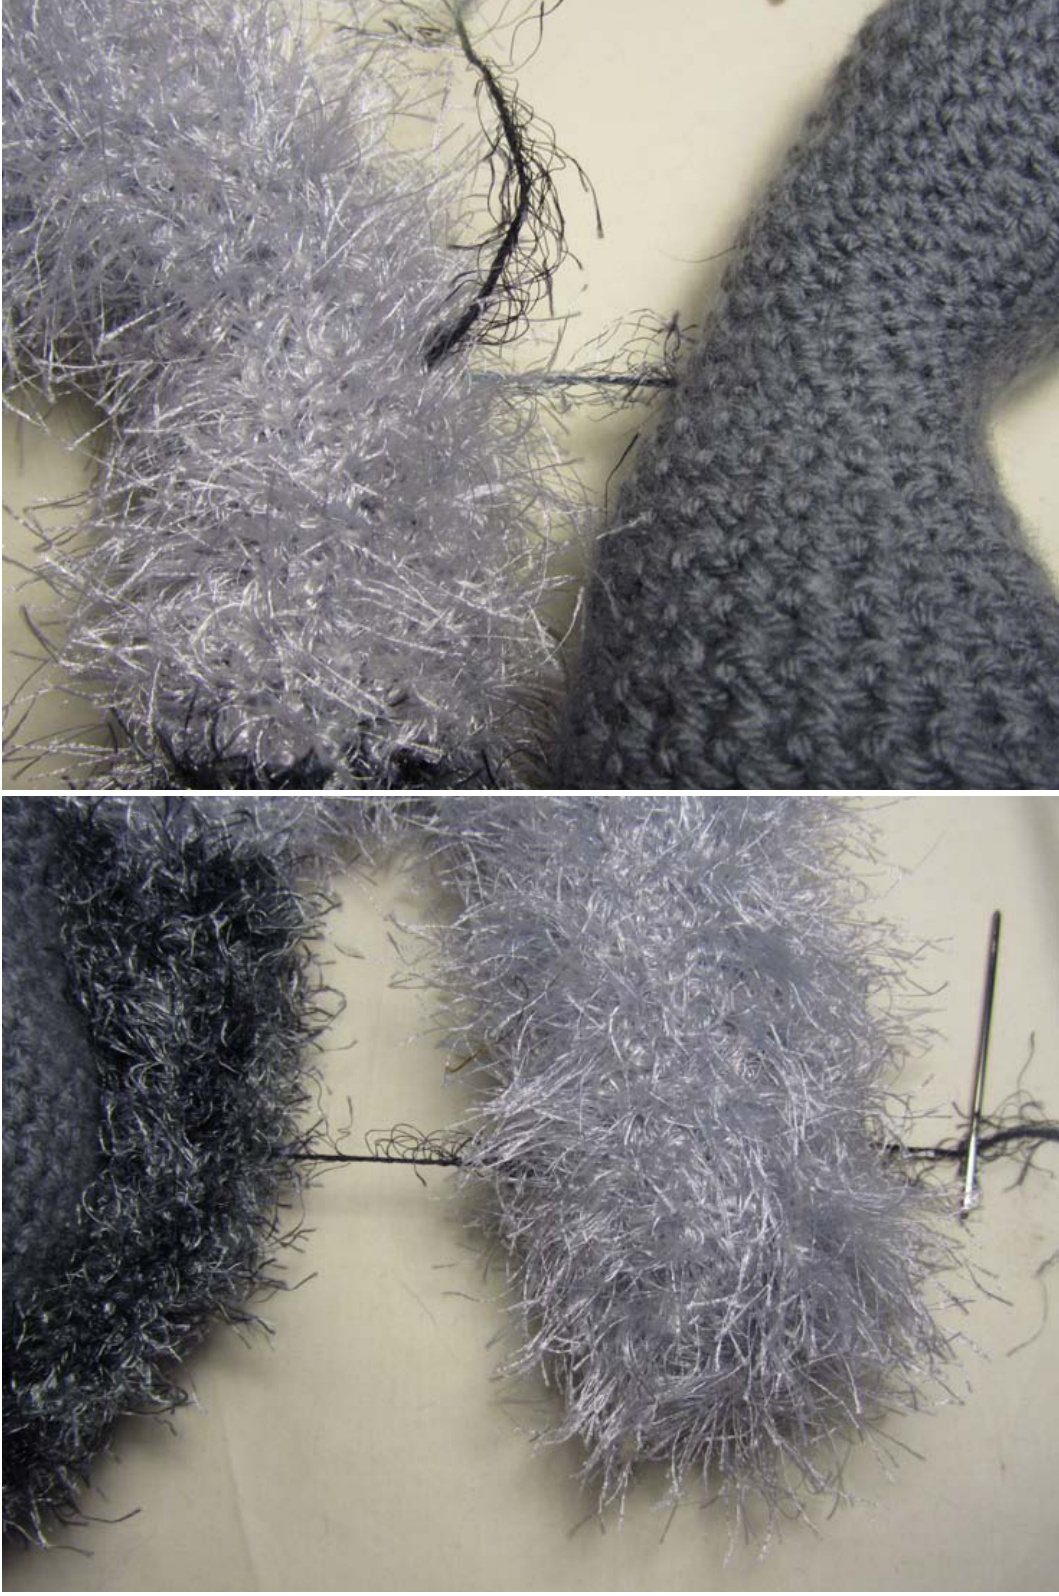
Step 3: The third place where the tail is attached to the body, at the thin part of the neck. Step 4: Starting on the outer curve of the section of the tail attached to the body, sew all the way through the bent over part of the tail. If you would like the tail to stick up farther as compared to the head, you can modify this spot where you attach the tail by moving it up or down. Top Paws: (Make 2) The paws are done in worsted weight yarn. Round 1: Ch 2, 6 sc in second ch from hook. Place marker. Do not join. 6 st Round 2: (2 sc in next sc) around: 12 st Rounds 3 - 6: Sc around: 12 st Slip st in next sc, tighten yarn, and finish off. Leave a long end for sewing. Fill the top paws with fiberfill Bottom Paws: (Make 2) The paws are done in worsted weight yarn. Round 1: Ch 2, 8 sc in second ch from hook. Place marker. Do not join. 8 st Round 2: (2 sc in next sc) around: 16 st Rounds 3 - 9: Sc around: 16 st Slip st in next sc, tighten yarn, and finish off. Leave a long end for sewing. Fill the bottom paws with fiberfill. Sew all four paws on to the body as in the pictures. ... And now you're done!! If you have any comments, questions, advice, stories, or what not, related to my pattern, please feel free to contact me at any time at unforth@yahoo.com!! Check out my Etsy shop at http://www.etsy.com/shop/unforth. Visit me on Ravelry at http://www.ravelry.com/projects/unforth. Unforth's Curiously Crafted Creations, a blog about crafts, can be read at http://unforthccc.blogspot.com/.
Additional Images:
① Claire Houck, 2011


