Braided Baby Hat Instructions Becky Colvin (c) 2010
You may use this pattern to create your own hats to gift or sell. Please do not adjust and sell the pattern, as I'm offering it for free. Give credit, and send people this way to get their own free pattern!
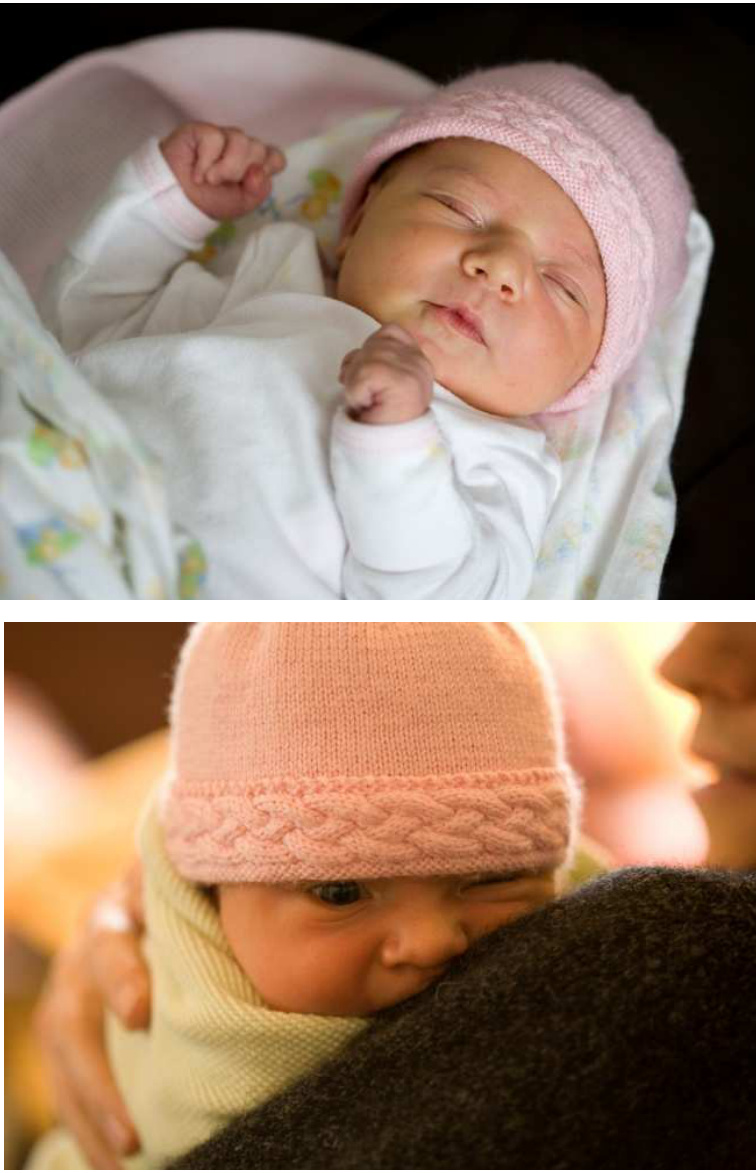
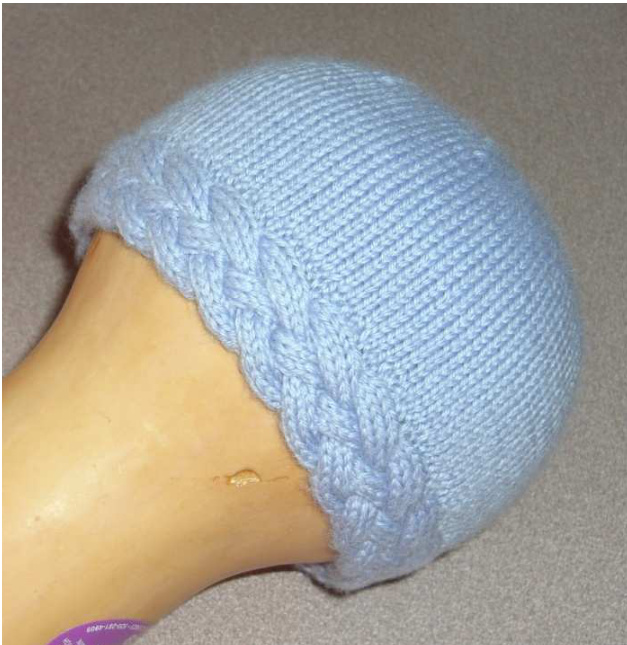
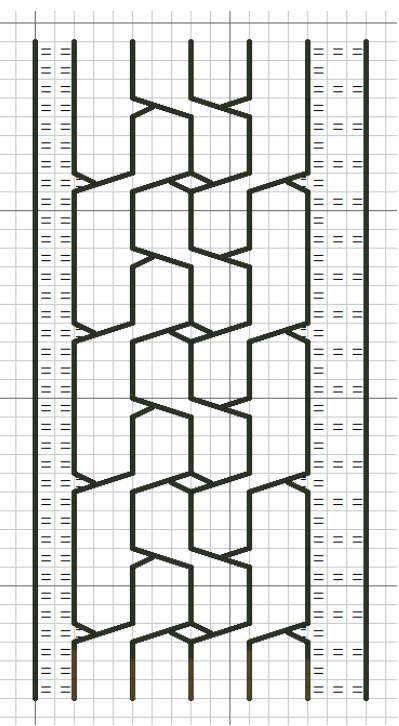
I used Dale Baby Ull in pale pink & lavendar and size 1 needles. Baby Ull is a fine gauge fingering weight wool. Gauge—10 stitches per inch (2.6 cm). Row gauge doesn't matter, since the majority of the pattern is given in length. If your yarn or needles create a different gauge, simply make adjustments when you pick up the stitches from the cable. This hat pattern uses the same basic braided cable in two different ways. My niece Holly models the “Cuffed" hat. The second variation of the hat is modeled by a butternut squash! I made two variations of the hat pattern. The first (the cuffed hat) has a delicate braid and keeps the “rough" back of the cable away from baby's face. It does require more yarn & more knitting time, as you are essentially knitting an extra 1 %2 inches or more of stockinette stitch for the cuff. The second variation I call “Scalloped"—it has a wider braid (16 stitches instead of 12) which serves as the band for the hat. With a single purl stitch on the edge of the braid, the edge looks more defined. As long as you use a soft baby yarn, there shouldn't be any issues with discomfort.
Abbreviations:
s3b--slip next 3 stitches onto a cable needle. Hold in back of the work s4b--slip next 4 stitches onto a cable needle. Hold in back of the work. s3f--slip next 3 stitches onto a cable needle. Hold in front of the work. s4f--slip next 4 stitches onto a cable needle. Hold in front of the work. kss--knit the slipped stitches. For Cuffed Hat, with size 1 needles, cast on 13. Row 1—wrong side row—k2, p8, k3. Row 2—right side row, increase—k2, p1, (k1, increase in the next stitch ) four times, p2. (17 stitches) Row 3—wrong side row—k2, p12, k3. Row 4—right side row, first twist—k2, pl, s3b, k3, kss, s3b, k3, kss, p2. Row 5—wrong side row—k2, p12, k3. Row 6—right side row, plain—k2, pl, k12, p2. Row 7—wrong side row—k2, p12, k3. Row 8—right side row, second twist—k2, p1, k3, s3f, k3, kss, k3, p2. Row 9—wrong side row—k2, p12, k3. Row 10—right side row, plain row—k2, pl, k12, p2. Repeat rows 3-10 until Hat band is 12-13 inches long (30.5-33cm). Bind off from right side, decreasing four times across braid (with either ssk or k2tog) as you bind off.
Skip ahead to instructions for hat crown.
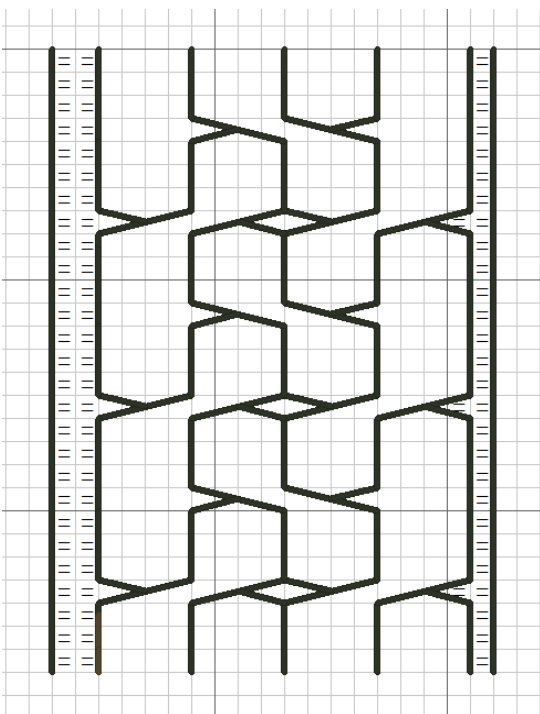
For Scalloped Edge Hat, with size 1 needles, cast on 1l. Row 1—wrong side row—k2, p8, k1. Row 2—right side row—p1, increase in each of the next 8 stitches (or make 1, k1 8 times), p2. (19 stitches) Row 3-wrong side row (and all wrong side rows)—k2, p16, k1. Row 4—right side row, first twist—p1, s4b, k4, kss, s4b, k4, kss, p2. Row 6—right side row, plain—p1, k16, p2. Row 8—right side row, second twist—p1, k4, s4f, k4, kss, k4, p2. Row 10right side row, plain—pl, k16, p2. Repeat rows 3-10 until Hat band is 12-13 inches long (30.5-33cm). Bind off from right side, decreasing eight times across braid (with either ssk or k2tog) as you bind off.
Hat Crown
Pick up 133 stitches evenly along the edge of the p2 border (about 3 stitches every 4 rows). Hint: Divide 133 by the number of completed twists. Use that number as the number of stitches to pick up per cable twist. Note: If you chose to use a different weight of yarn or needle side, adjust the number of stitches you pick up from the edge of the cable. If your cable was 13 inches long, simply multiply your inch gauge by that number. My gauge was 10 stitches per inch, so I picked up approximately 130 stitches. If your gauge is 7 stitches per inch, you would pick up 7 x 13, or about 91 stitches. If your gauge is 8 stitches per inch, you would pick up 8 x 13, or 104 stitches. I would suggest picking up an additional stitch to end up with an odd number (105). For Cuffed Edge Hat, knit on the wrong sides, purl on the right sides. For Scalloped Edge Hat, purl on the wrong sides, knit on the right sides. Work even in stockinette stitch (knit one row, purl one row) until hat measures 3 %2 to 4 inches (8.9-10.2 cm) from the ribbing OR for a cuffed hat, from the folded over edge. Begin to work decreases for hat crown. OR, work in the round with two circular or 5 dpns. When you reach the decrease instructions, knit one row in between decrease instructions. Note: These instructions are specifically for 133 stitches. If you picked up a different number of stitches, you would want to make an adjustment. In our examples, you picked up 91 or 104 stitches. The first example, 91, is an even number (90, or 9 x 10) plus 1 stitch. I would work an additional 5 rows and then start with the row 6 directions, to create 9 repeats of 10 stitches. The second example, 105, is 13 repeats of 8 stitches. You could start on row 10, but that might decrease too quickly. Another option would be to start with k1, \*k2tog, k11 across, working decreases until you have a multiple of twelve plus one, and then follow rows 2& on.
Hat Crown
Row 1—wrong side row and all wrong side rows—purl across. Row 2—right side row, decreasek1, \*k2tog, k10. Repeat from \* to end. (mult of 12 plus 1) Row 4—right side row, decrease—K1, \*k2tog, k9. Repeat from \* to end. (mult of 11 plus 1) Row 6—right side row, decrease—k1, \*k2tog, k8. Repeat from \* to end. (mult of 10 plus 1) Row 8—right side row, decreasek1, \*k2tog, k7. Repeat from \* to end. Row 10—right side row, decrease—k1, \*k2tog, k6. Repeat from \* to end. Row 12—right side row, decrease—k1, \*k2tog, k5. Repeat from \* to end. Row 14—-right side row, decrease—k1, \*k2tog, k4. Repeat from \* to end. Row 16—-right side row, decreasek1, \*k2tog, k3. Repeat from \* to end. )w 18—right side row, decrease—k1, \*k2tog, k2. Repeat from \* to en( )w 20—right side row, decrease—k1, \*k2tog, k1. Repeat from \* to en( Row 22—right side row, decrease—k1, \*k2tog. Repeat from \* to end.
Finishing
Cut yarn, leaving approximately 12-18 inches (30-45 cm). Thread onto a yarn needle. Pass needle through all the loops left on the knitting needle. Pull tight. (Run yarn through loops a second time if desired). Fold hat right sides together, sew back seam from crown to ribbing. Work yarn ends in. To shape hat, rinse in lukewarm water. Roll up in a towel to wring out excess water. Gently press or pull into shape; lay flat to dry. OR I had a perfectly sized butternut squash that served as an awesome form for letting a slightly misshapen hat dry (I ran out of yarn & had to decrease more steeply at the crown, leaving it somewhat puckered. After a night on the squash, you'd never have known there was an issue. ?


