Rocky Point
A Knitting pattern by Pam Sluter

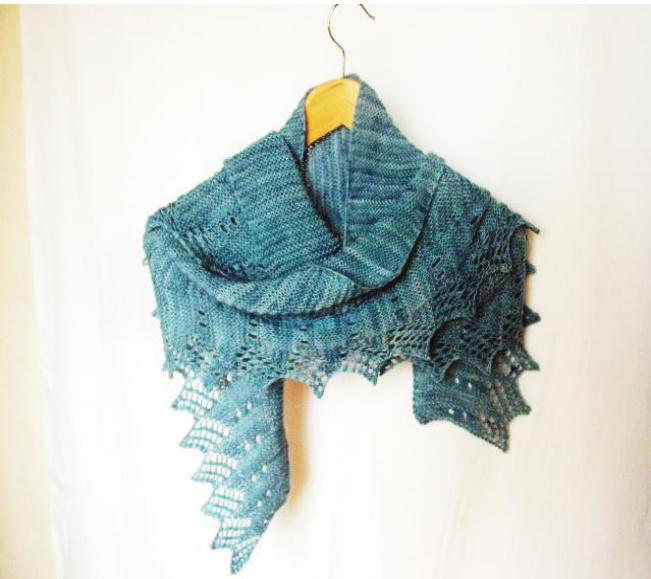
Rocky Point is a shawl knit end to end in squishy garter stitch with a lace edging. I found myself thinking of the ocean and summer time while designing this shawl and found the perfect shade of blue to make my idea come to life. The lace is suitable for a first time lace knitter. Interesting to knit but you can still carry on a conversation! Gauge: 20 sts / 28 rows over 4"/10 cm in stockinette stitch. Size: 5"/ 13cm (width at tips) x 75 "/ 190.5 cm length. ( Center depth 14"/ 36 cm) Materials: Approx. 600 yds fingering weight yarn. Shown in: Dirty Water Dyeworks Lillian (100 % superwash merino wool, 400 yd / 3.5 oz (365m / 100g) 2 skeins) in color Beach Bum. Needles: Size US 5 / 3.75 mm 24" circular or size to obtain gauge. Stitch marker Yarn needle
Abbreviations
K - Knit yo- yarn over P- Purl k2tog- knit 2 together sts- stitches ssk- slip, slip knit rep- repeat BO- bind off kfb- knit into the front and back of the stitch
Border
The border begins with 16 stitches, increases to 22 and returns to 16 at the end of each 12 row repeat. Row 1: (RS) K10, (yo, k2tog) 2 times, yo, k2. (17 sts) Row 2: K8, p9. Row 3: K3, yo, k2tog, k1, yo, k2tog, k3, (yo,k2tog) 2 times, yo, k2. (18 sts) Row 4: K9, p9. Row 5: K12, (yo, k2tog) 2 times, yo, k2. (19 sts) Row 6: Knit. Row 7: P9, k4, (yo, k2tog) 2 times, yo, k2. (20 sts) Row 8: Knit. Row 9: P9, k5, (yo, k2tog) 2 times, yo, k2. (21 sts) Row 10: Knit. Row 11: P9, k6, (yo, k2tog) 2 times, yo, k2. (22 sts) Row 12: Bind off 6, k15 (16 sts)
Directions
Increases are worked on rows 4, 8, & 12.
Cast on 19 sts. K3, place marker, work row 1 of border. Row 2: Work row 2 of border, slip marker, knit to end. Row 3: Knit to marker, slip marker, work row 3 of border. Work row 4 of border to marker, slip marker, kfb, knit to end. 1 st increased. Row 5: Knit to marker, slip marker, work row 5 of border. Row 6: Work row 6 of border, slip marker, knit to end. Row 7: Knit to marker, slip marker, work row 7 of border. Row 8: Work row 8 of border to marker, slip marker, kfb, knit to end. 1 st increased. Row 9: Knit to marker, slip marker, work row 9 of border. Row 10: Work row 10 of border, slip marker, knit to end. Row 11: Knit to marker, slip marker, work row 11 of border. Row 12: Work border pattern to marker, slip marker, kfb, knit to end. 1 st increased. Work rows 1-12 in this manner a total of 16 times. (67 sts total, 51 in garter stitch body, 16 edging) Work rows 1-12 even (without increases) a total of 7 times. Work rows 1-7 of pattern. Decreases begin on row 8 of this repeat as follows: Row 8 : Work border pattern to marker, slip marker, ssk, knit to end. 1 st decreased. Row 9: Knit to marker, slip marker, work row 9 of border. Row 10: Work row 10 of border, slip marker, knit to end. Row 11: Knit to marker, slip marker, work row 11 of border. Row 12: Work border pattern to marker, slip marker, ssk, knit to end. 1 st decreased. There are now 49 sts in the garter stitch body. Decreases are worked on rows 4,8,& 12 as follows. Row 1: Knit to marker, slip marker, work row 1 of border. Row 2: Work row 2 of border, slip marker, knit to end. Row 3: Knit to marker, slip marker, work row 3 of border. Work row 4 of border to marker, slip marker, ssk, knit to end. 1 st decreased. Row 5: Knit to marker, slip marker, work row 5 of border. Row 6: Work row 6 of border, slip marker, knit to end. Row 7: Knit to marker, slip marker, work row 7 of border. Row 8: Work row 8 of border to marker, slip marker, ssk, knit to end. 1 st decreased. Row 9: Knit to marker, slip marker, work row 9 of border. Row 10: Work row 10 of border, slip marker, knit to end. Row 11: Knit to marker, slip marker, work row 11 of border. Row 12: Work border pattern to marker, slip marker, ssk, knit to end. 1 st decreased. Work rows 1-12 in this manner a total of 15 times. You should now have 4 sts in the garter stitch body. Work rows 1-7 with a decrease worked on row 4. Row 8: Bind off all stitches. Weave in ends. This shawl needs to be blocked to shape and to make the border points and eyelets show to their best advantage. I washed my shawl in wool wash, gently squeezed out the excess water and pinned the shawl to shape and size on blocking mats. I began by first pinning the garter edge straight and then pinning the border points. The shawl can be made longer by working more repeats in the increase section. Keep track of this so you can make the decrease section symmetrical. Questions/comments: psluter@yahoo.com


