Requirements
Needles: 6mm Yarn: Fritidsgarn from Sandnes Garn Knowledge of knit, purl, seed stitch, right and wrong side
History
Having a lot of the green bulky yarn Fritidsgarn at hand I decided I was going to try my hand at making a hooded scarf and keeping track of what I was doing to hopefully make a pattern for everyone to use. Adding a grey ball of yarn from the same maker and bulkiness I decided to add some charts. What better than adding your fandoms to your headwear/neckwear? That's where it kind of spiralled out of control, but that's another story entirely. I made this pattern for the hooded scarf up with the thought of wanting some more Ranger's Apprentice inspired knitting on Ravelry. Thinking of the cowl described in the books I decided to make something similar, yet not exactly like the cowl. So please do note that this is not an exact copy of the cowl described in the books. Well, that's how it started out. Once I started making the charts it kind of spiralled out of control. So now there's more than just the cowl (kind of) and the oak leaf chart made with a thought of the ranger's oak leaf necklaces from Ranger's Apprentice. It now features Gandalf's rune, a TARDIS and a paw print. Four of my many fandoms I'm sure more people share with me. Right? Don't leave me hanging here, make one and put up a picture of it in the projects tag!
Before you start
Do note that while you're knitting the hooded scarf you might not want to add all the charts or do all the rows required. That's okay. I know how impatient one can be when knitting. Knit as far as you like and then continue on. There shouldn't be any problems skipping a chart or skipping 10, 20, 30 rows of knitting. Especially if you want a shorter scarf part. Abbreviations: sts = stitches, co = cast on, bo = bind off, RS = right side, WS = Wrong side,
Basic Pattern
CO 50 sts. Knit seed stitch for 5 rows. Rows 6-86: Knit the first 10 sts in seed stitch, the next 30 sts in stocking stitch and the last 10 sts in seed stitch. Follow the seed stitches from the row before. That way there won't be a break between the two rows. The wrong side (WS) is knitted the same way as the right side (RS), only purl the 30 sts instead of knit. Rows 87-112: Knit like you've done during the previous rows until the last two stitches. Increase 1 stitch using your preferred method and knit the last stitch. Continue this way until you have increased your stitches to 75 sts.
Note:
If you want to you can keep knitting just 10 sts of seed stitch even after you start increasing, or you could include all new stitches within the seed stitch section. In other words you'll have 35 sts during the hood section. Now you knit the hood as large as you want it to be. When it has the preferred size, you decrease 1 stitch (in the same end as you increased earlier) every right side row until you have your starting stitches (50 sts). Knit like you did during rows 6-86. End with 5 rows of seed stitch. BO. Remember to sew together the back of the hood or it will be quite draughty. \*\*\*\*\* That's the basic pattern for those who do not want to add the charts to their knitting or are beginners at knitting. The following pattern has the carts included. Do note that the finished product of this part will be a bit longer than the basic pattern if you follow all instructions. You will notice that the charts are in different sizes. If you are like me, a lazy sod that can't be bothered with calculating out where to put the middle, you just knit the first stitch of the chart from the first stitch of the 30 sts. The charts will be included on individual pages for easier use.
Basic patter with charts
CO 50 sts. Knit seed stitch for 5 rows. Rows 6-9: Knit the first 10 sts in seed stitch, the next 30 sts in stocking stitch and the last 10 sts in seed stitch. Don't forget to keep doing this while you knit the charts! Tip: Follow the seed stitches from the row before. That way there won't be a break between the two rows. The wrong side is knitted the same way as the right side, only purl the 30 sts instead of knit. Keep this in your mind as you knit the charts. Follow the chart below (chart 1) as follows:
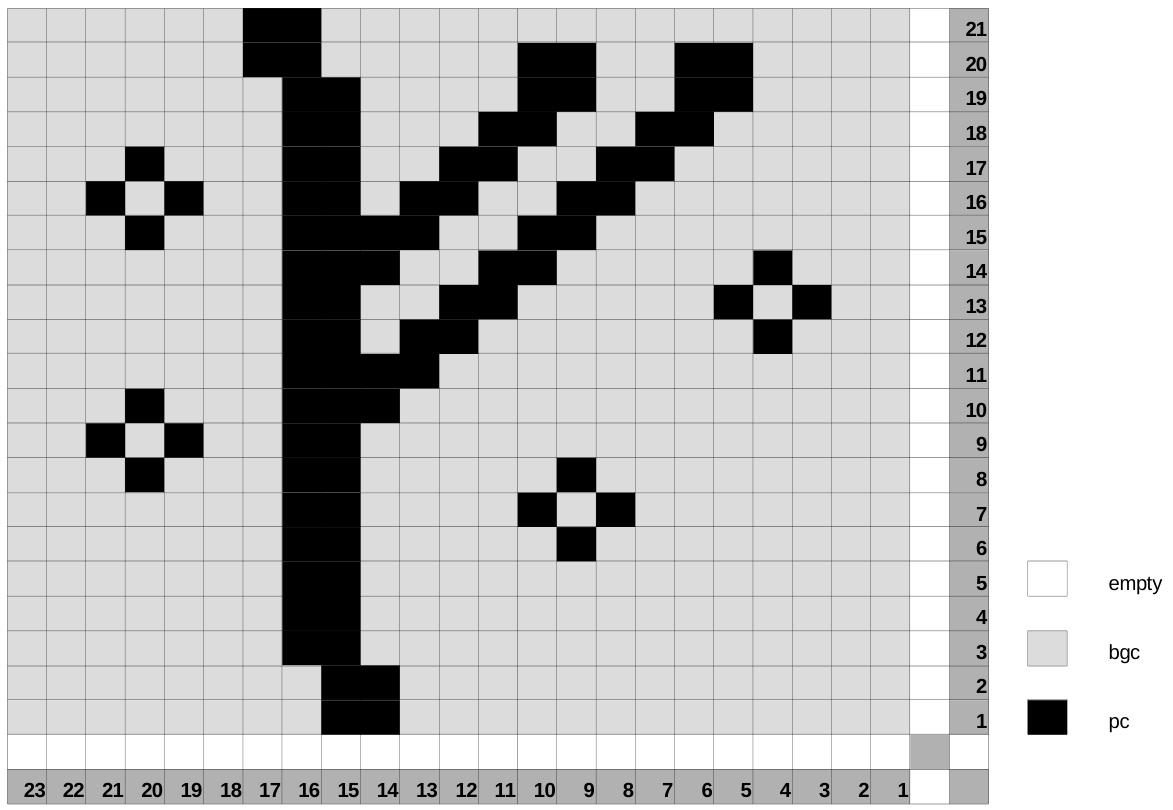
Chart 1: Vargen Johansson White box: Empty Light grey box: Background colour (bgc) Black box: Contrasting colour (pc = pattern colour) The picture is of Gandalf's rune. Chart made by me, Vargen Johansson, in Excel When you've finished knitting according to the chart, continue to knit 5 rows the same way as you did during rows 6-9. In other words (RS) 10 sts in seed stitch, 30 sts in stocking stitch and the 10 last sts in seed stitch. This will be rows 30-35. When this is done, follow the chart below (chart 2):
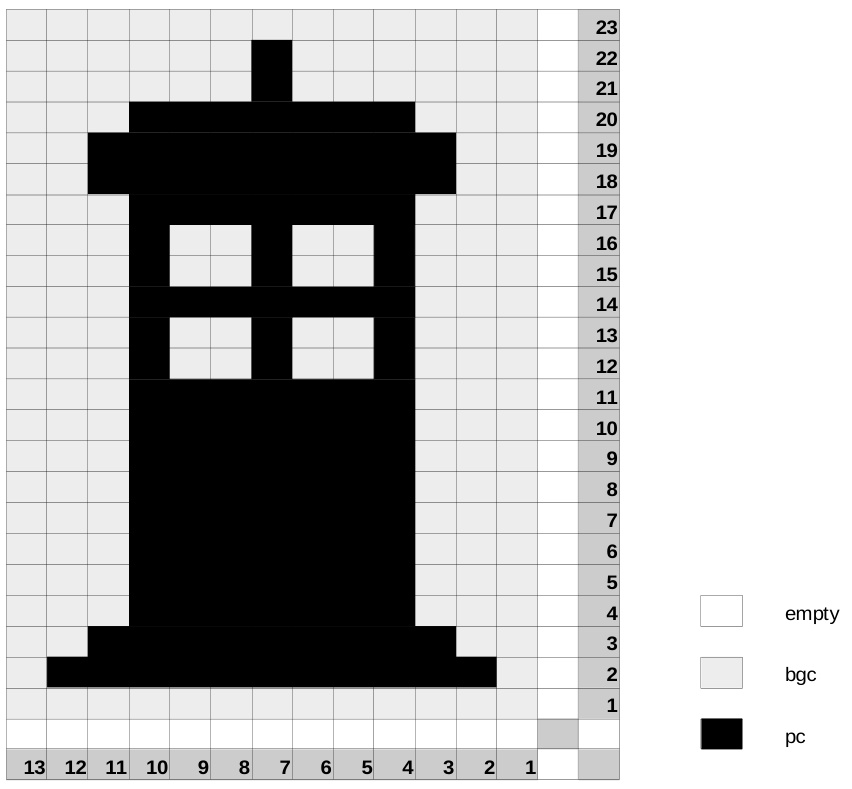
Chart 2: Vargen Johansson The chart is picturing a TARDIS. Chart made by me, Vargen Johansson. Again when you're done knitting chart 2 you knit 5 rows the same way you did during rows 6-9. In other words (RS) 10 sts in seed stitch, 30 sts in stocking stitch and the 10 last sts in seed stitch. This will be rows 59-63. Then follow the next chart (chart3):

Chart 3: Vargen Johansson The chart is picturing a paw print. Chart made by me, Vargen Johansson, in Excel When you're done knitting according to the chart, you knit 5 rows the same way as during rows 6-9. This will be rows 89-94. Rows 95-120: Knit like you've done during the previous rows until the last two stitches. Increase 1 stitch using your preferred method and knit the last stitch. Continue this way until you have increased your stitches to 75 sts. Now: Knit the hood as large as you want it to be. When it has the preferred size, decrease 1 stitch per row until you have 50 stitches on your needles again. Then knit like you did during the rows with charts. Knit the charts from top down, not from the bottom up. Or you'll end up with upside down knitted images. Start with chart 3, then chart 2 and lastly chart 1. At the end you knit 5 rows of seed stitch. BO. Remember to sew together the back of the hood or it will be quite draughty. If you do not want a “blank" hood without a pattern on it follow chart 4 as you knit the hood. Before you knit the chart: Knit 5 rows as you did during rows 6-9. Then follow the chart:

Chart 4: Vargen Johansson The chart is picturing an oak leaf. Chart made by me, Vargen Johansson, in Excel Knit 5 rows like you did during rows 6-9 once you're done knitting the chart. Then when you've knitted the hood, follow the instructions from earlier. I'll repeat them here: When the hood has the preferred size, decrease 1 stitch per row until you have 50 sts on your needles again. Then knit like you did during the rows with charts. Knit the charts from top down, not from the bottom up. Or you'll end up with upside down knitted images. Start with chart 3, then chart 2 and lastly chart 1. Knit 3 rows like during rows 6-9. End with 5 rows of seed stitch. BO. Remember to sew together the back of the hood or it will be quite draughty. The following pages will have the charts in bigger sizes so it will be easier to follow them.

Chart 1: Vargen Johansson
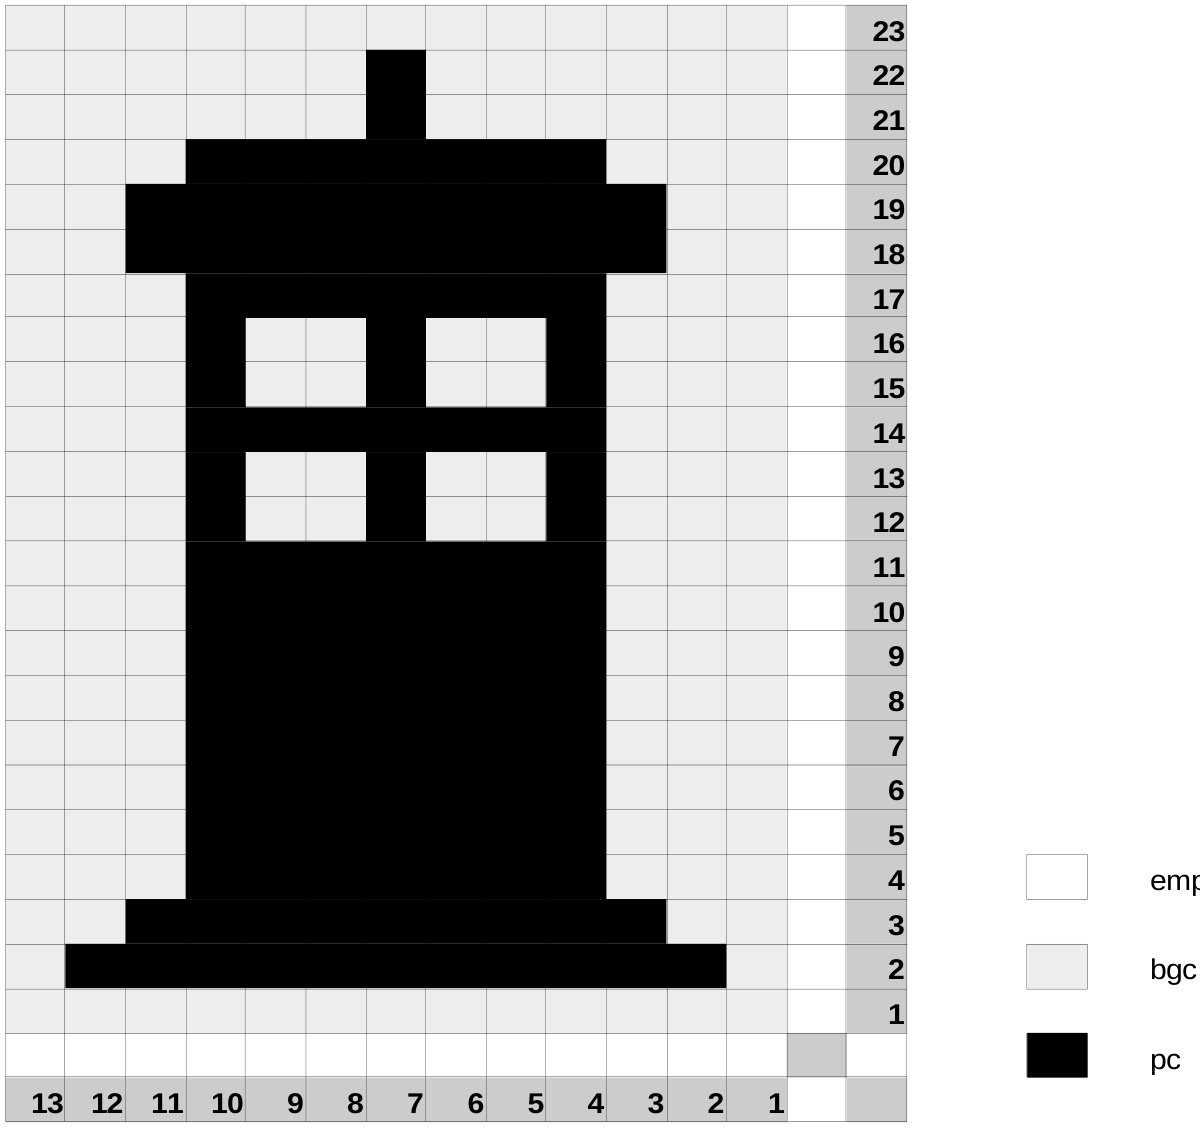
Chart 2: Vargen Johansson
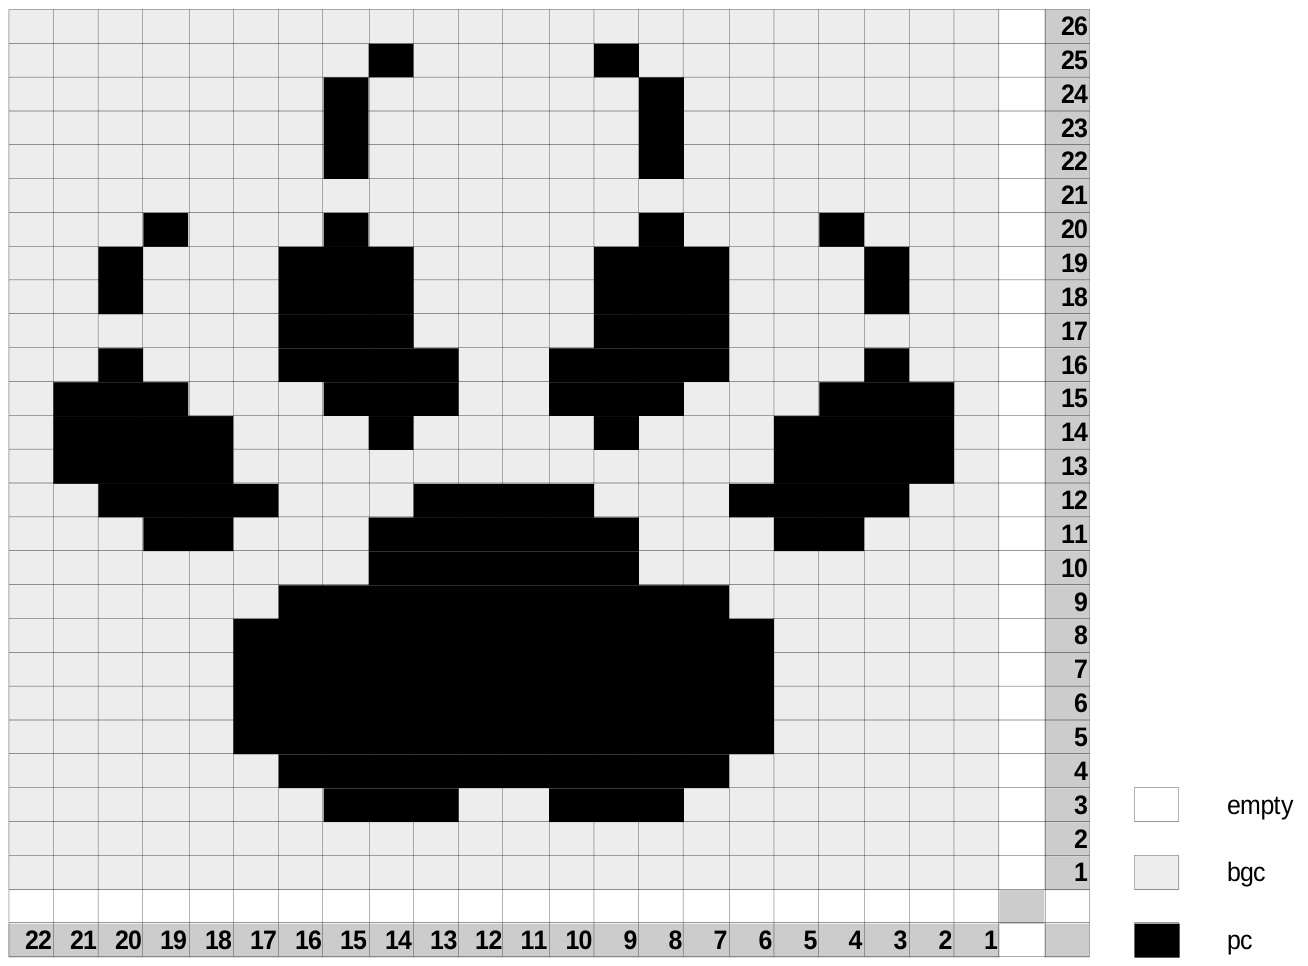
Chart 3: Vargen Johansson
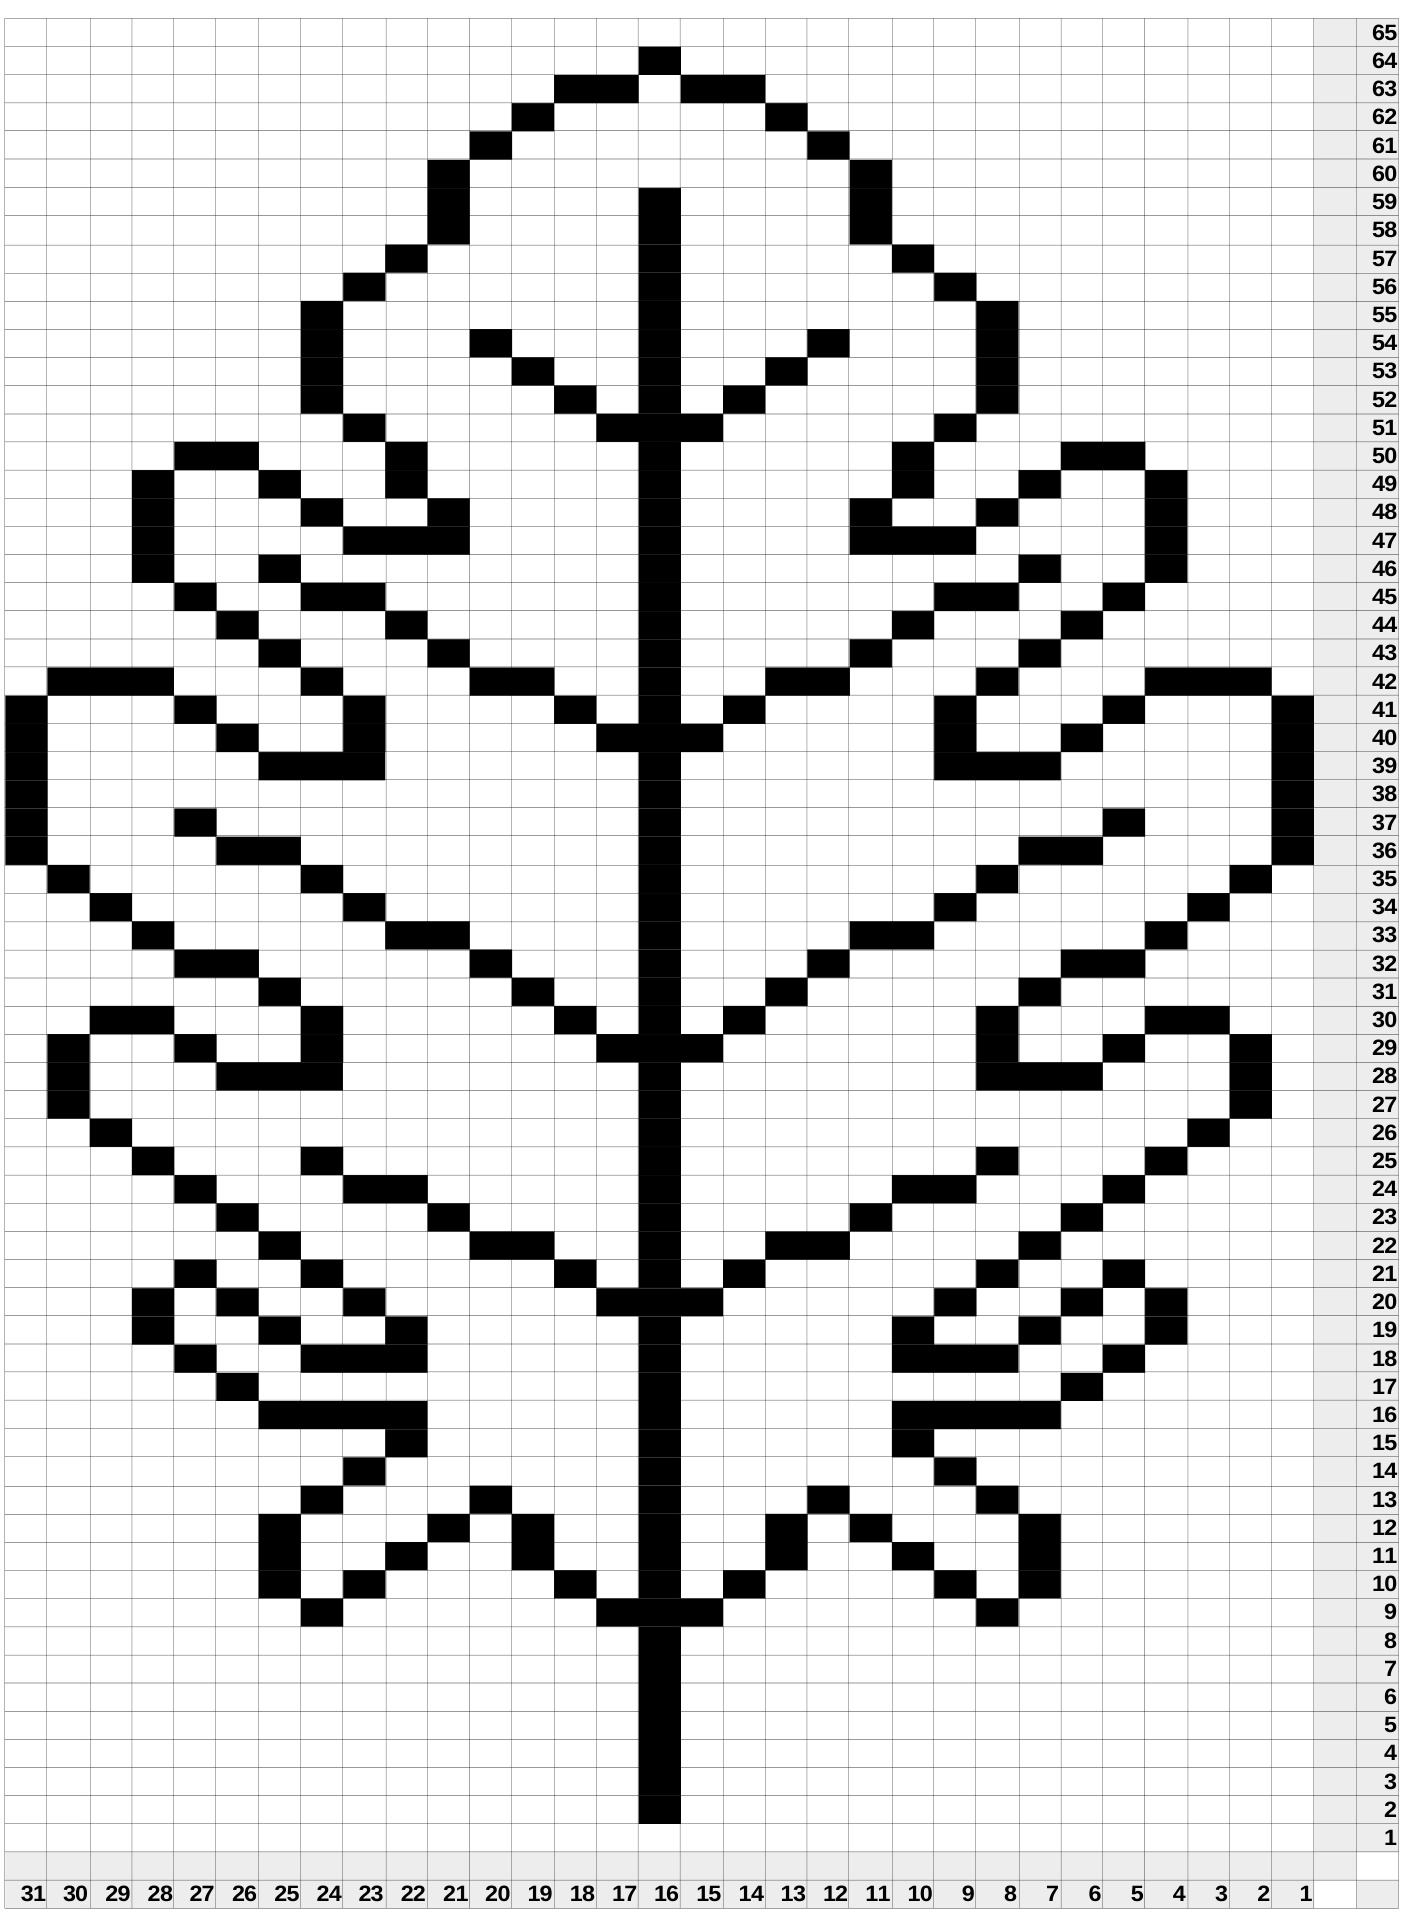
Chart 4: Vargen Johansson


