Cabled Pillow Pattern
- By Karina Moller -
This is a lovely cabled pillow cover pattern for those who like their pillows to be very trendy and a bit rustic. I used double DMC natura XL cotton yarn which comes in all sorts of lovely coloursand gives great texture. You could also use a not so elastic type of Zpagetti yarn that is not overlychunky. And if you prefer wool, you could use a yarn like Drops Polaris or one or two threads of Lana Grossa RagazzaLei. This is a very simple design, anyone who can knit, purl and cable can do it. You can even do it if you haven't cabled before, just watch a few videos on cabling on youtube, and youll see it is not that hard at all and you will definitely understand this pattern.
Good luck and have fun!
WHAT YOU NEED:
·Yarn: 5 skeins = 375 meters / 410 yards of DMC Natura XL (knit with double yarn) Or: 188 meters /205 yards if you use alternative yarn like Drops Polaris or Zpagetti Needle size: 12 mm. (EU) or 17 (US) Needle size or crochet hook size 15 mm. (EU) or 1g (US) for cast off Thick cable needle, or circular or regular 10 mm. (EU) or 15 (US) needle (or similar) (sharp) Tapestry needle or normal needle, matching or white plain sowing yarn Zipper (optional) Matching fabric for lining 82 × 41 cm. or 2,69 × 1,35 ft (optional) A piece of paper and a spencil Gauge is 7,5 stitches per 10 cm. or 4 inches in pattern stitch For measuring gauge I recommend knitting at least 1o cm. or 4 inches of the whole pillow cover in pattern, as it is just 34 stitches wide. Plus you probably won't mind if gauge is a little off and your pillow cover will be slightly bigger or smaller. This way you will have a really reliable gauge measurement, and with some luck can continue knitting at the same time.
WHAT TO DO:
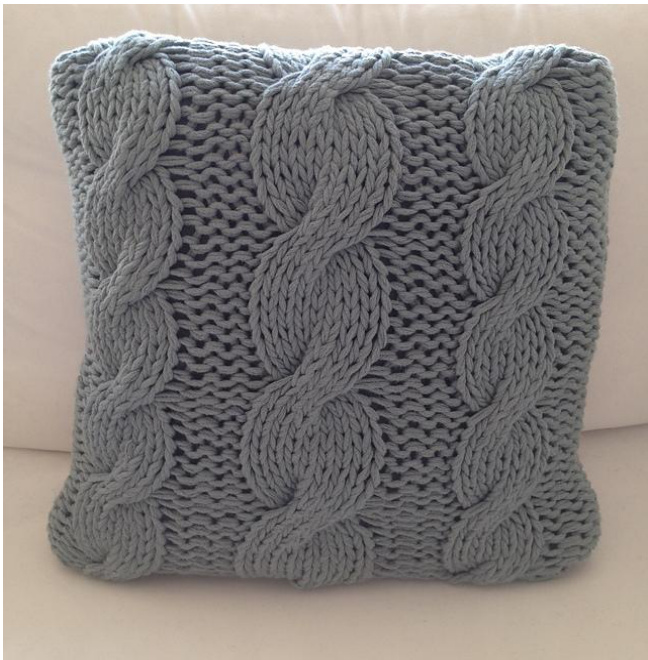
There are three cables in this pillow, two small ones plus a big one in the middle. The cables are knit in stockinette stitch, between the cables you use a garter stitch. The two outer cables are 6x8 cables, the middle cable is a 8x10 cable. 6X8 cable means the cable is 6 stitches wide, and 8 stitches long. 8x10 cable means the cable is 8 stitches wide, and 10 stitches long. The 6x8 cable is cabled every 5th row. The 8x10 cable is cabled every 7th row. Since the cables are different in length, I used pen and paper to know where I was in the pattern. Important: This pillow is knitted with double yarn! You could also use one strand of very thick yarn intended for 12 or 15 mm. (US 17 or 19) needles. Cast on 34 stitches with double yarn on 12 mm. (US 17) needles, and place markers while casting onasfollows: Since there are two 6x8 and one 8x1o cable in the pillow, place markers after the first 4 stitches, the next 6 stitches (small cable), the next 3 stitches, the next 8 stitches (big cable), the next 3 stitches, the next 6 stitches (small cable). 34 stitches on needle. Row 1: Purl 4 stitches, knit 6 stitches, purl3 stitches, knit 8 stitches, purl 3 stitches, knit 6 stitches, purl 4 stitches. Row 2: Is exactly the other way around: Knit 4 stitches, purl 6 stitches, knit 3 stitches, purl 8 stitches, knit 3 stitches, purl 6 stitches, knit 4 stitches. Repeat these two rows once.
Cabling
In row 5 all three cables are cabled with the thick cable needle or 10 mm. (US 15) (circular) needle. Purl 4 stitches like row 1 until you come across the first cable. Put the first half of the stitches from the first cable on your cable needle, and put the cable needle behind your work for a right turning cable, and in front of your work for a left turning cable. I made three right turning cables, and thus held the cable needle behind the work. Now knit the last half of the stitches from the cable that are still on your left needle, and after that knit the stitches from your cable needle. Congratulations! One cable done. Now purl 3 stitches, and cable the big cable the same way you did with the small cable. Purl 3 more stitches, and also cable the last small cable. Purl 4 stitches. Knit 3 more rounds in pattern stitch (row 2, row 1, row 2). Now we finished 8 rows and made 2 full smaller cables. Since the middle cable is bigger, from now on the smaller cables are cabled every 5th row out of 8. The bigger cable is cabled every 7th row Outof 10. In short, this means the cabling of the big cable moves up 2 rows every time you finish a pair of small cables after 8 more rows. So the second cabling of the big cable will take place in the 7th row of the 2nd smaller cabling, because 5 + 2 = 7. This also means there is no cabling of the big cable in the 3rd round of smaller cables, because 7 + 2 = 9 and the small cables are only 8 rows long. So, the 3rd cabling of the big cable takes place in the ist row of the 4th small cable, because 9 -8= 1. Never mind if you don't follow me. Just remember that the small cables are cabled every 5th row out of 8, and that the big cable is cabled every 7th row out of 1o. Keep track of when to cable with a pencil and some paper, and you'll get the hang of it soon enough. Keep alternating row 1 and row 2 and cabling the small cables every 5th row out of 8, and cabling the big cable every 7th row out of 10 until your work measures at least 86 cm / 2,82 ft., or until you run out of yarn. I say at least 86 cm., as cotton will get shorter and wider after washing and blocking. Wool keeps its shape much better, so you can stop knitting at 84 cm. /2,76 ft. if you're using a woollen yarn. Cast off loosely with a 15 mm. (US 19) knitting needle or crochet hook.
Finishing
When finished, block your work (it will get a lot wider by blocking as it is cotton). Sow the side seams together with a sowing machine or by hand. Use plain matching yarn, and a tapestry needle. I used a 1 stitch seam allowance, you could also use a o,5 stitch seam allowance. It is a good idea to line the pillow you will put in the cover with a matching fabric, as the stitches in this pillow are quite big, and it is always nicer to see a matching fabric underneith. Just cut a piece of 82 × 41 cm. or 2,69 x 1,35 ft out of matching fabric, fold in two, and seam the side seams together. There is a 1 cm. or o,4 inch seam allowance. You don't have to do this very carefully if you hate sowing and are doing this by hand. It won't show. Fold the lining inside out, put the pillow in, and sow the bottom with a 1 cm or o,4 inch seam allowance. Cut excess fabric off. Put the pillow in the cover if you plan to seam the bottom shut. Measure carefully so that you put the seam at the same place as the width of the pillow cover. This way the pillow becomes a nice square. You have to do this by hand and use a plain matching yarn. You can use a normal sowing needle, or a sharp tapestry needle. The other option is to get a zipper in (see below). You can put a zipper in the bottom of the pillow cover like I did if you want to. Measure carefully so that you put the zipper at the same place as the width of the pillow cover. Watch youtube videos if you don't know how to do this and you will learn quickly.
Congratulations! You finished your Cabled Pillow Cover
Note: This is the first pattern I wrote for other people than myself and I hope you enjoyed it. I did my best to explain everything clearly, and hope you understand what I meant well. I do refer to youtube videos once in a while, because I find them much more instructive than written text can ever be. I checked for mistakes many times, but if you find any flaws you can send me a Ravelry message.


