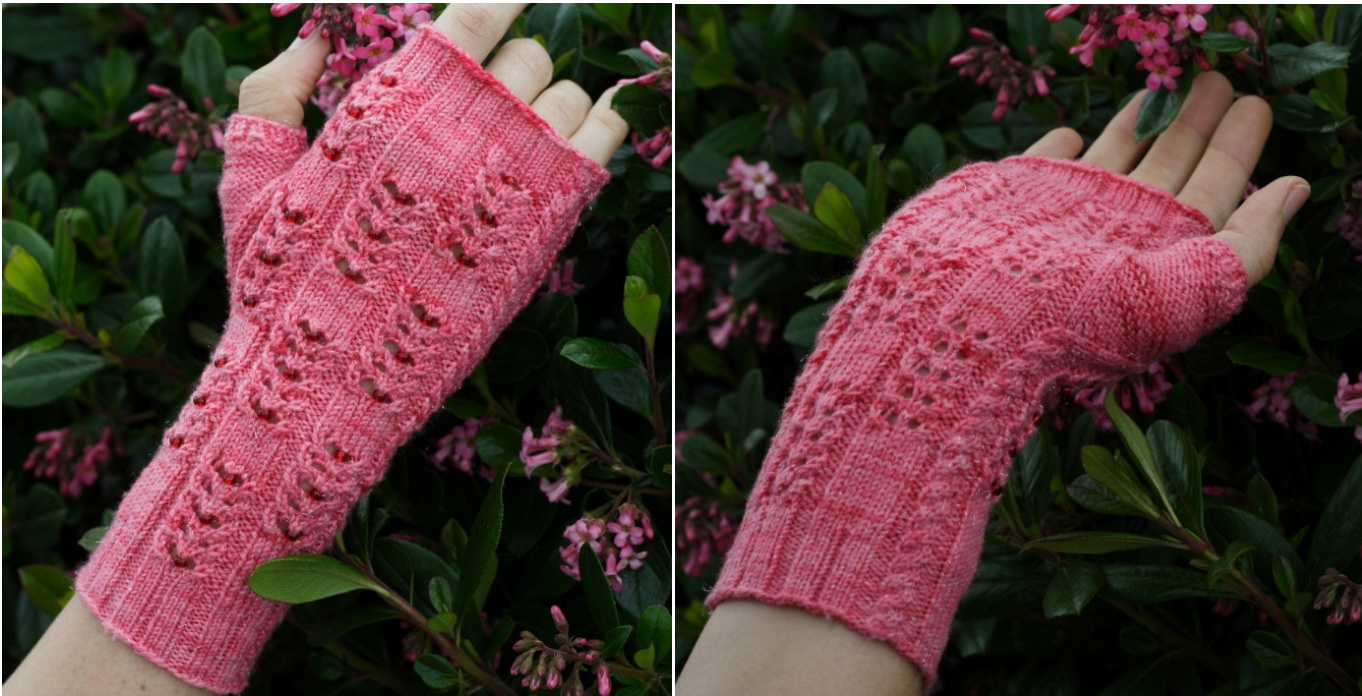
Walda's Mitts
design by Amy Klimt
outofstepdyeworks.etsy.com www.amyklimt.com A companion piece to my Vertebral Socks, in a new colorway inspired by House Bolton from A Song of IceandFire. Size: to fit women's medium- up to 8" circumference around knuckles. Larger sizes can easily be achieved with a slightly larger needle size if you allow for extra yarn.
Finished Measurements:
Unblocked and unstretched- 2.5" across, 8.5" total length. 6" from wrist edge to end of thumb gusset, 2.5" from end of thumb gusset to end. Yarn: Out of Step Dyeworks Sparkle Sock, (75% Superwash Merino Wool, 20% Nylon, 5% Stellina); 394 yards [360 meters]/100g. Our Blades Are Sharp, just under half of 1 skein needed for a pair. Beads: 54 size 6/0 seed beads. I used Miyuki silver lined beads in color Ruby. A pair of mitts uses less than half a 20 gram tube. Needles: US 1.5/2.5mm or size needed for gauge and/or fit, US 0/2mm or 2 (half) sizes smaller than main needle. I use a 32" or longer circular for magic loop, but you can use 2 circs or divide the stitches onto 4 DPNs if you prefer. Size 1.3mm (size US 10 steel hook) crochet hook for applying beads. The hook needs to be able to pass through the hole in the beads. Notions: 2 stitch markers for thumb gusset shaping, tapestry needle, cable needle. Gauge: Each chart repeat should measure about 3" across slightly stretched, and about 2.25" in length.
Abbreviations
C4L: Slip 2 sts to cable needle, hold in front of work. K2, then k2 from cable needle. C4R: Slip 2 sts to cable needle, hold in back of work. K2, then k2 from cable needle. K: knit K3tog: knit 3 together LH: left hand (as in needle) M1LP: Pick up running yarn between sts from front to back with LH needle, p tbl. M1RP: Pick up running yarn between sts from back to front with LH needle, p through front loop. P: purl P2tog: purl 2 together PM: place marker Rnd: round SL: slip St(s): stitch(es) SM: slip marker SK2P: Slip 1 st knitwise, k next 2 sts tog, pass slipped st over. YO: yarn over
Pattern notes:
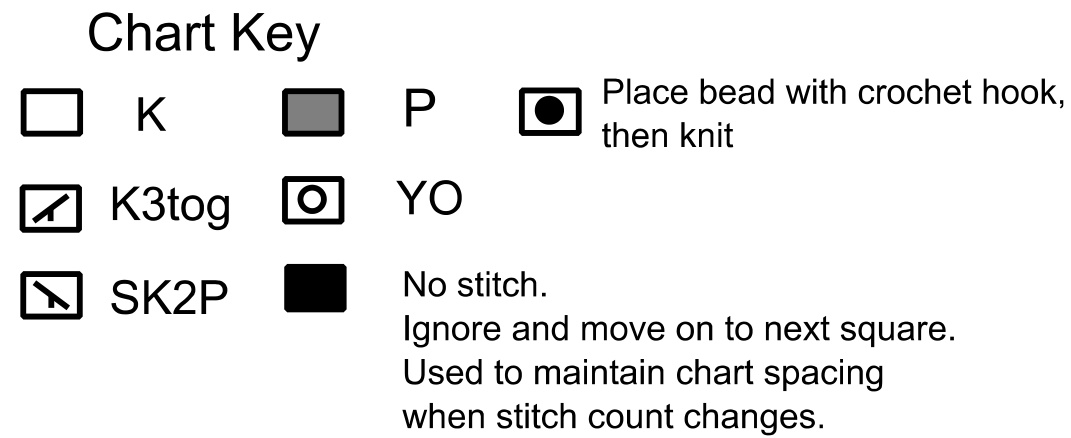
Beading instuctions- Stitches to be beaded are represented as filled circle on the chart with the legend "place bead with crochet hook, then knit". When you arrive at such a stitch, put a bead onto the crochet hook. Use the hook to grab the next stitch on the LH needle, and pass the bead off the hook and around both legs of the stitch. Put the stitch back onto the LH needle (with the bead underneath the needle), and then knit the beaded stitch. Beading is done on only half of the round so beads are worn on the back of the hand and not the palm. For the first mitt, you will place beads on the first half of the round. For the second mitt, you will place beads on the second half of the round.
Mitt (make 2)
Cast on 66 sts using long-tail method on smaller needle. Join work in the round, being careful not to twist. For magic loop or 2 circs, divide the stitches into 33 on each needle. Rounds 1-3: [P1, k4, (p2, k3, p1, k3) 3x, p1] twice. (once on each needle) Round 4: P1, c41, (p2, k3, p1, k3) 3x, p1 on first needle. P1, c4r, (p2, k3, p1, k3) 3x, p1 on second needle. (You can make the cables the same on each side instead if you prefer.) Repeat these 4 rnds 3 more times. (16 total rows so far, with 4 completed cable crossings.) Work should measure about .75" so far. Begin pattern (see notes for beading instructions): Switch to larger needle and establish beginning chart as follows Rounds 1-3: P1, k4, p1, work appropriate row of chart including beads on next 27 sts on first needle. P1, k4, p1, work appropriate row of chart without beads on next 27 sts on second needle. Round 4: P1, c4l, p1, work row 4 of chart including beads on next 27 sts on first needle. P1, c4r, p1, work row 4 of chart without beads on next 27 sts on second needle. In other words, continue cable crossings every 4th round as established in ribbing as you work the chart. This will happen on row 4 of beginning chart and rows 4, 8, 12, 16, 20, 24, and 28 of main chart. Beads will be placed as instructed on the first half of the round only. This will become the back of the mitt and there will be no beads placed on the palm side. Once you have worked the 4 rounds of "beginning chart" once, continue on to "main chart". Once you have completed all 28 rounds once, and up to and including round 12 once more, it is time to begin gusset shaping. Gusset Shaping The gusset will grow out of the center of the cable on one side of the mitt, so cable crossings will stop on that side until the gusset is finished, but will continue as established on the other side. Beading continues as indicated on chart on first half of round only. Setup round: Work across first needle as established, using round 13 of Main Chart. On second needle, p1, k first 2 sts of cable, pm, mlpL in center of cable, pm, k last 2 sts of cable, p1, work the rest of needle as established using round 13 of Main Chart. Gusset increase rounds: Round A (when Main Chart round is even): Work across first needle as established, using even round of Main Chart (and working cable if the round is a multiple of 4). On second needle, P1, k2, sm, p between markers, sm, k2, p1, work the rest of needle as established using even round of Main Chart. Round B (when Main Chart round is odd): Work across first needle as established, using odd round of main chart. On second needle, P1, k2, sm, mlpr, p to marker, mlpL, sm, k2, pl, work the rest of needle as established using odd round of Main Chart. Repeat these 2 rounds until there are 23 purl stitches between the markers, ending with a completed "B" round. This should happen on round 7 of Main Chart if you worked the gusset setup round on round 13 of Main Chart. Gusset rejoining round: Work across first needle as established. This should be round 8 of Main Chart. On second needle, P1, slip 2 k sts to right hand needle (or cable needle), put 23 purl stitches on waste yarn using tapestry needle. Put the held 2 sts on cable needle (if not already), then complete cable crossing (c4r) as usual. P1 and complete round as established, using round 8 of Main Chart. Remainderofmitt: Continue as established before gusset with beading and cable crossings as appropriate, ending on round 24 of Main Chart. Switch to Ending Chart for rounds 25-30. Round 28 should have a cable cross as usual. Endingribbing: Switch to smaller needle and work as follows Rounds 1, 3, 4: [P1, k4, (p2, k3, p1, k3) 3x, p1] twice. (once on each needle) Round 2: P1, c4l, (p2, k3, p1, k3) 3x, p1 on first needle. P1, c4r, (p2, k3, p1, k3) 3x, p1 on second needle. Repeat these 4 rnds once more. (8 total rows of ribbing so far). Complete just Round 1 once more, then bind off in pattern. You can adjust the length of ribbing here, just be certain to have at least one plain round in between completing a cable crossing and binding off. Complete thumb: Put 23 held thumb stitches back on larger needle(s). Rejoin yarn, picking up one stitch in the gap at the bottom of the cable (24 stitches total now), then purling the remainder of the stitches. Join to work in the round and complete 3 rounds of purling every stitch. Switch to smaller needle and work in K1,P1 rib for 3 rounds. BO in pattern. Make second mitt- follow instructions as for first mitt, but place beads on the opposite side (second half of the round) only.

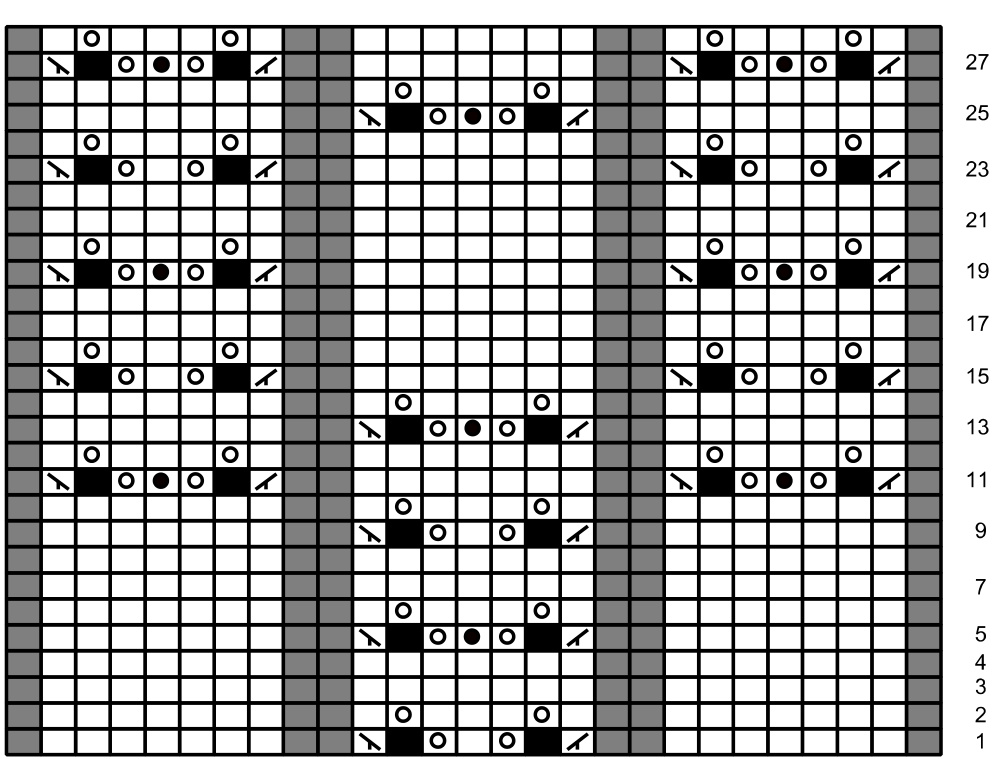
Ending chart after round 24 of last repeat.
| 29 | ||||||||||||||||||||||||||||
| o | o | 0 | o | |||||||||||||||||||||||||
| o | 0 | |||||||||||||||||||||||||||
| 0 | 27 | |||||||||||||||||||||||||||
| 25 |
Beginning chart- 4 rounds work once
? 2013, Amy Klimt. All rights reserved


