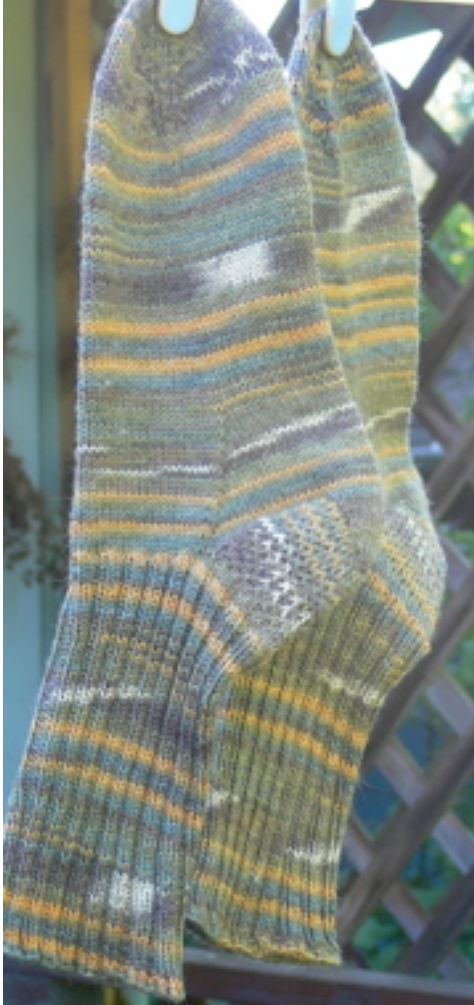
MASH-UP MAGIC TOE-UP SOCKS (MUMTUS) Compiled By Zhenya Lavy · Published June 2008
A customizable recipe to make great-fitting, toe-up socks for any size foot and with any weight yarn-knitting two at a time, using magic loop technique, and featuring a gusset and heel flap with Eye of Partridge cushion stitch. I combined my favorite bits from several freely available patterns and re-wrote them into a comprehensive pattern for magic loop construction. I draw most heavily on Barbara Tolleson's “Knitting Basic Toe-Up Socks Using the “Magic Loop' Circular Method" and Judy Gibson's \*"You're Putting Me On" Socks. An expanded workshop/pictorial version is online at Aesthetic Entanglementz (http://aestheticentanglementz.blogspot.com/ 2008/07/mash-up-magic-toe-up-socks-workshop.html). ITEMS NEEDED: Yarn: $100\mathrm{g}$ will make a pair of child's socks or anklelength socks for a woman. For larger feet or men's socks 150 grams is better. Wind into 2 center-pull balls. Reinforcing thread (recommended, not required) $\mathbf{40^{\circ}}$ circular needle in a size for desired fabric density and gauge. Make a gauge swatch. Tape measure · Tapestry needle
STITCHES USED:
Knit, Purl, K2tog, P2tog
·SSK: Slip 1 as if to knit,slip another as if to knit, knit these together through back loop. M1R (Make 1 Right): Insert left needle, back to front, under the horizontal strand between the last stitch worked and the first stitch on the left needle. This forms a loop on the needle. Knit through the front of this loop. M1L (Make 1 Left): Insert the left needle, front to back, under the horizontal strand between last stitch worked and firs stitch on lft needle. Knit through back lop.
PRIMARY STITCH COUNT
PRIMARY STITCH COUNT: Subtotal 2 adjusted to nearest multiple of 4.
CAST ON
Ifyou arepacking your sock project ina singlebagfor greater portabilityand neatness, as described in AestheticEntanglementz(http://aestheticentanglementz.blogspot.com/2008/03/how-to-prep-tidy-sockproject-coffe.html), cast on using the left skein first (for Sock 2) and the right skein second (for Sock 1). Using your favorite toe-up method, cast on stitches per sock (Chart 1, Row A) —- each needle will have_ stitches per sock (Chart 1, Row B). I recommend Judy Becker's Magic Cast-On. Knitty published a pictorial at http://www.knitty.com/ISSUEspring06/FEATmagiccaston.html. Remember on your first round to knit normally off Needle 1 but through the back loop off Needle 2.
ORIENTATION & GLOSSARY FOR THESE DIRECTIONS
Neutral Position: Turn the needles and place them into your left hand, tips pointing to the right. Needle 1 (bottom/sole of fot) is in front and willbe held in your let hand when kniting. Needle 2 (top/instep of foot) is in back and will be pulled around and held in your right hand to knit. The working yarn hangs off the right-hand side of Needle 2 for each sock. Round: all the way around both needles. Row: used in the heel directions, when you're only working back and forth on one needle.
TOES
· Round 1: Needle 1: \*K2, M1L, Knit to 2 stitches before end of sock, M1R, K2.\* Repeat for Needle 2. Round 2: Knit all. Repeat these two rounds until the total number of stitches for each sock equals your primary stitch count. (Half on each needle.) Cut the reinforcing thread.
FOOT
Knit until the sock reaches the point on your foot where the leg meets the top of the foot. (Or until the sock measures the length determined by Measurement C [above] or Chart 2 [at end].) \*\*If you want tout ki aeorative stith pat on the topof thefoot, kit rous d thn stat the new stitch pattern. Knit the decorative pattern across the stitches on Needle 2 only.
Round 1
Needle 1 (bottom of foot/sole): K1, M1L, K to 1 stitch from end, M1R, K1 Needle 2 (top of foot/instep): Knit all. Round 2: Knit all. Repeat these two rounds times (Chart 1, Row C) altogether until... Needle 1 has stitches (Chart 1, Row D) per sock. Needle 2 has stitches (Chart 1, Row E) per sock. There are stitches (Chart 1, Row F) altogether per sock.
HEEL EXTENSION
!!Let Sock 2 hang on the cable while you work the entire heel extension and heel flap back and forth on Sock 1. Then you will work the heel extension and flap on Sock 2 while Sock 1 waits!!!
Preparation Row:
Knit stitches (Chart 1, Row G) Add reinforcing thread (or place marker if you prefer no reinforcing thread) SSK Knit stitches (Chart 1, Row H) $^+$ (Chart 1, Row I) stitches. (If you are not using reinforcing thread, place second marker here) stitches (Chart 1, Row J) remain unworked. (The H+I stitches will be worked back and forth in short rows until the heel flap. The G and J stitches on either side just hang out and wait.)
Row 1: Turn, P2tog, P across only those stitches knit with reinforcing thread (between the markers) Row 2: Turn, SSK, K across reinforced stitches (between the markers) Repeat Rows 1 & 2 until stches (Chart 1, Row K) remain that ae being knit withrinforcing thread (between the markers), ending with a wrong side row.
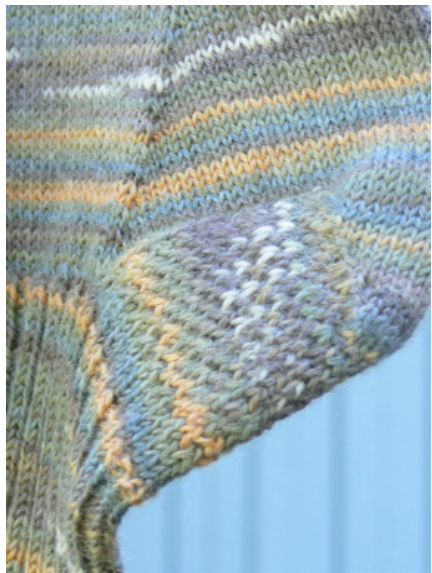
HEEL FLAP
Preparation Row 1: Tum, place marker, sl 1 knitwise, K across heel, pik up stitches (Chart 1, Row L) by knitting along the decrease edge Preparation Row 2: Turn, place marker, sl 1 purlwise, P back across heel, pick up. stitches (Chart 1, Row L) by purling along the other decrease edge At this point, stitches (Chart 1, Row M) have been worked with reinforcing thread (are between the markers). This is where you start incorporating the G and J stitches from the sides: You will knit the heel flap upward in the Eye of Partridge stitch, incorporating 1 stitch from G or J each time you turn, as follows: Eye of Partridge Stitch: . Row 1: Turn; sl 1 knitwise; K1 sl 1 across reinforcing thread. On the final reinforced stitch, which you would be working as a K (not a slip), work a SSK, incorporating the first unreinforced stitch from the side. (Place marker if you wish.) Rows 2 & 4: Turn, sl 1 stitch purlwise, P across to last stitch worked with reinforcing thread, P2tog (the last reinforced stitch and 1 unreinforced stitch - shifting marker as necessary) Row 3: Turn, slip first 2 stitches knitwise; K1, sl 1 across. You knit the $2^{\mathrm{nd}}$ to last reinforced stitch and then SSK the last reinforced stitch with the first unreinforced stitch from the side. Repeat these 4 rows until all G and J stitches have been worked, ending with a purl row. Note: If you prefer the columnar slip/knit hee stitch, omit rows 3 & 4 from the Eye of Partridge. At this point, you have (Chart 1, Row N) stitches altogether for each sock: stitches (Chart 1, Row O) on Needle 1 and stitches (Chart 1, Row P) on Needle 2. Heel Completion Row: Turn, sl 1 knitwise, K to end, M1 by knitting into stitch below the first stitch on the left needle (creating a new stitch so that when you start knitting in the round again there won't be a hole between the heel and instep stitches). Twist the new stitch, if necessary,to close gaps. You have just completed the heel extension and flap for Sock 1.
Work the HEEL EXTENSION and HEEL FLAP for Sock 2.
When you have completed both heels and are at the point where you have just made a new stitch at the end of the heel on Sock 2, cut the reinforcing threads for both socks. Finish the $2^{\mathbf{nd}}$ Half of the Round: Knit the instep of Sock 2. Knit the instep of Sock 1. Ifyou used a special stitch pattern for the top of the foot, continue in pattern. Heel Completion Round: Turn the work so you're ready to knit the heel stitches. M1 between the heel and instep stitches. (Knit into the stitch below the first stitch on the left needle. Twist if needed to close anygap.) You now have the primary stitch count (Chart 1, Row A) for each sock again.
LEG & CUFF
Pick one of these four options, or do whatever else you want! 1. Continue in stockinette until the socks measure 2 inches shorter than the desired length from bottom of foot to top of sock. Switch to K2 P2 ribbing for the final two inches of cuff. 2.-OR- Knit a few rounds of stockinette and then switch to a ribbing pattern of your choice all the way up the leg. 3.-OR- Knit a few rounds of stockinette and then switch to a special design pattern all the way up the leg. (If you think you might take this option, you will need to have swatched in the special pattern. You may find it necessary to switch needle sizes to make sure your gauge in the special stitch matches the stockinette gauge used on the foot.) 4. -OR- If you already were using a special design stitch on the top of the foot, simply continue that design up the leg.
BIND OFF
Use your favorite stretchy bind-off. I recommend Elizabeth Zimmermann's Sewn Cast Off (from Knitting Without Tears) or the Russian Bind Off used by Wendy Johnson.
REFERENCE CHARTS
These charts, by Peggy Pignato, are from Judy Gibson's "Putting Me On Socks." Chart 2 appears as first published. Chart 1 has been modified, but the calculations follow Pignato's original proportions.
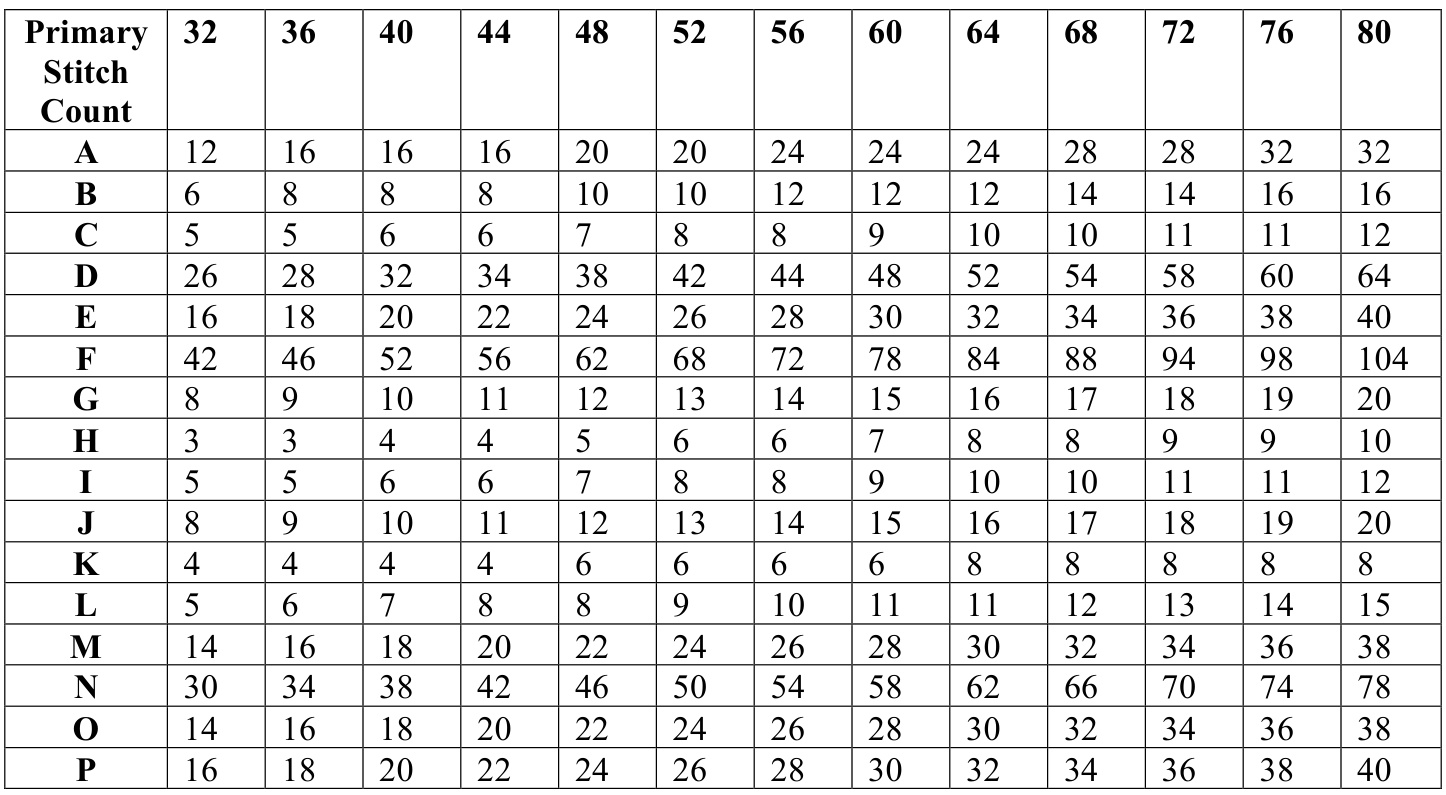
Chart 2: Best Guess for Length to Gusset


