
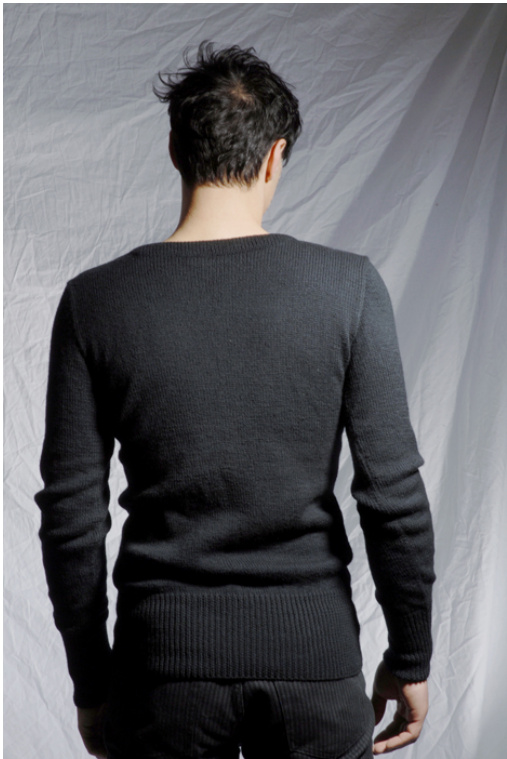
Small (36), Medium (38), Large (40), XL (42) This pattern is written with a negative ease; finished measurements will be smaller than given size. Model is a 38 long and wears a Medium.
Materials
Yarn
One Cone of JaggerSpun Superfine Merino 2/18 Lace Weight (100% wool; 5040 yds./1lb. cone) [See source notes at the end ofthe pattern.] This pattern is specifcally created to work in conjuntion with the qualties of the recommended yarn; substitutions and gauge adjustments are not advised.
Needle Size
US3 $(3.25~\mathrm{mm})$ 24" or 32" circular needle US5 (3.75 mm) 24" or 32" circular needle Notions Ball winder Tapestry needle 4 stitch holders or large safety pins
Gauge
26 sts and 36 rows $=$ 4" (10 cm) in St st on US5 needles.
Pre-Hhniting Preparations
Take Measurements
Accurate measurements are key to achieve the Kindling & Tinder fit. Take measurements before starting the sweater, and write them down. Ifyou are making the sweater for yourself, have someone help you take the measurements to ensure the correct fit for your body. To determine chest size, take wearer's measurement shirtless or with a closefitting undershirt. To determine the appropriate length, take wearer's measurement from under armpit to lower hip (approximately 4 inches below the natural waist). To achieve the fit as pictured, this is the measurement between the top ofthe ribbing and armpit bind off. For instance: ifthe wearer's armpit-to-hip measurementis $\bar{\mathrm{I}}6\,\,^{1}\!/\!_{2}$ inches,the sweater will need to be $22^{1}\!/\!_{2}$ incheslong from the bottom of the sweater to the armpit bind off. To determine the armscye (armhole circumference), place measuring tape at the top of the shoulder and run tape under armpit and over clavicle to the top of the shoulder. A few caveats: 1) Stand up Straight, with good posture, but keep shoulder and arm relaxed. 2) Pull measuring tape tightly. Ifthis procedure is mildly uncomfortable, you're probably doing it correctly. To determine arm length, measure the inside of the arm from the armpit to the wrist and add 2 inches.
Prepare Yarn
Using ball winder, wind yarn into manageable 3-ply balls as follows: Wind one ply from cone on to ball winder. Stop when ball is about 2 inches thick. Remove ball from winder and place level with cone. Take one ply from the cone and one from the ball and rewind the ball. Remove ball from winder again and place level with cone. Take one ply from the cone and two plies from the ball and wind again. Yarn is ready to knit. Method
Back
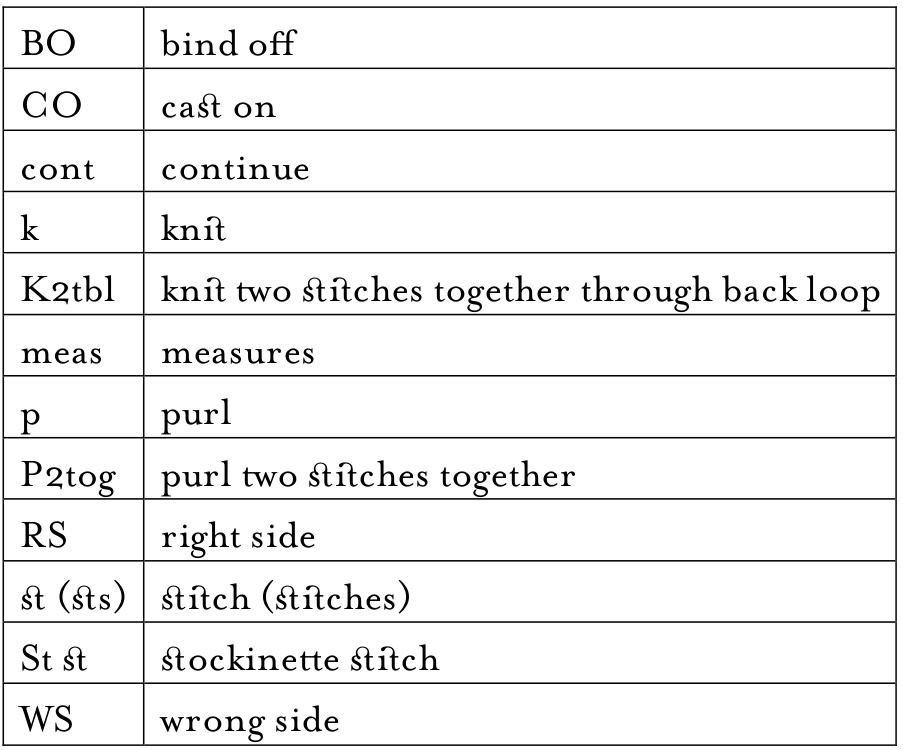
With US3 needles, CO 110 (116, 122, 128) sts using long-tail metho Work 6 inches in Ix1 (kI, p1) rib.
Change to US5 needle. Work in St st for the length you have determined through the sizing instructions above, ending with wrong side row.
Armscye Shaping
For all sizes: BO 5 sts at beginning of next 2 rows, ending with wrong side row. Decrease I st at beginning of each row 3 times, 3 sts from edge; k2tbl on right side rows and p2tog on wrong side rows. Work remaining 94 (100, 106, 112) sts until the sweater armscye is half the length of your stated armscye measurement taken as described in the sizing instructions, ending with a wrong side row. Break yarn and turn work to right side. Slip 23 (25, 26, 28) sts on to holder. Join yarn and knit next $48\left(50,\,54,\,56\right)$ Sts for neck facing. Slip last 23 (25, 26, 28) sts on to another holder.
Neck Facing
Purl next row. Continue in St st, decreasing I st at each end of each row until 36 (38, 42, 44) sts remain. Break yarn. Using tapestry needle, slip these live Sts on to a stitch holder.
Front
Work same as back, including neck facing.
Sleeves
With US3 needles, CO 64 (64, 70, 70) sts using long-tail method. Work 6 inches in Ix1 (kI, p1) rib. Change to US5 needle. Working in St t, increase ISt at each end of every gh row (on the right side), until there are $84$ (90, 96,102) Sts on the needle. Work even until sleeve is the length of the arm measurement as described in the sizing instructions.
Short-row Sleeve Cap Shaping
Continuing in St St, BO 3 sts at beginning of next 2 rows until 78 (84, 90, 96) sts remain, ending with wrong side row. Decrease I St at the beginning ofthe next 4 rows 3 sts from the edge; k2tbl on right side rows and p2tog on wrong side rows.
For Small
Work 4 rows even. Then work next row for 72 sts, wrap next sSt and turn work, leaving I unworked st on the needle. Work the next row for 70 sts; wrap the next st and turn, leaving unworked st on the needle. Repeat until there are a total of 20 sts on each side of the sleeve cap. Continuing in St st and wrapping Sts, leave 2 unworked sts on the needle at the end ofthe next 2 rows; 3 sts on the needle at the end ofthe following 2 rows; 4 Sts on the final 2 rows. End short row shaping with a total of 16 live center sts. Break yarn. Slip all live Sts on to one needle. Join new yarn and loosely BO all 74 Ss, picking up and hiding the wrapped sts.
For Medium
Work next rowfor $78$ Sts, wrap next St and turn work, leaving I unworked &t on the needle. Work the next row for $76$ Sts; wrap the next sSt and turn, leaving I unworked st on the needle. Repeat until there are a total of 22 Sts on each side ofthe sleeve cap. Continuing in St t and wrapping Sts, leave 2 unworked Sts on the needle at the end ofthe next 2 rows; 3 sts on the needle at the end ofthe following 2 rows; 4 Sts on the final 2 rows. End short row shaping with a total of 18 live center sts. Break yarn. Slip allive Sts on to one needle. Join new yarn and loosely BO all 80o Sts, picking up and hiding the wrapped sts.
For Large
Work next row for 84 sts, wrap next St and turn work, leaving I unworked st on the needle. Work the next row for $76$ Sts; wrap the next St and turn, leaving I unworked st on the needle. Repeat until there are a total of 24 Sts on each side of the sleeve cap. Continuing in St sSt and wrapping Sts, leave 2 unworked sts on the needle at the end of the next 2 rows; 3 Sts on the needle at the end of the following 2 rows; 4 Sts on the final 2 rows. End short row shaping with a total of 20 live center sts. Break yarn. Slip all live Sts on to one needle. Join new yarn and loosely BO all 86 Sts, picking up and hiding the wrapped sts.
For Extra Large
Work next row for go sts, wrap next St and turn work, leaving I unworked st. on the needle. Work the next row for 88 sts; wrap the next st and turn, leaving I unworked st on the needle. Repeat until there are a total of 26 sts on each side of the sleeve cap. Continuing in St st and wrapping Sts, leave 2 unworked Sts on the needle at the end ofthe next 2 rows; 3 sts on the needle at the end of the following 2 rows; 4 Sts on the final 2 rows. End short row shaping with a total of 22 live center Sts. Break yarn. Slip all live Sts on to one needle. Join new yarn and loosely BO all 92 Sts, picking up and hiding the wrapped sts.
Finishing
Weave in all ends for all joins in body and sleeves.
Shoulder Seams
Match the body pieces with wrong sides together. Align Stitch holders from both sides of one shoulder. Lining up stitch for stitch, graft shoulder together using Kitchener Stitch method. Finish opposite shoulder using same method.
Set-in Sleeves
Pin the center ofthe sleeve cap to the shoulder seam. Pin the corresponding bound-off armscye Stitches to bound-off titches at sleeve cap edge. Continue pinning armscye and sleeve-cap edges, adjusting ease as needed. Sew sleeve in place.
Side and Sleeve Seams
Secure edges with safety pins. Begin seams using long tail ends from cast-on rows. Complete seams using mattress stitch method, inserting tapestry needle under the corresponding horizontal bars between Stitches, alternating from side-to-side and pulling yarn tight enough to hide edges. Working from hip edge to armscye and from sleeve edge is recommended.
Neck Facing
Working from wrong side, fold front facing edge to inside of sweater. Using tapestry needle and a single ply of yarn, tack down the live stitches at facing edge to a single row of purl stitches. Repeat with opposite facing edge. Reinforce neck edges at grafted shoulder by gently rolling the edges to the inside and tacking down with a single ply of yarn. Weave in all ends. Steam until damp to


block and set stitches. Lay flat to dry. You will lose a small amount of vertical length with this process, as the yarn settles into its finished shape.
Caring for your sweater
Hand wash in cold water with gentle soap or wool wash. Do not wring or agitate. Squeeze out excess water, then roll in towels to remove remaining water. Lay garment flat to dry out of direct sunlight and shape to original measurements.
Hancyoen fen dageregpun Jaen http://www.halcyonyarn.com Weaving Rainbow http://www.weavingrainbow.com model Peter Mavrogeorgis: working musician, sound engineer, independent construction contractor, awesome bartender and general nuisance.


