MioMi Slouch Beret
Skill Level:
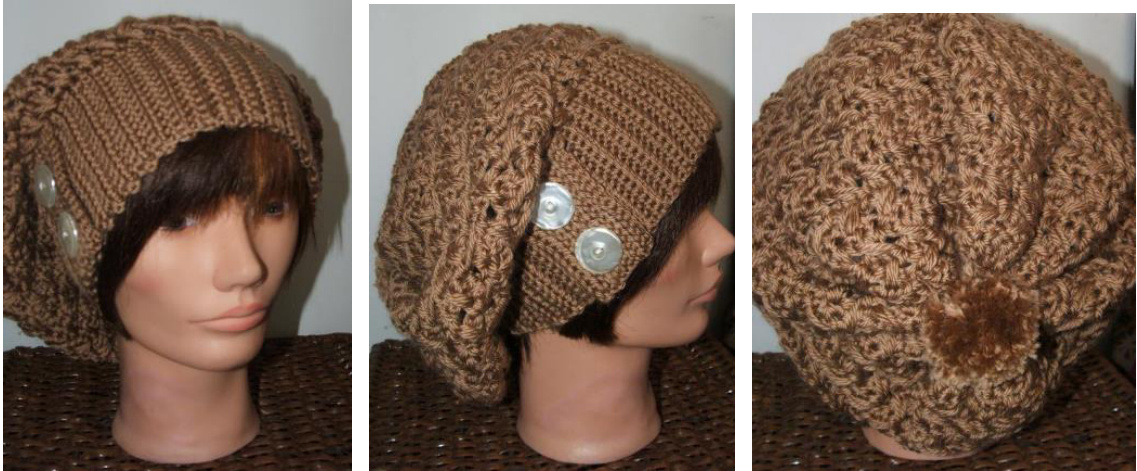
Stitches Used: ch (chain), slst (slip stitch), sc (single crochet), hdc (half double crochet), dc (double crochet), dcdec (decrease double crochet). Note: beginning or turning ch 3 countsasfirstdc. Supplies: Size F/5/3.75mm, G/6/4mm, H/8/5mm and J/10/6mm Crochet Hooks, 6.75 0z. Herschners Whisper Sof Yaem Dbk Beige 02s - yaen Nedle -1 Butons Gauge: with J hook, 2 pattern groups = 2", 4 pattern rows = 3" Pattern = 2 dc, loosely hdc in skipped dc, skip next dc. \* Directions:
Ribbing
Rnd. 1: with F hook, leaving 12" tail, ch 16, sc in 2nd ch from hook and in each ch across, ch 1, turn. 15 sc Rnd. 2: working in back loops, sc in each sc across, ch 1, turn. 15 sc Rnd. 3-71: repeat rnd. 2. 15 sc vith G hook, working in front loops, slst in each sc across, ch 1, turn. 15 sls Rnd. 73: slst in each slst across, ch 1, turn. 15slst Rnd. 74: repeat rnd. 73. Rnd. 75: slst in first 3 slst, ch 3, skip next 3 slst, slst in next 3 slst, ch 3, skip next 3 slst, slst in last 3 slst ch 1, turn. (2-button holes) Rnd. 76: slst in each slst and in each ch across, ch 1, turn. 15slst ? January, 2012 Pattern may not be reprinted, republished or resold without express written permission. Rnds. 77-80: repeat rnd. 73, fasten off at end of rnd. 80. 15 slst Using tail, whip stitch side seam at back loop of rnd. 72 and at beginning ch. Fold flap over seam, sew buttons opposite of button holes as shown. Weave in ends.
Hat
Rnd. 1: with J hook, attach yarn in end of any row on back of hat, ch 1, sc in same st, evenly work 71 more sc around top of hat, working through both thickness on hat and flap, join to beginning sc, ch 3, do not turn. 72sc Rnd. 2: dc in same st, loosely hdc in last sc on rnd. 1, skip next sc, \*2 dc in next sc, loosely hdc in skipped sc, skip next sc\*, repeat from \* 34 times, join to beginning dc, ch 3, turn. Rnd. 3: dc in next st, loosely hdc in 2nd dc on rnd. 2, skip next st, \*dc in next 2 st, loosely hdc in skipped st, skip next st\*, repeat from \* 34 times, join to beginning dc, ch 3, turn. Rnds. 4-14: repeat rnd. 3. Rnd. 15: with H hook, repeat rnd. 3, ch 2, turn. Rnd. 16: holding last loop back on hook, dc in next 2 dc, yo, pull through all 3 loops on hook, \*work 1 dcdec over next 3 dc\*, repeat from \* 34 times, join to beginning dc, fasten Of. Working on wrong side, using yarn needle and yarn, weave yarn through all d's on top of hat, pull tightly and securely tie in place. Weave in ends. Tie pom-pom to top of hat.
Pom-Pom
Wrap yarn 50 times around 2" cardboad square, slide off cardboard, tie in center, cut ends. ① January, 2012 Pattern may not be reprinted, republished or resold without express written permission.


