MioMi Mittens-Average Size
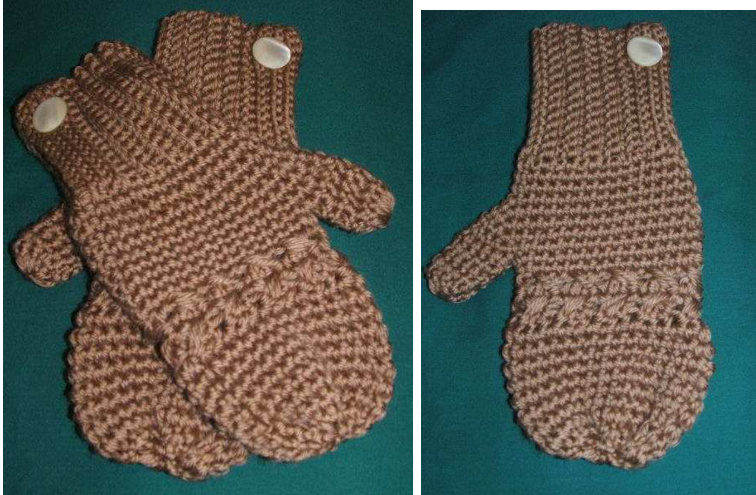
Skill Level: Intermediate Stitches Used: ch (chain), sl st (slip stitch), sc (single crochet), hdc (half double crochet), dc (double crochet), dec sc (decrease single crochet). Note: turning ch 3 counts as first dc. Supplies: Size F, G, H Crochet Hook, Yarn Needle, 3 ounces Herrshners Whisper SoftDk Beige #0025, 2-7/8mButtons Gauge: with H hook, 6 sc = 2", 7 sc rows = 2" Directions RightMitten-Ribbing Rnd. 1: with F hook, leaving 12" tail, ch 16, sc in 2nd ch from hook and in each ch across, ch 1, turn. 15 sc Rnd. 2: working in back loops, sc in each sc across, ch 1, turn. 15 sc Rnds. 3-29: repeat rnd. 2. vith G hook, working in front loop, sl st in each sc across, ch 1, turn. 15 sl st Rnd. 31: sl st in each sl st across, ch 1, turn. 15 sl st Rnd. 32: sl st in first 3 sl st, ch 2, skip next 2 sl st, sl st in next 10 sl st, ch 1, turn. Rnd. 33: sl st in each sl st and in each ch across, ch 1, turn. 15sl st Rnds. 34-35: repeat rnd. 31, fasten off at end of rnd. 35. 15 sl st With button hole at top of ribbing, using tail, whip st cuffat beginning ch and back loop of rnd. 30. Sew button onto ribbing, opposite of button hole on flap as shown. RightMitten-Body Rnd. 1: with H hook, attach yarn through both thickness of flap and first row of ribbing, ch 1, sc in same st, evenly work 30 sc around ribbing, join to beginning sc, ch 1, do not turn. 31 sc Rnd. 2: sc in each sc around, join to beginning sc, join to beginning sc, ch 1, do not turn. 31sc Rnd. 3: repeat rnd. 2. Rnd. 4: sc in first 15 sc, 2 sc in next sc, sc in next 15 sc, join to beginning sc, ch 1, do not turn.32 sc Rnd. 5: sc in first 15 sc, 2 sc in next 2 sc, sc in next 15 sc, join to beginning sc, ch 1, do not turn.34 sc Rnd. 6: sc in first 15 sc, 2 sc in next sc, sc in next 2 sc, 2 sc in next sc, sc in next 15 sc, join to beginning sc, ch 1, do not turn. 36 sc Rnd. 7: sc in first 15 sc, 2 sc in ext sc, sc in next 4 sc, 2 sc in next sc, sc in next 15 sc, join to beginning sc, ch 1, do not turn. 38 sc Rnd. 8: sc in first 15 sc, 2 sc in next sc, sc in next 6 sc, 2 sc in next sc, sc in next 15 sc, join to beginning sc, do not turn. 40 sc Rnd. 9: sc in first 15 sc, skip next 10 sc, sc in next 15 sc, join to beginning sc, ch 1, do not turn.30 sc Rnd. 10: sc in each sc, join to beginning sc, ch 3, do not turn. 30sC Rnd. 11: dec in next sc, loosely hdc in last sc on rnd. 10, skip next sc, \*dc in next 2 sc, loosely hdc in skipped sc, skip next sc\*, repeat from \* 8 times, join to beginning dc, ch 3, turn. Rnd. 12: dc in next dc, loosely hdc in 2nd dc on rnd. 11, skip next dc, \*dc in next 2 st, loosely hsd in skipped st, skip next st\*, repeat from \* 8 times, join to beginning dc, ch 1, turn. Rnd. 13: sc in each st around, join to beginning sc, ch 1, turn. 30 sc Rnds. 14-20: repeat rnd. 10. Rnd. 21: dec sc over first 2 sc, \*dec sc over next 2 sc\*, repeat from \* 13 times, join to beginning sc, fasten off, leaving tail. With wrong side facing, using tail, weave through each sc ion rnd. 21, pulltight and tie securely, weave in end. Thumb-Right andLeftMitten Rnd. 1: attach yarn at last skipped sc on rnd. 9, ch 1, sc in same st and sc in next 9 sc, ch 1, turn. 10 sc Rnd. 2: sc in each sc across, ch 1, turn. 10 sc Rnds. 3-5: repeat rnd. 2 Rnd. 6: dec sc over 10 sc, fasten off, leaving 12" tail. 1 sc With right sides facing, using tail, sew side seam. Weave in ends. LeftMitten-Ribbing Rnds. 1-31: repeat rnds. 1-31 of Right Mitten ribbing. id. 32: sl st in first 10 sl st, ch 2, skip next 2 sl st, sl st in next 3 sl st, ch 1, turr Rnds. 33-35: repeat rnds. 33-35 of Left Mitten. on hole on top of ribbing, whip st cuff at beginning ch and back loop of rnd. 3 Sew button onto ribbing, opposite of button hole on flap as shown. LeftMitten-BodyRnds. 1-21: repeat rnds. 1-21 of Right Mitten-Body


