Chain Reaction!
By: Tobi Beck
This may be the first color work for you, the intrepid sock knitter. I've tried to include all the main concepts of color work in this pattern, without making the tricky ones overwhelming. You can do this. If you are new to color work, there are several tips at the end of the pattern to make the challenge easier. You may find you like color work so much, it willstart a chain reaction...

Materials:
Fingering Weight Yarn; two colors Size 2 needles (set of sock needles, or 9' round and two double points, or size 2 long enough for magic loop, and so on) StitchMarkers TapestryNeedle
Gauge:
Small - 10 stitches/ inch Medium - 9 stitches/inch Large 8 stitches/inch
Cuff:
Cast on 72 Stitches in Contrasting Color Rows 1-12: K2, P2 around
Leg:
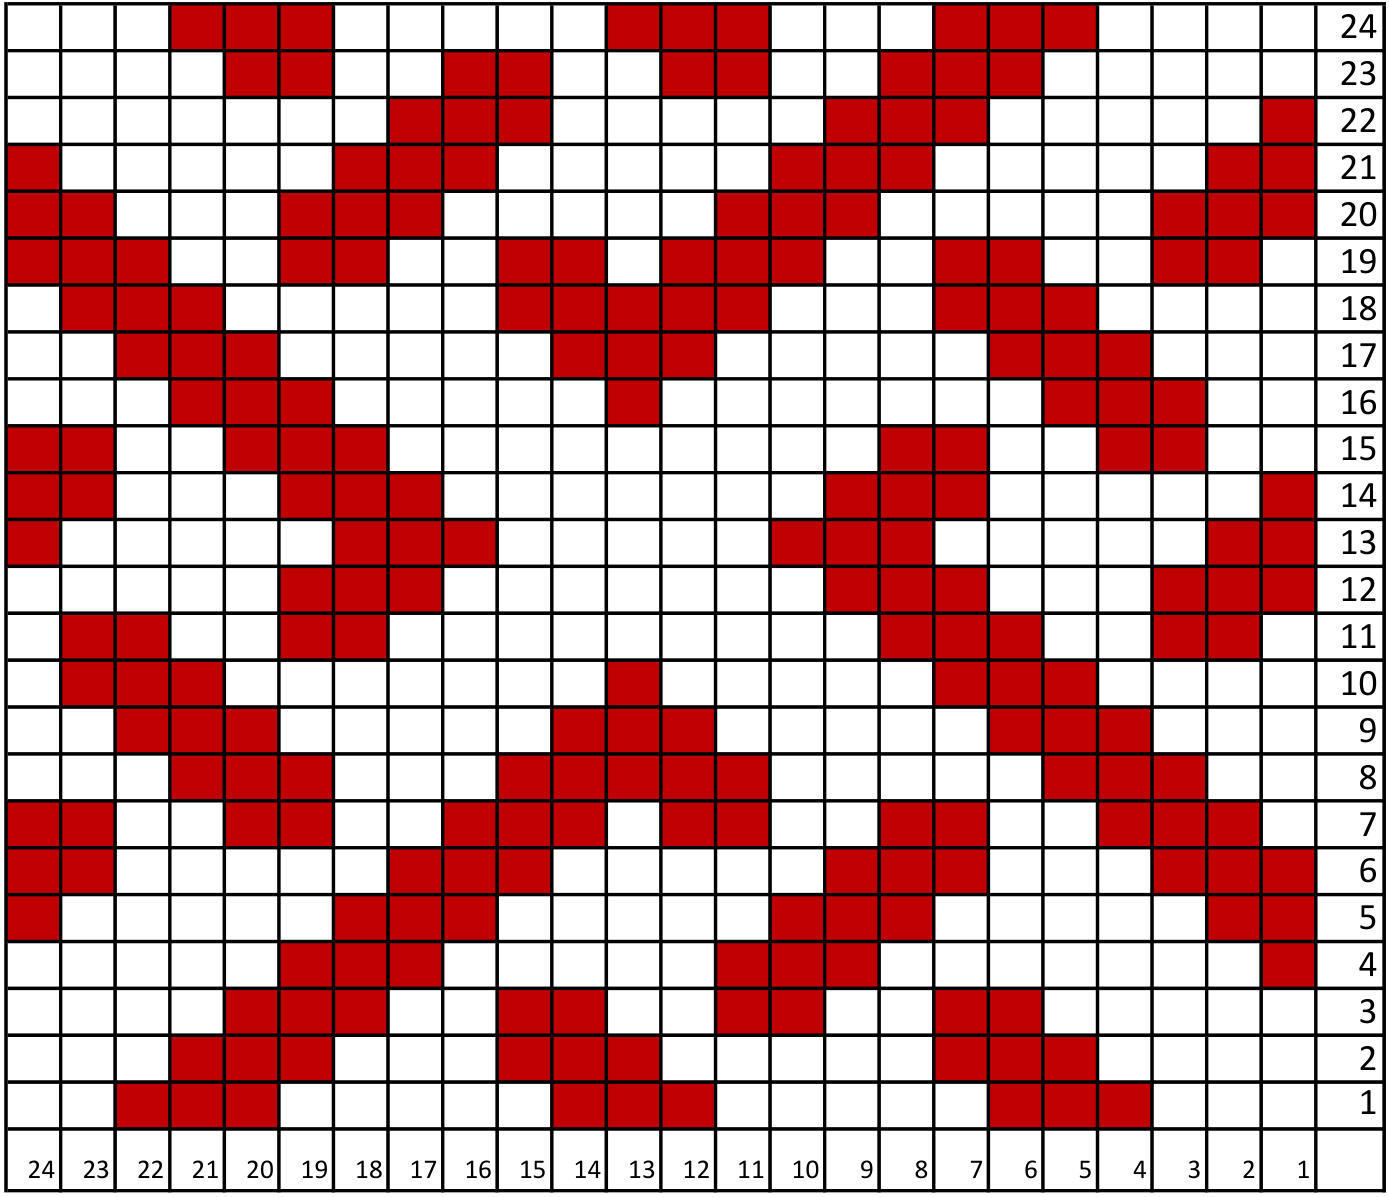
Rows 1-24: Repeat chart three times around sock. Rows 25-72: Repeat pattern twice more. Row 73: Work through first row of pattern one and a half times (36 stitches), and place these 36 stitches on a spare needle or holder, while working the remaining 36 stitches in a heel flap.
Heel:
Using the contrasting color knit across the remaining stitches of row 73. Turn work and Purl back across these 36 stitches. Row 1: S1, K1 across 36 stitches Row 2: Turn work S1 and purl remaining stitches Continue these two rows 15 more times. You will be making a heel flap that has ridges on it. This technique makes a very sturdy heel that wears well, and shapes to the foot nicely.
Turn Heel:
Row1: S1, K20, SSK, K1, Turn Row 2: S1, P7, P2tog, P1, Turn Row 3: S1, Knit to 1 stitch before gap, K2tog, K1, Turn Row 4: S1, Purl to 1 stitch before gap, P2tog, P1, Turn Row 5-14: repeat 3 and 4 until no gap remains. Row 15:knit across
Gusset:
Set up round: In Contrasting color, pick up and knit 16 stitches along heel flap, place marker. (You will need to break the yarn and rejoin the MC) Knit across the stitches that were held back, starting on row 2 of the pattern, place marker. In pattern of K3 CC and K1 MC, pick up and knit 17 stitches along heel flap. Continue in pattern K3 CC and 1 MC across bottom of foot and up heel flap. There \*should\* be a MC stripe in the center of the bottom of the foot. Row 1: Continue in pattern on the top of the foot, and the color pattern (3CC, 1MC) around the instep of the foot, until you reach 1 stitch before the center bottom stripe. K2tog in MC, continue in pattern around. Row 2: Continue in pattern on the top of the foot and the color pattern (3CC, 1MC) around the instep of the foot, until you reach the center bottom stripe. SSK in MC, continue in pattern around. Continue these two rounds for a total of 24 rounds. 31 stitches in stripes remain, 36 stitches in pattern remain.
Foot:
Continue in pattern until two inches from total length of foot.
Toe:
Set up: In CC knit around moving 1 stitch to stripe side next to each marker (this puts 34 on top side, and 33 on bottom side. Knit to first marker K1, K2tog pass marker. From this point forward, count the center bottom of the foot as the beginning of the round. Row 1: Knit around. Row 2: \*Knit to within three stitches of marker, SSK, K1, Pass Marker, K2tog, repeat from \*. Repeat these two rounds until 34 stitches remain. Repeat row 2 until 14 stitches remain. After the final repeat of Row 2, knit 7 to get to the side of the toe. Graft last 14 stitches together with Kitchener stitch. Weave in ends (you should have two threads at either point of the heel/gusset/foot join to clean up that little hole that always shows up.) Put sock on, admire and cast on the second one before you take it off!
There are a few things to remember in color work:
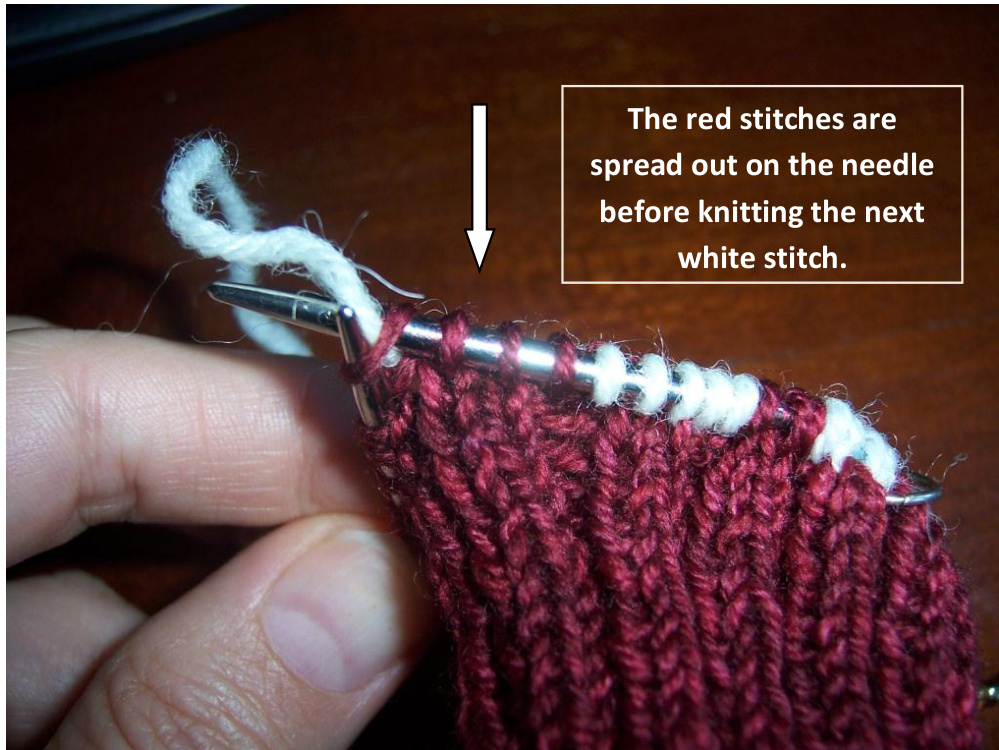
\*TENSION is key! When doing color work the key to an even knit, that is not to tight, is to make sure there is enough slack in the color that is carried behind the stitches. We have all seen knits that are drastically pulled in when the second color is introduced. When working on a sock, this will make the sock unwearable. When switching colors, to make sure I have enough slack in the thread I carry behind, I like to spread out the stitches of the previous color before knitting the first stitch of the new color. Once the new color has been knit, the slack is 'ocked in'.
\*Floats - a 'float' is the term used for the thread in the back that is not being knit, it 'floats' along the back of the work. Sometimes, if one color is knit for many stitches without switching, the float on the back side can be very long. This (especially in a sock) can make snags. To help reduce this problem (and help tension) if the float is going to be more than 5 stitches long, twist it under the other color halfway through the float. Look at line 11 on the chart, it has 9 stitches of white right in the middle there....so, about stitch 4 or 5 take the red yarn in back, and twist it under the white on the back side (make sure to used the tension technique above - spread the white stitches as if you were changing color) and then on the next stitch flip the red back to where it was so the yarn does not tangle. This will lock in the float, and make sure you have enough slack at the same time.
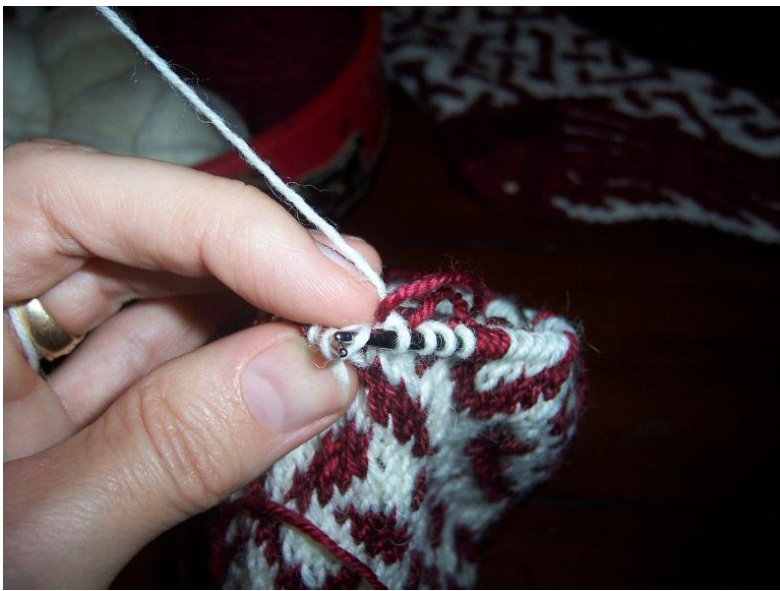
\*\* Tricky floats....look at line 3 on the chart....between the end of the chart and the next line there are also 9 (or 10 if you are going to line 4) white stitches..make sure to lock in that float as well. \* Ifyou are new to color work, try using wool or other'sticky' yarn first. This will help prevent a looser tension from pulling out and making loose stitches. Wool = good, silk = bad. \*While you really only need one stitch marker to mark the beginning of a round, I like to use a marker at the beginning of each chart repeat..that is to say, one at the beginning of the round, and one between stitch 24 & 25 and another between stitch 48 & 49. This way, if I've messed up on the chart, it is easier to find out where. \* Read the chart from the bottom right side starting with square 1/1, and read allthe way across the row, repeat row 1 twice more to do all 72 stitches around the sock. Then move on to row 2. \* Keeping your place in the chart...very important... It helps to have some sort of guide to show you what line you are on, a book, ruler or paper will do. I put the edge of a paper above the line I'm working on so that the top line I see is the one I'm knitting. This also lets me see the line below it so that I know what color I should be knitting into. That is to say if I'm knitting a red square and the square directly below it is white, I \*should\* be knitting into a white stitch. \* Since knitting in the round is actually a spiral normally there is a slight jog when moving from one row to the next. There are techniques you can use to minimalize this; however, this pattern will keep that jog to a minimum without those techniques. \* Try to work with your needle tips close together. This is particularly important when knitting into the first stitch of a color change from the previous row. It is easy to pull this stitch out of shape and take up the slack from the float (see picture). If this happens, knit a few more stitches, then reach to the inside of the work and pull the float on the row with the stretched stitch until the stitch is uniform again. \* Finally, take it easy....really. If you are one of those tense knitters who always has to use a couple of sizes larger on the needles to get the same gauge....elax a bit, and take it easy, don't tug on the yarn so much when pulling it through, let it slide through your fingers if you wrap it around your fingers for tension. The trick is to be consistent and easy on the yarn. Enough of the preliminaries, you can do this....Are you ready?....LET'sS GO!


