Simple striped bag
by Chris Laning This is my favorite project for a beginner's class in knitting. It requires only that you be able to cast on, cast off, and knit - no purling required! The result is a simple bag that is useful in many ways.
NEEDLES
16-inch circular needle, size 5 or 6 (Optional: a set of double-pointed needles in the same size)
YARN
This bag takes about 2 ounces or 100 yards of worstedweight yarn - the size most commonly used for sweaters. Recommended yarns: Bartlett Yarns Fisherman 2-ply, Philosopher's Wool 2-ply worsted, or another 2-ply 100% wool worsted-weight yarn would be the closest approximation to historical yarn from before 1600. To be most historically accurate, you want solid colors, with no light-to-dark or multicolor shading or heathering (these are later developments). If you are doing stripes, you can use a few yards of any yarn in a color you like, as long as it's the same thickness as your basic yarn. A one-row stripe all the way around takes about ayard. BEGINNING AT THE TOP Cast on 60 stitches. Join them into a round, being careful not to twist the row of stitches when you join it. Knit plain (knit every stitch - no need to purl) until you think it's long enough (8 inches is a good length). After an inch or two, you may want to try putting your stitches onto 3 or 4 double-pointed needles, with one needle left free to work the stitches on each needle in turn. This was the method used for knitting in the round before circular needles were invented in the early 20th century.
STRIPES
If you want to try a small adventure and introduce some variety, take a length of colored yarn and at some point just start knitting your new stitches with that yarn instead. When you get around to your starting point again (1, or 2, or more rounds later) drop the new color and pick up your old yarn, being careful not to pull too tight and pucker the knitting. Repeat stripes at whatever interludes you like. FINISHING When finished, bind off, flatten the cylinder of knitting and overcast (sew) the two bound-off edges together at the bottom with a large needle and a strand of the same yarn (going once through each front & back stitch). Alternatively, do a 3-needle bind-off to close the bottom of the bag (a common finish for closed ends before 1600).
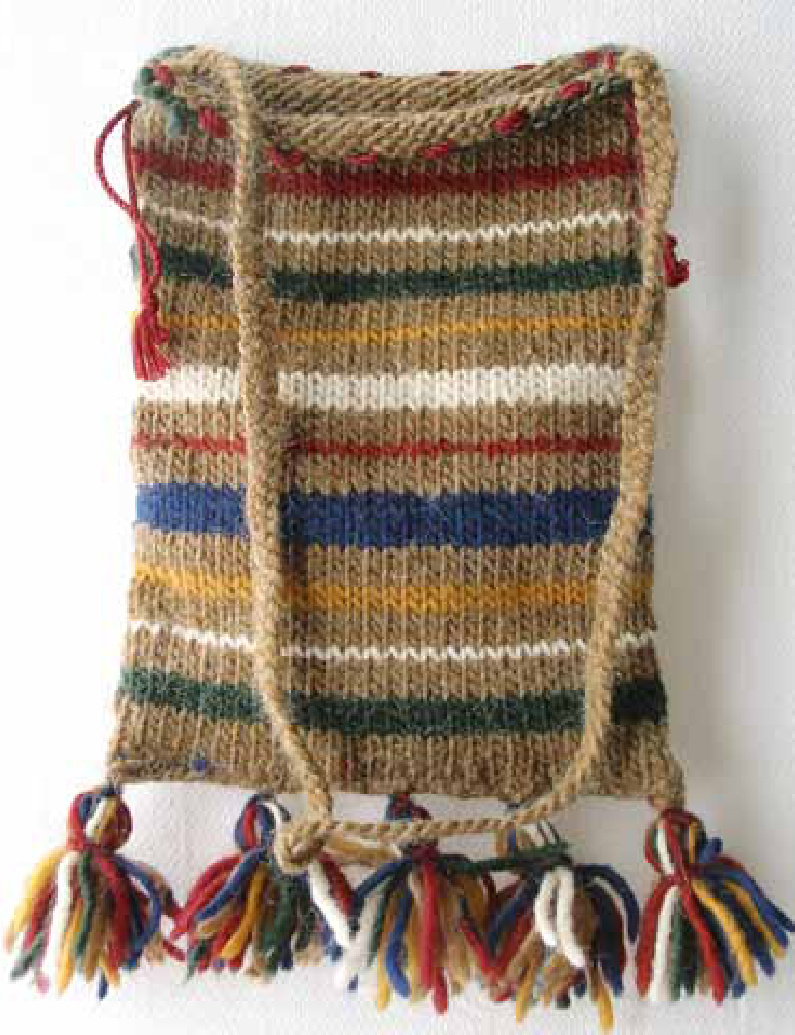
If you changed colors, pull the beginning and ending of the colored yarn carefully so the stitches on the outside are the same size as all the other stitches. Take the loose end of yarn and, on the inside of the bag, weave it in and out a few times among other stitches of the same color and trim off the end. Braid a carrying strap from leftover yarn (or any yarn you like). Sew it neatly onto the top of the bag at two opposite points. Cut or make two drawstrings - they work better if they are not wool. Shoelaces, smooth cotton string, and braided cotton embroidery thread work well. Thread both drawstrings in and out between the stitches in the third row from the top of the bag. Knot the two ends of each drawstring together. Pull one drawstring from each side to close the bag. Simple bags like this often show up in medieval paintings with three to five tassels along the bottom.
HISTORICAL BACKGROUND
Knitting seems to have been invented sometime late in the first millennium AD, perhaps as early as the 8th century. The earliest pieces of surviving knitting are dated to the 9th, 10th and llth centuries. Most of this material comes from graves and trash heaps in Egypt and other dry places, where textiles are more likely to be preserved. Knitting history was complicated for a long while by the confusion of knitting with another craft, nalbinding (unhelpfully referred to as "one-needle knitting"). Nalbinding has been around much longer, and it can create textiles that look quite a lot like knitting, but the technique and structure of the fabric are quite different. Many pieces once called "knitting" or 'crochet" are now correctly identified as nalbinding. The earliest knitting was probably worked in the round to make cylindrical or tapered shapes, such as bags, stockings or hats. Each stitch knitted has a right and a wrong side: the right side showing a smooth loop, the wrong or"purl" side showing a raised "bump" of yarn for each stitch. Early knitting is all knit stitches, which form a smooth fabric (today called 'stockinette"). Knitting in the round on several double-pointed needles seems to be much older than knitting back and forth on two needles, which is the way most modern American directions are written. Historically, many of the surviving pieces of early knitting show a "jog" or mismatch in the pattern, proving they must have been knitted in the round, where this jog occurs at the end of every round. We don't see clear examples of back-and-forth knitting until very close to 1600, and it didn't become the"normal" way of constructing knitted garments until the 20th century. It seems likely that the earliest knitting needles were metal wires, probably handmade. Larger needles for coarser work could of course be made from wood or bone, but both are too prone to snap to make good needles in the smaller sizes needed for fine knitting. Much - but not all - of the early knitting we have is worked in much smaller stitches than we are used to in modern pieces. Stitch gauges of 10 to 15 stitches per inch are quite common, whereas modern knitters are accustomed to working in thicker yarn at 3 to 5 stitches per inch. Thick yarns, however, are also found well before 1600, especially in the colder parts of Europe, where they are used to make woolen caps and other warm items. While there are many ways to wrap yarn and make stitches, there is no "wrong" way to knit. Knitters may work from left to right (usual) or right to left (less usual), hold the loose yarn in their left or right hands, or loop it around their necks, twist their stitches, work into the back loops and so forth. These are all"correct" if they produce well-made knitted fabric. Until at least the late 1500s, knitting seems to have mostly been used for small items, including bags, hats of all kinds, long stockings, mittens and gloves. Although there is evidence for wool undershirts, on the whole, larger knitted "body, garments" such as sweaters, hoods, or capes seem to have been a later development. There was a good deal of common, ordinary or"coarse" knitting in wool, and there was also fine luxury knitting in silk (and in the Middle East, in blue and white cotton). While wool knitting could have been worked by almost anyone, the very fine silk knits were produced by specialist artisans. Women as well as men knitted. Knitting guilds, when they existed, often farmed out the actual knitting, but took products back to properly supervise the finishing. Common colors in wool knitting (other than natural wool colors) include bright red, brick or madder red, pink, burgundy, light yellow, amber or gold color, light green, turquoise, light blue, dark blue, and a very dark brown or black. If you're interested in more detail about the history of knitting, both before and after 1600, the book to get is Richard Rutt's A History of Hand Knitting (now unfortunately out of print). It's a classic, and while not always well organized, Rutt is a good scholar and lays out the reasons for his conclusions.
MORE HISTORICAL KNITTING
My enthusiasm for re-creating knitted items from the Middle Ages and Renaissance is shared with other historical knitters. Two likely gathering spots if you wish to participate in this kind of experimentation and discussion are the HistoricKnit list on Yahoo!Groups ( http://groups.yahoo.com/group/ HistoricKnit/ ) and the Historic Knitting Group at Ravelry. com ( http://www.ravelry.com/groups/historic-knitting). This pattern may be reproduced for nonprofit educational uses only; copies must include this notice. Contact the author at <claning@igc.org>.
Notes for beginners
Wooden or bamboo needles are often easier than metal needles for beginners, because the stitches don't fall off the needles quite as easily. Most people also find it easier to cast on their stitches on a circular needle at first, rather than double-points. Many beginning knitters knit far too tightly. If you can't easily slide your stitches along the fat parts of the needle, or if you have trouble geting the point of your needle into the stitches to make new ones, they are too tight. Try not to pull on the yarn to tighten the stitch after you've made it.
WEB RESOURCES
For beginners who want to teach themselves to knit, I recommend the Bernat site:
http://www.bernat.com/learntoknit.php?PHPSESSID
I always start beginners off with a "knitted cast-on", as shown on the Bernat page. This isn't the cast-on used by most experienced knitters, but it's easy and works well. Knittinghelp.com has some nice free videos: http://www.knittinghelp.com/video/play/knitting-onenglish http://www.knittinghelp.com/videos/knit-stitch
http://www.knittinghelp.com/videos/casting-off
Many of the Knittinghelp pages give you a choice between "Continental" knitting (loose yarn heid in your left hand) or "English" (in your right hand). Knittinghelp slso has pages for increasing, decreasing, purl stitch, binding off. They show circular knitting under "advanced techniques," but don't let this intimidate you! http://www.knittinghelp.com/knitting/advanced techniques/


