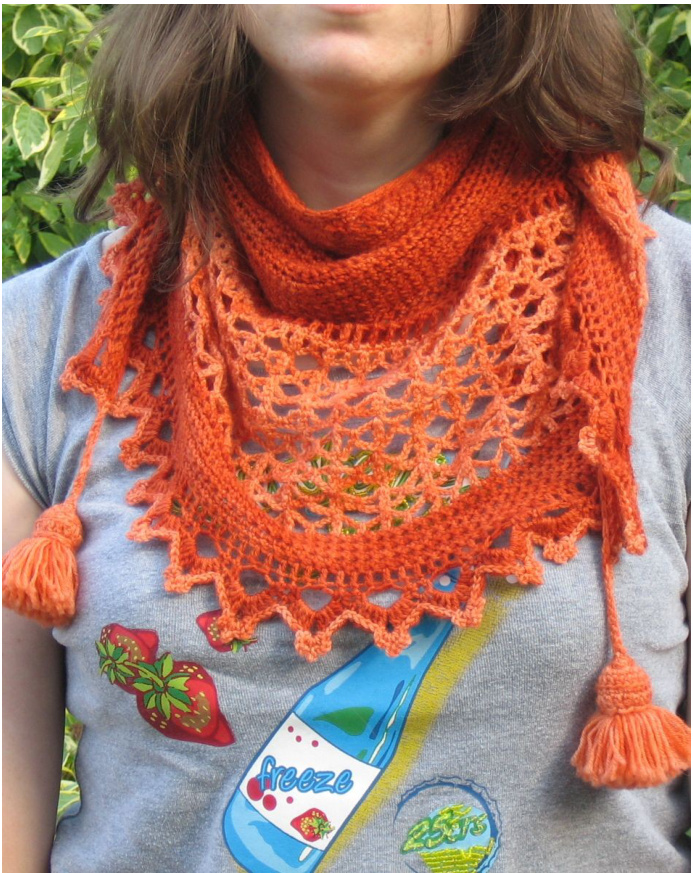
JULIANA WRAP
Crochet Neckerchief or Shoulder Shawl The orange version was made to wear at the Queen's Day Celebration in Amsterdam at the end of April 2010. On that day everyone wears orange in honour of the royal House of Orange. This wrap is named Juliana - the name of the previous Queen of the Netherlands, whose birthday is still the date for the celebration. Queen's Night is celebrated on the evening before with open air concerts and bars late into the night. The Juliana Wrap is perfect to wear in the evening as it gives just enough cosiness without being heavy. The mesh section is flexible and squishes small to wear around the neck . Or it will lay flat if you want to wear it as a shawl on your back.
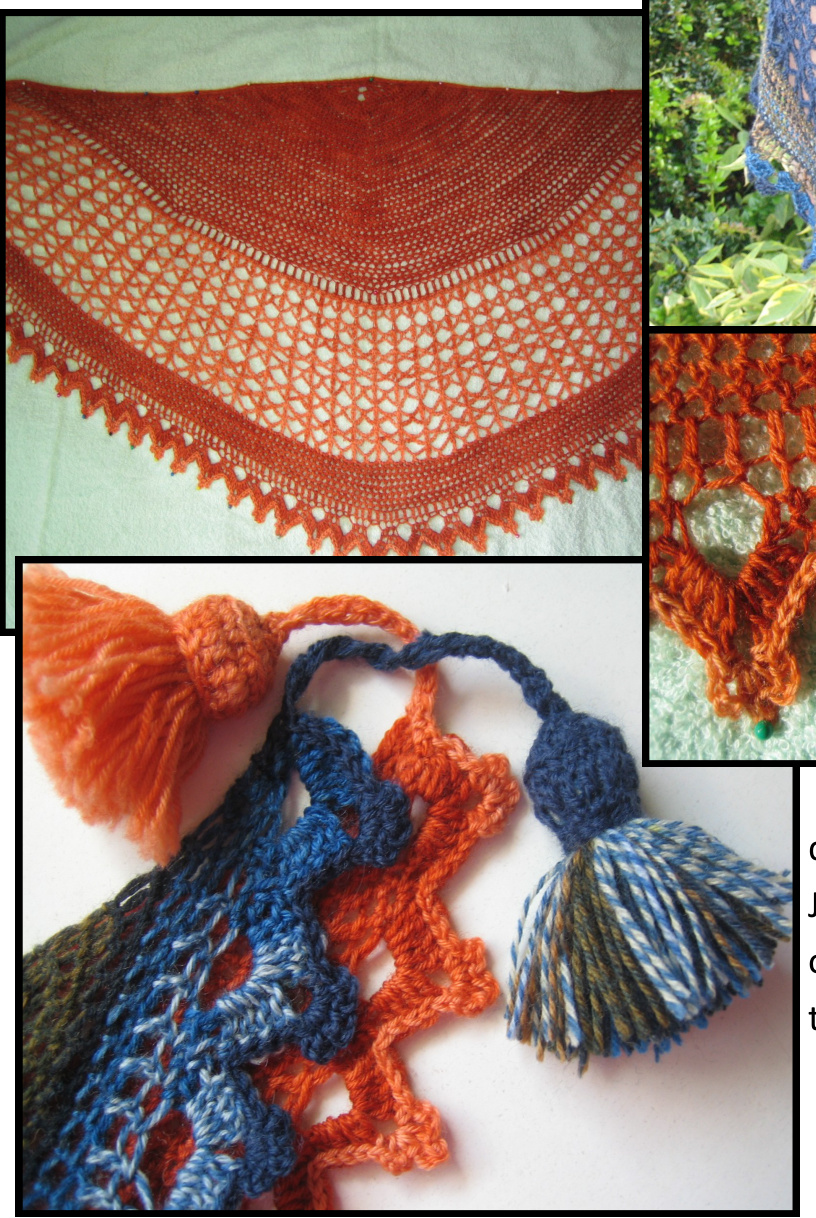
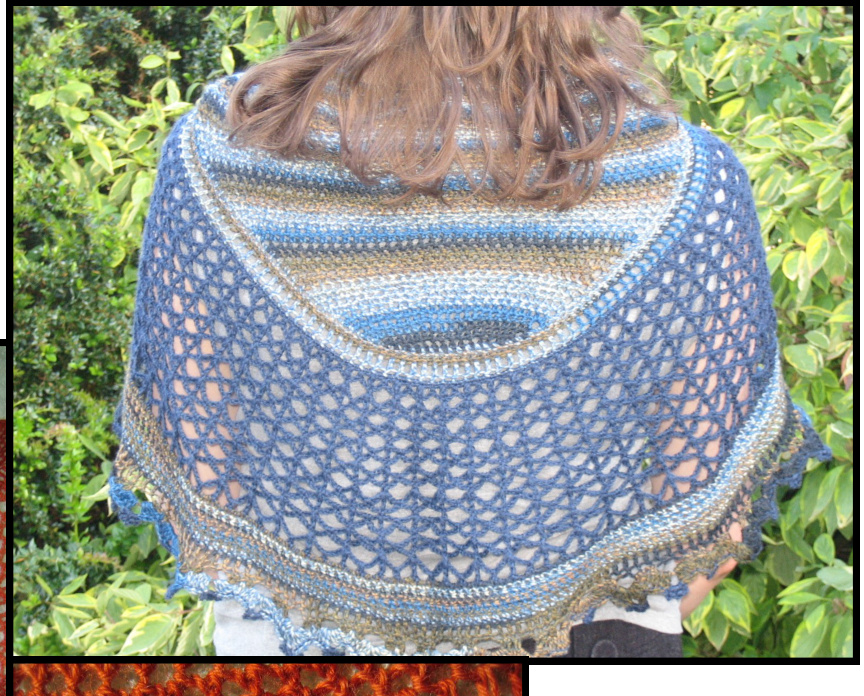

The tassels have a crocheted top section and they are both attractive and functional. They can be tied in different positions, left untied or the Juliana can be worn as a normal scarf with one end over the shoulder. The weight of the tassels keeps it all in place!
Designed by Rachel Lintern, Bristol UK
JULIANA WRAP
Crochet Neckerchief or Shoulder Shawl $\spadesuit$ $3\mathrm{mm}$ and $6\:\mathrm{mm}$ crochethooks $\spadesuit$ $100\mathrm{g}\left(420\mathrm{m}\right)$ each of two colours of Sock Yarn or 4-ply USA Crochet Terms used throughout Single Crochet Section Using 6 mm hook and Colour A Row 1: Chain 10, 2 sc in 2nd chain from hook, \*sc in next ch, 2 sc in next $c\mathrm{h^{*}}$ to end. (14 stitches) Row 2: Ch1, 2 sc in first stitch, sc to last stitch, 2 sc in last stitch. Row 3: Ch1, sc all stitches. Repeat rows 2 and 3 until work measures approximately 54 cm along the working edge.
Turn the work so that all further crocheting is done along the curved edge
TASSELS:
A good time to make them is during the Single Crochet Section, it prevents boredom and they are made with the hook and yarn which are not in use on that section. Work evenly spaced single crochets along the curved edge avoiding gaps or gatherings. (Approximately 120 stitches.) Work two more rows of sc (3 rows of sc along curved edge in total). Iassel lops (work 2): 1: Using 3 mm hook and Colour B, chain 5 and join in a circle 2: Work 8 hdc over the chain & join (8 sts). 3: Sc around & join 4: Ch2, 2 hdc in each stitch & join (16 sts). 5: Sc around in back loop of stitches $\&$ join. 6: Dc around, decreasing every 3rd stitch $\&$ join (12 sts). 7: Sc around. 8: Slip stitch around and fasten off leaving a $6^{\prime\prime}$ tail. Next Row: Ch2, skip 1, dc in each sc to end.
Change to 3mm hook and Colour B and proceed to theMeshSection Please Turn Over.
Tassel: Wrap yarn 90 times round a $2.75^{\prime\prime}/7\,\mathsf{c m}$ card. Using a needle threaded with yarn, gather the wraps tightly and knot together at the top. Cut and trim the bottom. Pull the top of the tassel into the tassel top. The knotting thread goes through the hole - use to attach the tassel to the shawl. The Tassel Top may be secured/ gathered at the lower edge using the $6^{\prime\prime}$ tail you left in step 8. Ch 1, 2 sc in each dc of previous row. Setup Row: Ch1, sc in first st, \*ch2, skip 1, 2 dc cluster, ch2, sk1, sc\* repeat to end. Row 1 $:\mathrm{Ch}5^{*}\mathrm{sc}$ in top of cluster, ch5\* to last cluster, sc, ch2, dc in 1st sc of previous row Row 2: ch1, sc in top of $\operatorname{dc}{}^{*}\mathbf{c}\mathrm{h}2$ ,cluster in sc, ch2, sc in 5-ch space\* to end, sc in turning chain. The mesh is worked for 16 rows and increases are made as follows:

Change to 6 mm hook and Colour A and proceed to the Single Crochet Band 2 DC CLUSTER: Wrap yarn, insert hook in next stitch, wrap yarn and pull through (3 loops on hook). Wrap yarn, insert hook in same stitch, wrap yarn and pull through (5 loops on hook). Wrap yarn, pull through 2 loops (4 loops), wrap yarn and pull through 2 loops, (3 loops), wrap yarn and pull through 2 loops (2 loops), wrap yarn and pull through 2 loops. Stitch finished. Single Crochet Band Next row: Ch1, 2 sc in each ch-4 space, sc in turning chain of previous row. Work 6 rows of sc, working 2 sc in the last stitch of each row. Next row: Ch2, dc in each sc to last stitch, work 2 dc. Edging Row 1: Ch1, sc in next 2 stitches $^{*}\mathrm{ch}5$ ,sk1, $3s c^{*}$ repeat to last 3 stitches; ch5, skip 1, 2 SC. Row 2: Ch1, sc, \*(4dc, ch2, 4dc) in ch-5 space, sc in central sc of $3\;s c^{*}$ sc in last stitch.
Change to 3 mm hook and Colour B Form first tassel string by chaining 10 then working back with a single crochet in each chain. (The tassels are sewn onto the strings after the edging is completed.)
Finish the edging Sc, \*slipstitch in each of 4 dc (sc, ch3, sc, ch3, sc, ch3, sc) in ch-2 space, slipstitch in each of $4~\mathrm{d}c^{*}$ to end, slipstitch in last stitch. Work second tassel string as before, secure with a slip stitch and fasten off. Sew tassels to the end of strings, Block the Juliana Wrap to enhance the texture.


