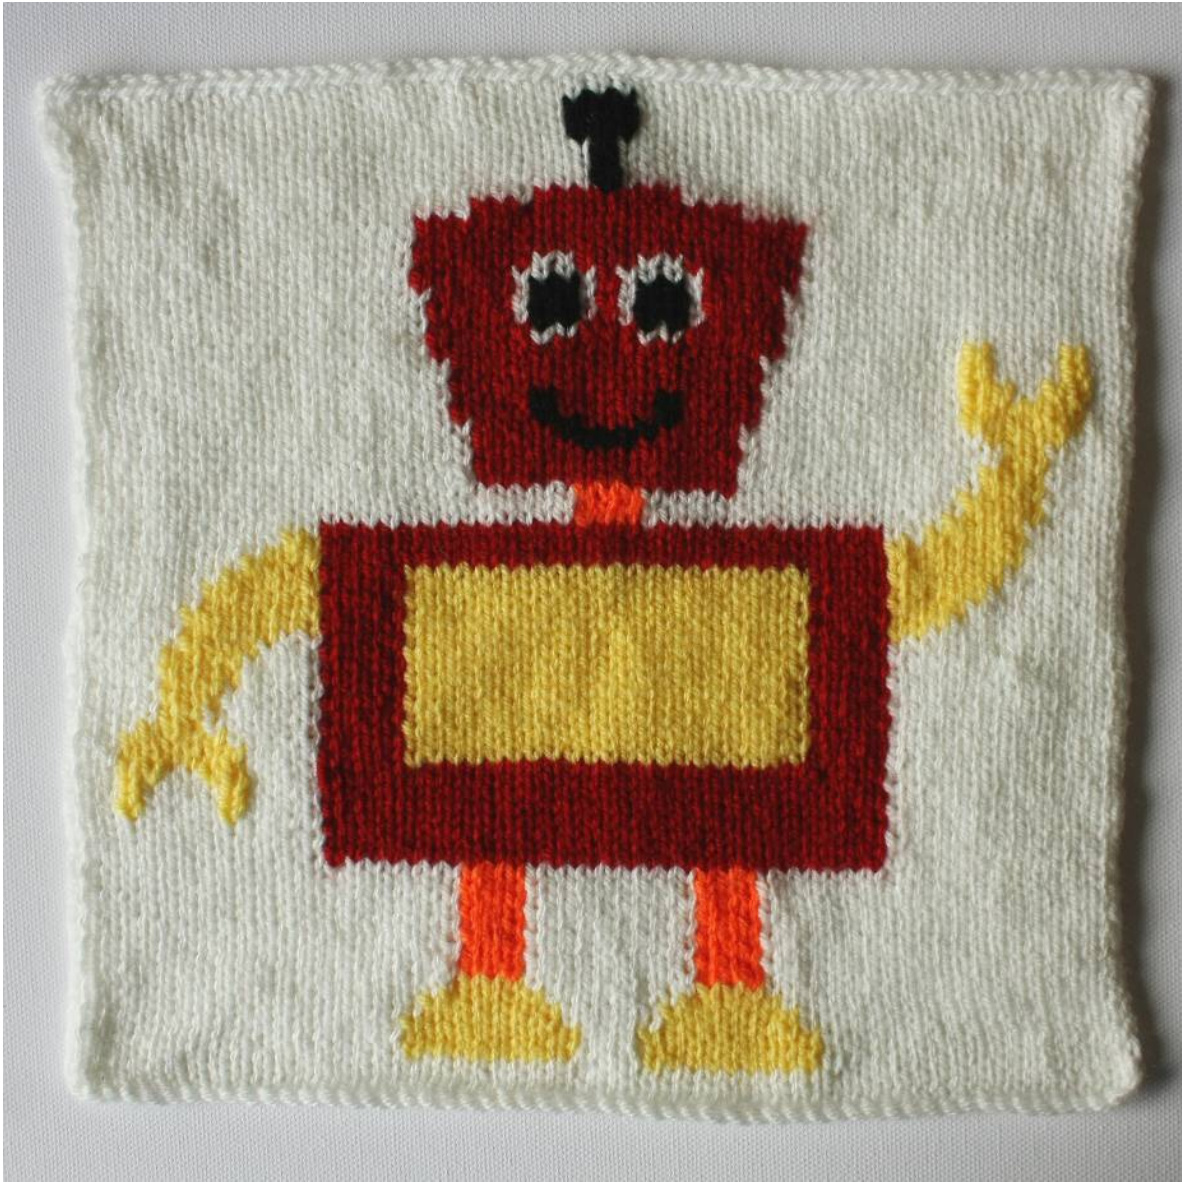
Ronnie the robot
By Vikki Bird A blanket square intarsia tutorial
Introduction
Ronnie the robot is a blanket square pattern featuring a full intarsia tutorial with lots of photographs to help you. The pattern also contains sections on Swiss darning (duplicate stitch) and blocking. This pattern was written for the Knitting for Boys group on Ravelry as their May 2015 skills building knit-along.
Tension
22 sts and 32 rows = 4 inches (10 cm) in stocking stitch on 4 mm (US 6) needles, or size needed to obtain correcttension.
Size
10 in × 10 in (25 cm × 25 cm)
Materials
● 4 mm (US 6) straight, single-pointed needles Yarn: Hayfield Bonus DK (100% acrylic, 280 m/305 yds per 100 g) 0 Cream (70 m/75 yds) 0 Classic Red (20 m/25 yds) Bright Orange (20 m/25 yds) Bright Lemon (5 m/5 yds) until there are 8 sts rem, PM, Alternatively, any DK weight yarn can be used. The yardages needed are shown in the list above; please note that all yardages given are approximate and depend on your knitting being the same gauge as that listed. pattern, seed st 8 sts, PM. K ·Bobbins for holding the different yarn colours during intarsia knitting · Next row (RS): while keeping in Chart row marker (optional)
Abbreviations
K: knit kfb: knit into the front and back of the stitch (increase one knitwise) P: purl pm:place marker slm: slip marker
Instructions
Cast on 57sts. Work the 80 rows of the chart, starting in the bottom right hand corner. Loosely cast off all 57 sts knitwise.
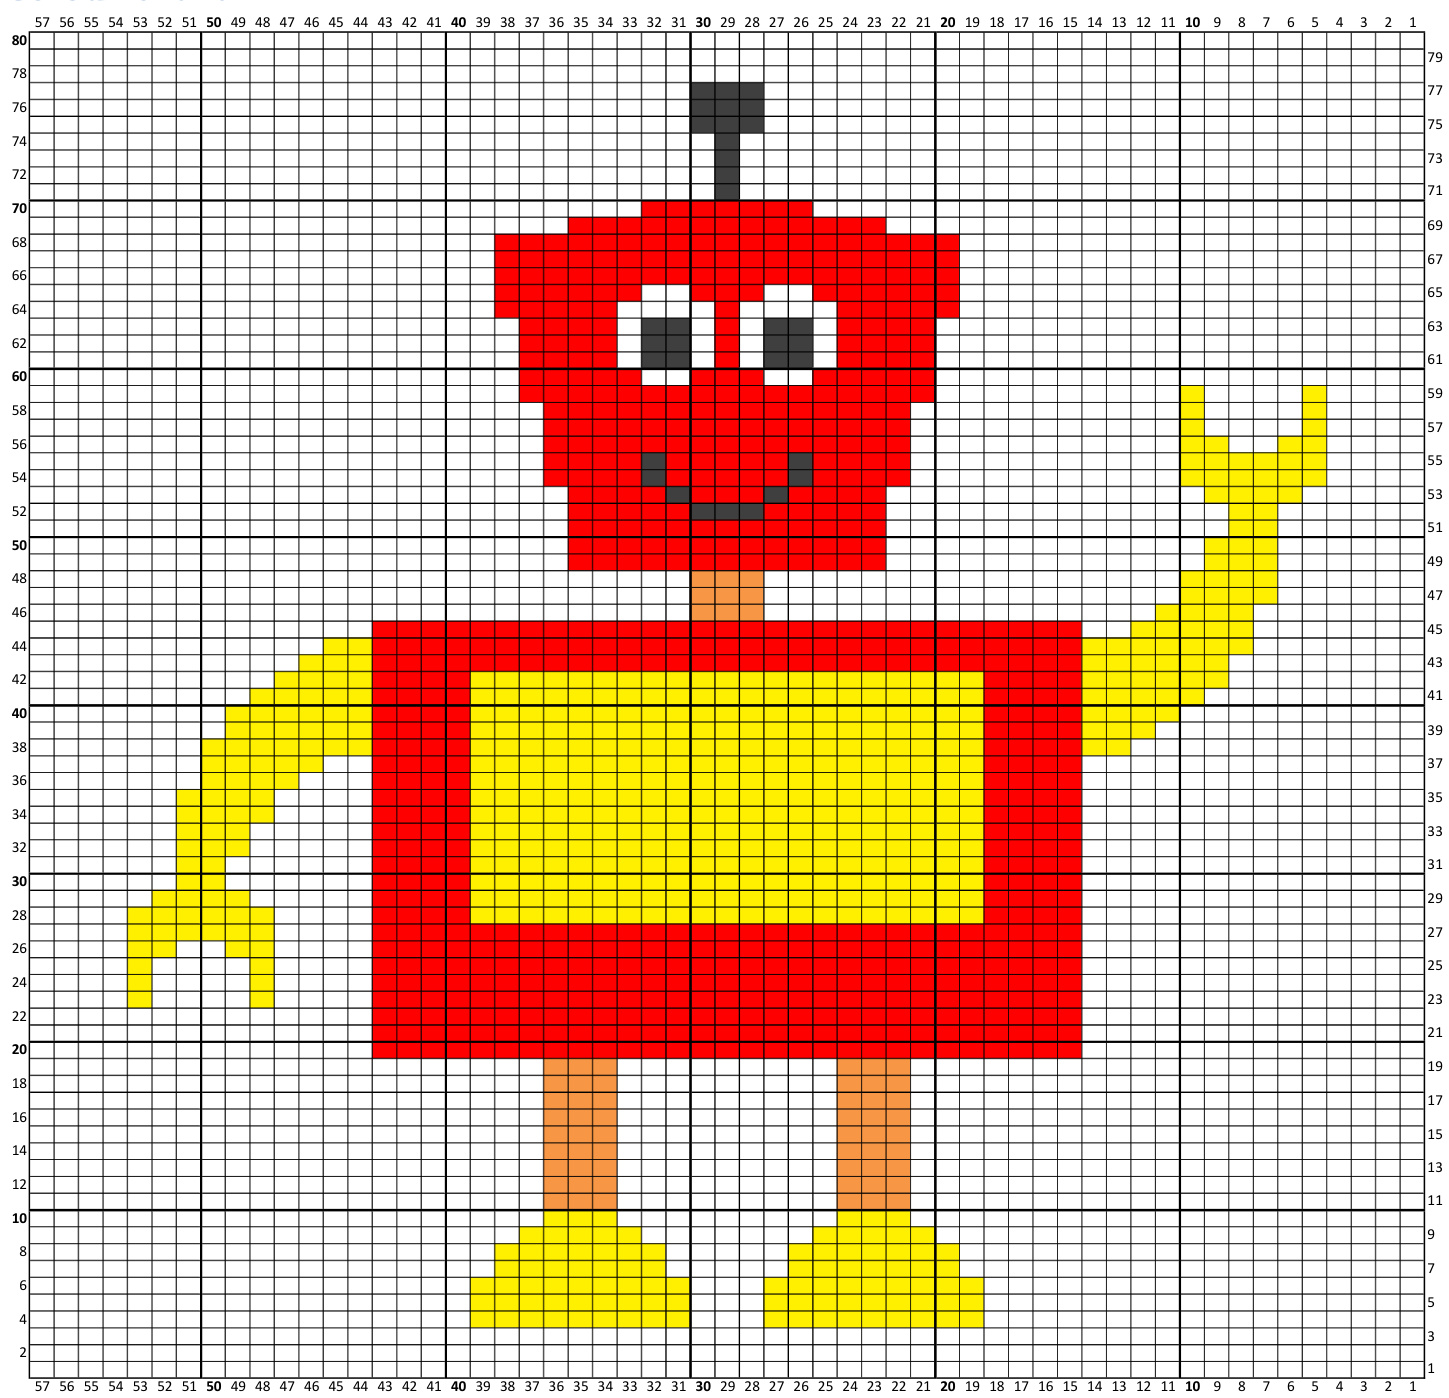
Colour chart
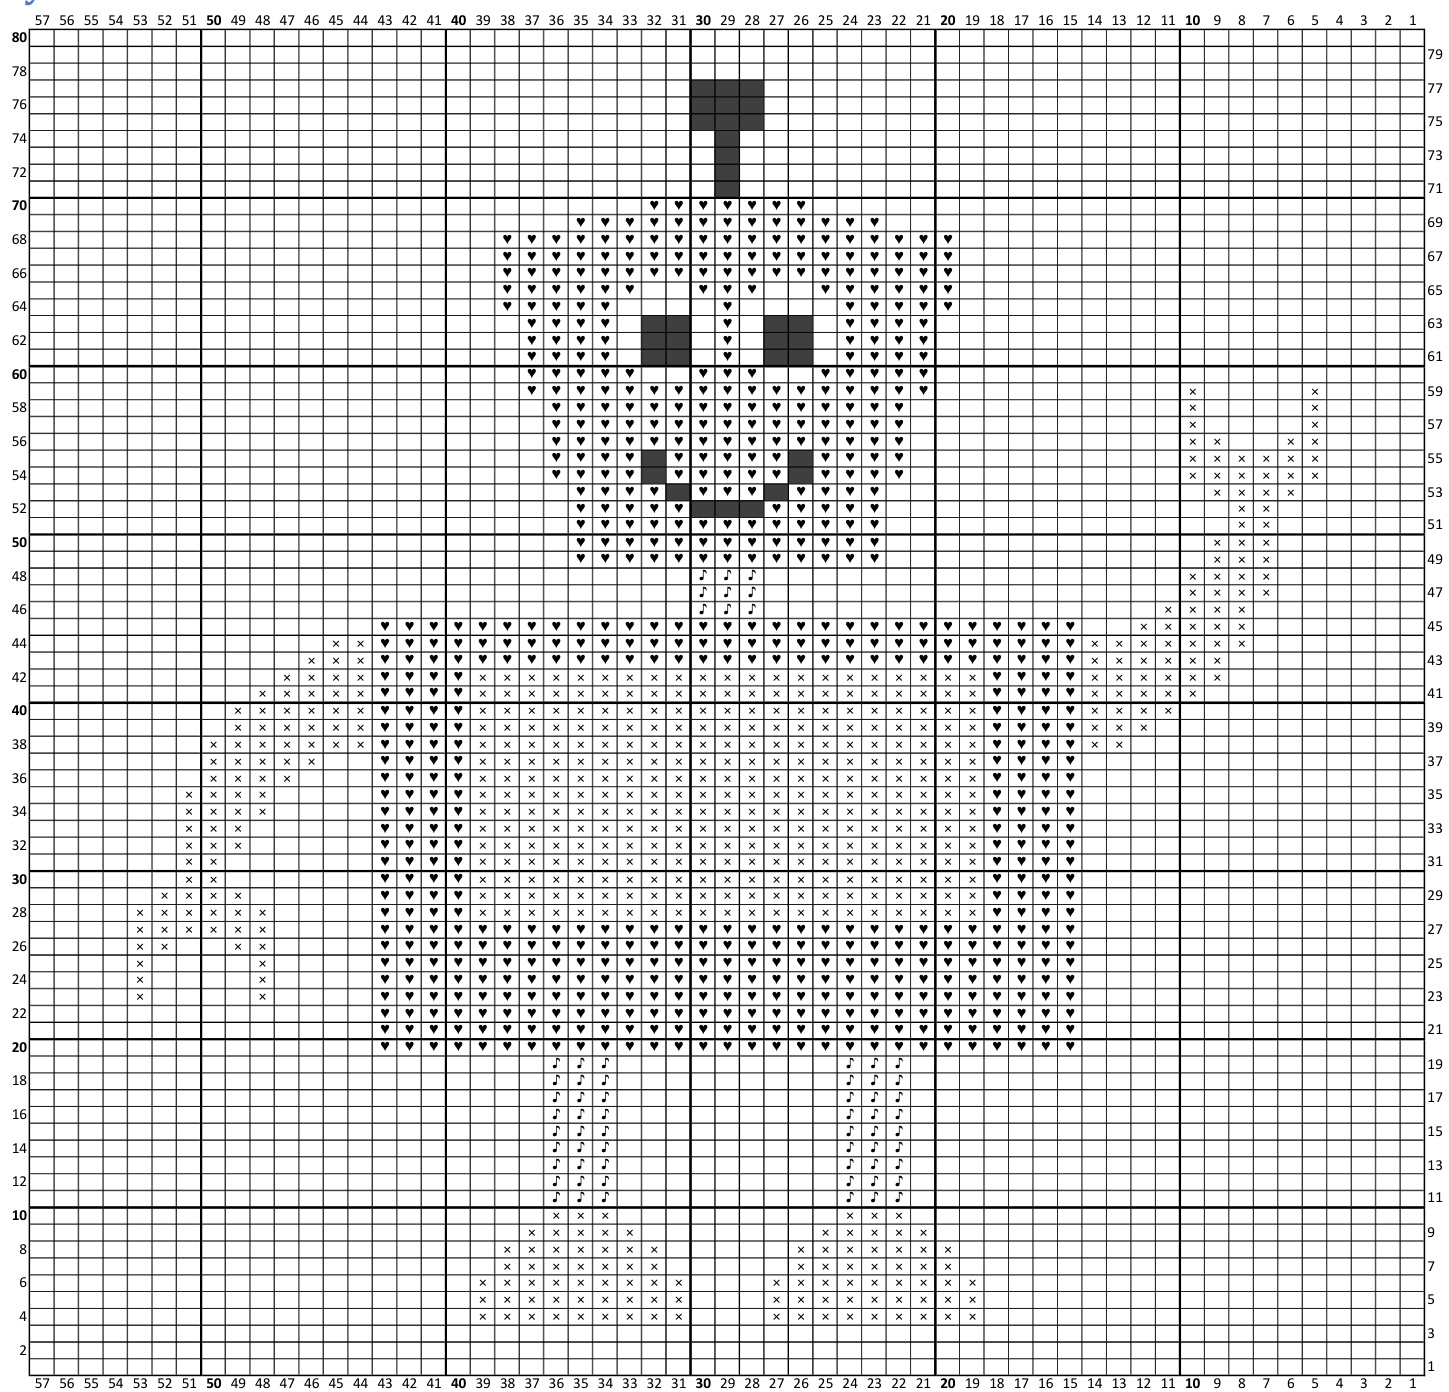
Symbol chart
Key white Red orange Yellow Black
Getting started
Choosing your yarn
For intarsia, you should choose a yarn that is not too slippery - intarsia requires a lot of ends to be darned in, and you want them to stay where you put them! On the other hand, you don't want a yarn that's too fuzzy, otherwise your stitches will merge into one another, spoiling the intarsia effect. I often use acrylic yarns and wool and wool blends. I aim for yarns that are relatively tightly spun, and would always go for plied yarns over single ply. I would not recommend something like mohair, which would be too fuzzy; cotton, which can be too splitty to darn the ends in easily; or silk yarns that are very slipery. Where possible, I would use the same yarn for all colours in a design. If this is not possible, I would aim for all the colours to have the same composition, and for all colours to have very similar strand widths. Remember, you don't have to use the same colours as I have; feel free to use whatever colours you like - this project is perfect for using up scraps.
Gauge
For this tutorialI have deliberately chosen a design where gauge will not be critical - the design features only straight lines, and gentle diagonals. If your gauge varies from that stated the design will come out a little taller or shorter, but the picture will still look like a robot. You want to aim for a fabric that is not too loose or too tight. If your fabric is too loose you'll struggle to darn all the ends in neatly, and if it's too tight the individual stitches may get distorted at the interfaces between colours. Gauge is much more critical if a design features curves, or images that are symmetric along the diagonal. In general, with intarsia designs, your gauge should either match that in the pattern, or the ratio between the number of stitches and rows per unit length should match that in the pattern. For example, if the pattern states a gauge of 22 sts and 32 rows to 4 inches (10 cm), the ratio is 22/32 = 0.6875 sts per row. Therefore if you have a stitch gauge of 20 sts per 4 inches, you will require a row gauge of 29 rows per 4 inches (20/0.6875 \~ 29). If your gauge is much tighter (more stitches per 4 inches) than that stated in the pattern you will use less yarn than listed; if your tension is much looser (fewer stitches per 4 inches), you will use more.
Coloured vs. symbol charts
This pattern features two charts: one coloured, one with symbols. Which one you use is entirely up to you; if you work from a laptop or tablet screen, or have a colour printer, the coloured chart should be fine, however, if you work from a black and white screen, e.g. an e-reader, or like to print your charts and don't have access to a colour printer (or you like to save your coloured ink) you'll probably prefer working from the symbol chart.
Preparing your yarn
Before you cast on an intarsia design, you should prepare your yarn by winding it into manageable lengths. For very small areas (up to about 10 sts), using a loose length of yarn should be ok. For larger areas, you should either wind your yarn into butterflies, or onto bobbins. I like to use plastic bobbins; they are relatively inexpensive and last forever. Alternatively you can make your own cardboard bobbins (just cut out a piece of card so that it looks like the plastic bobbins shown below); they don't last as long, but are fine if you only intend doing intarsia occasionally.
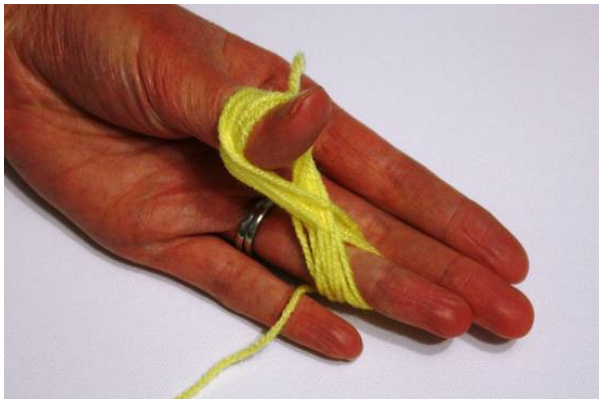
Figure 1: Butterfly your yarn by winding in a figure of eight between your thumb and third finger
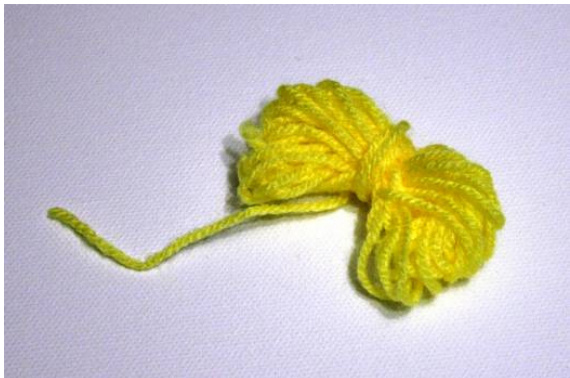
Figure 2: Cut your yarn and wrap the tail around the middle of your butterfly
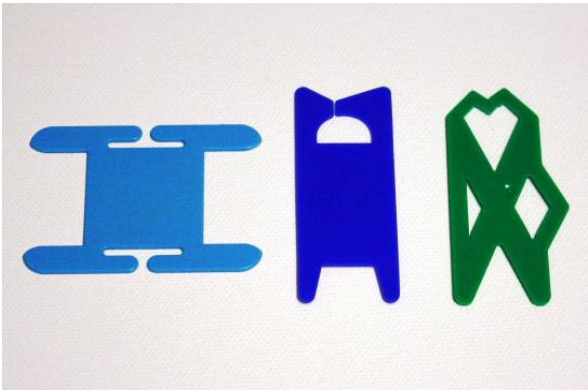
Figure 3: Examples of plastic bobbins You need one bobbin per area of colour in any given row. If you have an area of colour that starts a few rows after the last time that colour was used, you'll be able to reuse the previous bobbin. You'll also need to remember to wind bobbins for the background. For this square you will need the following bobbins: · 4 x white (minimum; you're likely to need more than this as 4 bobbins won't hold enough yarn for the whole of the background) ·3xyellow ·2 x orange · 2 x red + 1 long length of red ·The black areas will be completed using Swiss darning (duplicate stitch), so you don't need to wind bobbins for these details
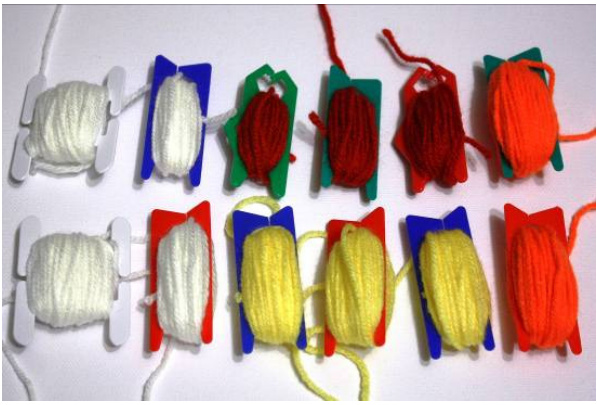
Figure 4: Bobbins ready for use
Knitting the design
Reading the chart
When reading the chart, odd numbered rows are knitted and are read from right to left; even numbered rows are purled and read from left to right. Each square represents an individual stitch, with the square's colour or symbol indicating what colour the stitch should be. Example: Row 1: K57 white. Row 2: P57 white. Row 3: K57 white. Row 4: P18 white, P9 yellow, P3 white, P9 yellow, P18 white.
Joining new yarns
Leaving a tail at least 4 inch (10 cm) long, work the next stitch in the new colour, then pass the old colour over the new yarn. Continue working in the new colour.
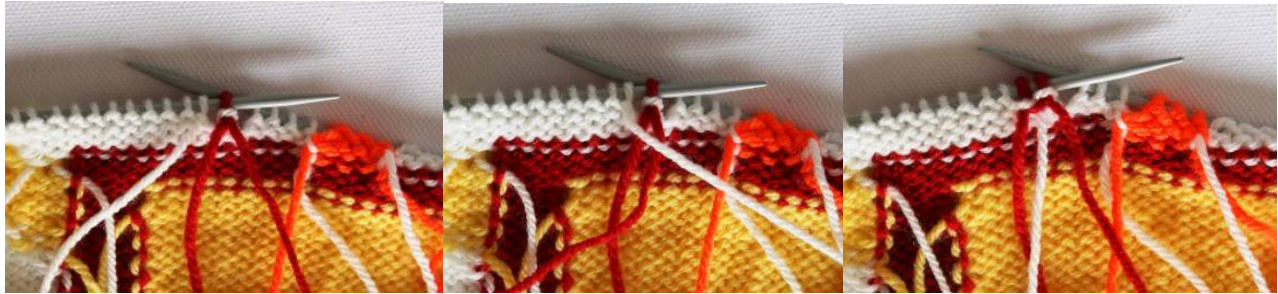
Figure 5: Starting a new yarn. Leaving a 4 inch (10 cm) tail, work the first stitch in the new yarn. Pass the tail from the old yarn over the new yarn, then work the next stitch in the new yarn
Working with bobbins
Using bobbins helps to keep the yarns contained and stops them getting tangled. The key to using them is to only unravel the yarn as you need it, otherwise the yarn will still get tangled!
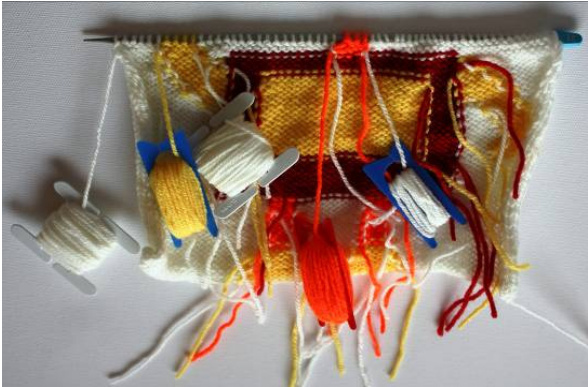
Figure 6: Keep your bobbins close to your work
Changing colours
When you change colours within a row, you need to 'twist' the yarns together to prevent holes from forming between the colours. This is simpler than it sounds, and actually just involves bringing the new yarn up under the old yarn to make the new stitch so the new and the old yarns interlink.
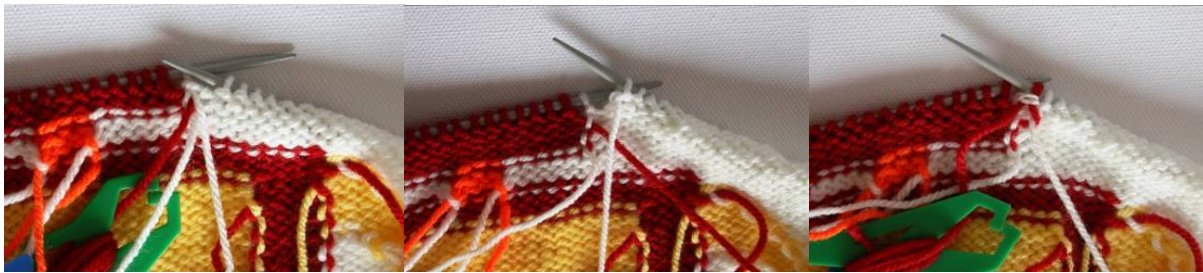
Figure 7: Changing colour: Bring the new yarn (red) up under the old yarn (white) and work the next stitch in the new colour (red)
Stitch tensioning
When making the first stitch in a new colour, be careful not to pull the yarn too tightly, especially when working diagonals.
Carrying yarns
When working intarsia, I wouldn't recommend carrying the yarn across more than 3-4 stitches; if you need to carry yarn further than this, you should break the yarn and rejoin a new length.
Keeping track of where you are
You may wish to use a chart row marker; you can buy special magnetic row markers, but masking or washi tape works just as well. If you do wish to use a row marker, use it to cover the rows that you are still to work, rather than the rows you have already worked. This will allow you to see how the row you are currently working fits with the rows you have already worked. I'd recommend checking your work every couple of rows to make sure that what you've worked is correct - there's nothing more frustrating than realising you've made a mistake 20 rows earlier!
Finishing
When you cast off and remove your knitting from the needles, you may find that it doesn't look perfect. With intarsia, the finishing is very important, and once you've done these steps your square willook great.
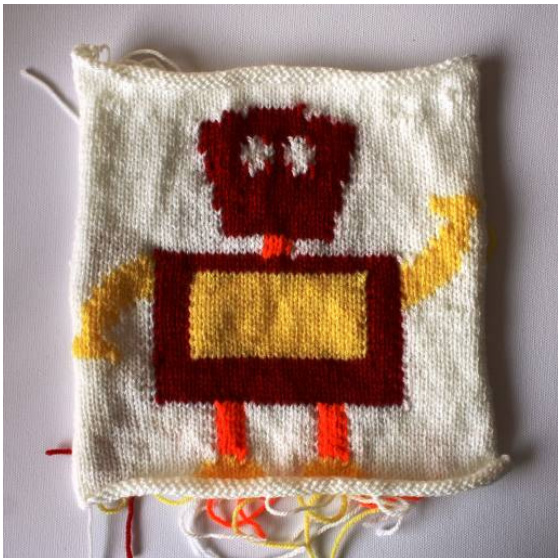
Figure 8: Robot square fresh off the needles
Darning in ends
The downside of intarsia is that the technique does create a lot of ends. It might be tempting just to leave these and hide the ends with a backing, but if you plan on using the finished object the ends will become loose over time and all your hard work will be spoiled.
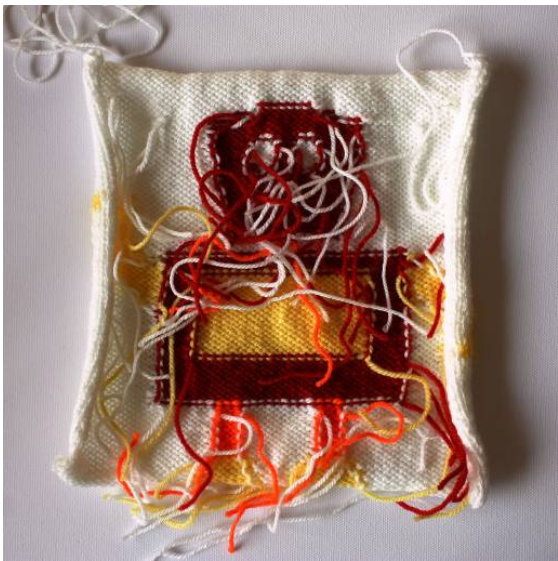
Figure 9: Lots of ends Ends should be darned into regions of the same colour as the end you're darning in; this means that you won't be able to see the ends from the right side. If you look closely at the back of the stitches at a colour change, you will see which direction you need to pull the thread in to tension the stitch. The yarn should be darned in in the direction that tensions the stitch, otherwise your stitches are likely to loosen over time. When darning in the ends, you should use a sharp needle and run the end through a few stitches, splitting the stitches as you go, then pull the yarn through. Make sure you don't pull the thread so hard that it distorts the stitches; you may wish to give the fabric a gentle stretch to make sure that it maintains its mobility. Once you've run the tail through in one direction you may wish to run it back through a few stitches in the other direction to fully secure the tail, before trimming off any remaining yarn. I generally leave a tail of around % inch (1 cm) long to prevent the end from poking through the fabric over time.
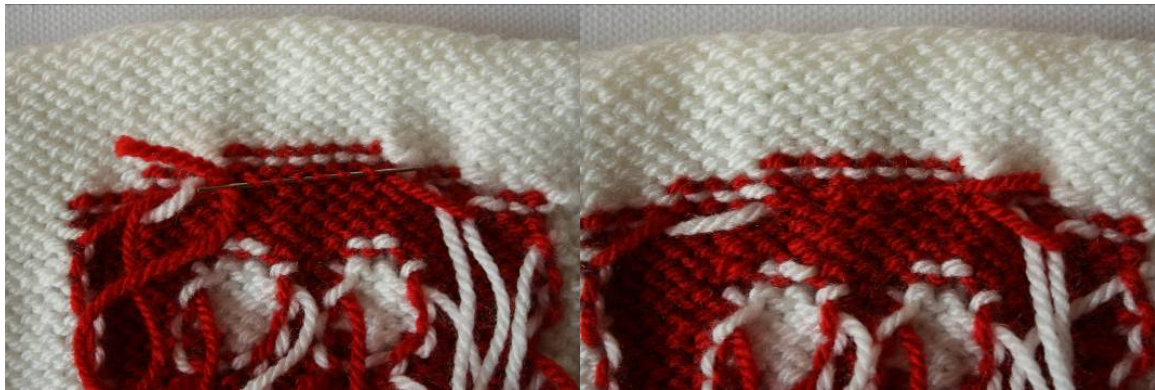
Figure 10: Darning in ends: use a sharp needle and weave the ends into areas that are the same colour as the end
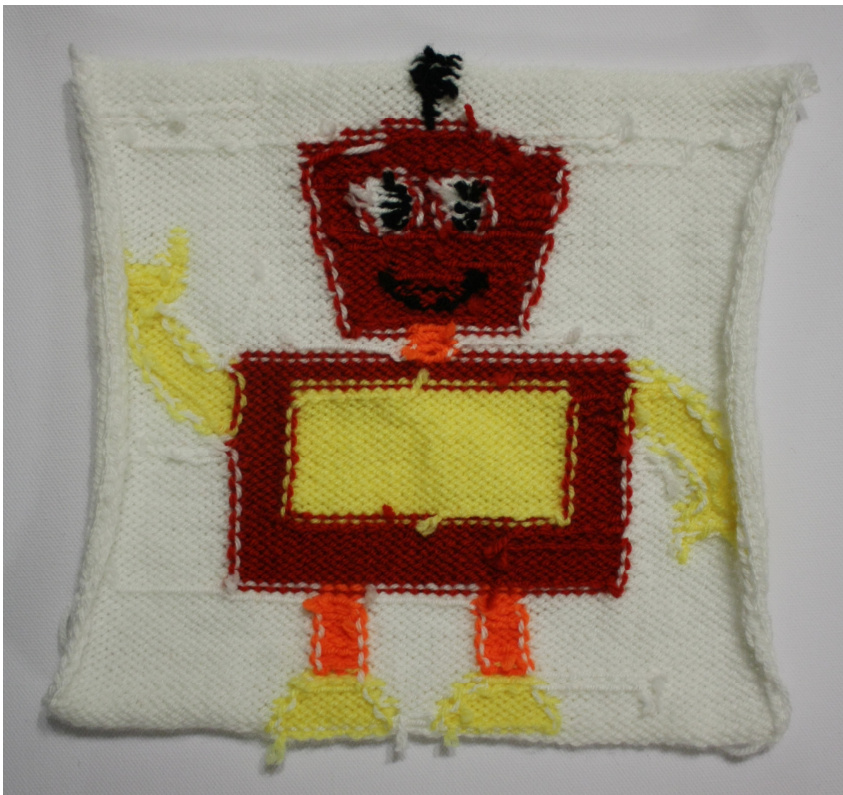
Figure 11: Ends all darned in
Swiss darning/duplicate stitch
Sometimes it is easier to use duplicate stitch for some areas of colour than it is to knit them in. I tend to use duplicate stitch for the following types of area: 1. Single isolated stitches 2. Very small areas of colour 3. Columns that are only one or two stitches wide Duplicate stitch works best when a darker colour is added over a lighter colour. In this pattern I used duplicate stitch for the robot's pupils, mouth, antenna and hands.
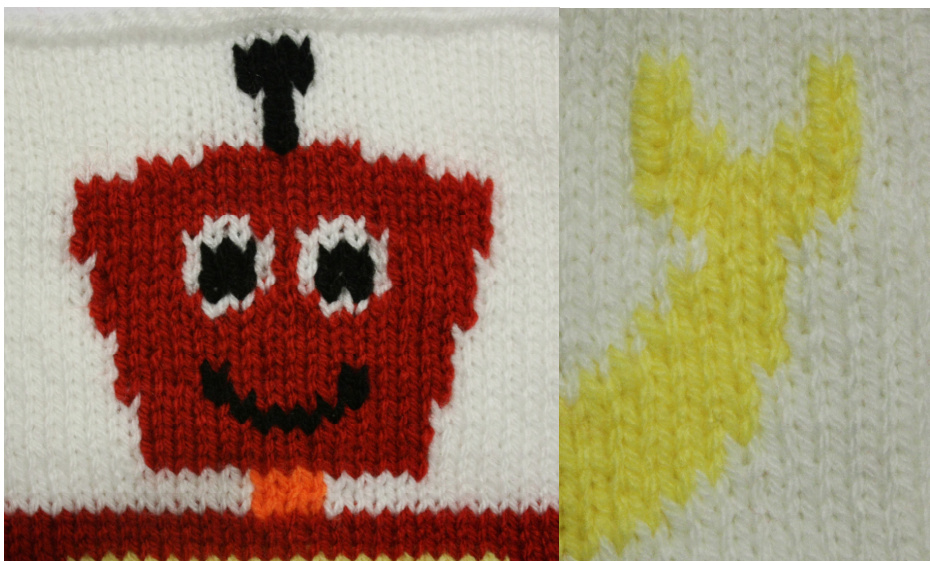
Figure 12: Robot's antenna, pupils, mouth and the tips of the hands were added using Swiss darning You should refer to the chart to work out where to position the duplicate stitches, e.g. for each pupil you require 6 duplicate stitches. Start by threading a blunt needle with yarn of the appropriate colour. Bring the needle from the back of the work to the front through the gap at the bottom of the V-shape of the stitch you wish to darn over. Pass the needle under both legs of the V-shape of the stitch above, then pass the needle through the gap at the bottom of the stitch, this time from front to back. This completes one stitch. Repeat this process for each stitchyou wishto cover.
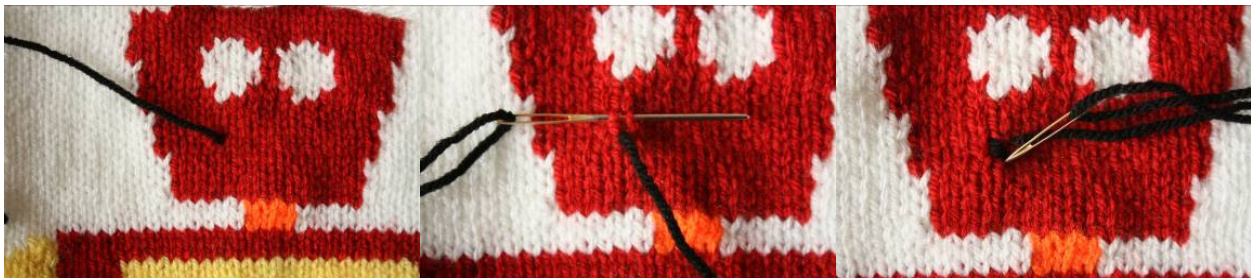
Figure 13: Use duplicate stitch for the features
What to do with your finished square
This square is designed as a square for a blanket, so the obvious thing to do with it is to make lots more squares, then stitch them all together. But that's not the only thing you could do; here are just a few examples: Stitch it onto a plain jumper or bag Turn it into a pocket Frame it and hang it on a wall Use it as a blanket for a cuddly toy (which is what happens to most of my squares, my son claims them before I can do anything else with them!) Use it as a wash cloth If you want to use your square as a standalone piece, you may wish to add a border. To do this, use a long circular needle (or two circular needles if you prefer) the same size as the one you used to knit your square, and, starting at the top right corner of the square, pick up and knit one stitch for every stitch along the top edge, pm, pick up and knit three stitches for every four rows along the left hand edge, pm, pick up and knit one stitch for every stitch along the bottom, pm, and pick up and knit three stitches for every four rows along the right hand edge, pm. Round 1: K all stitches. Round 2: [kfb, K to one stitch before marker, kfb, slm] to end. se two rounds until the border is the desired width. Cast off all stitches loosely, knitwise.
Blocking
Acrylics
Acrylics are best blocked using steam blocking. First of all, wash the square, following the washing instructions on the ball band. Then steam block your square, pinning the square out to the required dimensions, then using a steam iron to gently steam the square, using your hand to smooth out the stitches. Take great care not to let the iron touch the square as the acrylic will melt. Using this method will stop the square from curling and make it look more even.
Wool and wool blends
Wool and wool blends are best wet blocked. Simply wash your square as described on the ball band, then pin it out to the dimensions specified and leave it to dry.
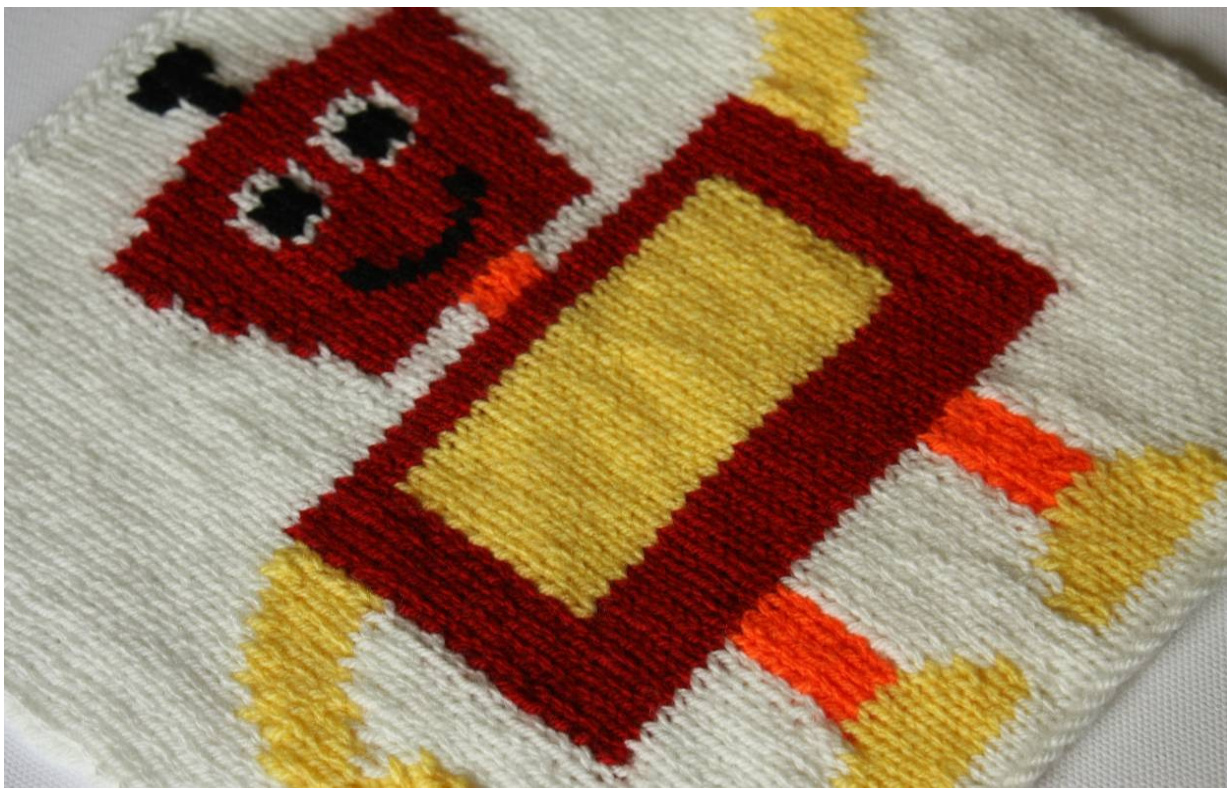
Figure 14: Stand back and admire
Copyright
@Copyright 2015, Vikki Bird. All rights reserved. You are welcome to sell what you make using my patterns. Please include a link or reference to my shop (http://www.ravelry.com/designers/vikki-bird) for the pattern. This pattern is copyright protected; it should not be reproduced, redistributed, or displayed publicly in any way.


