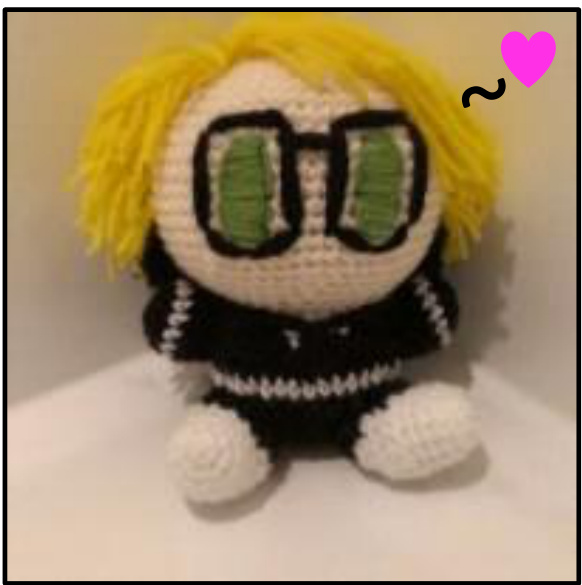
Ronald Knox Plushie
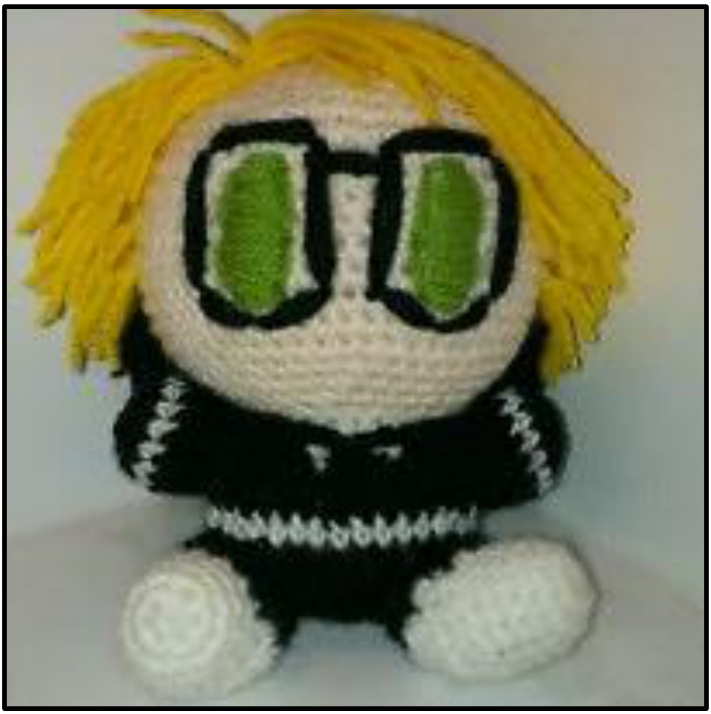
I have always loved Ronnie. He is just so adorable and cool all at once! That is why I decided to make this very cute version of him as a tribute to his cute nature. This doll is based on Ronald Knox the Shinigami (re: grim reaper) from the second Kuroshitsuji (re: Black Butler) musical, The Most Beautiful Death in the World. I think everyone sometimes needs someone cool and cute to steal their heart away. Disclaimer: I do not own this character or the anime/manga/musicals that he comes from (though I wish I did..l)
Materials:
Worsted weight acrylic yarn: 1 x 5Og each of white (W), black (B), flesh (F), yellow (Y) and green (G) 4mm crochet hook Stuffing
Size:
16cm high (approx. 6in)
Method:
Note: the spiral method is used for this doll (means no joining at the end of rounds!) I would recommend using a stitch marker to mark the end of round. Also, the section about making the hair is probably confusing, but read it through completely before you start that step and you should understand it if you are a slightly experienced crafter. The method is the same as used on the amigurumi Coraline Doll found at: http://amigurumitogo.blogspot.ca/2011/06/revised-crochet-coraline-dollpattern.html
Head:
Round 1: Using F, chain 2. Work 6 dc into 2nd chain from hook. 6 sts. Round 2: 2 dc into each dc. 12 sts. Round 3: (2 dc in next dc, dc into next dc) repeat around. 15 sts. Round 19: (dc into next 8 dc, dc 2 together) repeat around. 54 sts. Round 20: (dc into next 7 dc, dc 2 together) repeat around. 48 sts. Round 21: (dc into next 6 dc, dc 2 together) repeat around. 42 sts. Round 22: (dc into next 5 dc, dc 2 together) repeat around. 36 sts. Round 23: (dc into next 5 dc, dc 2 together) repeat around. 30 sts. Break yarn, leaving a long tail for sewing.
Body:
Round 1: Using B, chain 2. Work 6 dc into 2nd chain from hook. 6 sts. Round 2: 2 dc into each dc. 12 sts. Round 3: (2 dc into next dc, dc into next dc) repeat around. 18 sts. Round 4: (2 dc into next dc, dc into next 2 dc) repeat around. 24 sts. Round 5: (2 dc into next dc, dc into next 3 dc) repeat around. 30 sts. Round 6: (2 dc into next dc, dc into next 4 dc) repeat around. 36 sts. Round 7: (2 dc into next dc, dc into next 5 dc) repeat around. 42 sts Round 8: Dc around. At last stitch, change to W. 42 sts. Round 9: Dc around. At last stitch, change to B. 42 sts. Round 10: (dc into next 5 dc, dc 2 together) repeat around. 36 sts. Round 11: Dc around. 36 sts. Round 12: (dc into next 4 dc, dc 2 together) twice, dc into next 4 dc, change to W, dc 2 together, dc in next dc, change to B, dc in next 3 dc, (dc into next 4 dc, dc 2 together) repeat to the end of round. 30 sts. Round 13: Dc into next 14 dc, change to W, dc into next 4 dc, change to B, dc to the end of round. 30 sts. Round 14: Dc into next 12 dc, change to W, dc into next 6 dc, change to B, dc to the end of round. 30sts. Break yarn, leaving a long tail for sewing.
Arms (make 2):
Round 1: Using B, chain 2. Work 6 dc into 2nd chain from hook. 6 sts. Round 2: 2 dc into each dc. 12 sts. Round 3: (dc into next 3 dc, 2 dc into next dc) repeat around. At last stitch, change to W. 15 sts. Round 4: Dc around. At last stitch, change to B. 15 sts. Round 5 - 7: Dc around. Break yarn, leaving a long tail for sewing. Legs (make 2): Round 1: Using W, chain 2. Work 6 dc into 2nd chain from hook. 6 sts. Round 2: 2 dc into each dc. 12 sts. Round 3: (dc into next 3 dc, 2 dc into next dc) repeat around. 15 sts. Round 4 - 5: Dc around. 15 sts. Row 6: Dc into next 12 dc, chain 1, turn. 12 sts. Row 7 - 8: Repeat row 6. 12 sts. Row 9: (dc into next 2 dc, dc 2 together) repeat to end of row, chain 1, turn. 9 sts. Row 10: (dc into next dc, dc 2 together) repeat to end of row, chain 1, turn. 6 sts. Row 11: (dc into next dc, dc 2 together) repeat to end of row, turn (no chain 1). 4 sts. Round 12: Dc around the opening you have created. Altogether, 15 st Round 13: Dc around. 15 sts. Break yarn, leaving a long tail for sewing. Making up Stuff and sew the head, body and limbs as shown in the picture. Using the G and satin stitch, embroider the eyes as shown. With B, embroider the glasses with backstitch. For the tie, use B and crochet hook, chain long enough to wrap around the neck 2 times. Finish off and tie the length of chain stitches around his neck, using the starting and finishing threads to sew it in place. For the hair, I like to use the same method as if you were to put tassels on the ends of a scarf, using a crochet hook and one strand of yarn at a time. I start the hairline in line with the shoulder and one row above where the head and body meet. First, cut lengths of B yarn, approximately 4cm long. Using a crochet hook inserted from top to bottom of a stitch, loop the yarn around the hook and pull the loop through like a normal stitch. Pull the two ends of the yarn through the loop. I repeat this for every stitch around the head where the bottom row of hair will be. I put three rows of this using B, skipping a row of dc in between the rows of hair. I then use Y yarn, using the same method, working up until the hair is about in line with the top of his glasses. I then cut 15cm lengths of Y yarn and lay these across the top of his head, covering any bits of skin there. I sew this in place with a few stitches (as shown in picture). The last and final step: trimming. This is really fun! Trim his hair into Ronald's trademark style, trying to create that slightly spiky look. I recommend using a reference picture for this. And now you're done! I hope you had fun creating your own little Ronald Knox!