Samantha Backpack
by Deb Barnhill Modeled by Sarah Barnhill Like her namesake, Samantha is fun, fearless, and loves to toot around town. This plucky gal will carry you from season to season with ease. Noro Kureyon comes in dozens of delicious colour variations and is a felter's favourite.
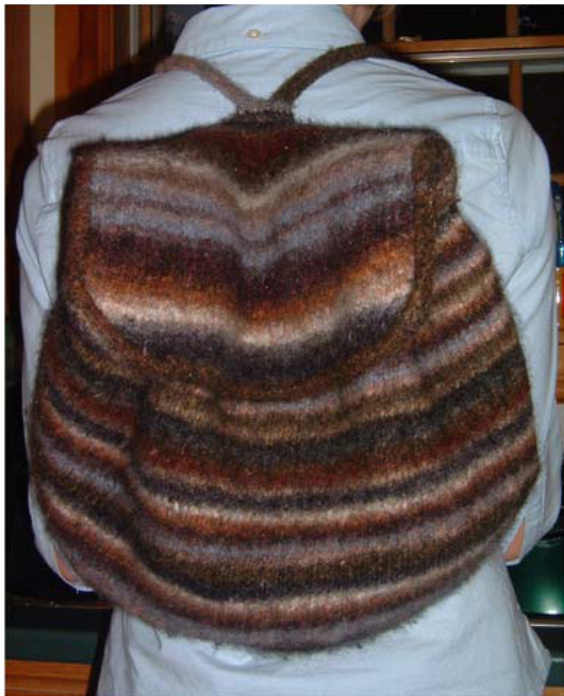
Samantha is knit seamlessly from a double-sided cast on, with short rows shaping her semicircular base. All components are knit directly onto her before felting, eliminating the need for sewing, seaming and measuring for strap placement.
Size
One. Approximate height after felting 11 inches; circumference 29 inches.
Pattern Notes
There are as many was to felt as there are shades of this lush yarn. A simple web search will yield dozens of means to achieve Samantha's dense, fuzzy, muted stripes. Fortunately, the yarn felts readily and generously, so play and have fun!
Materials
Six skeins Noro Kureyon? ( $100\%$ wool, $100\,\mathrm{m}$ per $50\;\mathrm{g}$ skein) 2 circular needles, Us $10.5\,/\,6.5\,\mathrm{mm}$ Stitch holders and markers as desired
Pattern
Using the provisional cast-on of your choice, cast on 81 stitches. Do not join in round. Knit across to last 2 stitches, knit 2 together. 80 stitches on needle, which now rests. Slip these stitches onto a holder if you wish. Turn work. “Unzip" the remaining 80 stitches from their provisional chain onto a needle and work short row base as follows: First row: k53, k2 tog, k1, turn Second row: sll, p29, p2 tog, pl, turn Third row: sll, k30, k2 tog, kl, turn Fourth row: sll,p31, p2 tog, pl, turn Fifth row: sl1, k32, k2 tog, k1, turn Continue in this manner, on each row working one more stitch between the beginning sll and the k2 or p2 together. Each time you work 2 stitches together, you are working the last stitch from the working needle and the first stitch of the unworked stitches on the left needle. Once all of the stitches have been worked onto the “middle” needle, you will be at the end of a knit row and you will have 55 stitches on your needle. These stitches form the back surface of the backpack. Turn your attention to the 80 stitches on the resting needle. These form the curve that will sit away from your body and will hereafter be referred to as the front stitches. Work 3 stitch applied i-cord edging around the front stitches. Work an additional i-cord repeat where the ssk is worked with the last stitch from the front needle and the first stitch from the back needle. Slip the 3 i-cord stitches back onto the left needle. Knit across the 57 stitches on the left needle. Pick up 2 stitches from the cast-on edge of the i-cord. Your back surface now has 59 stitches. You will now begin working in the round. Pick up and knit 80 stitches along the front surface's i-cord edge.
Place bottom strap anchors:
k10, [knit and purl into the same stitch] x 5, k29, [knit and purl into the same stitch] x 5, k10. Knit 80 stitches around front surface. k10 [sll onto a piece of waste yarn at front of work (bag's outside surface), kl] x 5, k29, [sll onto a piece of waste yarn at front of work, kl] x 5, k10. Place marker. Knit 80. Place marker. You now have 159 stitches blooming from a semicircular base trimmed by an i-cord on the curved edge. The straight edge has stitches waiting for the effortless addition of straps. Markers delineate the front and back surfaces.
Work backpack body:
Knit in the round until work from top of i-cord edge measures 16 inches, ending with back surface stitches ready to work.
Place cincher anchors:
k5, [knit and purl into the same stitch] x 3, k43, [knit and purl into the same stitch] x 3, k5 Knit 80 stitches around front surface. Next round: k5, [kl, sll onto a piece of waste yarn at back of work (bag's inside surface)] x 3, k43, [kl, sll onto a piece of waste yarn at back of work] x 9,k5
Work front gathering row:
[k8, k2 tog, yo] x 3, k20, [yo, k2 tog, k8] x 3 Place top strap anchor on back: k25, [knit and purl into the same stitch] x 9, k to end of round Next round: $_{\mathrm{k}25}$ , [sll onto a piece of waste yarn at front of work (bag's outside surface), k1] x 9, k25 Work 2 rounds Work front 80 stitches, slipping them onto a holder or spare needle to rest.
Work top flap:
First row: sll, k to end of row Second row: sll,p to end of row Repeat first and second rows 14 more times.
Work top flap shaping:
First row: sll, k57, ml, kl, turn Second row: sll, p57, ml, pl, turn Repeat these rows 11 more times. Work first row once more, omitting turn.
Work top and flap edging:
Knit the 12 stitches remaining on left needle. Pick up and knit 16 stitches along side of flap. Place marker. Knit 80 front stitches from holder or spare needle. Pick up and knit 16 stitches along opposite side of flap. Knit around to marker. Work 3-stitch applied i-cord edging. Graft ends of i-cord together.
Make cinchers:
Transfer 3 anchor stitches to a needle. Work 25 inches 3-stitch i-cord. Cast of and break yarn. Repeat on other side.
Make and join straps:
With back surface of bag facing you, select the strap anchors on the left. Transfer them to a needle and work 25 inches 5-stitch i-cord. Break yarn but do not cast off. Transfer stitches from opposite strap anchor to a needle and work 25 inches 5-stitch i-cord. Knit across 4 stitches from right i-cord strap. Knit together the last stitch from this strap and the first stitch from the other strap. Knit to end of other strap. 9 stitches on needle. Purl 1 row. Break yarn, leaving a tail of sufficient length to graft to top anchor stitches.
Anchor straps:
Transfer top strap anchor stitches to a needle. Graft to top of straps.
Finishing
Work in all ends. Felt as desired. Blocking may take some creativity. Lay the bag on her back surface and nudge into the desired shape. I had best success propping her open with a large beanbag-type ball from my kids' toy chest. When Samantha is dry, weave each cincher through its three corresponding gathering holes, ending with the cinchers at the front of the backpack. Cut them shorter if desired, bearing in mind that when taking Samantha out on the town you will want to make a slipknot in each cincher or tie them together in a bow to secure her contents. She is not one for being left at home!


