Starz
Felted star hat with points
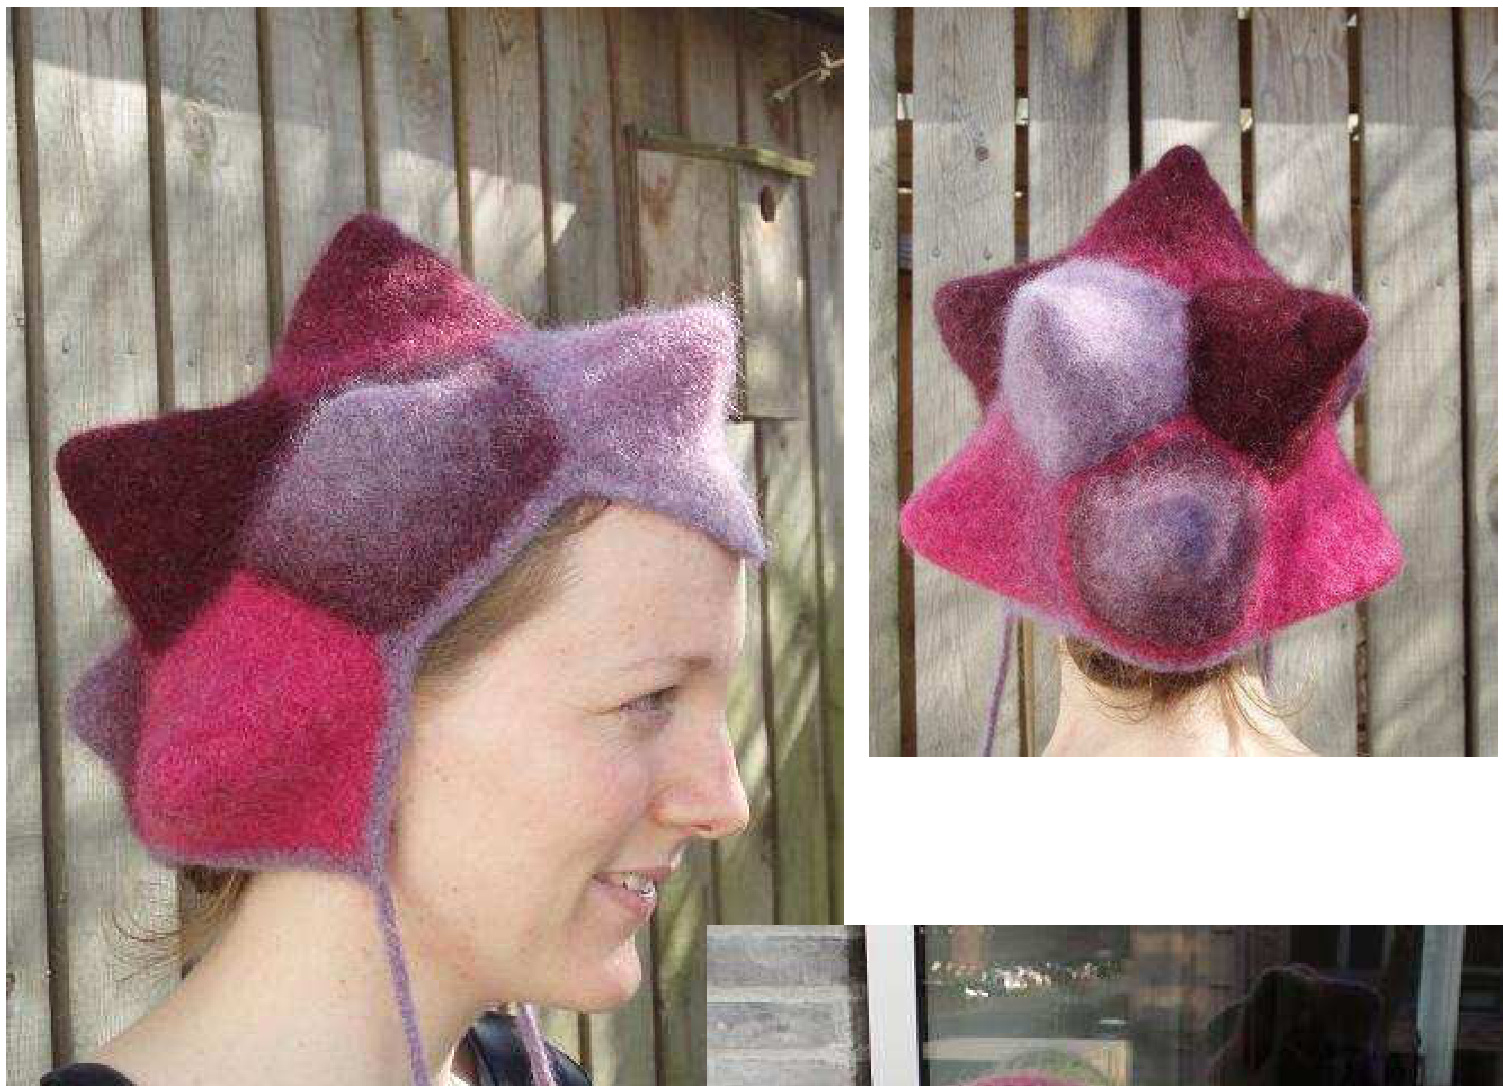
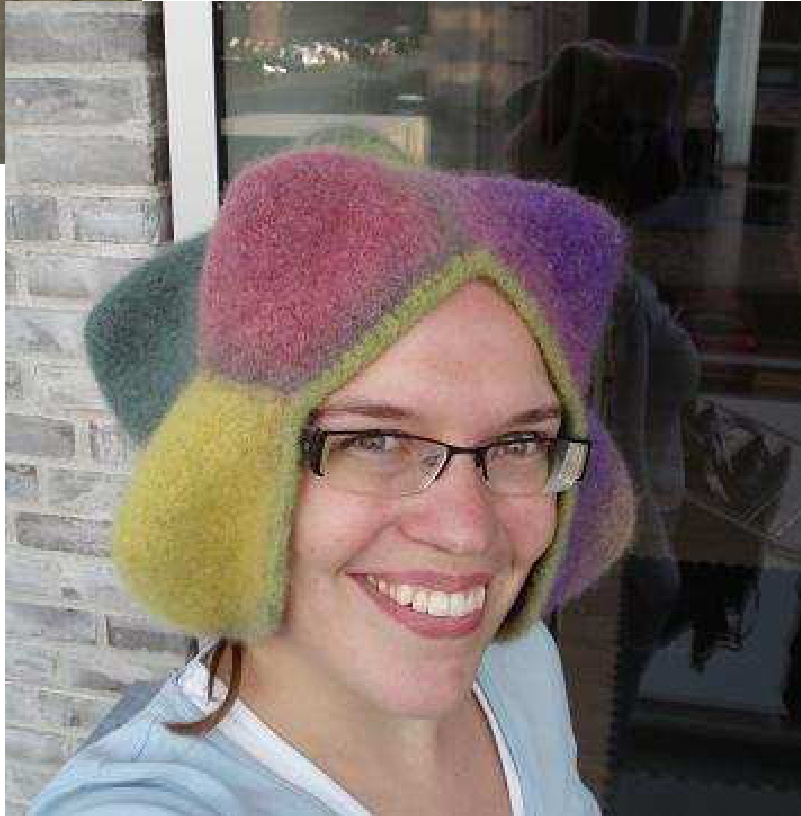
The pink hat is version 2, the "devil's peak", while the green/purple/pink is version 1 (open forehead)
This is a Lykkefanten design. Full pattern help is available. For questions, please write to: lykkefanten@hotmail.com
About the inspiration and the pattern:
The hat is inspired by the mathematical form, a dodecahedron, also known as a star with twelve points, where the base of each point is a pentagon with equal sides. The hat is knit on DPNs, one point at a time. You knit the points together by picking up stitches along the sides of already established points as you go. This means the hat is constructed while you knit, and there is no seaming in this pattern. The pattern contains directions for two different versions of the Starz hat, one with an open forhead (version 1) and one with a point down the forehead (a type of “devil's peak" hat) (version 2). The pattern is complete with a drawn diagram of the placement of the points and full written directions. Size: Five sizes, XS (S, M, L) XL.
Finished measurements:
As the final product needs felting or fulling, it can be very hard to correctly give a finished size. Even so, size XS should fit a larger child, S M and L should fit normal adult sizes (around size 54-60), and XL for a big adult head (larger than size 60).
Gauge:
Both samples of the hats are knit with a gauge of 17 stitches and 24 rounds/rows for 10x10 cm in stockinet stitch. Materials: 90-150 gram Kauni multi coloured wool yarn Set of 5 DPNs, size 5mm and a 5mm crochet hook
Abbreviations:
sts - stitch(es) k-knit k2tog - knit to sts together stbl - slip 1 sts knit-wise, put sts back on left needle and knit 2 sts together through back loop sl2, k1, psso - slip 2 sts purl-wise, k1, passed the slipped sts over
Basic pattern for a point (basic point):
This basic pattern describes how a point is constructed after the cast-on/picking up of stitches. All points are made from this basic pattern. The beginning, i.e. the cast-on or the picking up of stitches are described in the sections describing each of the two versions. a. Work 4 rounds in stockinet stitch. Then start decreasing. b. \*stbl, k 7 (9, 11, 13) 15, k2tog\* repeat \*\* to the end of round $=$ 45 (55, 65, 75) 85 sts C. Work 4 rounds in stockinet stitch. d. \*stbl, k 5 (7, 9, 11) 13, k2tog\* repeat \* to the end of round $=$ 35 (45, 55, 65) 75 sts e. Work 4 rounds in stockinet stitch. f. \*stbl, k 3 (5, 7, 9) 11, k2tog\* repeat \*\* to the end of round $=$ 25 (35, 45, 55) 65 sts g. Work 3 rounds in stockinet stitch. h. Continue like this, decreasing every fourth round until there are 15 sts remaining on the needles after a decrease round. i. Work 3 rounds of stockinet stitch. Now knit: \*s2, k1, psso\* repeat \*\* to the end of round $=5$ sts J. Break the yarn and pull i through the remaining 5 sts The only difference between first point and the following 8 or 9 is that the only time the full number of base sts are cast on is when making the first point. For the following points a number of the sts are instead picked up along the edge of already existing points.
Diagram over placement of points:
The diagram below shows how to place each point in relation to the others. The ordering of the points is necessary for maximum spread of the colours on the hat. The direction for picking up stitches is marked by the small red arrows in the diagram. For version 1, you work all 10 points of the diagram, while point 9 is excluded for vesion 2.
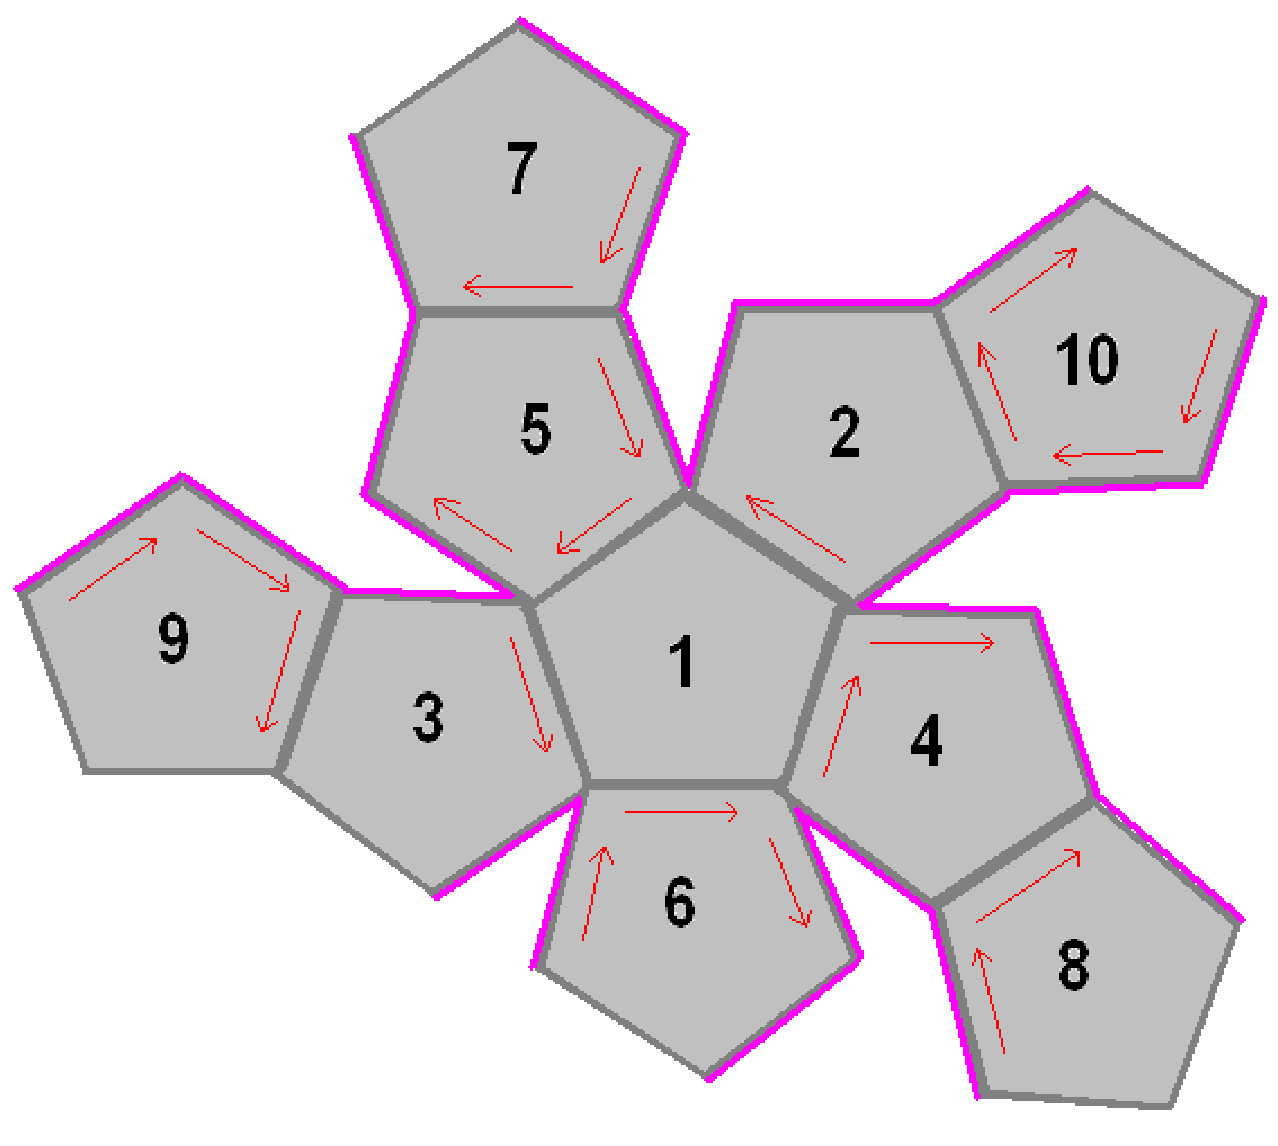
Diagram key:
Starz version 1 (open forehead):
The following directions willspread out the colour repeats to maximum effect. If you do not with this you can knit the points in any order that you like. Point 1: Cast on 55 (65 75 85) 95 sts on DPNs (with 22 (26 30 34) 38 sts on the first needle and 11 ( 13 15 17) 19 sts on each of the following). Mark the beginning of the round. Work a Basic Point. Point 2: Cast on 44 (52, 60, 68) 76 sts, and pick up the remaining 11 (13, 15, 17) 19 sts along one of the edges of Point 1. Now work a Basic Point. Point 3: Cast on 44 (52, 60, 68) 76 sts, and pick up the remaining 11 (13, 15, 17) 19 along the edge of Point 1 opposite of Point 2. Now work a Basic Point. Point 4: Cast on 33 (39, 45, 51) 57 sts. Pick up 11 (13, 15, 17) 19 sts along the sides of both Point 1 and Point 2. Now work a Basic Point. Point 5: Cast on 22 (26 30 34)38 sts. Pick up 11 (13, 15, 17) 19 sts along the sides of Point 2, Point 1 and Point 3. Now work a Basic Point. Point 6: Cast on 22 (26 30 34)38 sts. Pick up 11 (13, 15, 17) 19 sts along the sides of Point 3, Point 1 and Point 4. Now work a Basic Point. Point 7: Cast on 33 (39, 45, 51) 57 sts. Pick up 11 (13, 15, 17) 19 sts along the sides of Point 2 and Point 5. Now work a Basic Point. Point 8: Cast on 33 (39, 45, 51) 57 sts. Pick up 11 (13, 15, 17) 19 sts along the sides of Point 6 and Point 4. Now work a Basic Point Point 9: Cast on 22 (26 30 34) 38 sts. Pick up 11 (13, 15, 17) 19 sts along the sides of Point 7, Point 5 and Point 3. Now work a Basic Point. Point 10: Cast on 11 (13, 15, 17) 19 sts. Then pick up 11 (13, 15, 17) 19 sts along the sides of Point 8, Point 4, Point 2 and Point 7. Now work a Basic Point. Weave in all ends. Make two rounds of single crochet around the edge of the hat. If you like, put in plaided strings to tie under your chin. These strings should be put in Point 8 and Point 9. Felt the hat by washing it, start slowly as it is easier to felt more than the reverse (l washed mine in a front loaded at 40 degrees Celcius) If you want to make the hat even warmer, you can fill each point with some wool
Starz version 2 (devils peak):
Version 2 is worked exactly like version 1, where Point 9 is not worked. If you like, put in strings to tie under the chin. These are placed in Point 7 and Point 8 in this version. Happy knitting Karen Skriver Lauger, Lykkefanten


