Inspired by the movie, The Odd Life of Timothy Green, these socks will captivate your senses the same way Timothy captivates his new parents' hearts when he is "born" as a young boy out of the mud of their garden patch. An added bonus activity while knitting these socks would include renting the DVD and settling in to cast on the toes. Socks are knit toe-up, with contrasting yarn for toes, heels, and cuffs. If you don't have a darker green, you can do what I did, and wind off some of your sage green yarn and microwave-dye it. It's easier than you think! Check out this site:

http:/ /www.instructables.com/id/ How-to-Dye-Yarn-with-FoodColoring/ #intro Experience Level: You should be familiar with sock construction, as you will be knitting your own preferred heel and toe design. (Pattern will be subsequently updated with heel and toe instructions.) Can be knit on double points, two circulars, or one circular, and 2-at-a-time, (which is how I knit them). Yarns: Fingering/Sock weight, merino super-wash with a litle nylon for durability Cascade Yarns Heritage Solids - Sage, 80 grams (350 yards) total, of which 20 grams (90 yards) is dyed dark green with Wilton's food coloring, first dyed with Leaf Green and then with Black to darken further. If you knit a larger size, you may want to dye an additional 3-5 grams a dark green, to be sure you have enough. See heel notes, below, with more info about yardage for various heels. Remnant - White, 2 grams (10 yards) Needle & Sizing: The pattern is knit with US 1.5 (2.5 mm) 40" circular lace tip needle, on 64 stitches. This results in socks that fit a US Women's Medium, (approx. size 9) foot. The leaf pattern varies in # of active stitches per round, but the gauge and sizing stays consistent with a plain vanilla (stockinette) sock knit on 64 stitches. To adjust size, I recommend that you either use a needle size and yarn that fits you with 64 stitches, or that you increase or decrease the number of edge stitches you need to get socks that fit nicely. Since patterning is only on the front of the sock, you can use the chart and knit vine leaves into your preferred pattern and needle size. Heels & Toes: Yardages reflect socks knit with contrasting color toes, short-row heels, and cuffs. These look best with a contrasting short-row heel, but if you prefer a flap or another heel method in the main color, then note that you will need more light green main color yarn and less dark green contrasting color yarn.
Legend
Highlighted Stitches are easier to watch being knit than they are to describe in words, so I recommend viewing the videos I made for these stitches by going to Www.YouTube.com and typing into the search box Patty Joy Tutorials and the abbreviated name of the stitch.
| K | knit | |
| K2Tog | knit 2 together (knit right loop) Insert right-hand needle into the back and to the front of the right | |
| 米 | KRL | loop of stitch just below next stitch, and place it onto the left-hand needle, then knit it. (This is the increase stitch.) Now knit the first stitch on the left-hand needle. You have increased one knit stitch. |
| 小 | S2KP | (slip 2 knit pass) Slip 2 stitches together, knitwise, (so slip your right needle through the front of both stitches as if you were going to knit them together, but don't knit them!.. Slip them off the left needle, and they will now be twisted together, backwards, on the right needle), knit 1 stitch, pass the 2 twisted, slipped stitches over the stitch you just knit. You have created a double decrease, with the center stitch |
| SSK | lying neatly over the two decreased stitches. (slip, slip, knit) Slip one stitch as if to knit, slip a second stitch as if to knit, move slipped stitches back to left needle and knit them together through the back loop. | |
| P | You have decreased one stitch. | |
| P2Tog | purl purl 2 together | |
| PIP | (purl increase, purl) Find the purl loop immediately below the purl stitch on the left needle, (the previous row's purl), and insert right needle point downward into the front of this stitch. With original purl still on left needle point, put left needle tip into lifted purl stitch on right needle, from left to right, and purl through the lifted stitch. Now purl the original stitch still sitting on left needle tip. You have increased from one purl stitch to two purl stitches. | |
| PPI | (purl, purl increase) Purl one stitch. Find the purl loop two loops below the purl you just knit on the right needle, and insert the left needle point upward into that purl stitch. Insert right needle tip purlwise into lifted stitch on left needle tip and purl it. You have increased from one purl stitch to two purl stitches. | |
| YO | (yarn over) Note that a yarn over that is followed by a purl stitch will wrap all the way around the needle and come back to the front again, which uses more yarn. Snug these yarn-overs very tight to prevent a loose stitch on the next row. | |
| NS | no stitch |
Chart-reading tip: While most patterns are easier to knit with a chart, the stitch count on the front needle fluctuates between 32 and 36 stitches. For this reason, you may find using the written directions easier. If you use the chart, perhaps glance at the written directions to check the number of purl stitches that each row begins and ends with, to keep things straight and to knit faster. Avoid Laddering Tip: Note that this pattern reverses the stockinette side of the fabric such that the purl/bumpy side is outside and the smooth knit side is inside, (which does feel scrumptious on the sole of your foot, by the way!). But purls on the outside at needle-turns require you to give an extra tug when making that turn, and holding onto that yarn for the first three stitches, to keep it from loosening again. Attending to this little detail will help you avoid loose, laddering stitches in your finished socks. Cast on toes: Using your preferred needle(s) and toe pattern, cast on toes with dark green and knit/increase toes until you have 64 stitches. (Magic Loop: 32 stitches on front and back of each sock). Begin pattern: Join light green and knit first round. Follow Section A written or charted directions for sock fronts, and purl sock backs. To shadow pattern, right sock begins with Row 1 and left sock begins with Row 13. Knit in pattern until you are ready to knit short-row heel. Begin contrasting color short-row heel: Do not cut light green yarn, but rather join dark green at beginning of first short-row on back of sock. Knit short-row heel, until you come to the last row, when you will pick up light green yarn at right side of heel and knit across last row of heel. Continue knitting around to front-of-sock patterning again. IMPORTANT! Don't knit pattern right up to the cuff! This pattern includes both written and charted directions to create socks that end nicely at the cuff without the half-leaf and random vine leading into the cuff that you would ordinarily get if you simply followed Chart A. (I know, crazy, but it took me extra time and effort to write and chart the pretty vine to avoid this problem, so I hope you enjoy knitting it this way!) Stop knitting three leaves, (1 1/2 pattern repeats), before you are ready to start the cuffs. To determine when you only have 3 leaves to go, simply fold the sock in half at the short-row heel, and stop knitting when you can see three more leaves visible on the foot of the sock than you can see on the calf. Don't worry if your folded-in-half sock falls partway between a leaf. Just finish knitting the leaf you're on, and end after knitting Row 12 for one sock and Row 24 for the other. Then move on to written and charted directions in Charts B and C.
Chart A - begin right sock on Row 1 and left sock on Row 13
Set-up row: knit one round with light green (main) color Note: after knitting first set-up round, the directions below indicate knitting on front of sock only. Back of sock is always purled, except for the short-row heel, which is done in knit stitch with dark green contrasting color. RoW 1: P12, K3, P4, K5, P8 (32) Row 2: P10, P2Tog, KRL, K2, P4, K2, YO, K1, YO, K2, P8 (34) Row 3: P11, K1, P1, K2, P4, K7, P8 (34) RoW 4: P9, P2Tog, K1, PIP, K2, P4, K3, YO, K1, YO, K3, P8 (36) Row 5: P10, K1, P2, K2, P4, K9, P8 (36) Row 6: P8, P2Tog, K1, PIP, P1, K2, P4, SSK, K5, K2tog, P8 (34) Row 7: P9, K1, P3, K2, P4, K7, P8 (34) Row 8: P7, P2Tog, K1, PIP, P2, K2, P4, SSK, K3, K2Tog, P8 (32) Row 9: P8, K1, P4, K2, P4, K5, P8 (32) Row 10: P8, YO, K1, YO, P4, K2, P4, SSK, K1, K2Tog, P8 (32) Row 11: P8, K3, P4, K2, P4, K3, P8 (32) Row 12: P8, (K1, YO) twice, K1, P4, K1, KRL, P2Tog, P2, S2KP, P8 (32) Row 13: P8, K5, P4, K3, P12 (32) Row 14: P8, K2, YO, K1, YO, K2, P4, K1, KRL, K1, P2Tog, P10 (34) Row 15: P8, K7, P4, K2, P1, K1, P11 (34) Row 16: P8, K3, YO, K1, YO, K3, P4, K2, PPI, K1, P2Tog, P9 (36) Row 17: P8, K9, P4, K2, P2, K1, P10 (36) Row 18: P8, SSK, K5, K2Tog, P4, K2, P1, PPI, K1, P2Tog, P8 (34) RoW 19: P8, K7, P4, K2, P3, K1, P 9 (34) Row 20: P8, SSK, K3, K2Tog, P4, K2, P2, PPI, K1, P2Tog, P7 (32) RoW 21: P8, K5, P4, K2, P4, K1, P8 (32) Row 22: P8, SSK, K1, K2Tog, P4, K2, P4, YO, K1, YO, P8 (32) RoW 23: P8, K3, P4, K2, P4, K3, P8 (32) Row 24: P8, S2KP, P2, P2Tog, K1, KRL, P4, (K1, YO) tWice, K1, P8 (32) Begin written or charted directions for Charts B and C. If knitting 2-at-a-time, you will use written/charted B and C directions simultaneously for the appropriate, corresponding sock where the vine pattern will continue/flow, (shadowed left and right), so that the vines end prettily before starting the cuffs. If you are knitting one sock at a time, use the appropriate written/charted B or C directions to complete the patterning on each sock.
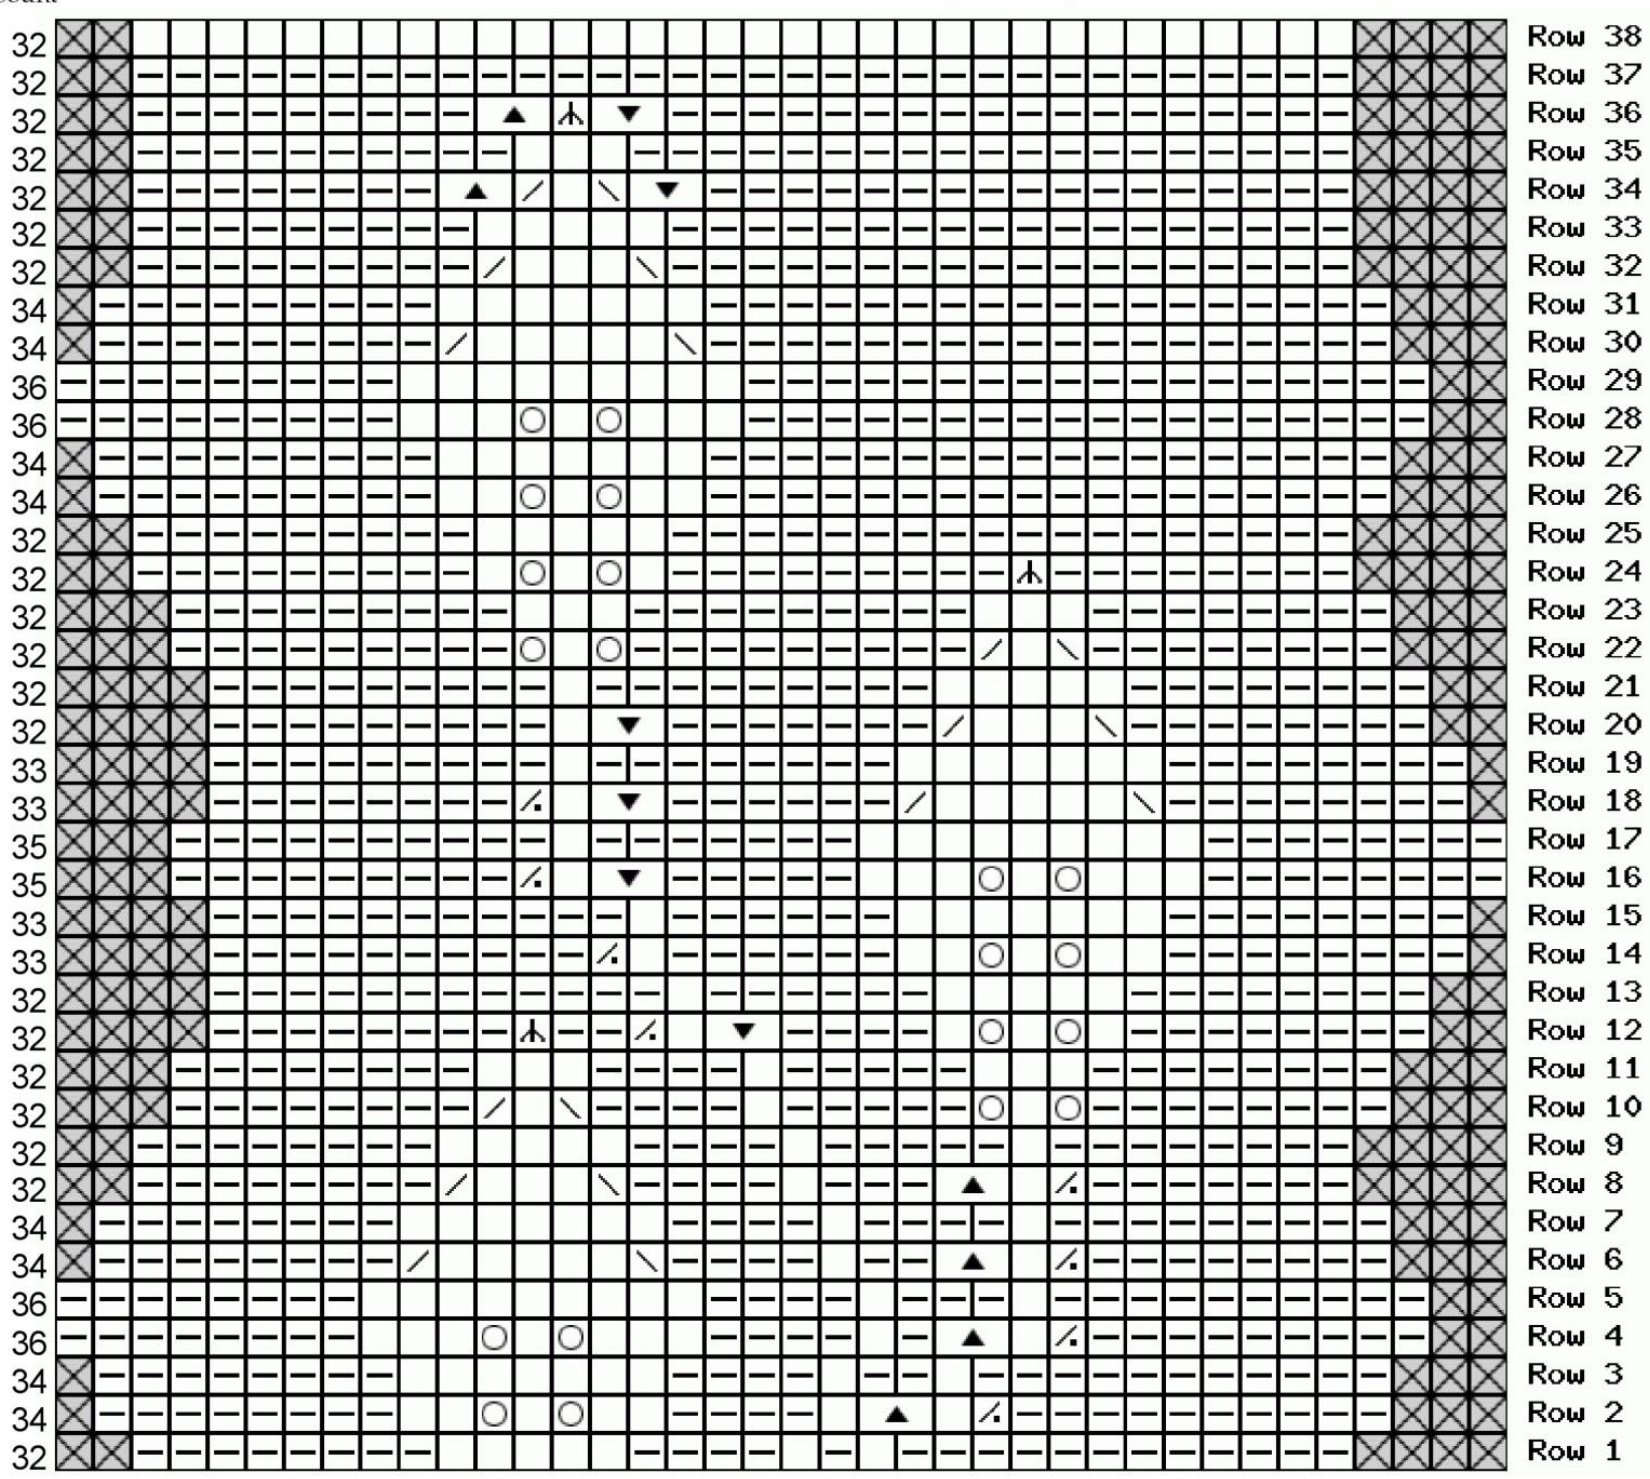
Chart B, Sock with vine on LEFT and leaf beginning on RIGHT
Row 1: P8, K5, P4, K1, P1, K1, P12 (32) Row 2: P8, K2, YO, K1, YO, K2, P4, K1, PPI, K1, P2Tog, P10 (34) Row 3: P8, K7, P4, K1, P2, K1, P11 (34) Row 4: P8, K3, YO, K1, YO, K3, P4, K1, P1, PPI, K1, P2Tog, P9 (36) Row 5: P8, K9, P4, K1, P3, K1, P10 (36) Row 6: P8, SSK, K5, K2Tog, P4, K1, P2, PPI, K1, P2Tog, P8 (34) Row 7: P8, K7, P4, K1, P4, K1, P9 (34) Row 8: P8, SSK, K3, K2Tog, P4, K1, P3, PPI, K1, P2Tog, P7 (32) Row 9: P8, K5, P4, K1, P5, K1, P8 (32) Row 10: P8, SSK, K1, K2Tog, P4, K1, P5, YO, K1, YO, P8 (32) Row 11: P8, K3, P4, K1, P5, K3, P8 (32) Row 12: P8, S2KP, P2, P2Tog, K1, PIP, P4, (K1, YO) twice, K1, P8 (32) Row 13: P12, K1, P6, K5, P8 (32) Row 14: P10, P2tog, K1, P6, K2, YO, K1, YO, K2, P8 (33) Row 15: P11, K1, P6, K7, P8 (33) Row 16: P9, P2t0g, K1, PIP, P5, K3, YO, K1,YO, K3, P8 (35) Row 17: P10, K1, P2, K9, P8 (35) Row 18: P8, P2tog, K1, PIP, P6, SSK, K5, K2t0g, P8 (33) Row 19: P9, K1, P8, K7, P8 (33) Row 20: P9, K1, PIP, P7, SSK, K3, K2tog, P8 (32) Row 21: P9, K1, P9, K5, P8 (32) Row 22: P9, YO, K1, YO, P9, SSK, K1, K2tog, P8 (32) Row 23: P9, K3, P9, K3, P8 (32) Row 24: P9, (k1, YO) twice, K1, P9, S2KP, P8 (32) Row 25: P9, K5, P18 (32) RoW 26: P9, K2, YO, K1, YO, K2, P18 (34) Row 27: P9, K7, P18 (34) Row 28: P9, K3, YO, K1, YO, K3, P18 (36) Row 29: P9, K9, P18 (36) Row 30: P9, SSK, K5, K2tog, P18 (34) Row 31: P9, K7,P18 (34) Row 32: P9, SSK, K3, K2tog, P18 (32) Row 33: P9, K5, P18 (32) Row 34: P8, PPI, SSK, K1, K2tog, PIP, P17 (32) Row 35: P10, K3, P19 (32) Row 36: P9, PPI, S2KP, PIP, P18 (32) Row 37: P32 Row 38: K32 (and knit on back side of sock as well, in preparation for ribbii Chart C, Sock with vine on RIGHT and leaf beginning on LEFT Row 1: P12, K1, P1, K1, P4, K5, P8 (32) Row 2: P10, P2Tog, K1, PIP, K1, P4, K2, YO, K1, YO, K2, P8 (34) Row 3: P11, K1, P2, K1, P4, K7, P8 (34) Row 4: P9, P2Tog, K1, PIP, P1, K1, P4, K3, YO, K1, YO, K3, P8 (36) Row 5: P 10, K1, P3, K1, P4, K9, P8 (36) Row 6: P8, P2Tog, K1, PIP, P2, K1, P4, SSK, K5, K2tog, P8 (34) Row 7: P9, K1, P4, K1, P4, K7, P8 (34) Row 8: P7, P2Tog, K1, PIP, P3, K1, P4, SSK, K3, K2Tog, P8 (32) Row 9: P8, K1, P5, K1, P4, K5, P8 (32) Row 10: P8, YO, K1, YO, P5, K1, P4, SSK, K1, K2Tog, P8 (32) Row 11: P8, K3, P5, K1, P4, K3, P8 (32) Row 12: P8, (K1, YO) twice, K1, P4, PPI, K1, P2Tog, P2, S2KP, P8 (32) Row 13: P8, K5, P6, K1, P12 (32) Row 14: P8, K2, YO, K1, YO, K2, P6, K1, P2t0g, P10 (33) Row 15: P8, K7, P6, K1, P11 (33) Row 16: P8, K3, YO, K1, YO, K3, P5, PPI, K1, P2tog, P9 (35) Row 17: P8, K9, P7, K1, P10 (35) Row 18: P8, SSK, K5, K2tog, P6, PPI, K1, P2tog, P8 (33) Row 19: P8, K7, P8, K1, P9 (33) Row 20: P8, SSK, K3, K2tog, P7, PPI, K1, P9 (32) Row 21: P8, K5, P9, K1, P9 (32) Row 22: P8, SSK, K1, K2tog, P9, YO, K1, YO, P9 (32) Row 23: P8, K3, P9, K3, P9 (32) Row 24: P8, S2KP, P9, (K1, YO) tWice, K1, P9 (31) Row 25: P18, K5, P9 (32) Row 26: P18, K2, YO, K1, YO, K2, P9 (34) Row 27: P18, K7, P9 (34) Row 28: P18, K3, YO, K1, YO, K3, P9 (36) Row 29: P18, K9, P9 (36) Row 30: P18, SSK, K5, K2tog, P9 (34) Row 31: P18, K7, P9 (34) Row 32: P18, SSK, K3, K2tog, P9 (32) Row 33: P18, K5, P9 (32) Row 34: P17, PPI, SSK, K1, K2tog, PIP, P8 (32) Row 35: P19, K3, P10 (32) Row 36: P18, PPI, S2KP, PIP, P9 (32) Row 37: P32 Row 38: K32 (and knit on back side of sock as well, in preparation for ribbing)
Begin Ribbing:
Change color to dark green. Knit 6 rounds of K1, P1 ribbing. Change color to white. Knit 4 rounds of K1, P1 ribbing. Change color to dark green. Knit 4 rounds of K1, P1 ribbing. Change color to white. Knit 4 rounds of K1, P1 ribbing. Change color to dark green. Knit 4 rounds of K1, P1 ribbing. Bind off in pattern using Jeny Staiman's Surprisingly Stretchy Bind-Off. I will be making a YouTube video showing the 1x1 ribbing bind-off using this method, (with a mantra to say while you're doing it, so you can keep track of where you are), but for now, here is a link showing the bind-off method with 2x2 ribbing: http:/ /www.youtube.com/watch?v=ZBsYZltTNaA
Copyright by Patty Joy White
Please do not copy or reproduce this pattern. It is currently available for free on www.Ravelry.com by member, Patty-Joy of Patty-Joy Designs, so refer knitters to it there. I will soon be updating this pattern, and when I do, it will be for sale rather than free. In the meantime, you may knit socks for your own use, to give as gifts, and for charity, but please do not sell this pattern or commerciallymade socks using this pattern. If you do, I will cry, all your yarn will be knotted by goblins while you sleep, and your chocolate will mysteriously disappear. You have been warned! ?

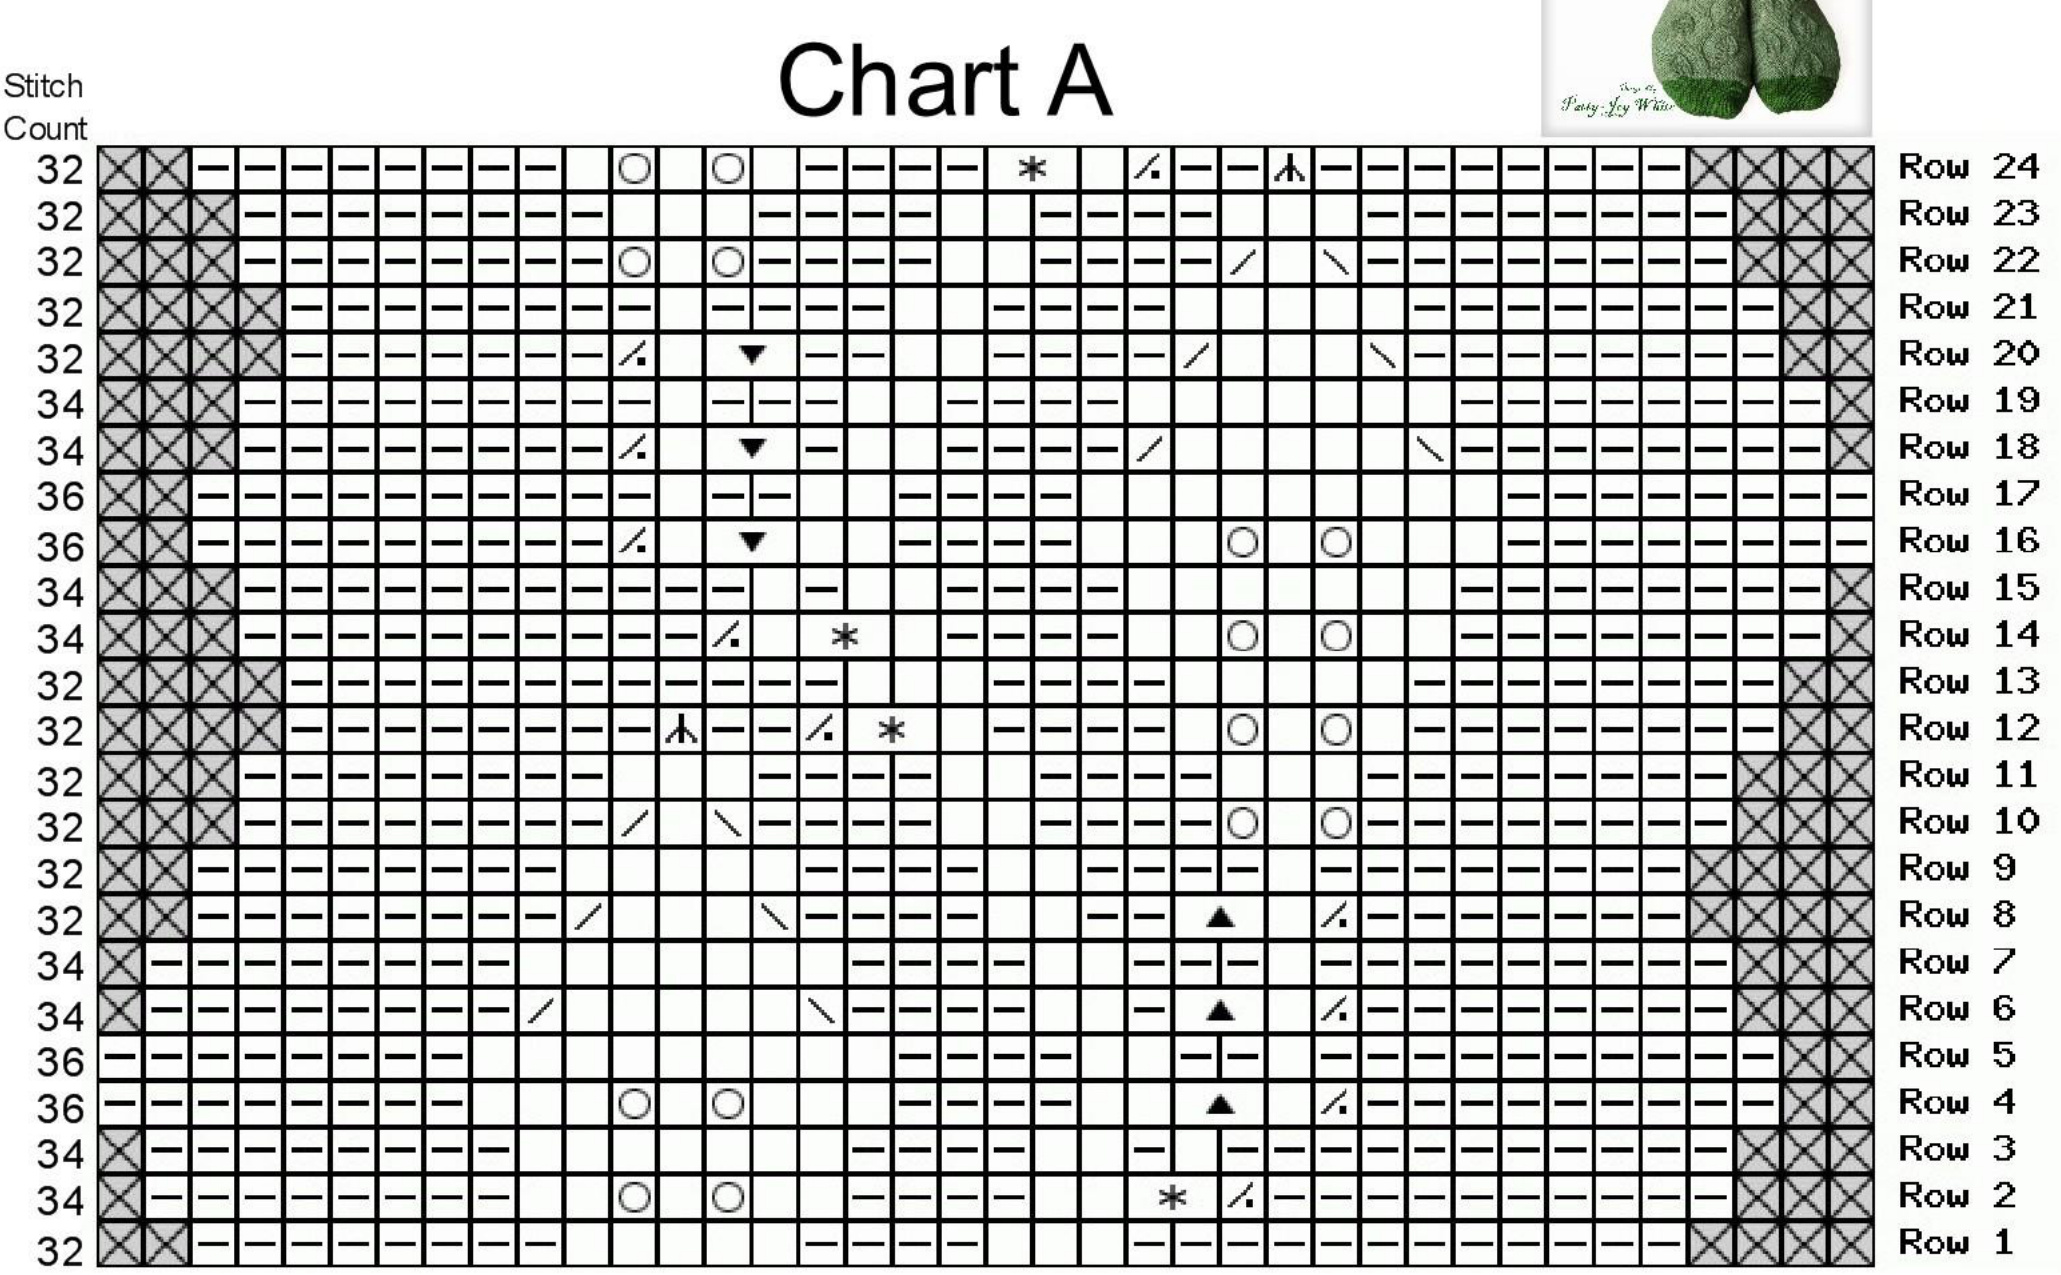
Chart B
Use this chart to finish knitting the sock that left off from Chart A with vine on LEFT and leaf beginning on RIGHT
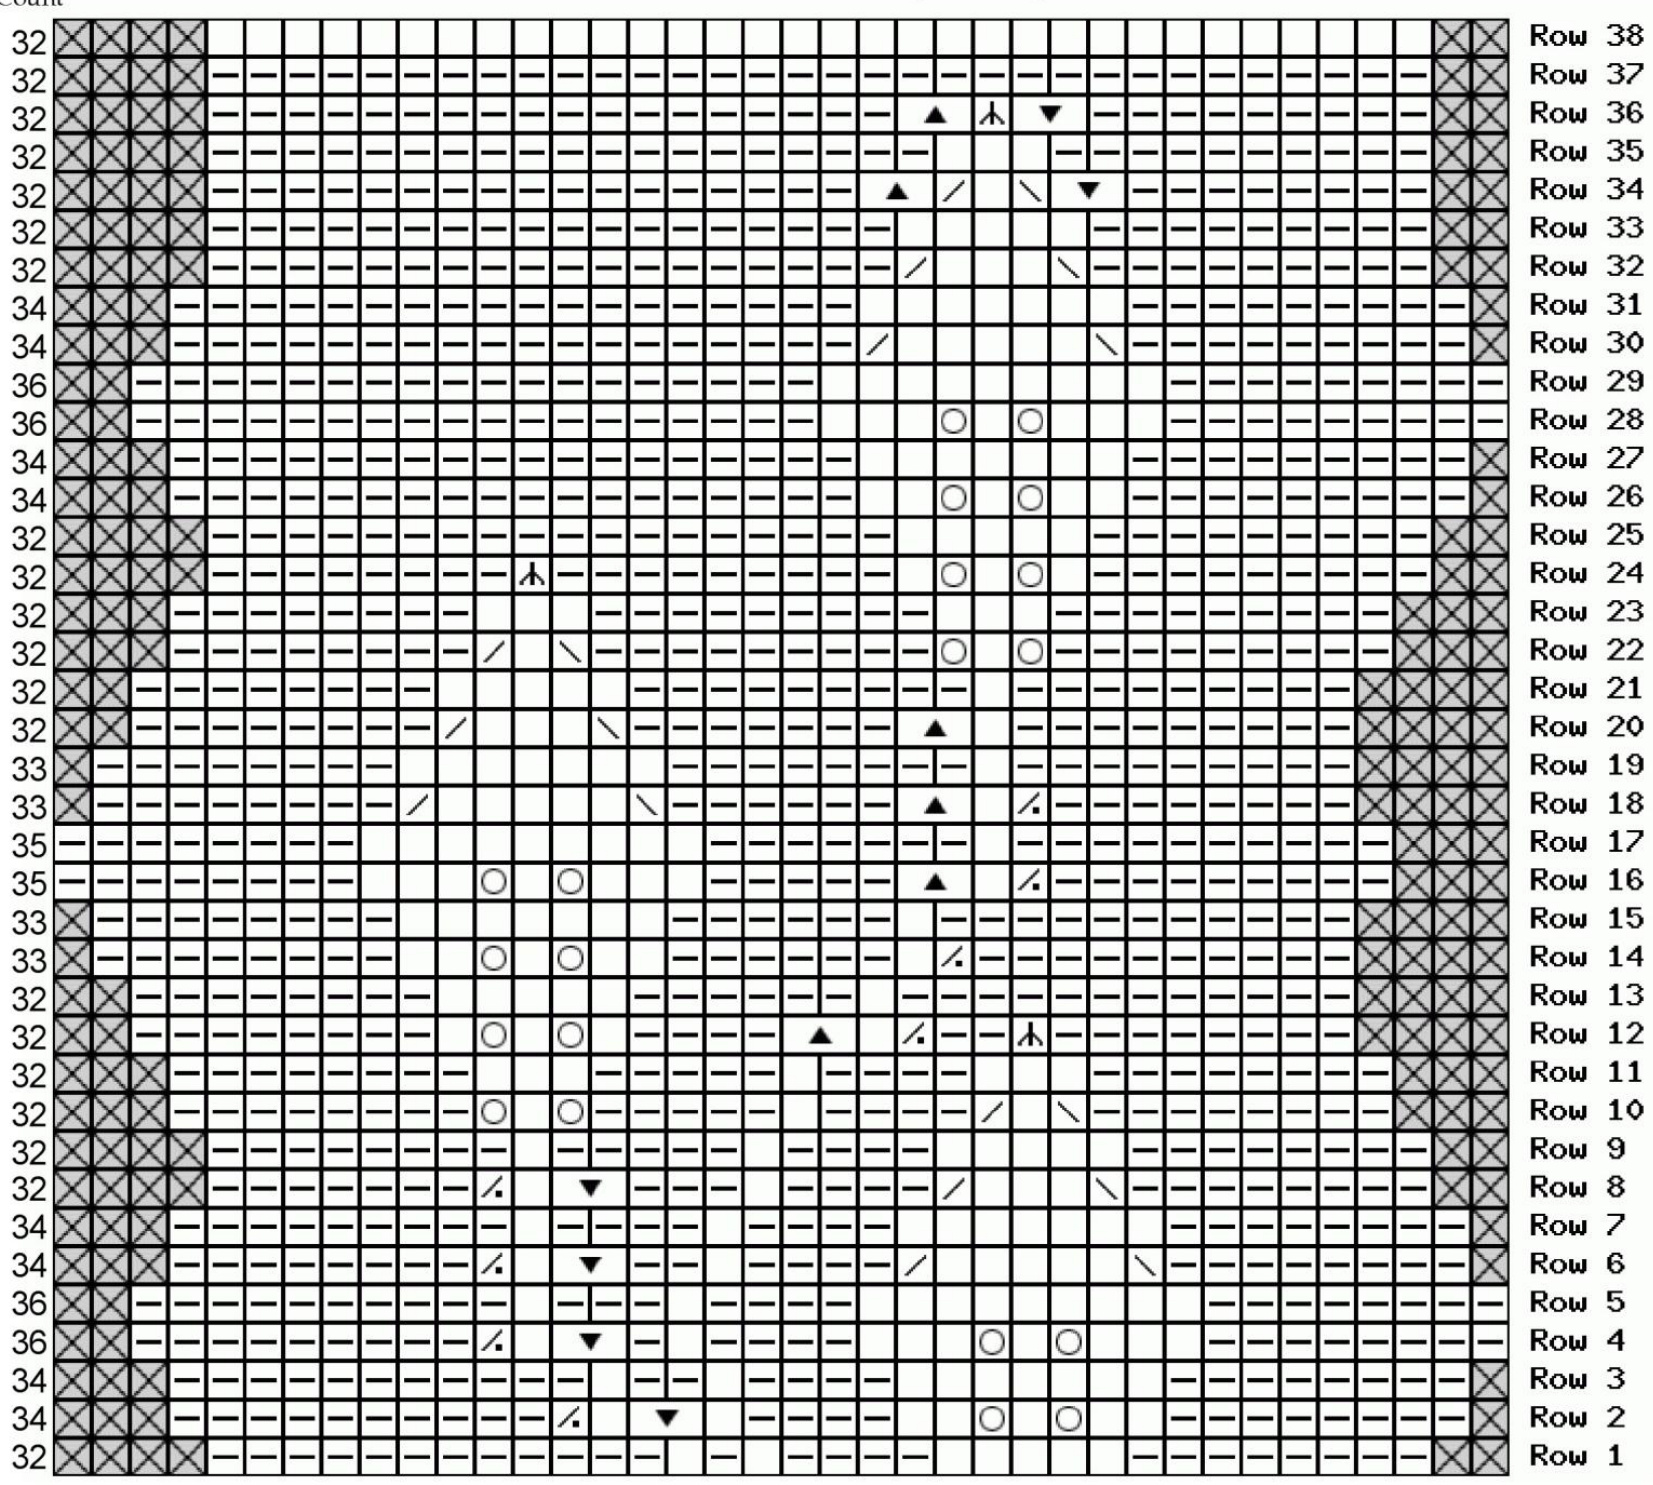
Chart C
Use this chart to finish knitting the sock that left off from Chart A with vine on RIGHT and leaf beginning on LEFT