HONSVEH KNITS
SEA GLASS
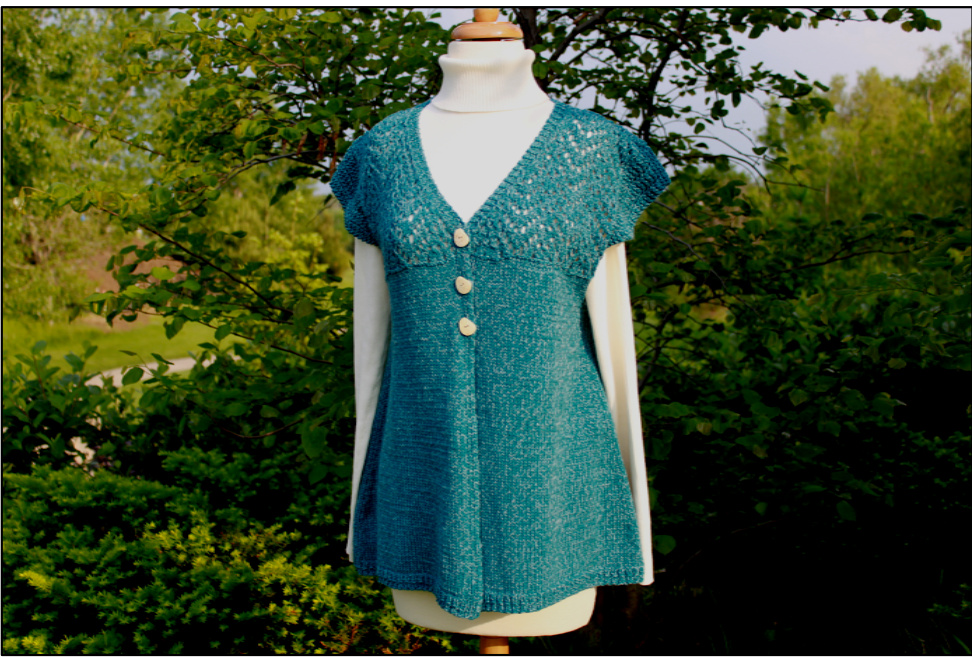
This figure flattering, cap sleeve sweater is primarily knit in stockinette stitch, with a simple, yet striking, lace bodice. It is a fully-fashioned piece, with a surprise - minimal finishing.
Materials
Brown Sheep Company Serendipity Tweed (60% Cotton, 40% Wool; 210 yds/191 m; 3.5 oz/100 grams), 4 (4, 5, 6) skeins ST 20 - Teal Orchid One size 7 (4.5 mm) circular knitting needle, 24", or size to get gauge Stitch markers Stitch holders Darning needle Scissors 3 buttons, 7/8"
Finished Measurements
32" (36", 40" 44") for a relaxed fit, approximately 26" in length
Gauge
5 stitches/inch, stockinette stitch 4 stitches/inch, lace pattern
Stitches and Abbreviations Used
BO - bind off; Co - cast on; k - knit; k1tbl - knit one through the back loop; k2tog - knit two together; p - purl; pm - place marker; rep - repeat; Rs - right side; sm - slip marker; ssk - slip, slip, knit; st(s) - stitch(es); Ws - wrong side (Additional stitches are listed in the Legend.)
-Back
CO 113 (131, 145, 159) sts. Rib (A broken rib pattern, beginning and ending with extra knit stitches for seaming.) Row 1 (Rs): K2, \*p1, k1; rep from \* across row, end k1. Row 2: P2, \*k1, p1; rep from \* across row, end p1. Row 3: K1, purl to last st, k1. Row 4:Rep Row 2. Row5:Rep Row 1. Row 6: Rep Row 2. Body (Stockinette stitch with decreases.) Row 1 (RS): Knit. Row 2: Purl. Rows 3 and 4: Rep Rows 1 and 2. Row 5: K4, ssk, knit to last 6 sts, k2tog, k4. Row 6: Rep Row 2. Continue working in stockinette stitch, decreasing every 6th row, as instructed on Row 5. Work in this way until 8, (10, 10, 11) decrease rows have been completed. [97 (111, 125, 137) sts] Now decrease on every 4th row for 9 (10, 10, 10) times. [79 (91, 105, 117) sts] After last decrease, work 4 rows in stockinette stitch. (Sweater may be lengthened here by knitting additional rows, without decreases.) Armholes (Decreases in stockinette stitch, followed by the addition of the lace bodice.) Row 1 (RS): BO 4 sts, knit to end. Row 2: B0 4 sts, purl to end. [71 (83, 97, 109) sts] Row 3: K1, ssk, knit to last 3 sts, k2tog, k1. Row 4:Purl. Rows 5 and 6: Rep Rows 3 and 4. [67 (79, 93, 105) sts] Continue in stockinette stitch until armhole measures 1V2"(2", 2", 214") from beginning of Armhole, and knit the last Ws row, decreasing 6 (6, 8, 8) sts, evenly spaced, forming a raised ridge on the Rs. [61 (73, 85, 97) sts] Bodice (A six-row lace repeat, and cap sleeves in a garter stitch lace.) Follow Chart for Sizes Small and Large, or Chart for Sizes Medium and X-Large Sizes Small and Large: A 6-stitch section has been added to one side of the 12-stitch Pattern Repeat, and a 7-stitch section has been added to the other side. Work the 12-stitch Pattern Repeat 4 times for Small, and 6 times for Large. Use stitch markers to separate the repeats. Begin the cap sleeve increases on Row 7. Use different color or style stitch markers to show the division from cap sleeves and bodice. Sizes Medium and X-Large: To center this lace pattern, one extra stitch has been added after the last 12-stitch repeat. Work the 12-stitch Pattern Repeat 6 times for Medium and 8 times for X-Large. Use stitch markers to separate the repeats. Begin the cap sleeve increases on Row 7. Use different color or style stitch markers to show the divisionfrom cap sleeves and bodice. Continue increasing until there are 12 stitches in each cap sleeve. (Row 31 on charts) Now continue straight until the bodice measures 8 /2" (912", 91/2", 10") ending having worked a RS row. [85 (97, 109, 121) sts] Next Row (ws): Purl across row, and BO the center 25 (27, 29, 31) stitches. Place remaining 30 (35, 40, 45) stitches for each shoulder on stitch holders. Copyright 2011 - All rights reserved - Lynn Anne Banks
-Left Front
CO 61 (69, 75, 85) sts. Rib (A broken rib pattern with a knit-in button band of k1p1 ribbing that will continue to bodice.) Row 1 (Rs): \*K1, p1; rep from \* to last 7 sts, place marker, (k1, p1) 3 times, k1. Row 2: \*p1, k1; rep from \* across row, end p1. Row 3: K1, purl to marker, (k1, p1) 3 times, k1. Row4:RepRow2. Row 5: \*K1, p1; rep from \* across row, end k1. Row 6:RepRow 2. Body Row 1 (RS): Knit to marker, (k1, p1) 3 times, k1. Row 2: (P1, k1) 3 times, p1, sm, purl to end. Rows 3 and 4: Rep Rows 3 and 4. Row 5: K4, ssk, knit to marker, (k1, p1) 3 times, k1. Row 6: Rep Row 2. Continue working in stockinette stitch, decreasing every 6th row, as instructed on Row 5. Work in this way until 9 (10, 10, 11) decrease rows have been completed. [52 (59, 65, 74) sts] Now decrease on every 4th row 9 (10, 10, 10) times. [43 (49, 55, 64) sts] fter last decrease, work 4 rows in stockinette stitch. (Sweater may be lengthened here by knittin dditional rows, without decreases.)
Armholes
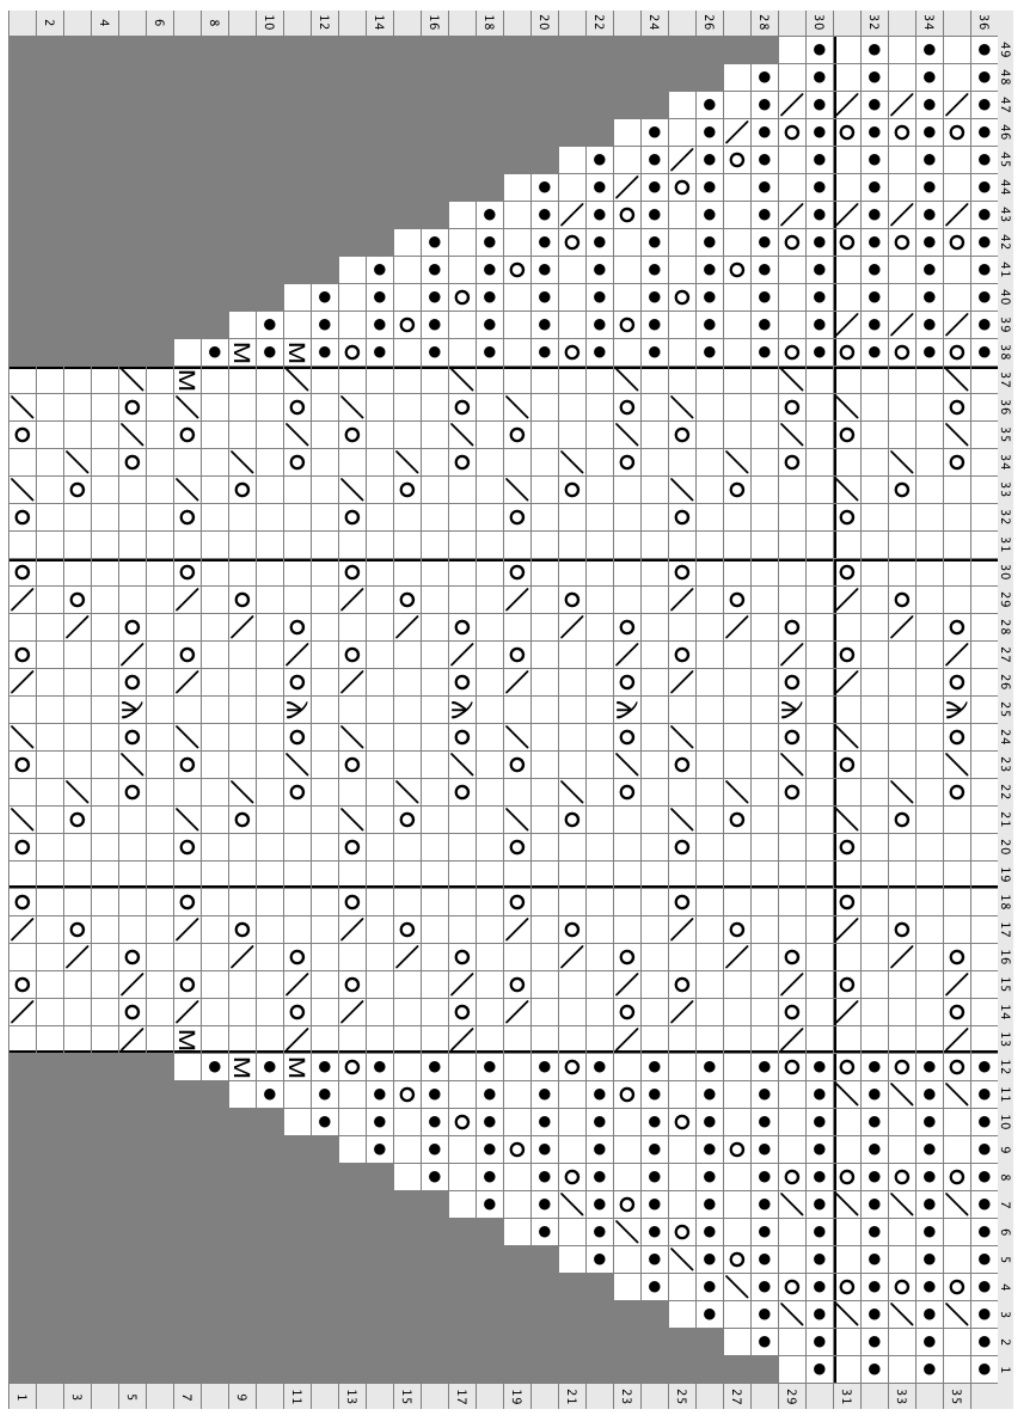
Row 1 (RS): BO 4 sts, knit to marker, (k1, p1) 3 times, k1. [39 (45, 51, 60) sts] Row 2: (P1, k1) 3 times, p1, sm, purl across row. Row 3: K1, ssk, knit to marker, (k1, p1) 3 times, k1. Row 4:RepRow 2. Rows 5 and 6: Rep Rows 3 and 4. [37 (43, 49, 58) sts] Continue in stockinette stitch and button band pattern until armhole measures 112"(2", 2", 21%4") from beginning of Armhole, and knit all the stitches in the last ws row, decreasing 3 (2, 3, 5 ) sts, evenly spaced, forming a raised ridge on the RS. Remove marker. [34 (41, 46, 53) sts] Bodice (There are decreases along the neck edge as well as the increases for the cap sleeves Follow Chart for Sizes Small and Large, or Chart for Sizes Medium and X-Large. Row 1 (Rs): Work lace pattern across first 30 (37, 42, 49) sts of chart, place marker, k4. Row 2: K4, purl to end. Complete one 6-row lace repeat, and then begin adding the cap sleeve on Row 7, as on the Back. Continue increasing until there are 12 stitches in each cap sleeve. (Row 31 on charts) At the same time, there are also decreases on the neck edge. Begin these decreases on Row 9. The decreases are made before the garter stitch edge. Decrease with an ssk on the last 2 stitches before the 4- stitch garter stitch neckline. (Since the decreases are occurring in a lace pattern, the best decrease may sometimes be leaving out the last yarn over.) Decrease in this manner on every Rs row until 30 (35, 40, 45) stitches remain, counting all stitches on the needle. Continue straight in pattern until Left Front measures the same length as Back. Place remaining stitches on astitchholder. Copyright 2011 - All rights reserved - Lynn Anne Banks Mark button placement with stitch markers. The top button will be placed in the garter edge (between the 3rd and 4th "ridge") of the bodice, and the other 2 buttons will be placed in the ribbing of the body, with approximately21/2"betweenbuttonholes.
-Right Front
CO 61 (69, 77, 85) sts. Rib Row 1 (Rs): (K1, p1) 3 times, k1, place marker, \*p1, k1; rep from \* across row. Row 2: \*p1, k1; rep from \* across row, end p1. Row 3: (K1, p1) 3 times, k1, purl to last stitch, k1. Row4:RepRow 2. Row 5: \*K1, p1; rep from \* across row, end k1. Row6:RepRow2. Body Row 1 (RS): (K1, p1) 3 times, k1, sm, knit to end. Row 2: Purl to marker, sm, (p1, k1), 3 times, p1. Rows 3 and 4: Rep Rows 1 and 2. Row 5: (K1, p1) 3 times, k1, sm, knit to last 6 sts, k2tog, k4. Row 6: RepRow 2. Continue working in stockinette stitch, decreasing every 6th row, as instructed on Row 5. Work in this way until 8 (10, 10, 11) decrease rows have been completed. [53 (59, 67, 74) sts] Now decrease on every 4th row for 9 (10, 10, 10) times. [44 (49, 57, 64) sts] BUT stop to add the first buttonhole when this front measures to the first buttonhole marker. Buttonhole Row (Rs): K1, p1, k2tog, yo, k1, p1, k1, sm, knit across row, decreasing at end if necessary. Next Row: Purl to marker, sm, p1, k1, p1, k1tbl, p1, k1, p1. (K1tbl tightens and neatens the yo.) Continue knitting and decreasing to next buttonhole and repeat the last 2 rows. (This buttonhole will probablybelocated after the armhole decreases.) After last decrease, work 4 rows in stockinette stitch. (Sweater may be lengthened here by knitting additional rows, without decreases.)
Armholes
Row 1 (RS): (K1, p1), 3 times k1, sm, knit across row. Row 2: B0 4 sts, purl to marker, sm, (p1, k1) 3 times, p1. [40 (45, 53, 60) sts] Row 3: (K1, p1) 3 times, k1, sm, knit to last 3 sts, k2tog, k1. Row 4: Purl to marker, sm, (p1, k1) 3 times, p1. Rows 5 and 6: Rep Rows 3 and 4. [38 (43, 51, 58) sts] Continue in stockinette stitch and buttonhole band until armhole measures 112"(2", 2", 214") from beginning of Armhole, and knit all the stitches in the last wS row, decreasing 3 (2, 4, 5) sts, evenly spaced, forming a raised ridge on the RS. Remove marker. [35 (41, 47, 53) sts] Bodice (The 7-stitch button band is now replaced with a 4-stitch garter band. There are decreases along the neck edge as well as the increases for the cap sleeves.)
Follow Chart for Sizes Small and Large, or Chart for Sizes Medium and X-Large.
Row 1 (Rs): K4, place marker, work lace pattern across last 31 (37, 43, 49) sts. Row 2: Purl to marker, sm, k4. Copyright 2011 - All rights reserved - Lynn Anne Banks Row 3: K4, sm, work lace pattern across 31 (37, 43, 49) sts. Row4:RepRow 2. Row 5 (Buttonhole Row): K2, k2tog, yo, sm, work lace pattern across 31 (37, 43, 49) sts. Row 6: Purl to marker, sm, k1tbl, k2. omplete one 6-row lace repeat, and then begin adding the cap sleeve on Row 7, as on the Back. At the same time, there are also decreases on the neck edge. Begin these decreases on Row 9. The decreases are made after the garter stitch edge. Decrease with a k2tog on the first 2 stitches after the 4- stitch garter stitch neckline. Decrease in this manner on every RS row until 18 (23, 28, 33) stitches remain, counting all stitches on the needle. (Since the decreases are occurring in a lace pattern, the best decrease may sometimes be leaving out the first yarn over.) Continue straight in pattern until Right Front measures the same length as Back. Place remaining stitches on astitchholder.
Finishing
Holding Left Front and Back together with WS facing out, join the left shoulder with a 3-needle bind off. Do the same on the right shoulder. Seam the sides using a mattress stitch. Sew on the buttons. Weave in all ends, block, and wear!
for Sizes Medium and X-Large (Read instructions on page 2 for Sizes Medium and X-Larc
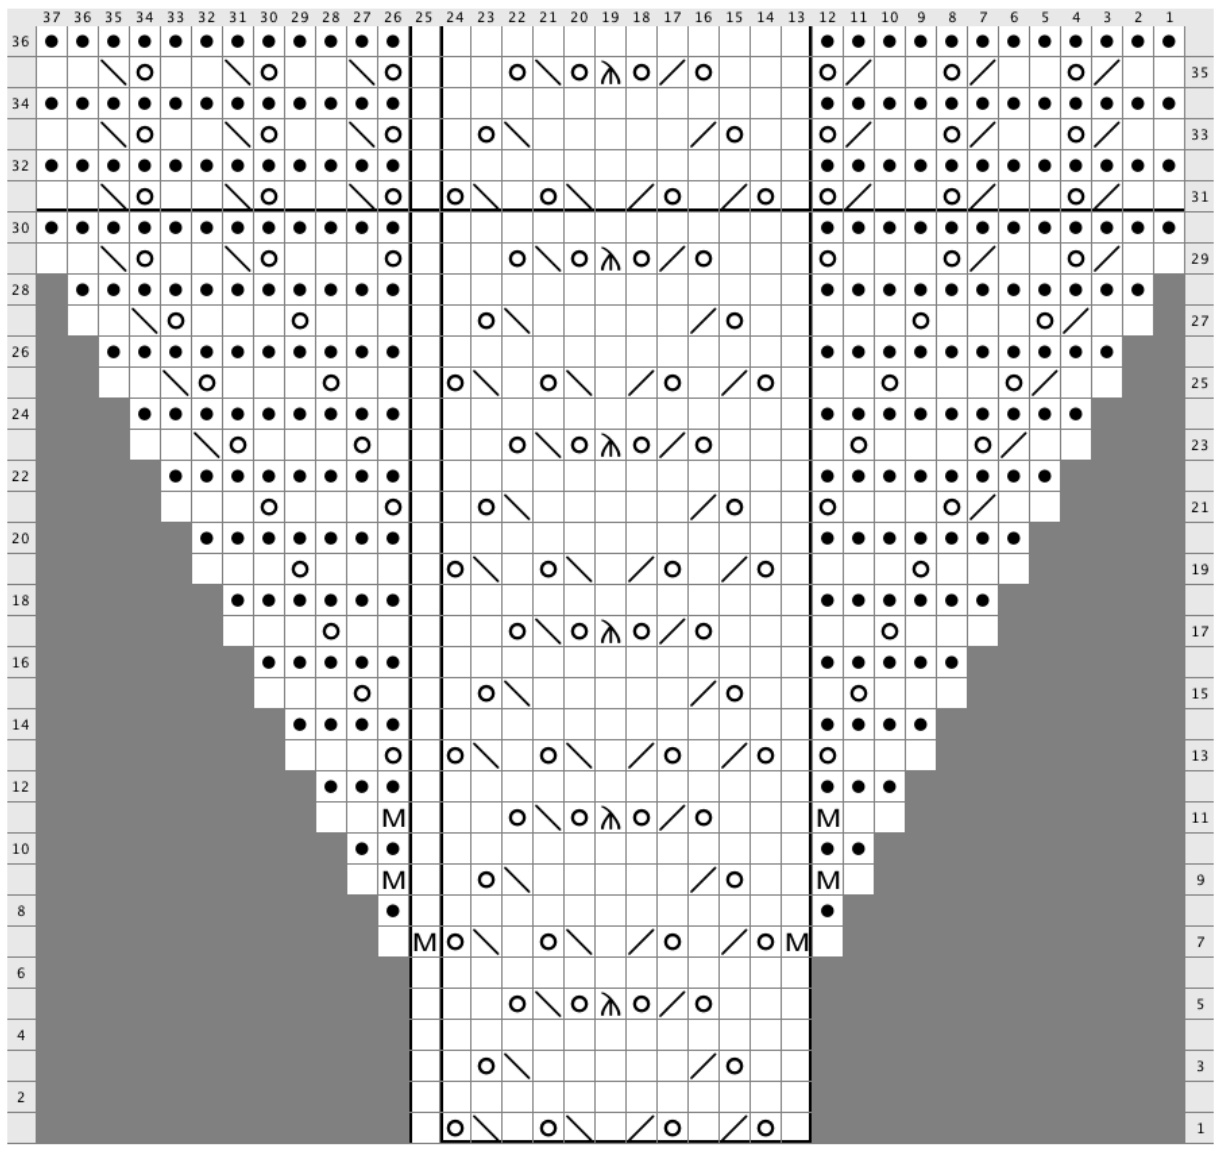
- 12-st repeat Complete Rows 1-36, working the 12-stitch repeat over and over across the row. Then, repeat Rows 31-36 to desired length. Copyright 2011 - All rights reserved - Lynn Anne Banks This pattern is provided for your personal use and may not be resold or shared. Questions? Problems? Email nonsuchknits@gmail.com + + Nonsuch Knits, 2555 S. 177th Plaza, #168, Omaha, NE 68130
Complete Rows 1-36, working the 12-stitch repeat over and over across the row. Then, repeat Rows 31-36 to desired length.


