Wedinas.. Wedinas Little Paw's Silk Garden Shawlette
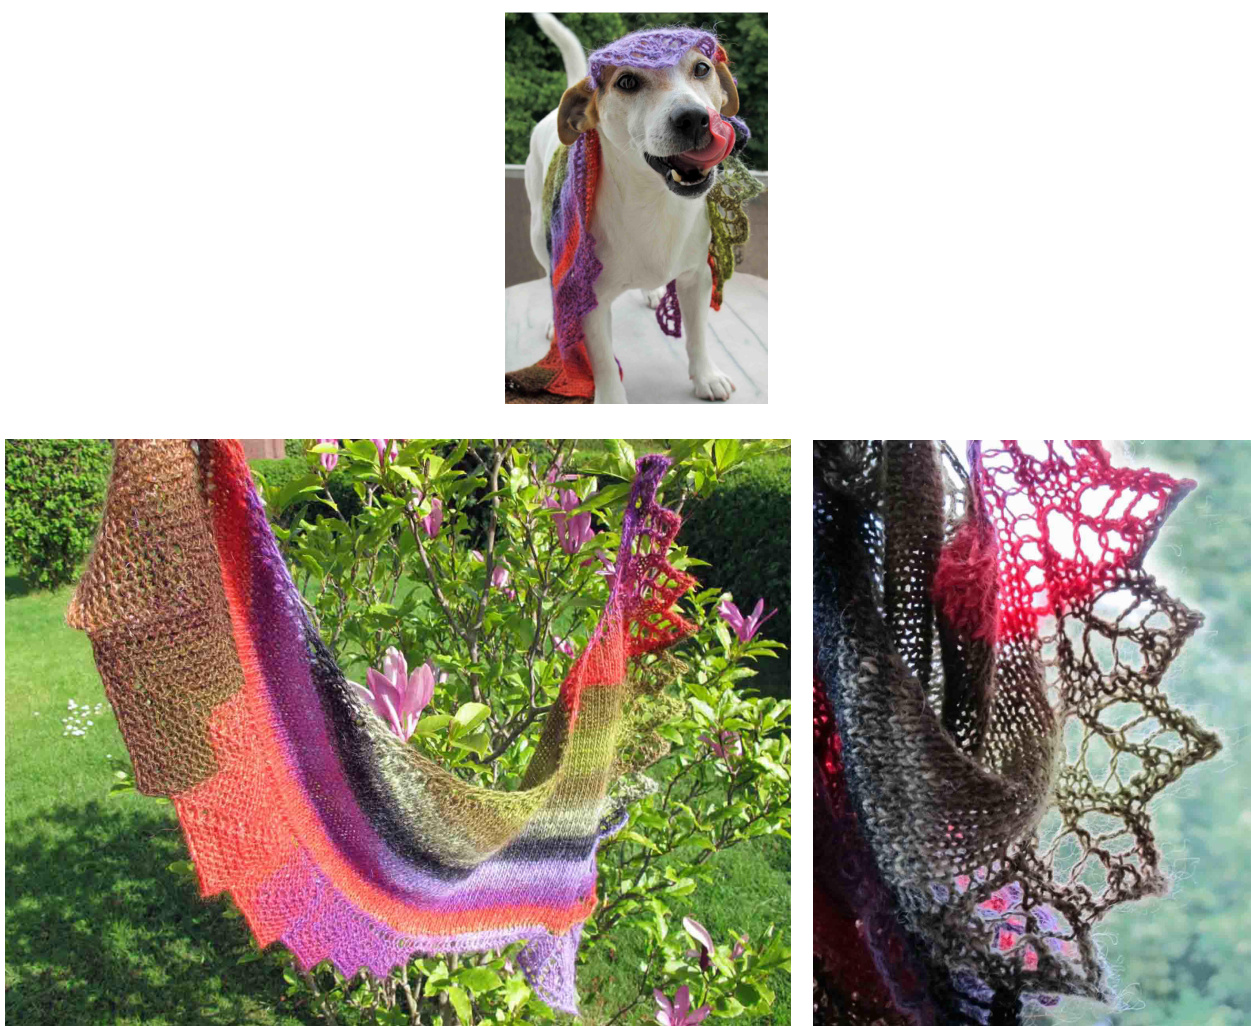
This pattern is a colourful asymmetric triangular shawlette. One border is decorated with lacy leafs. The other side consists of squares in garter stitch. It begins with a big square. Every next square is a little bit smaller than the previous one. The angle where leafs and squares are meeting ends in a blossom. Some time passed by since I made my knitting notices. I hope that nothing went wrong in my pattern description. If you have problems feel free to contact me. I'll answer as soon as possible. And now have much fun with your needlework.
Yarn
approx. 65g = 162 m / 177 yards Noro Silk Garden Lite (50 grams/1.76 ounces, 136 yards/124 meters), 45% Silk 45% Mohair 10% Wool, Texture Single
Needles
Circular knitting needle 5 mm - US 8
Gauge
is not important for this shawl. The gauge after washing & blocking is approx.: 10 x 10 cm (4 x 4 inches) = 17 sts x 24 R in stockinette stitch
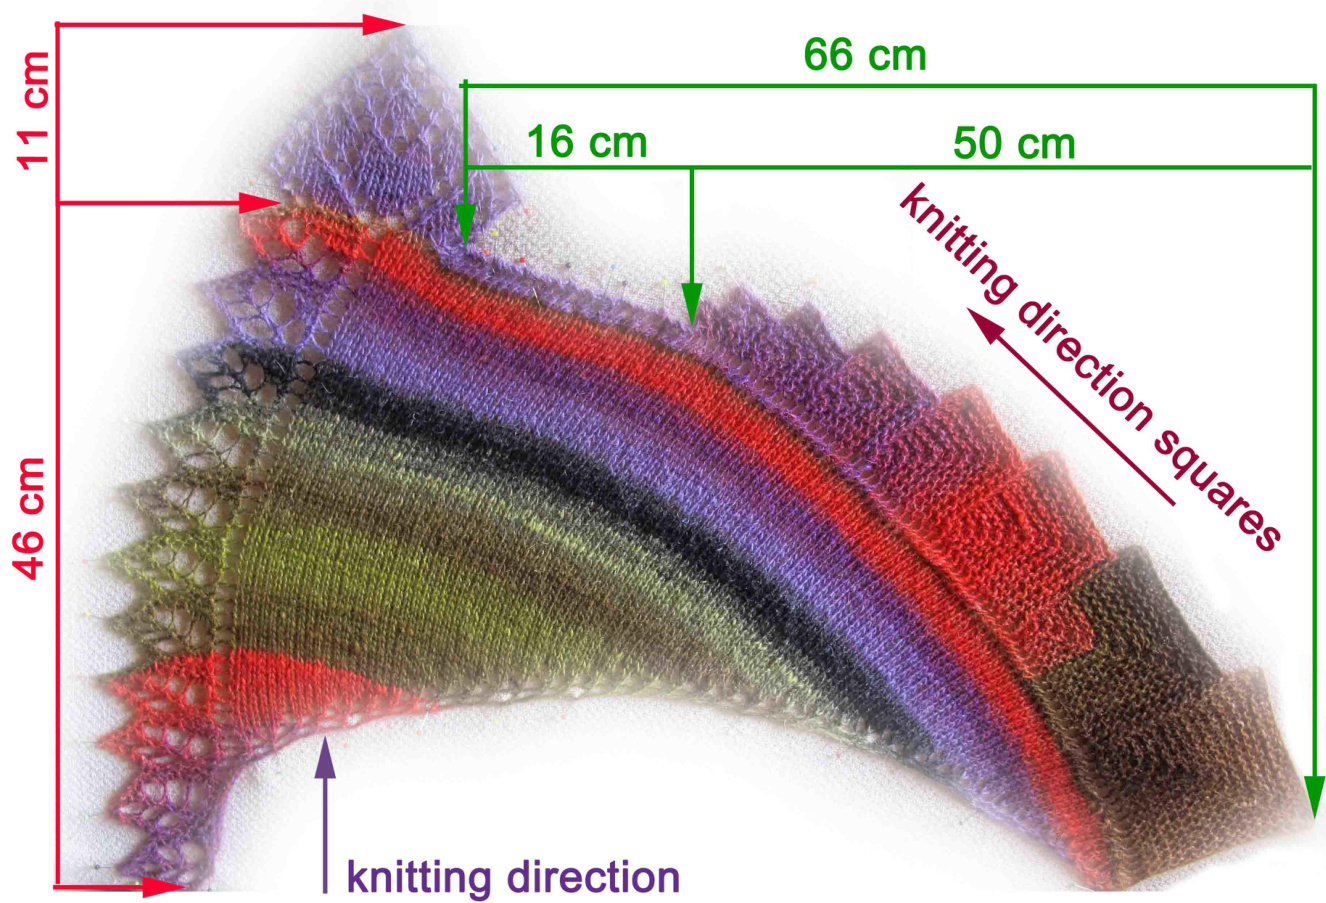
Finished measurements after washing & blocking approx. in cm:
Abbreviations:
WS wrong side RS right side ES edge stitch PR pattern repeat st(s) stitch(es) P purl k knit yo yarn over k2tog knit 2 stitches together sl1 k1psso slip 1 stitch, knit 1 stitch, pass slipped stitch over sl1 k2tog psso slip 1 stitch, knit 2 stitches together, pass slipped stitch over sl1 k3tog psso slip 1 stitch, knit 3 stitches together, pass slipped stitch over
Instructions
Part 1: Leafs
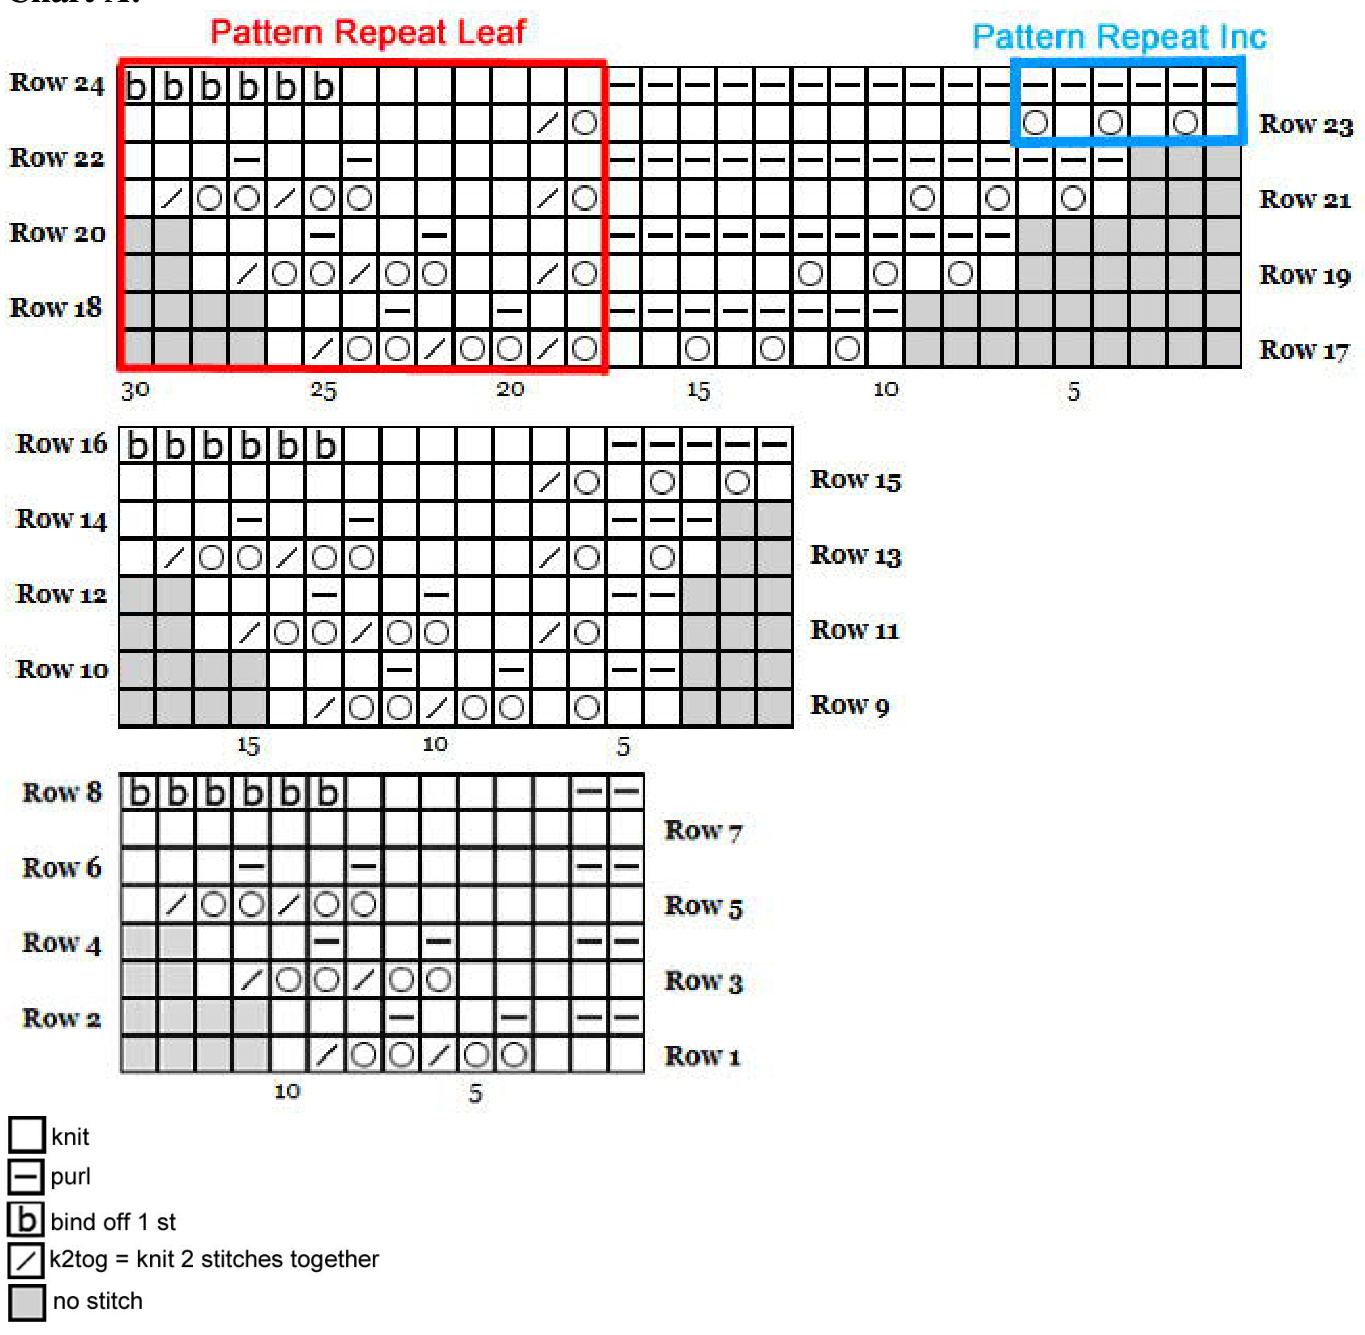
Cast on 8 sts. Knit 6 sts, purl 2 sts. Continue with chart A. The Leaf motif is patterned on both sides. Odd rows are RS, even rows are Ws. Odd rows are read from right to left, even rows from left to right. Work the rows 1 to row 24 once. After this repeat the PR Leaf chart A (row 17 to 24) horizontally 8 times. Continue with the increases on the right side edge as before (PR Inc blue marked). If you like, you may work further PRs Leaf of chart A for a bigger shawl. 1 count row 88 (after you worked the 8 horizontally PRs): 7 sts (Leaf) + 113 sts (stockinett
Chart A:
Part 2: Squares
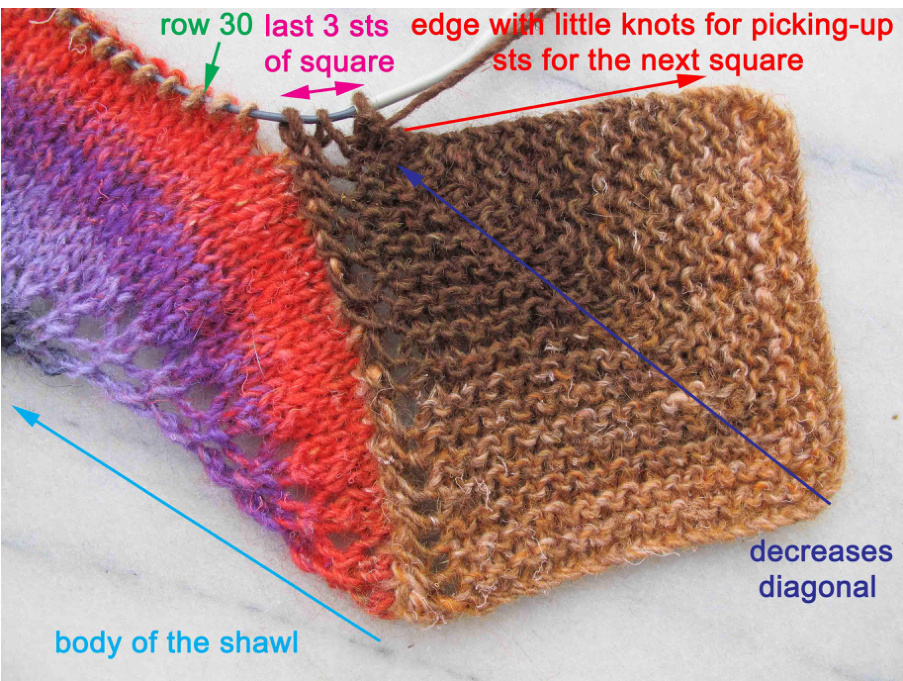
There are different ways to work a square in garter stitch. I prefer the way with sll klpsso and k2tog over the 4 middle stitches. Every square is worked in the usual way. Each following square is 2 sts smaller than the previous square and 4 rows shorter. There are 2 methods used for cast-on. They are described in the appendix.
2a) Square no. 1
pic 2.1 (RS)
pic 2.2 (RS) Cast-on CO1 35 sts (1st for the space column and 34 sts for the square). Even rows (WS) are blue framed! Turn after all rows unless otherwise is mentioned.
| R 0 W | ||||||
| 1 | k 15 sts | sl1 klpsso | k2tog | k 15 sts | yo | sl1 k2tog psso (slipped st is from lace pattern, the next 2 sts are from the body of the shawl), |
| 2 | slip one st purl wise | p1 st | k remaining sts | all even rows are worked like this unless otherwise is mentioned | ||
| 3 | k 14 sts | sl1 klpsso | k2tog | k 14 sts | yo | sl1 k2tog psso (the 3. st is from the body of the shawl) |
| 5 | k 13 sts | sl1 klpsso | k2tog | k 13 sts | yo | sl1 k3tog psso (the 3. and 4. sts are from the body of the shawl) |
| 7 | k 12 sts | sl1 klpsso | k2tog | k 12 sts | yo | sl1 k2tog psso (the 3. st is from the body of the shawl) |
| 9 | k 11 sts | sl1 klpsso | k2tog | k 11 sts | yo | sl1 k3tog psso (the 3. and 4. sts are from the body of the shawl) |
| 11 | k 10 sts | sl1 klpsso | k2tog | k 10 sts | yo | sl1 k2tog psso (the 3. st is from the body of the shawl) |
| 13 | k 9 sts | sl1 klpsso | k2tog | k9 sts | yo | sl1 k3tog psso (the 3. and 4. sts are from the body of the shawl) |
| 15 | k8 sts | sl1 klpsso | k2tog | k 8 sts | yo | sl1 k2tog psso (the 3. st is from the body of the shawl) |
| 17 | k 7 sts | sl1 klpsso | k2tog | k 7 sts | yo | sl1 k3tog psso (the 3. and 4. sts are from the body of the shawl) |
| 19 | k6 sts | sl1 klpsso | k2tog | k 6 sts | yo | sl1 k2tog psso (the 3. st is from the body of the shawl) |
| 21 | k 5 sts | sll klpsso | k2tog | k 5 sts | yo | sl1 k3tog psso (the 3. and 4. sts are from the body of the shawl) |
| 23 | k 4 sts | sl1 klpsso | k2tog | k 4 sts | yo | sl1 k2tog psso (the 3. st is from the body of the shawl) |
| 25 | k 3 sts | sll klpsso | k2tog | k3 sts | yo | sl1 k3tog psso (the 3. and 4. sts are from the body of the shawl) |
| 27 | k2 sts | sl1 klpsso | k2tog | k 2 sts | yo | sl1 k2tog psso (the 3. st is from the body of the shawl) |
| 29 | k1 st | sl1 klpsso | k2tog | k1 st | yo | sl1 k2tog psso (the 3. st is from the body of the shawl) |
| 30 | slip one st purl wise | p1 st | k2tog | WS, do not turn! |
2b) Square no. 2
Now you have 3 sts from the previous square on the right needle on WS (see pic. 2.2). Additionally pick-up CO2 14 sts from the edge of square 1. Additionally cast-on CO1 15 sts.
| R 0 | ||||||
| W 1 | k 13 sts | sl1 klpsso | k2tog | k 13 sts | yo | sl1 k2tog psso |
| 2 | slip one st purl wise | p1 st | k remaining sts | all even rows are worked like this unless otherwise is mentioned | ||
| 3 | k 12 sts | sl1 klpsso | k2tog | k 12 sts | yo | sl1 k3tog psso |
| 5 | k 11 sts | sl1 klpsso | k2tog | k 11 sts | yo | sl1 k2tog psso |
| 7 | k 10 sts | sl1 klpsso | k2tog | k 10 sts | yo | sl1 k2tog psso |
| 9 | k 9 sts | sl1 klpsso | k2tog | k 9 sts | yo | sl1 k2tog psso |
| 11 | k8 sts | sl1 klpsso | k2tog | k8 sts | yo | sl1 k2tog psso |
| 13 | k 7 sts | sl1 k1psso | k2tog | k7 sts | yo | sl1 k2tog psso |
| 15 | k 6 sts | sl1 k1psso | k2tog | k 6 sts | yo | sl1 k2tog psso |
| 17 | k 5 sts | sl1 k1psso | k2tog | k5 sts | yo | sl1 k2tog psso |
| 19 | k 4 sts | sl1 klpsso | k2tog | k 4 sts | yo | sl1 k2tog psso |
| 21 | k 3 sts | sl1 k1psso | k2tog | k3 sts | yo | sl1 k2tog psso |
| 23 | k 2 sts | sl1 klpsso | k2tog | k 2 sts | yo | sl1 k2tog psso |
| 25 | kl st | sl1 klpsso | k2tog | k1 st | yo | sl1 k2tog psso |
| 26 | slip one st purl wise | p1st | k2tog | WS, do not turn! |
2c) Square no. 3
Now you have 3 sts from the previous square on the right needle. CO2 12 sts from the edge of square 2. CO1 13 sts.
| R 0 | ||||||
| W 1 | k 11 sts | sl1 k1psso | k2tog | k 11 sts | yo | sl1 k2tog psso |
| 2 | slip one st purl wise | p1 st | k remaining sts | all even rows are worked like this unless otherwise is mentioned | ||
| 3 | k 10 sts | sl1 klpsso | k2tog | k 10 sts | yo | sl1k2tog psso |
| 5 | k 9 sts | sl1 klpsso | k2tog | k9 sts | yo | sl1 k2tog psso |
| 7 | k 8 sts | sl1 klpsso | k2tog | k8 sts | yo | sl1 k2tog psso |
| 9 | k 7 sts | sl1 klpsso | k2tog | k7 sts | yo | sl1 k2tog psso |
| 11 | k6 sts | sl1 klpsso | k2tog | k 6 sts | yo | sl1 k2tog psso |
| 13 | k 5 sts | sl1 klpsso | k2tog | k 5 sts | yo | sl1 k2tog psso |
| 15 | k 4 sts | sl1 klpsso | k2tog | k 4 sts | yo | sl1 k2tog psso |
| 17 | k3 sts | sl1 k1psso | k2tog | k 3 sts | yo | sl1 k2tog psso |
| 19 | k 2 sts | sl1 klpsso | k2tog | k 2 sts | yo | sl1 k2tog psso |
| 21 | k1 st | sl1 klpsso | k2tog | k1 st | yo | sl1 k2tog psso |
| 22 | slip one st purl wise | p1 st | k2tog | Ws, do not turn! |
2d) Square no. 4
Now you have 3 sts from the previous square on the right needle. CO2 10 sts from the edge of square 3. CO1 11 sts.
| R 0 | ||||||
| W 1 | k9 sts | sl1 klpsso | k2tog | k 9 sts | yo | sl1 k2tog psso |
| 2 | slip one st purl | p1 st | k remaining sts | all even rows are worked like this unless otherwise is mentioned | ||
| 3 | wise k 8 sts | sl1 klpsso | k2tog | k 8 sts | yo | sl1 k2tog psso |
| 5 | k 7 sts | sl1 klpsso | k2tog | k 7 sts | yo | sl1 k2tog psso |
| 7 | k 6 sts | sl1 klpsso | k2tog | k 6 sts | yo | sl1 k2tog psso |
| 9 | k5 sts | sl1 klpsso | k2tog | k5 sts | yo | sl1 k2tog psso |
| 11 | k 4 sts | sl1 klpsso | k2tog | k 4 sts | yo | sl1 k2tog psso |
| 13 | k3 sts | sl1 klpsso | k2tog | k 3 sts | yo | sl1 k2tog psso |
| 15 | k 2 sts | sl1 klpsso | k2tog | k 2 sts | yo | sl1 k2tog psso |
| 17 | k1 st | sl1 klpsso | k2tog | k1 st | yo | sl1 k2tog psso |
| 18 | slip one st purl wise | p1 st | k2tog | WS, do not turn! |
2e) Square no. 5
Now you have 3 sts from the previous square on the right needle. CO2 8 sts from the edge of square 4. CO1 9 sts.
| R 0 | ||||||
| W 1 | k 7 sts | sl1 klpsso | k2tog | k 7sts | yo | sl1 k2tog psso |
| 2 | slip one st purl wise | p1 st | k remaining sts | all even rows are worked like this unless otherwise is mentioned | ||
| 3 | k 6 sts | sl1 klpsso | k2tog | k6 sts | yo | sl1 k2tog psso |
| 5 | k 5 sts | sl1 klpsso | k2tog | k5 sts | yo | sl1 k2tog psso |
| 7 | k 4 sts | sl1 klpsso | k2tog | k 4 sts | yo | sl1 k2tog psso |
| 9 | k3 sts | sl1 klpsso | k2tog | k 3 sts | yo | sl1 k2tog psso |
| 11 | k 2 sts | sl1 klpsso | k2tog | k 2 sts | yo | sl1 k2tog psso |
| 13 | k1 st | sl1 klpsso | k2tog | kl st | yo | sl1 k2tog psso |
| 14 | slip one st purl wise | p1 st | k2tog | Ws, do not turn! |
2f) Square no. 6
Now you have 3 sts from the previous square on the right needle. CO2 6 sts from the edge of square 5. Co1 7 sts.
| R 0 | ||||||
| W 1 | k5sts | sl1 klpsso | k2tog | k 5sts | yo | sl1 k2togpsso |
| 2 | slip one st purl | p1 st | k remaining sts | all even rows are worked like this unless otherwise is mentioned | ||
| 3 | wise k 4 sts | sl1 klpsso | k2tog | k 4 sts | yo | sl1k2togpsso |
| 5 | k 3 sts | sl1 klpsso | k2tog | k3 sts | yo | sl1 k2tog psso |
| 7 | k 2 sts | sl1 klpsso | k2tog | k 2 sts | yo | sl1k2togpsso |
| 9 | kl st | sl1 klpsso | k2tog | k1 st | yo | sl1k2togpsso |
| 10 | slip one st purl wise | p1 st | k2tog | WS, do not turn! |
2g) Square no. 7
Now you have 3 sts from the previous square on the right needle. CO2 4 sts from the edge of square 6. CO1 5 sts.
| R 0 | ||||||
| W 1 | k 3 sts | sl1 klpsso | k2tog | k 3sts | yo | sl1k2togpsso |
| 2 | slip one st purl wise | p 1 st | k remaining sts | allevenrowsareworkedlike this unless otherwise is mentioned | ||
| 3 | k2 sts | sl1 klpsso | k2tog | k 2 sts | yo | sl1 k2tog psso |
| 5 | kl st | sl1 klpsso | k2tog | k1 st | yo | sl1k2togpsso |
| 6 | slip one st purl wise | p1 st | k2tog | WS, do not turn! |
2h) Square no. 8
Now you have 2 sts from the previous square on the right needle. CO2 2 sts from the edge of square 7. CO1 3 sts.
| R 0 | ||||||
| W 1 | kl st | sl1 klpsso | k2tog | kl st | yo | sl1 k2tog psso |
| 2 | slip one st purl wise | p 1 st | k1 st | WS,t turn |
Part 3: Edge only with a column of spaces
| R 0 W | ||||
| 1 | k1 st | yo | sl1 k2togpsso (the 3. st is from the body of the shawl) | RS, turn |
| 2 | slip one st purl wise | p1 st | k1 st | WS,t turn |
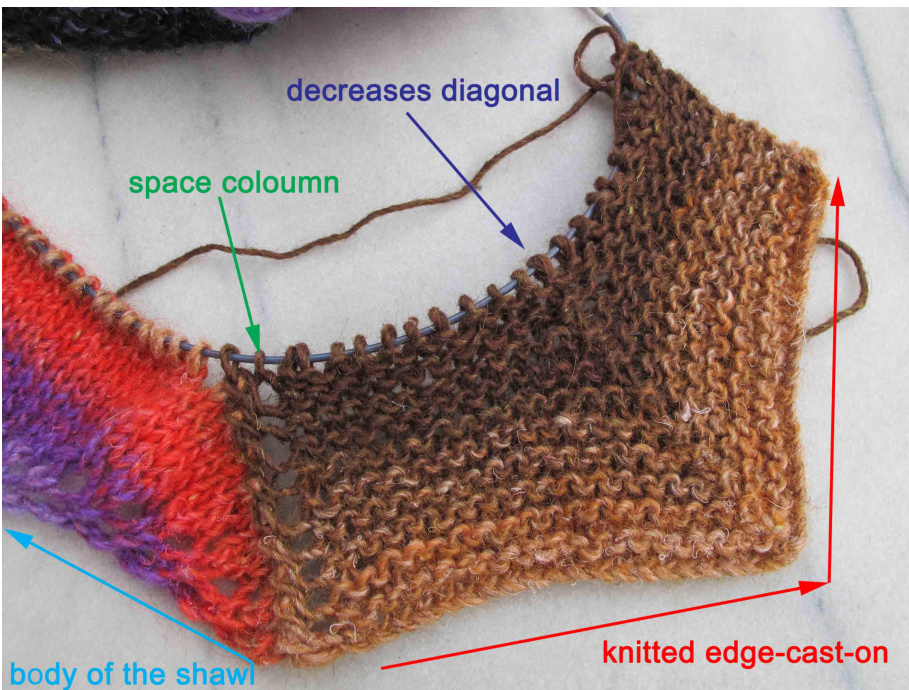
Repeat these 2 rows until 13 sts are left. See picture below.
pic 3 (RS)
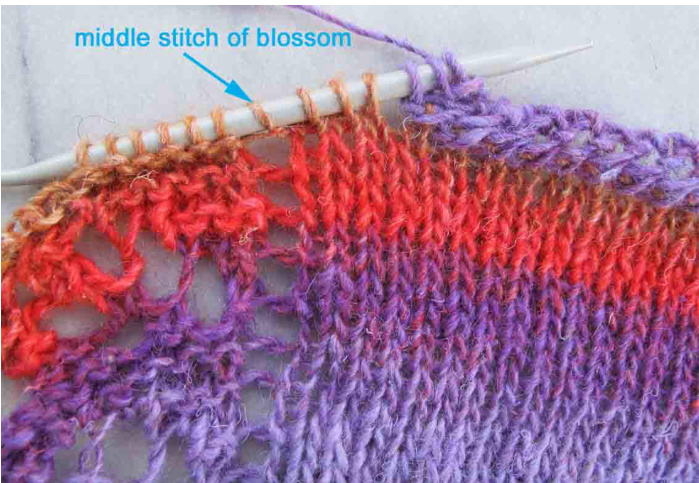
Part 4: Blossom Lace:
Continue witch chart B on RS. Work all 25 rows once. Even rows (WS) are purled. Bind off last st.
Chart B:
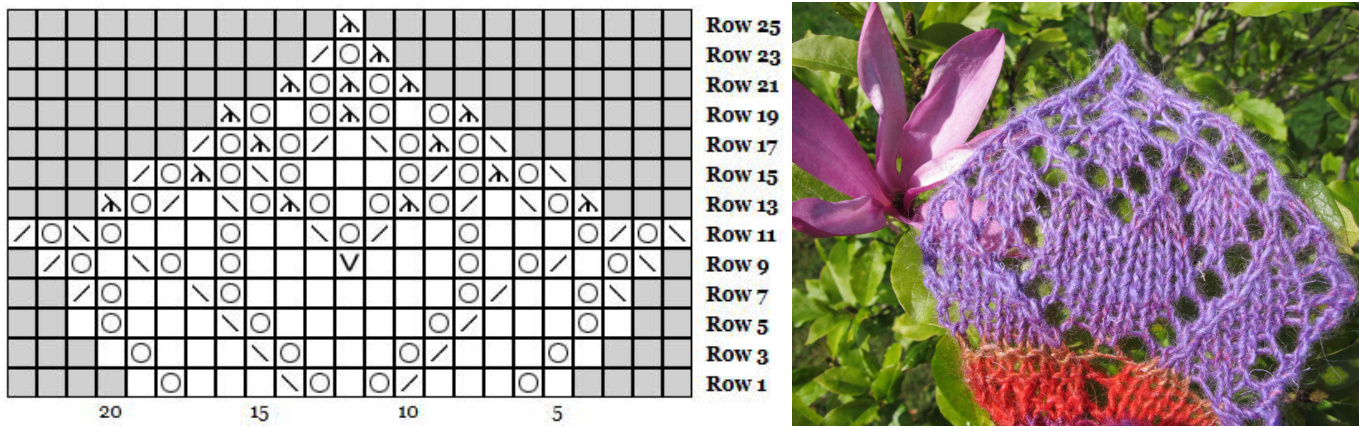
knit =purl bbind off 1 st k2tog =knit 2 stitches together sl1 k1 psso = slip 1 stitch, knit 1 stitch, pass slipped stitch over sl1 k2tog psso = slip 1 stitch, knit 2 stitches together, pass slipped stitch over make2stsoutofonekfb=knitintofrontandbackofsamestitch no stitch Washing, blocking, enjoy your new shawlette.
Appendix
A1) Cast-on CO1:
| The first new st is created on right side of the ES. Insert the right needle between the ES and the second st. | |
| Wrap the thread around the needle and pull it through as if to knit. | |
| Put the new st loosely back to the left needle. | |
| And now insert the right needle between the new st and the previous st. Wrap the thread around the needle and pull it through as if to knit. Put the new st loosely back to the left needle. Repeat until all sts are cast-on. |
Similar methods: Cable Cast-on, Knitted cast-on. You may use what you prefer.
A2) Cast-on CO2:
Pick-up the sts along the edge of a square. There are little knots at the edge. Insert your needle in a knot and draw the needle with the yarn through this knot. Then there will appear a nice cast-on row. A knot appears every second row when you knit the edge sts both on WS and RS.
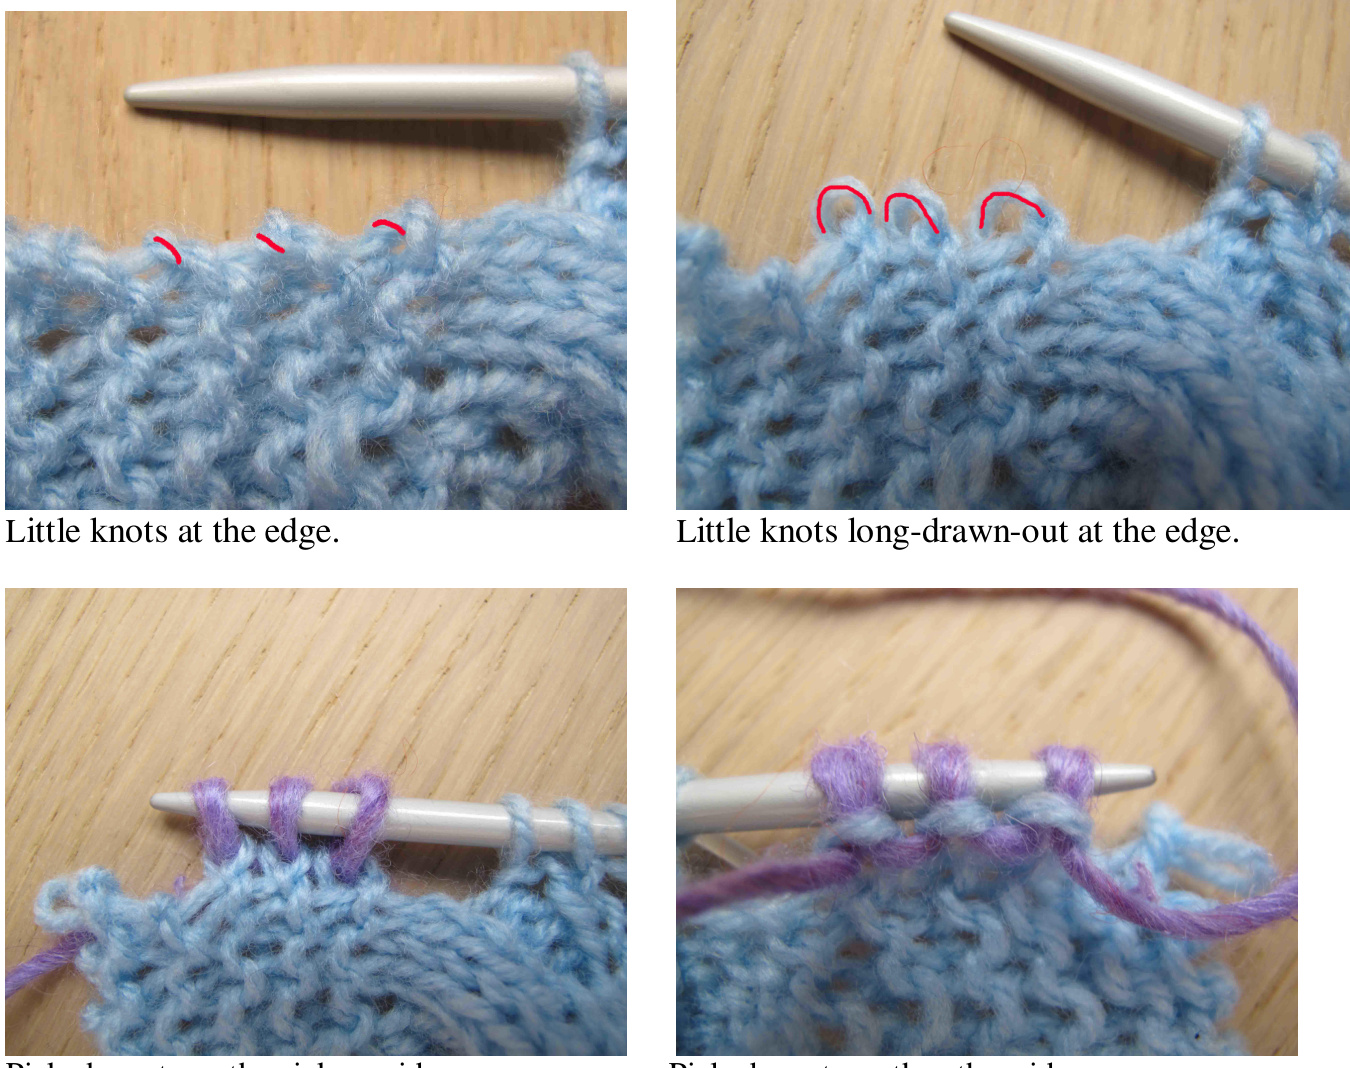
Picked-up sts on the other side. Picked-up sts on the pick-up side It's not so easy to photograph knitted pieces, when you only have two hands. I hope that these pictures are helpful for you.


