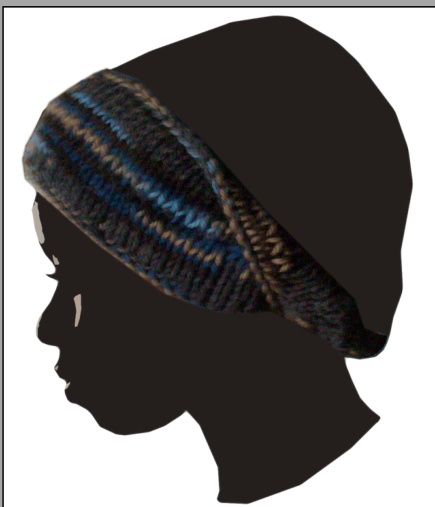
double knit mobius handband and earwarmer

It soundshopelessly geeky,but the prospect of knitting aMobius loop,was possibly one of thebiggestreasonsIlearned how toknit.Probablynot a surprise if you read my blog.) It satisfied my two major reasons for embarking on the adventure of making something myself.Ihad never seen one ina store;it was totally unique. Plus, it was a challenge and cool looking.Both of these things meant thatI wasguaranteedtobestoppedonthestreetwithinquires,which would lead toampleopportunities formeto saythemagical phrase,hanks,I madeitmyself. I've been knitting for about a yearand ahalf now,and can I say,that phrase never gets old.It brings a primal satisfaction like being 5years old and having yourparentsstickyourfinger-painting ontherefrigerator,orhaving theentire school applaud your work inthe annual school musical.If I can say that the design is my own as well, Let's just say the high is better than a black cat espresso.1 However, I realize that not everybody shares my shameless need for attention or my seemingly endless desire to treat myknitting as a series of puzzles that need solving.In that spirit I've included two versions of this pattern.The “Straight Arrow forthose whose life is quite completewithout actual hassle of knitting a mobius from themiddle when the same thing can easily be accomplished with a bit of seaming.Bewarned however,that 'veonlyincluded chart fortheStraight Arrow, with minimal instructions, as I haven’t knit it myself. (It defeats the point a bit for me).The instructions should work, especially if you are an old hand at double knitting, but may need a little tweaking. For mobius purists like me there is the “Full Cycle” version.I hope you enjoy it. The cast on is the trickiest part,but patience will be rewarded.I've included some pictures to try to clarify the procedure for casting on.Feedback is of course always appreciated and you can contact me at theblog or email info posted at the topofthepage. 1.Asreferenced in Esquire's 6o things worth shortening your lifefor."A triple. Note the exceedingly heavy body, with chocolate, caramel, and dried-fruit notes. Also note that you're vibrating. That means it's working. Difficulty: Not for the faint of heart Version1-The Straight Arrow Tame Version 2-Full Cycle Wild Features:circularknitting,Doubleknitting,chartedstitchattern,wo-color double provisional cast on with a twist), tubular bind off.
SIZE
Medium - a mildly snug fit around a 21-inch head, including thick hair. For a smaller size I would recommend removing stitches from the back-end of each arrow. If your gauge matches mine subtracting a stitch per arrow will make yourbandmorethan1.5inches smaller. Conversely,foralarger size add stitches to theback-end ofeach arrow.Ifyour gauge matches mine adding a stitch per arrow will make your band more than 1.5 incheslarger.
FINISHEDMEASUREMENTS
25-inch practical circumference. (This means 5o inches measured down the center of the mobius.Remember it's one-sided so actual measurements are doubled.),3.5 inches wide Headband (using sport weight yarn) 19.5 inches long, 2.75 inches wide
MATERIALS
Lion Brand Microspun [100% Microfiber Acrylic;168 yd/m per7og skein]; color:1 skein each Lilac&Ivory. The Microspunworksfinebut youmaywant to ry a similar weight ya withmore spring and stretch. The Microspun seems to lose its elasticity quickly. 2 long (I used 31-inch) US #4/3.5mm circular needles (they should be the same length) Optional: sizeD(3.25mm)Crochet hook Notstrictlyecessaryuttwillmakelifeasierlightlymalle you'reyourneedlehelps.
PATTERN NOTES
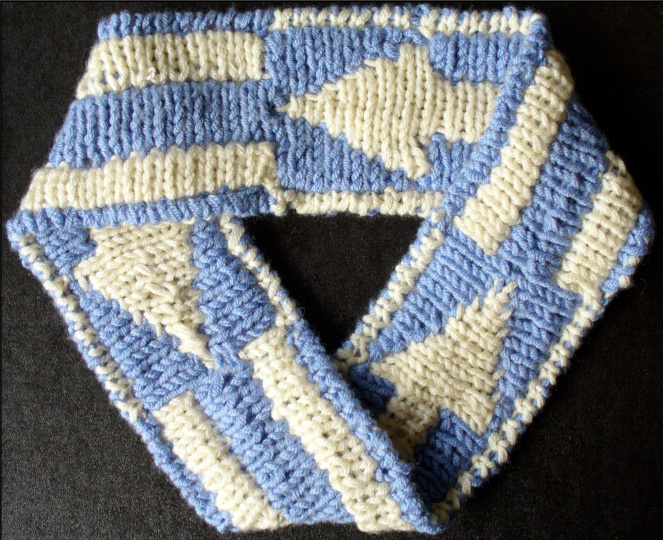
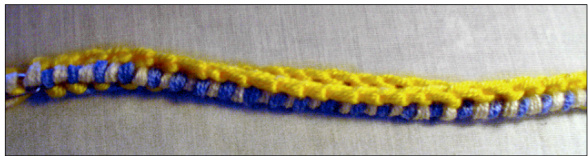
1.If you'reknitting theStraight Arrow,youll have to use your own discretion on best method for casting on and binding off, as I have not knit this one myself. I would probably want to do a nice stretchy tubular bind -off which means choosing some method of tubular or provisional cast on if you want the edges to match. On a test swatch I did forthe Earwarmer,(see the second silhouette picture on Page 2) Iused a longtail cast on,holding both yarns together.heresult was acceptable,though therewaslittlegive.Ive addeda link to a suggested technique in thelegend.If I get to this in the future,or anyone tries this and has a recommendation, let me know and I'll add it. 2.Reading the Charts. a) Each square on the chart represents 2 stitches,1 knit stitch,in the color on the chart, and 1 purl stitch in the opposite color.You'll always work the knit stitch first,then the purl stitch.Row1 of each chart represents the cast on row. The first half of the cast on stitches are done on 2 needles and are represented in Chart I. In the instructions, needle 1 will always represent the chart; needle 2 will be the opposite. (See Note 5 for details.) b) The cast on is continued in Chart II. See Note 6 for details. 3.There are two methods for double knitting. One involves working both colors at the same time,knitting theright side and purling the opposite side.The otherworks onecolorevery otherrow,slippingthe stitchesforthenonworking color.For Straight ArrowI would use the slipping method,because I find it tedious to work the twoyarns at once.However,forFull Cycle Iwork both colors at the same time.I figure there's enough to think about without having to remember which row you are on. Though it looks simple,there's a lot going on so I recommend working the way that makes you most comfortable. 4. Which brings me to this tip: If you are working both colors at the same time, always move both color yarns together.This way, you'll prevent any strange crossings or gaps when the yarn switches color. GAUGE Earwarmer #12 sts/20 rows = 4" in stockinette stitch Headband #15 sts/28 rows = 4" in stockinette stitch Blunt tapestry needle double knit mobius handband and earwarmer d) On needle 1 purl the first 24 stitches with color A.Leave enough tail to weave in at theend.If you havea bit ofa gapwhen youjoin your stitches you may alsobe able to camouflage any imperfections with your tail yarn so as Garbo would say, don't be stingy.This project takes well under a half skein for each color.Set needle 1 back down in its far position.Knit 24 stitches in Color B onto needle 2. Same note about the tail. (Here's where it gets tricky). Hold onto the yarn for Color B and set needle 2 down. Pick up needle 1 and continuing where you left off purl the next 24 stitches in Color B.This will join your two needles.When you are done you should have a total of 48 purl stitches on needle 1, 24 in Color A and 24 in Color B. You should have 24 knit stitches on needle 2 in Color B which lead into the last 24 stitches on needle 1.
e) Now pick up needle 2 and the yarn for Color A and continue knitting on 24 stitches. Drop needle 2, grab needle 1 and purl the final 24 stitches onto needle 1 in Color A.
f) Pick up ColorBand knit the final 24 stitches onto needle 2.Needle 1will have 72 purl stitches, 24ColorA, 24 Color B,24 color A.(Again, this will look thefirst row on your chart.)Needle 2 will be the opposite: 72 knit stitches in B, A, B.
Headband
5.The Cast on for Full Cycle.Read this through carefully and look at the pictures so you get the concept.I've tried to describe things with explicit details. (The pictures could be clearer,but keep in mind that it was my first time and it was the middle of the night.) If you are familiar with double knitting, you may find this annoying and wish to skip some of the minutia. This is fine, just keep in mind that it is very important NOT TO TWIST YOUR NEEDLES AROUND until the final step (Row 2). (If it confuses you, don't worry about it,just go through and follow the steps.It's best to treat it like the space-time continuum in StarTrek ortime travel inBack to the Future. In other words, don't think about it too much and follow the Prime Directive -err.rules.If you run into yourself, well, seek more help.That's a bit beyond the scope of these instructions.) a) The base of cast on that I use comes from these instructions at Planet Shoup (http://www.planetshoup.com/easy/knit/scarfmb.shtml). To summarize the concept:first use your gauge to calculate the number of stitches needed to get the desired circumference(in this pattern it's 72). Cast on this number with a long-tail cast on.This gives you the stitches for thefirsthalfof yourmobius.Forthesecond halfyouloop theneedleback around to thefirststitch andpickupastitchinthebottom ofeach stitch on the needle until you reach the end, doubling yourfinal stitch count (144). Got that? Good. Here's how I changed it. b) This is double knitting so you are essentially knitting 2 bands and need to double your numbers. You'll be casting on 72 stitches for band 1 and 72 stitches for band 2 (total 14). You'll need 2 needles. Using waste yarn and the longtail method cast 72 stitches onto each needle. c) Each band has three arrows in alternating colors. On band 1 the arrows are dark (Color A), light (Color B), dark (A) (matching the Row 1on Chart I, convenientlylabeled as“CO”-for cast on.);on band 2 they are the opposite: light (B), dark (A), light (B) (which matches, not incidentally, Row 1 on Chart I). To get the arrows started properly,you must cast on with the alternating colors.This is done one needle at a time. Think of eachneedle as a separate band.Line up the needles so that they are parallel to you.Needle 1 willbe the st band, the one closest to you.You'll be knitting on to this needle.Your second band, on needle 2 will be farthest away from you.You'llbe purling stitches onto this needle as if you are working the wrong side of the fabric. (This process will make it easier to keep things from twisting.)
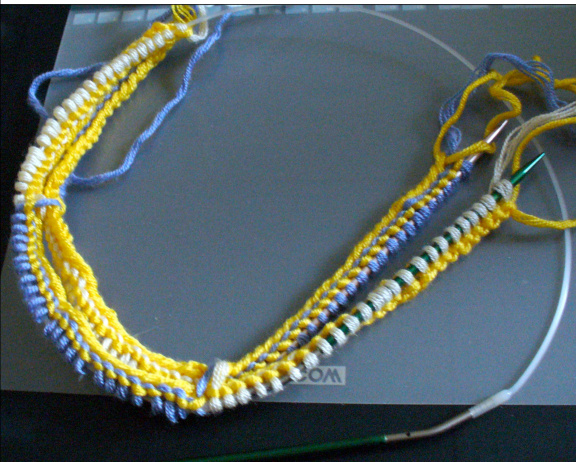
g)Now you'll mergeyour stitches together onto1needle.Lay both needles flat on a table, making sure that they do not cross each other. Slip the first stitch from needle 1 purlwise onto your working needle.(I just used the other side of needle 1.)Slip the first stitch from needle 2 purlwise onto your working needle. Continue alternating until all stitches are merged together on one needle.Remember that each square of the chart represents one knit stitch in the color shown and one purl stitch in the opposite color.Row1ofChart Iis nowcomplete.Congratulations,you've successfully cast on half the stitches!This might be a good time to take a break. (I'd suggest steering clear of the booze; you'll need your faculties for the next part.)
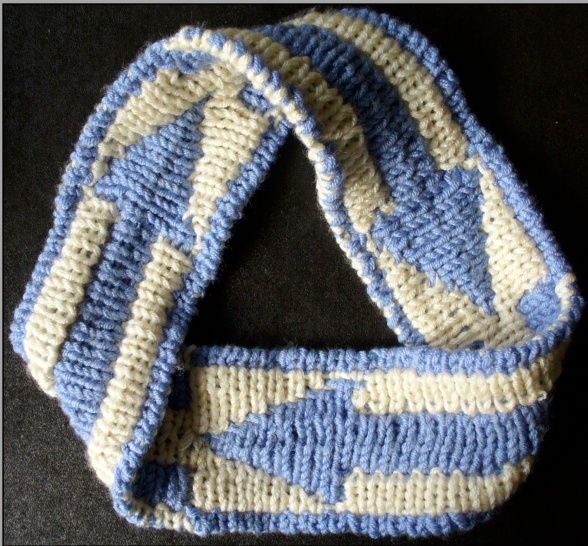
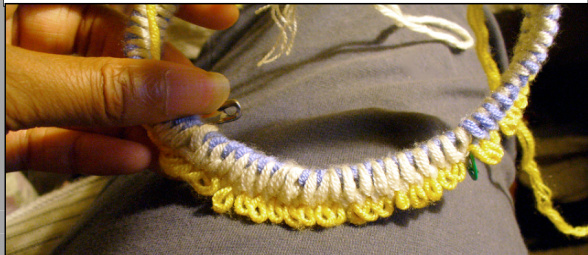
be able to wear this when you are done. In a thin, lightweight yarn (the headband version)I doubt you'll even notice the twists,whichwill fall at the nape of the neck. In a worsted weight however (earmuff version), the twists become markedly more noticeable. Depending on your yarn this may bug you.In the interests of wear-ability you may want to consider yourcomfortlevel.Onehalf twist will stillgiveyou a truemobius,but less bulk and may be preferable. The truly sensitive may say screw it,and just make a plain old flat circle. This screws up the pattern a bit, but hey, I won't tell if you don't. Now's the time to decide. 6.Adding the twist(s) a) At this point we'll create the mobius. This pattern yields a mobius loop with three half (1.5) twists, which accurately recreates the universally accepted recycle symbol.However, you should actually b) Lay your needle out on a flat surface and arrange the stitches in a circle so that they are not twisted and facing inward and the waste yarn faces outward.Then twist the working end of the needle so that the stitches face outside and the waste yarn is inside. Just do the one-half twist for a regular mobius, go around 1 full twist more for the full cycle. 7.Finishing the Cast on a)At this point, you've got onemerged needl with half thecast on stithes and2sets of waste yarn sticking out and a twist or three.Nowyoull pick up stitches forthe second half of the mobius.The number of stitches will double again,bring thetotal count to288.Why are there so many dang stitches?Well thefirst time thenumber doubled from 72becausewe are double knitting (remember I told you to think of it as two bands.)This time it's due to the way we are constructing the mobius.It is being knit from the center out. The first half stitches will be knitting from the middle to thetop.The stitches we are about to pick up will be knitting from the middle to the bottom (Note:ultimately there reallyisn't a top or a bottom, but for the purposes of clarity, we are going to ignore that fact right now.) b) The first stitch on your needle is a knit stitch in Color A. The last stitch on your needle is a purl stitch in Color B.You are set to join your ends in the round.(Take care not to undo your careful twisting.)You'll see that you'll be properlysetuptoknit,notinto thenextstitch,but thebottoms of the next stitches.Knit into the first color B stitch,(technically,the second stitch on top of the needle-the first purl stitch) with color B.Then purl the first Color A stitch,(the first knit stitch on the top of the needle) with Color A. In essence,you are knitting into the bottom of the purl stitches on top on the needle and purling into the bottom of the knit stitches on top of theneedles.The contrasting color of the waste yarn will make it easyto see the bottom of each stitch. You'll be following the first row of Chart II. double knit mobius handband and earwarmer a)Here's where the crochet hook comes in.It willikelybe difficult to pick up stitches with the end of the needle. Use the crochet hook to pull the yarn through and place it on your needle. Repeat this procedure until you pulled a stitch through the bottom loop of every stitch on the needle.
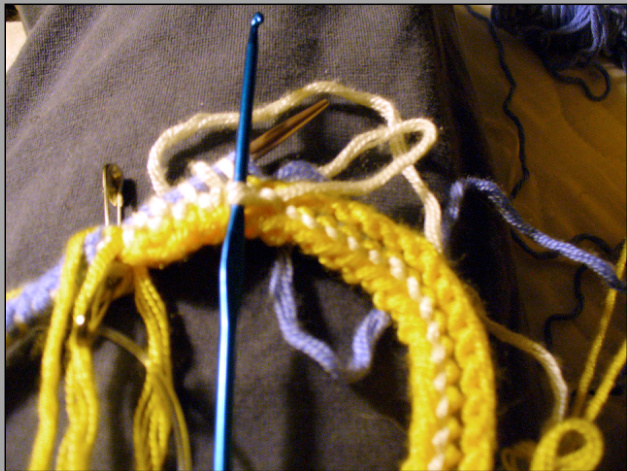
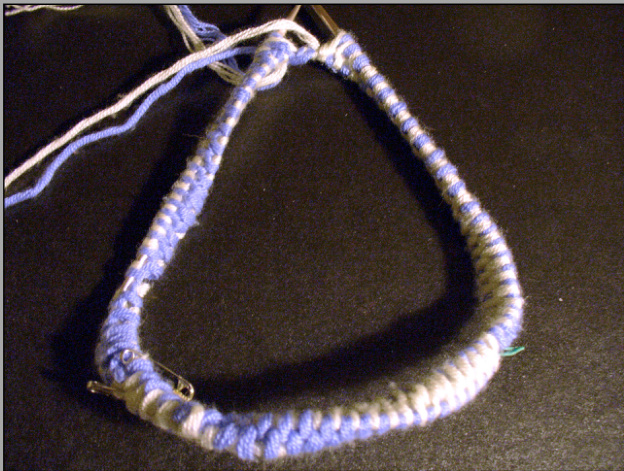
b) Pull out the waste yarn. The crochet hook may come in handy here too. Some of the yarn will be trapped between the needles.Don't worry,it will come out just fine.If it makes youfeel better you can unravel the waste yarn a bit as you go but you will not be able to fully unravel it until you completetherow. c) Congratulations again! This time you really are done with the cast on. Take another break.It's smooth sailing from now on.I still wouldn't advise breaking out any booze just yet though.
7d. Pull out the waste yarn
7e. The Finished Cast on 7c. Using a crichet hook makes it easier to put stiches on the hook.
PATTERNS
Full Cycle
1. Using both colors, cast on 154 stitches. (That's 77 stitches of each color. See PatternNote1.) 1. Cast on 288 stitches. (You've read the Pattern notes right? See Notes 5-7 in particular.) 2.Proceed according to the chart, starting with Chart I and following with Chart I1. (Together they make a full row, as illustrated below. They are broken up on the chart page to make them easier to print and read.)
Straight Arrow
It's helpful to place a marker at the first stitch and at the middle stitch (after stitch 144). This will give you a visual clue as to which chart you should be following. Chart I refers to the first half of the mobius. Chart II refers to the second half. (See Note 2 for instructions on how to read the chart.) For the first fewrows,the design won't look like much of anything.Be patient,the arrowswill showupsoon. 3. Bind off the stitches using a tubular bind off. I tried this using one color to bind off half the mobius and the other color to bind off the other half. It works, but I found that it looks much better and more consistent to bind off the entire mobius in one color. So choose the color you want to use for the bind off. Cut off a length about 4 times the total length of your ring. If you've never done this bind off before, err on the side of overestimating what you'll need.You've come too far to run out of yarn now. Cut the other color and weave in all ends when you are done. (Instructions for a tubularbindoff included inthelegend.) 4. Savor your results and brag loudly to your friends. 2. Follow chart. (See Pattern Note 2.) I added ribbing to the straight arrow, and played with doing a tubular bind off two stitches at a time.I only did a test swatch so theverdict is still out,but I do like the idea of ribbing on the edge to make it give the band more grab. If you wish, ignore the ribbing. 3. Bind off, using a tubular bind-off. 4. Twist (see Pattern note 5.) and seam. There is 1 stitch selvedge on each end.
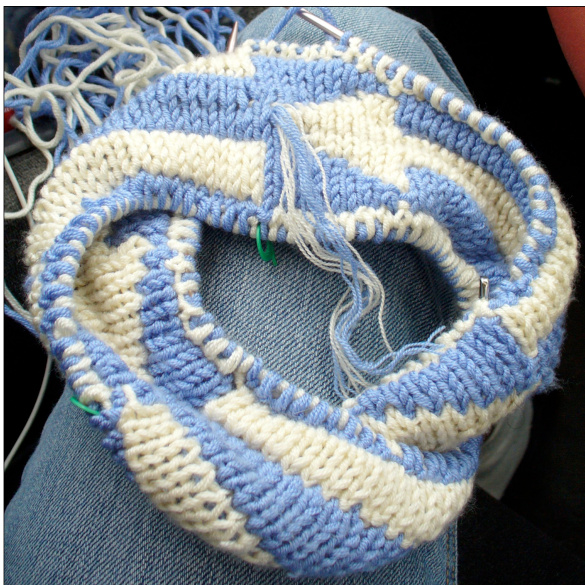
In Progress

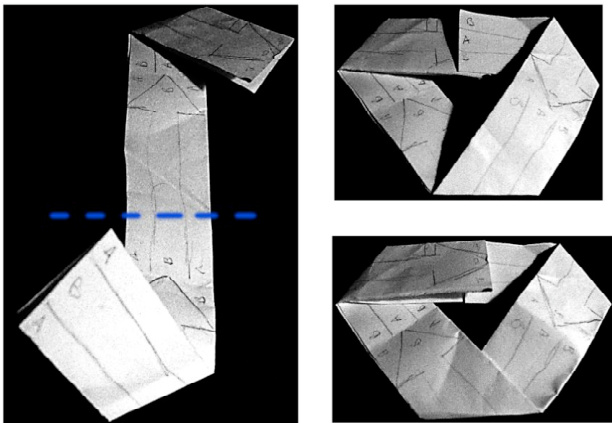
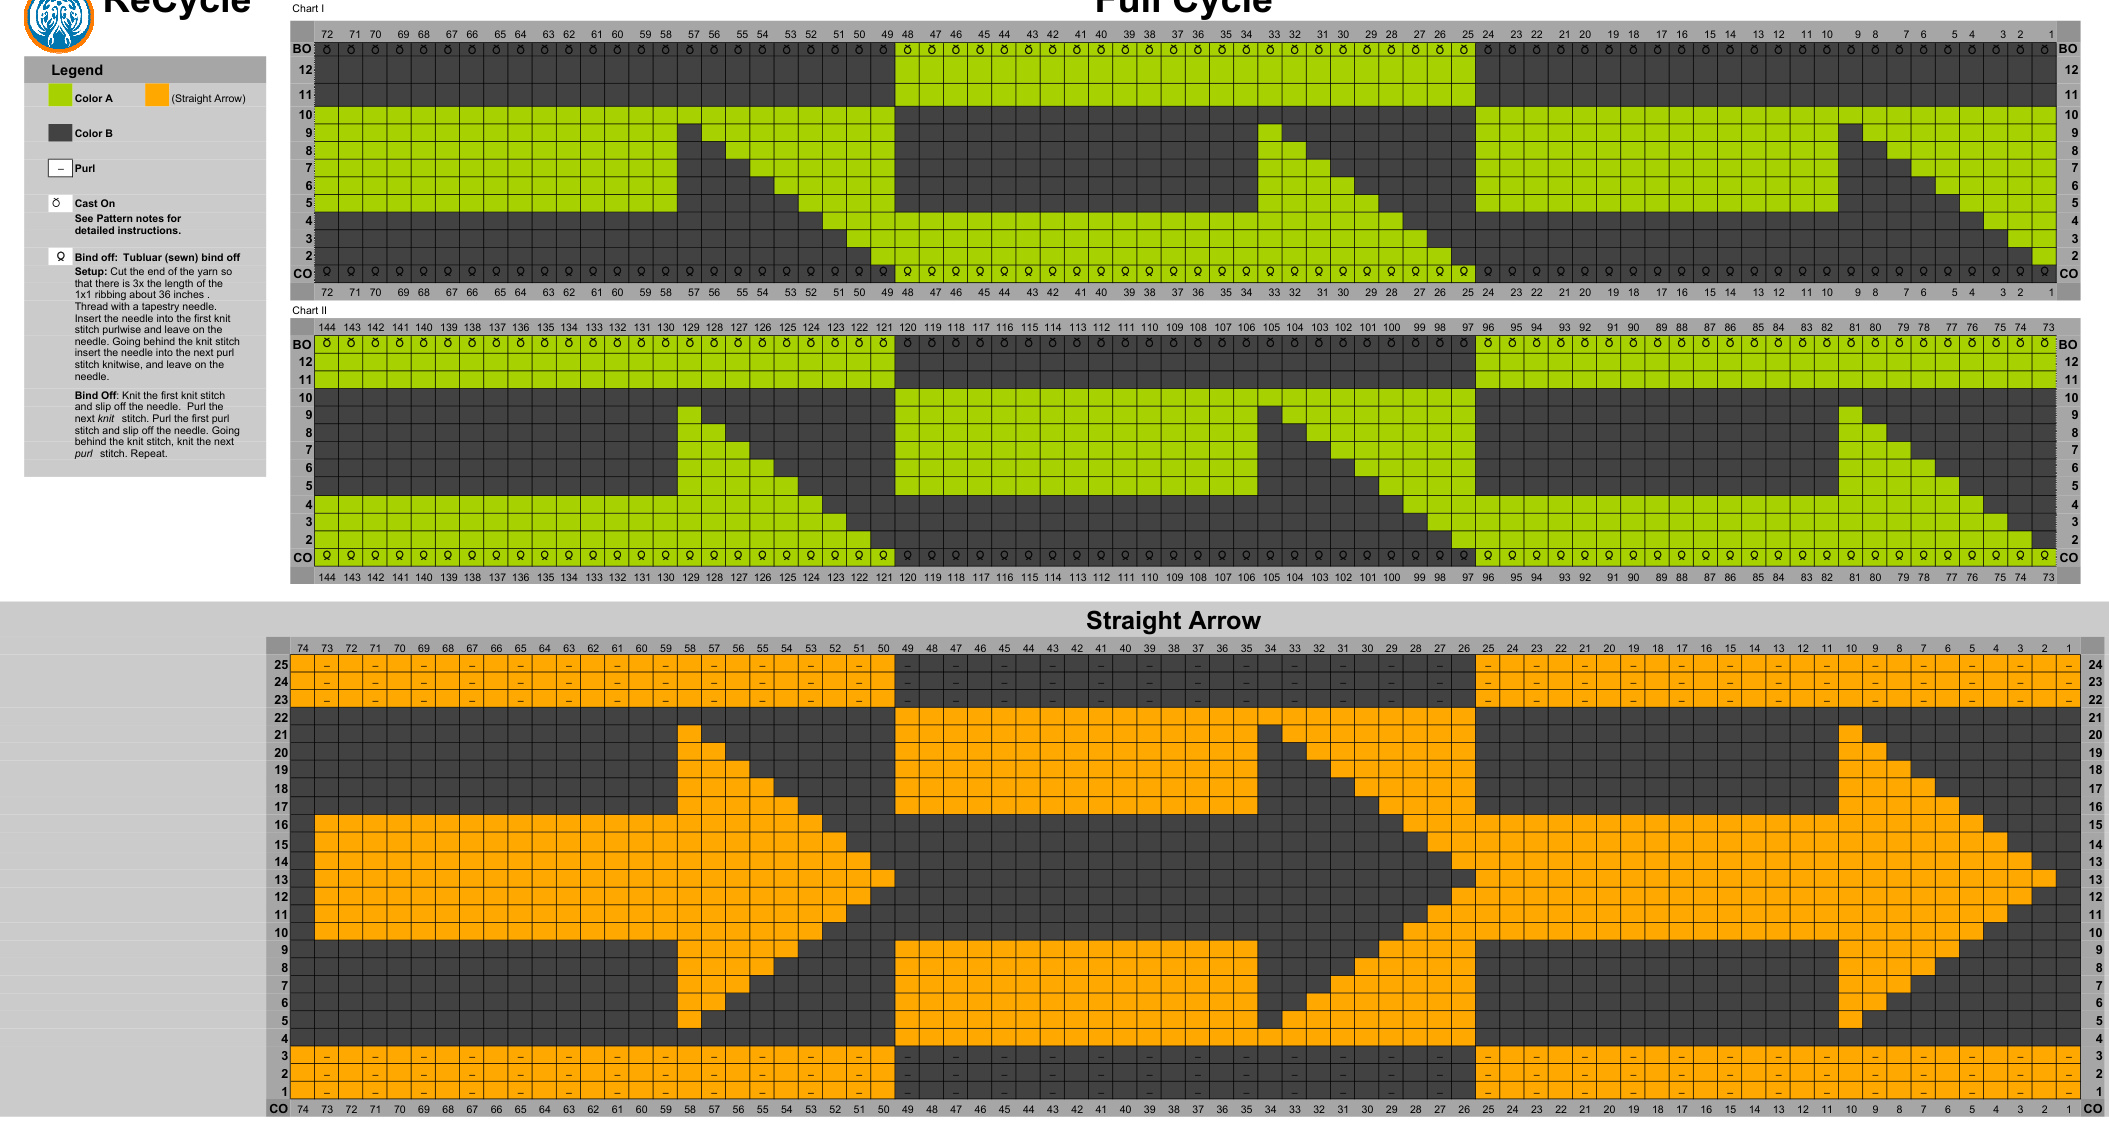
How to fold:Fold the strip as shown on the left.For one half-twist fold the bottom half up towards the top and attach the edges. For three half twists fold the bottom of the strip underneath and attach the edges.
Full Cycle