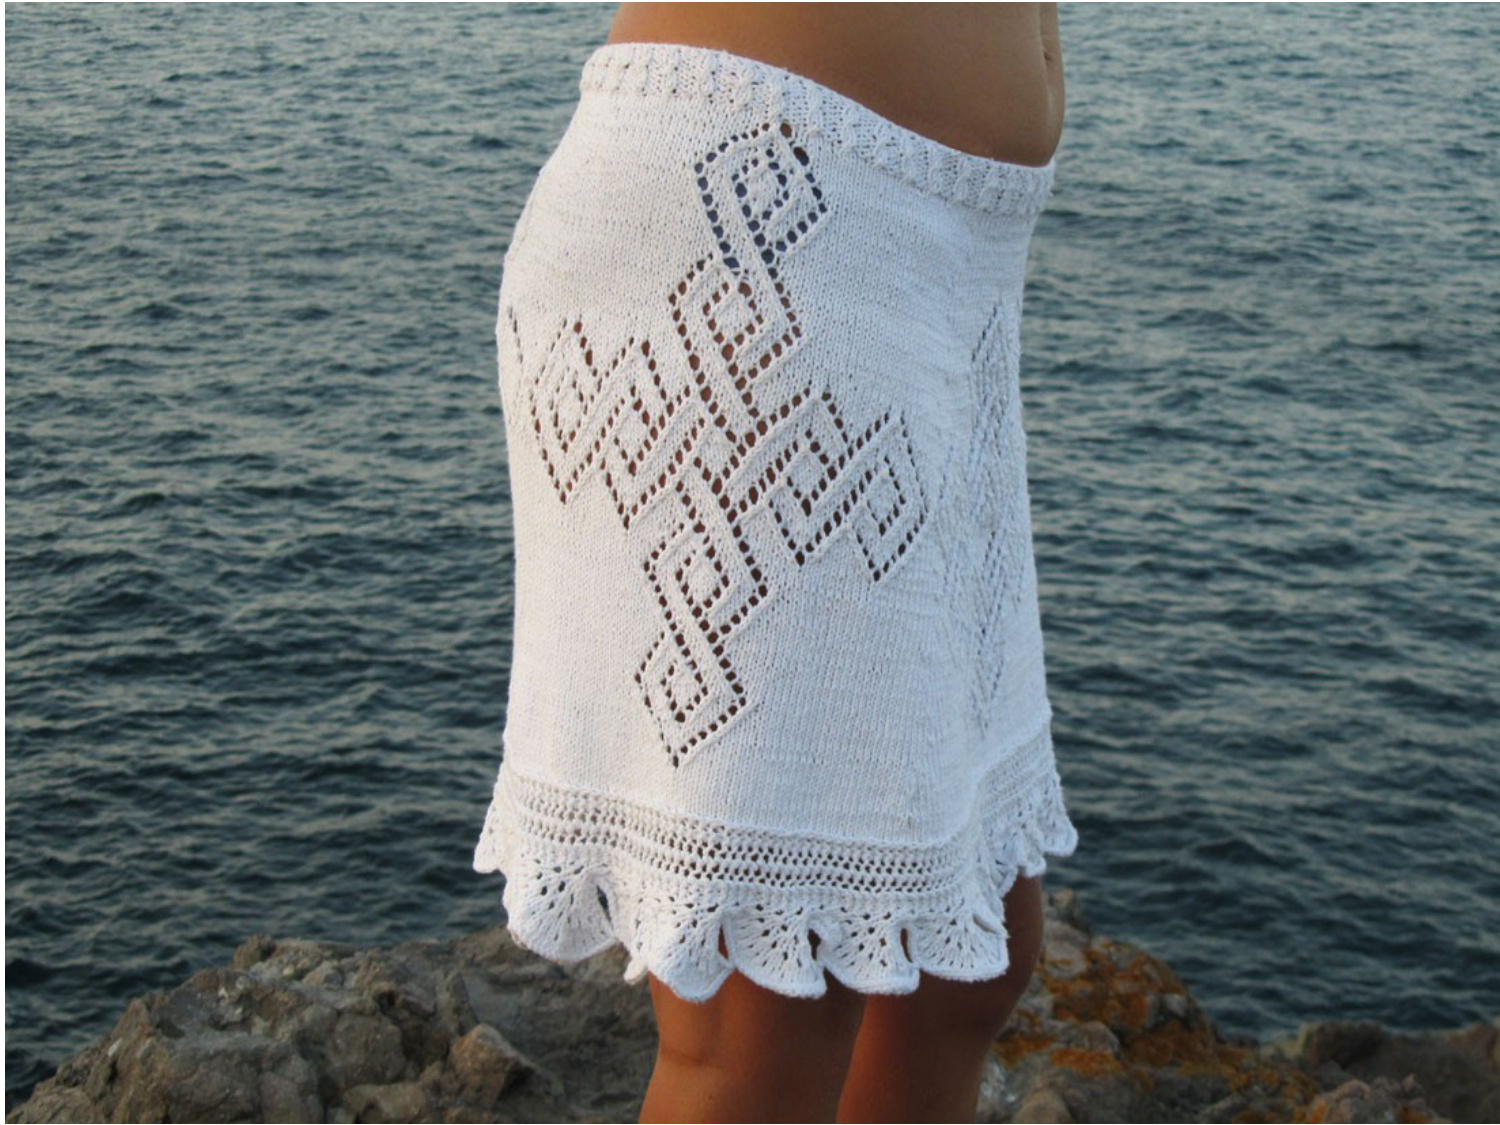
Crossroads a knitting pattern for skirt
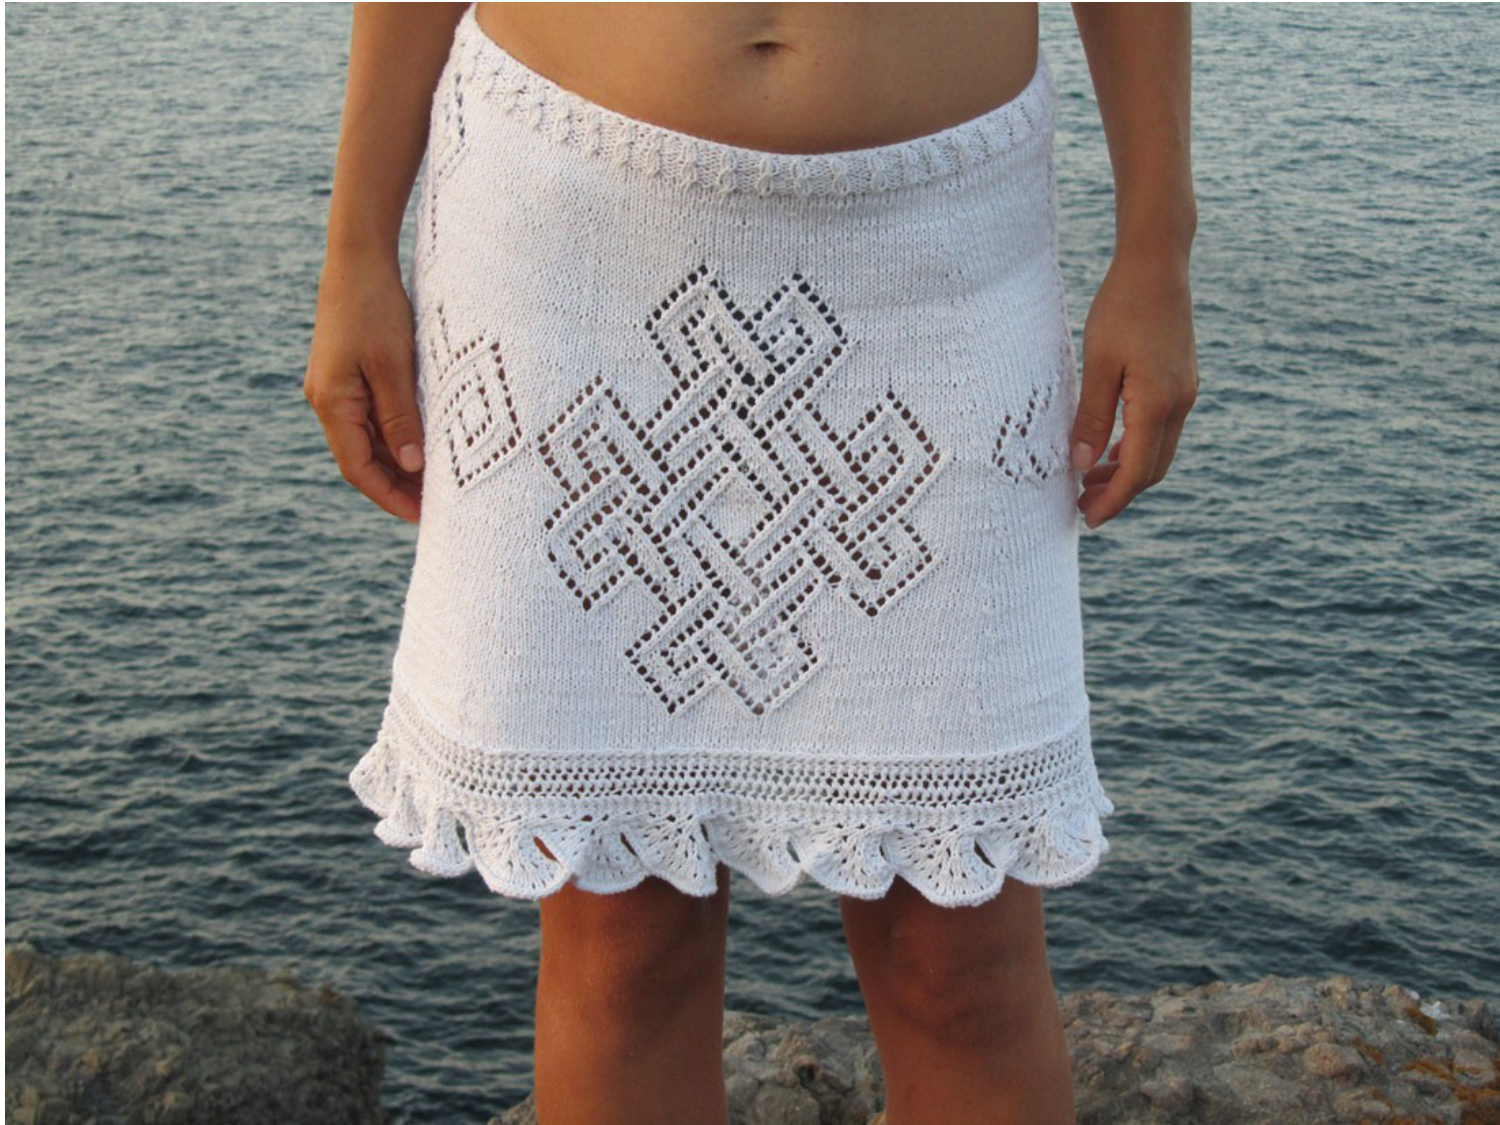
Sizes:M { horizontal: 83sm waistband- measured under the belly as it is a low waist skirt; 115sm-where the skirt ends-measured just above the scallops; vertical: 18 inches(46sm), including scallops}
Materials: 4-5 balls of cotton Gauge: 30rows, 22stitches=10cm(4 inches) Glossary: Yo - yarn over k2tog - knit two stitches together (a right slanting decrease) ssk- slip, slip, knit (a left slanting decrease): slip the first and second stitches on the left needle knit-wise, one at a time, then slide the point of left needle into the front part of both stitches and knit them together from this position; also could be worked “sl1, k1, pso" or "k2tog in back loops" sll, k2tog, psso- slip one, knit tow together, pass the slipped stitch over the two knitted stitches k3 tog- knit three stitches together; could also be worked “ssk , pass next stitch over m1 - Insert the left needle from front to back into the horizontal strand between the two stitches. Knit the stitch(either from the back or from the front) (...) x7(or other figure)-do the instructions in the brackets 7 times Patterns used: Scalloped edging Baby cable ribbing Charts for the four symbols
Method:
Scalloped edging Note:always slip the first stitch-later it will be visible from the fro1 Knit the following scheme 25 times until you have 25 scallops : Row 1: sl1, k2, (yo, k2tog) twice, k2, yo, k1, yo,k2 Row 2: sl1, k2, p3, k3, (yo, k2tog) twice, k2 Row 3: sl1, k2, (yo, k2tog) twice, k7 Row 4: Repeat row 2 Row 5: sl1, k2, (yo, k2tog) twice, k2, (yo, k1)x3, yo, k2 Row 6: sl1, k1, p7, k3, (yo, k2tog) twice, k2 Row 7: sl1, k2, (yo, k2tog) twice, k11 Row 8: Repeat row 6 Row 9: sl1, k2, (yo, k2tog) twice, k2, (yo, k1)x7, yo, k2 Row10: sl1, p1, p15, k3, (yo, k2tog)twice, k2 Row11: s1, k2, (yo, k2tog) twice, k19 Row12: Repeat row 10 Row13: sl1, k2, (yo, k2tog)twice, k2, (yo,k1)x15, yo,k2 Row14: sl1, k1, p31, k3, (yo, k2tog) twice, k2 Row15: sl1, k2, (yo, k2tog)twice, k35 On all subsequent repeats, work Row 15 as follows to connect the scallops neatly: sl, k2, (yo, k2tog) twice, k34, slip the last stitch, pick up and knit the 9" stitch from the previous scallop (counting from you), pass the slipped stitch over the picked up stitch, turn and work Row 16 as usual. Row16: Cast off 30 stitches, p2, k3, (yo, k2tog) twice, k2 Row 16 of the 25'"h scallop-Cast of all stitches.
Body of the skirt:
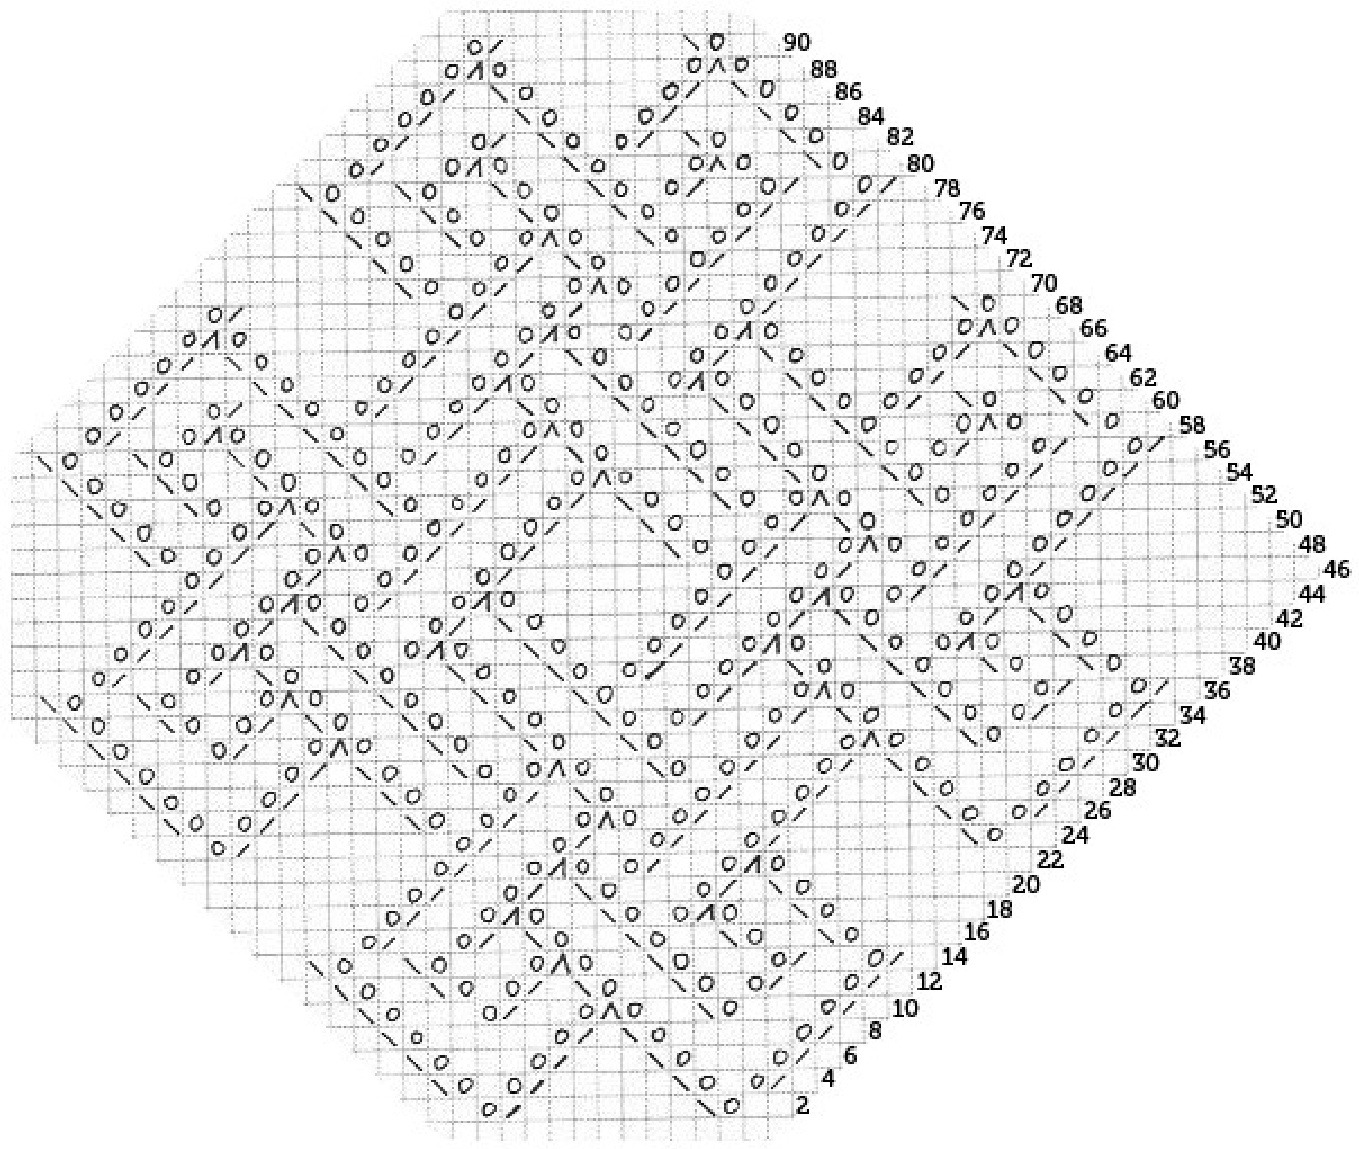
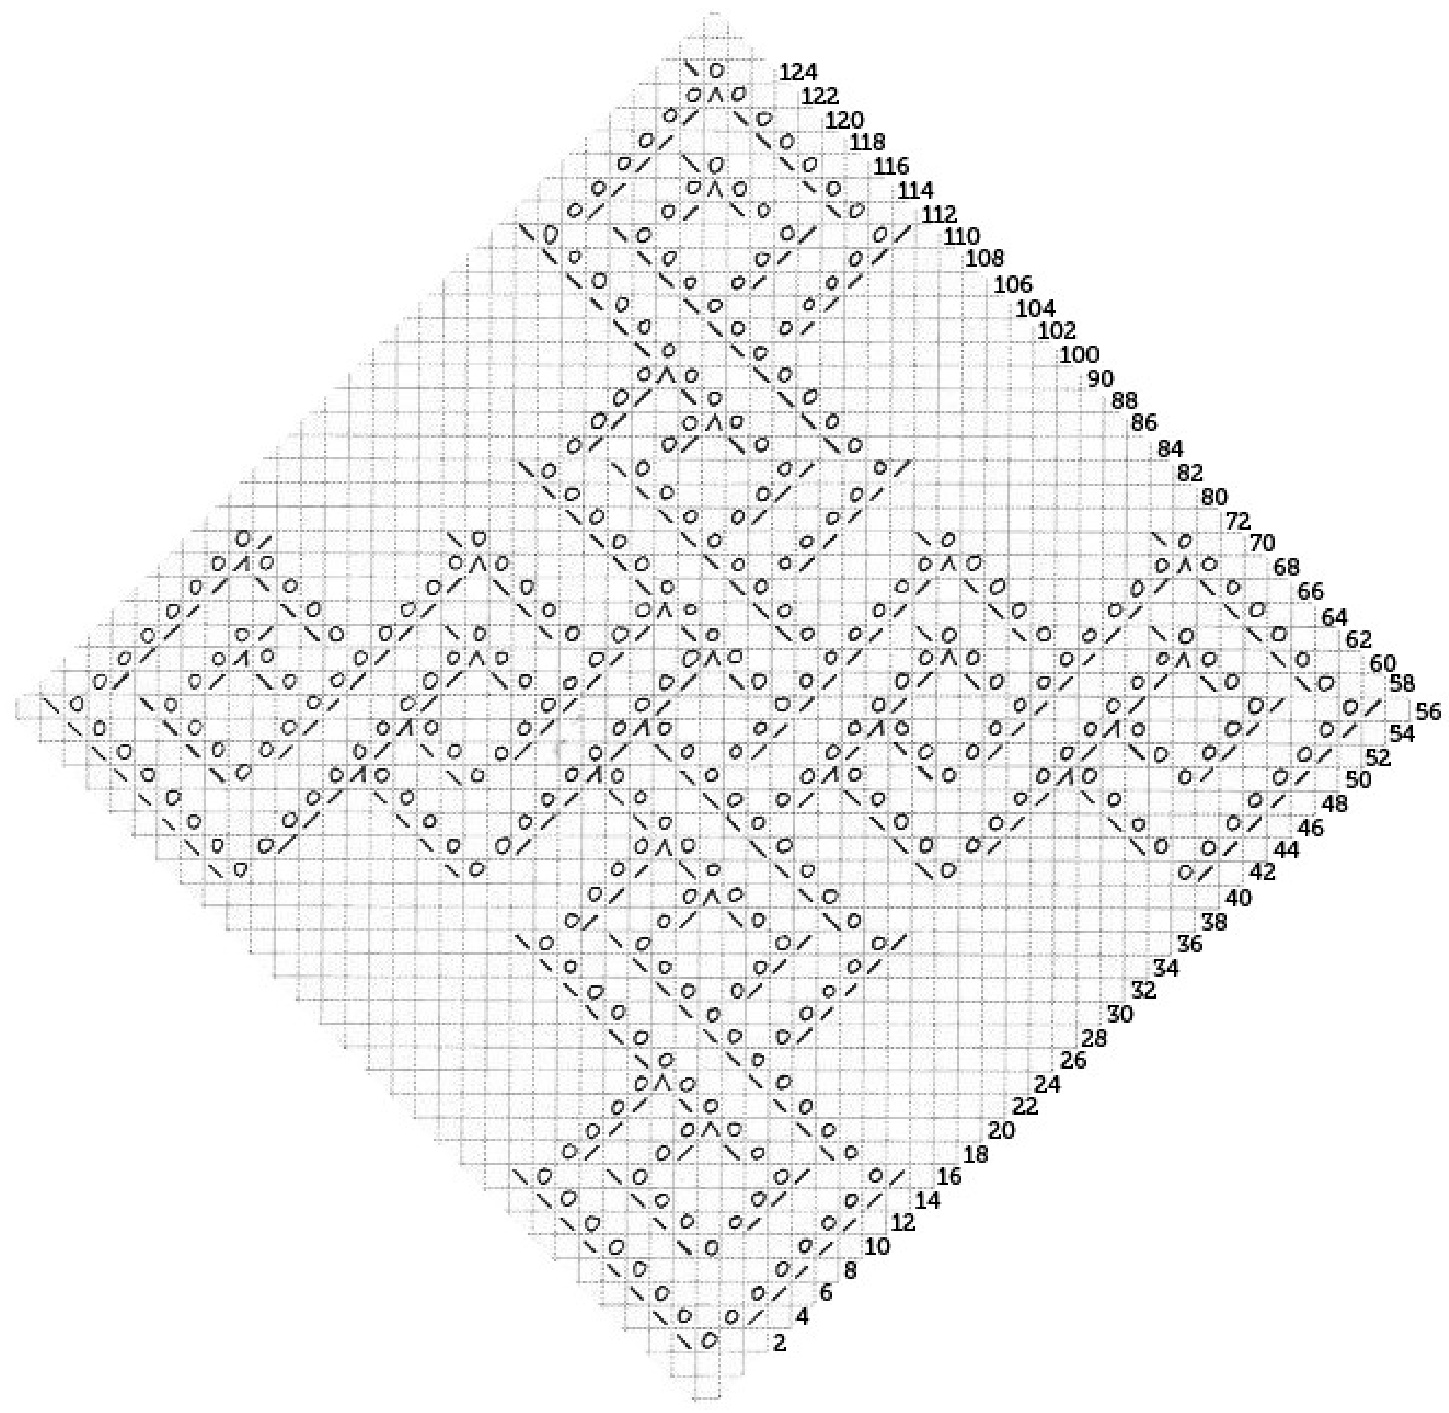
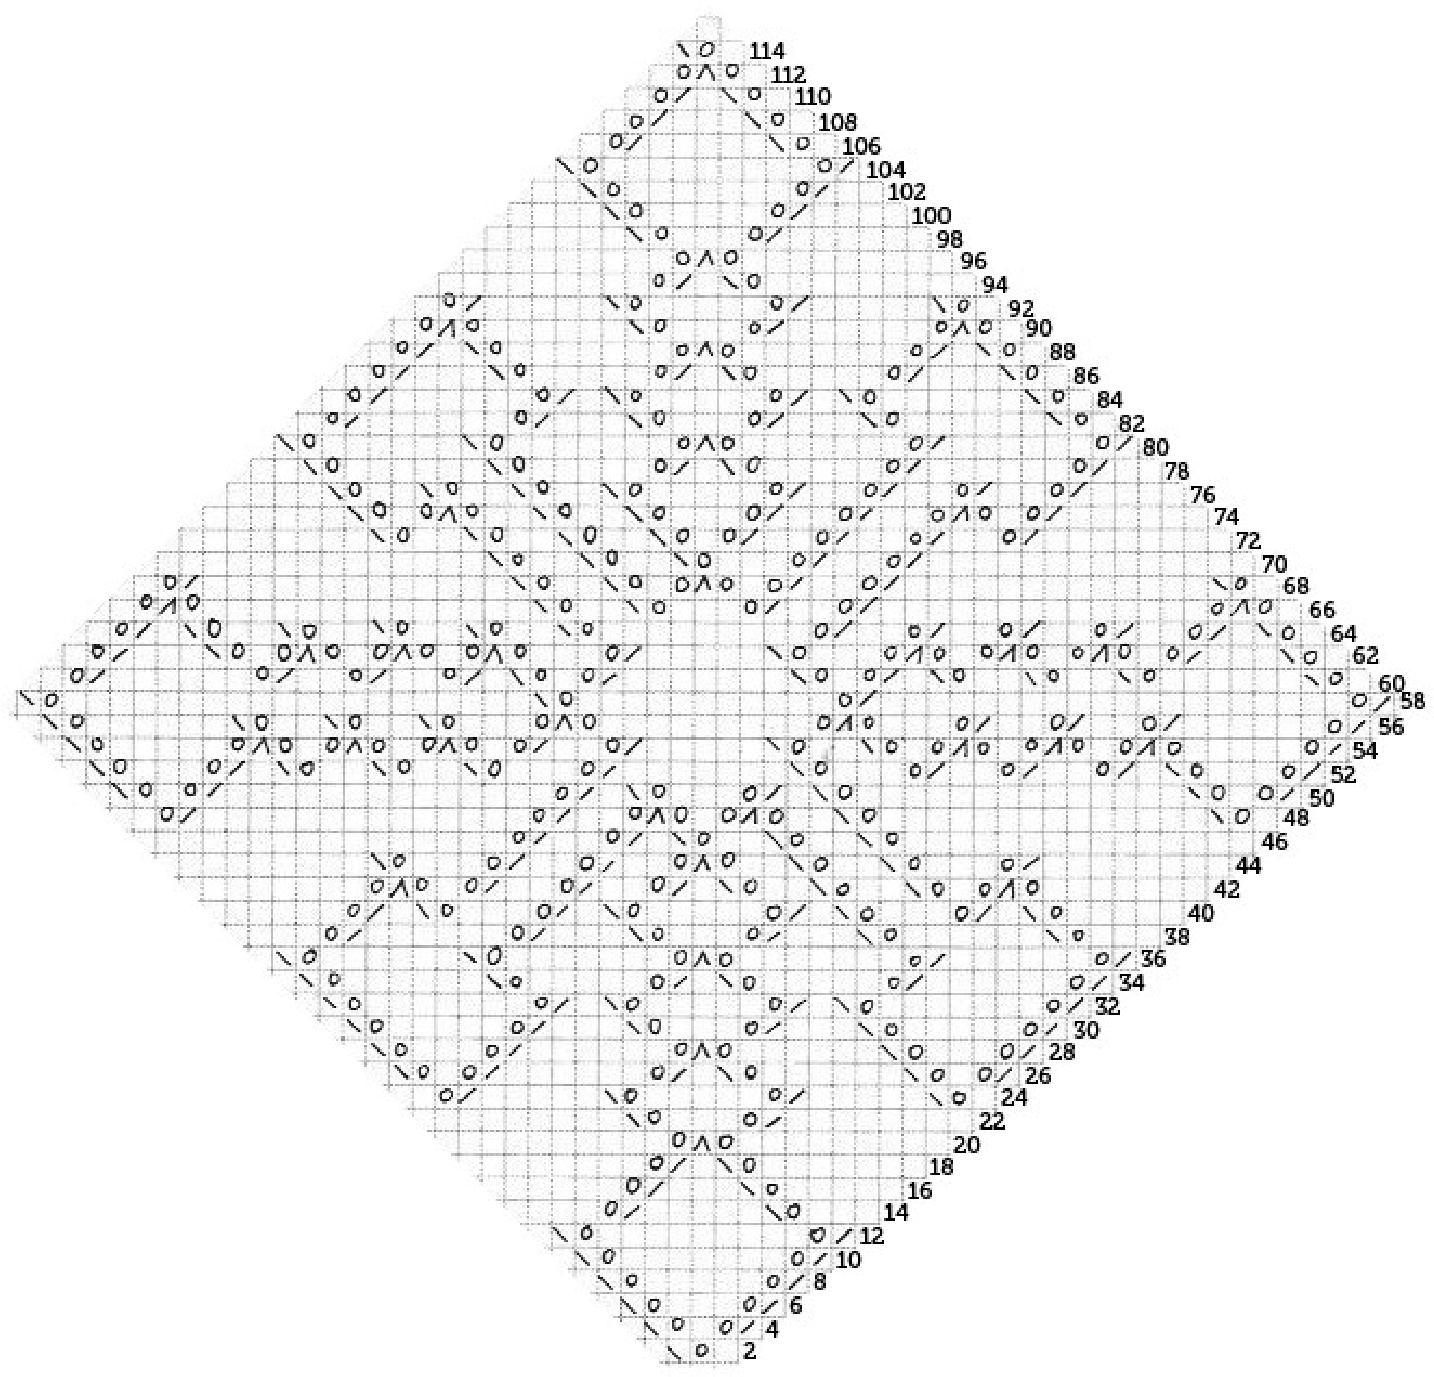
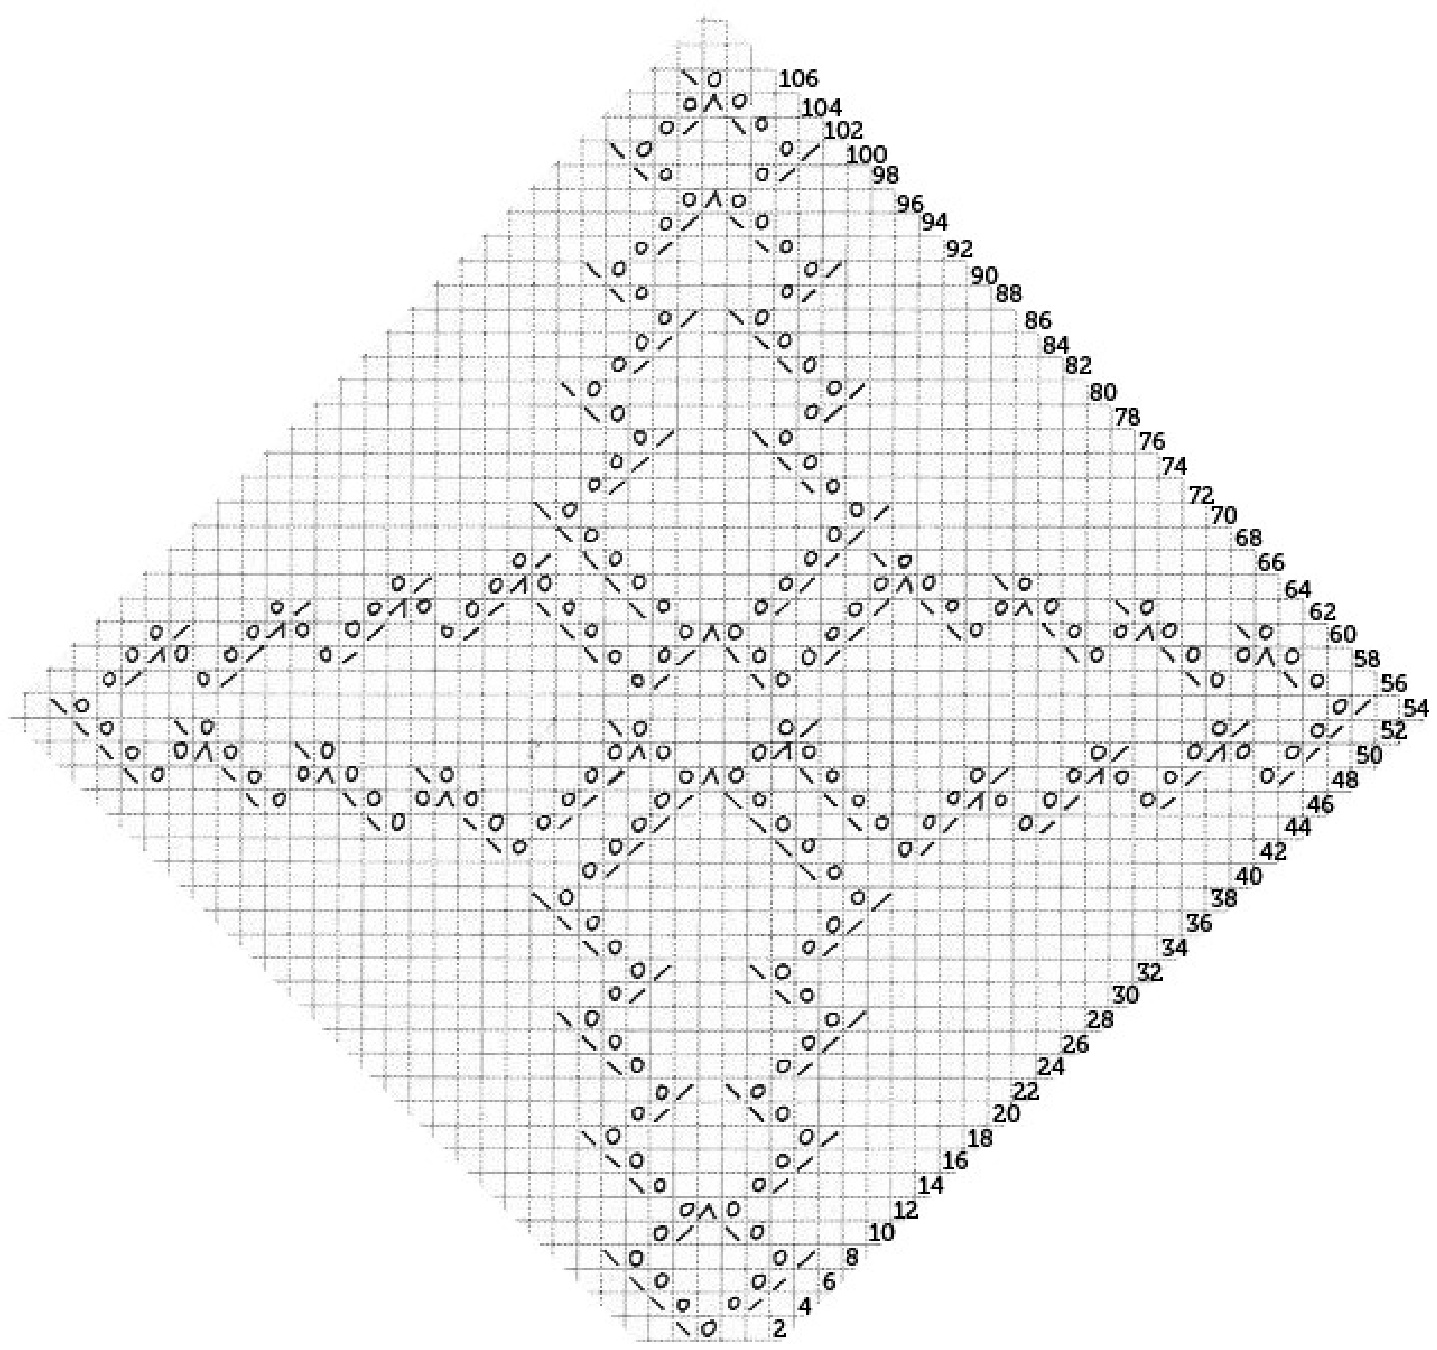
Without cutting the yarn, turn the work (you should be facing the back of it-mainly purl stitches and yarn overs visible) and start picking up all the slipped stitches that form the edge. The picking up is done the opposite way of the one we normally do it , but using this trick we end up with additional decorative line at the front of the work.192stitches Next row: \*(k3, m1), repeat from finishing with k3 - 256stitches Join in a round. Rnd 1: Knit and m1 4 times , situating new stitches evenly along the row- 260stitches Rnd 2: K65sts, place marker 1, k57sts,place marker 2, k67sts, place maker 3, k71, place marker 4. (As each section consists odd number of stitches, it will be easy for you to find the middle of each section) Rnd 3, 4, 5 : Knit Rnd 6: Find the middle of each section and begin the charts. Rnd 7, 8, 9 :Knit and follow the charts Note: Decreasing is done in the following manner: decrease two stitches before and two stitches after every stitch marker in the course of 20 rows .(every fifth row-4 stitches less). The trick is that markers should remain always in the middle of the decreased stitches. It is explained in details below: Rnd 10(decreasing round):(and every fifth rnd henceforward) start decreasing as follows: k to 3 stitches before marker 1 ssk, continue knitting to 3 stitches after marker 2 -k2tog, k to 3 stitches before marker 3 -ssk, k to 3 stitches after marker 4- k2tog; Rnd 11-14: Knit and follow the charts Rnd 15(decreasing round): k to 2 stitches before marker 1-ssk, k to 2 stitches after marker 2- k2tog, k to 2 stitches before marker 3-ssk, k to 2 stitches after marker 4-k2tog Rnd 16-19: Knit and follow the charts Rnd 20(decreasing round): k to 1 stitch before marker 1, ssk(including the stitch before an the stitch after the marker), place marker before the decreased stitch, k to 1 stitch after marker 2, k2tog(including the stitch after and the stitch before the marker), place marker after the decreased stitch, k to 1 stitch before marker 3, ssk(as for marker 1), place marker before the decreased stitch, k to 1 stitch after marker 4, k2tog(as for marker 2), place marker after the decreasedstitch Rnd 21-24: Knit and follow the charts Rnd 25(decreasing round): k to marker 1, ssk, k to 2 stitches before marker2 , k2tog, k to marker 4, ssk, k to 2 stitches before marker 4, k2 tog. A full session of decreasing is completed - 244sts. Do one more full session of decreasing as described above(Rnd 30 as Rnd10, Rnd 35 as Rnd 15, Rnd 40 as Rnd20 , Rnd 45 as Rnd 25 )-228sts. The next session of decreasing will be half session. Decrease in the same manner but one before and one after each marker for rounds 50 and 55. This measure is taken in order to avoid overlapping of the symbols.-220 sts. From now on continue knitting the charts and doing full sessions of decreasing until you have 172 sts which happens when you complete the tallest of the symbols -number 3.
Waistband
Continue in Baby cable ribbing as follows: Row 1: k2tog but leave on needle, insert the right-hand needle between the two stitches just knitted together, and knit the 1s stitch again; then sl both stitches from needle together; p2, rep from \* Rnds 2, 3, 4: \*k2, p2, rep from \* Rnd 5:(decreasing rnd) as rnd 1 but p2 tog every fourth purl section Rnd 6, 7, 8 :Rep rounds 2, 3, 4 At this point you can begin the termination of the project , but I strongly recommend knitting another repetition of Baby cable ribbing with decreasing p2tog taking place every 4" purl section , as cotton yarns tend to be very stretchy and the waistband loosens . After second(or third) repetition continue as follows: Rnd 9(13): as rnd 1 with decreasing p2tog every fourth purl section Rnd 10(14): k2, p2(or p1 where decreased) Finishing: There are two ways of finishing. I have tested both of them and I find that the second suits me better. The first way is simply to bind off using any f bind off methods you prefer. This ending doesn't allow your waistband to loosen too much, but is a little uncomfortable when putting the skirt on. The second is to use Elizabeth Zimmerman's sewn bind off. The waistband becomes very stretchy and comfortable to put on, but it loosens a bit. If you choose this bind off, I recommend using elastic sewing thread to make sure your skirt remains at place . Here is a video tutorial available on youtube.com : http://www.youtube.com/watch?v=9qtiYjwMAiU For larger sizes: Add more scallops, continue working in the method described above. When you divide the skirt into sections you can freely divide it into four equal ones. You won't have to worry whether the symbols will collide after decreasing, since you have enough stitches . Continue working in the established method , make it as long as you wish and make longer waistband if needed. Larger sizes haven't been tested, but there shouldn't be any problems, since only the original size (M) requires exact counting of stitches and situating symbols, so that they don't overlap. Happy knitting and please feel free to ask any questions during the process of creating this piece , using ravelry mail. Key to chart: / - k2tog I-sk 0- yo ^ - sl1, k2tog, psso - slip one stitch, knit next two stitches together, pass the slipped stitch over the two just knitted Every second round is plain knitting. That is why the chart includes only even numbers.
If you want your skirt to be unique you will find more symbols in “A Fourth Treasury of Knitting Patterns" by Barbara Walker - a great author and woman!
Note! Some adjustments of the pattern the should be made , regarding the whole number of stitches and decreasing.