Year of the Rabbit
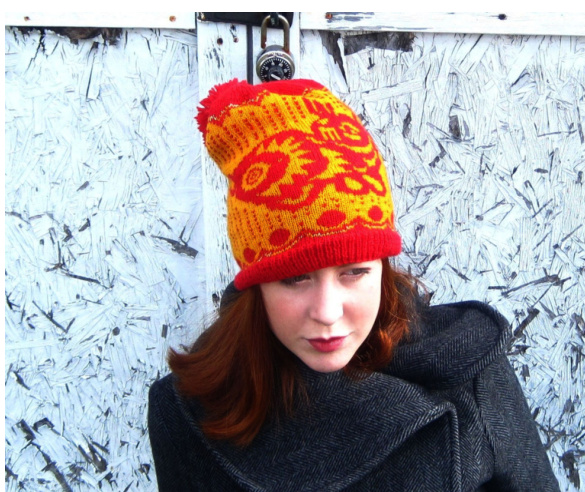
2011 is the Year of the Rabbit! Chinese New Year (or lunar new year) is one of the most widely celebrated holidays in the world. Like celebrations of its kind in many cultures, this is one that brings light and life to the darkest times of the year, and celebrates renewal and the coming spring. The design of this hat was inspired by Chinese paper cutting. Chinese paper cutting is an art form that is thousands of years old (paper was invented in China!), yet the traditional designs have a distinctly modern flair. Cut paper designs are a common decoration for lunar new year celebrations. Knit in the round, this fair isle hat is bright, slouchy, festive, and graphic, is a cozy mix of practical “pull-it-down-over-your-ears" warmth and whimsical fun. A metallic detail adds sparkle, and the falling "lus" remind me of new year's fireworks. Tools and Materials: MC] Brown Sheep Nature Spun Fingering [100% wool; 310yd/ 283m pel 50g skein]; color: Goldenrod; 1 skein [CC1] Brown Sheep Nature Spun Fingering [100% wool; 310yd/ 283m per 50g skein]; color: Red Fox; 1 skein [CC2] Knit One, Crochet Too 18 Karat [65% viscose/35% metallized polyester ; 225 yd/ 205m per 25g skein]; color: 18 karat; 1 skein 1 set(s) US #2/2.75 mm double-point needles 1 16 inch US #1/ 2.5 mm circular needle 116 inch US #2/ 2.75 mm circular needle notions required: stitch markers (up to about 8) needle toweave in ends 2.5 inch pompom maker or cardboard and scissors to make pompom Gauge: 30 sts/40 rows = 4" in stockinette stitch, knit in the round using size 2 needle Finished Measurements: size: Unisex- S/M (up to a 22 inch head) and L/XL (up to a 24 inch head) Hat Circumference: 18 (19 %) Inches Pattern technique: Wrapping: In traditional fair isle knitting, one only carries the unused yarn color behind the knitted work for a few stitches. There are a couple of spots where this pattern requires you to carry the unused color behind the knitted work for longer stretches. This can create long "floats" of unused yarn behind your work. Long floats, when incorrectly handled, can screw up your tension causing the fabric to buckle, and can get caught on your fingers (yuck). We will avoid having dangling floats by using a wrapping method. When to use the wrapping method: whenever a float is going to be more than about 4-6 stitches long. (this is more often than I would suggest for other items, because these are mittens) When done carefully, there is no show-through of the unused color. How to create the wrap: put your right-hand needle into the next stitch as if to knit. Wrap the unused color once over the used color, then knit the stitch color as normal. Tug the unused "wrapped" yarn gently up toward the top and right-hand side of the work. What direction do I wrap the yarn? The wrap works best if you bring the yarn over the top of the used color.
Making the Pompom:
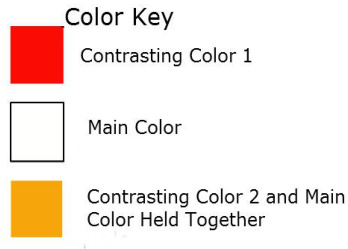
If you don't have a pompom maker, you can easily make pompoms using cardboard (it's fun!) - find directions here (http://www.knitting-and.com/knitting/tips/pompom.htm) jether when working the metallic accent at the top and bottom of the ht Abbreviations: CO Cast on CC1 contrasting color 1 cc2 contrasting color 2 DEC decrease INC increase K Knit K1P1- knit 1, purl 1 K2TOG- knit 2 together MC main color P purl PM- place mark SI slip SSK slip, slip knit St Stitch PM place mark
PATTERN
Using size 1 circular needle and CC1, CO 140[154]. pm for beginning of round. Join ( careful- don't twist!) Work in k1p1 rib for 15 rounds. k one round, changing to size 2 circular needle as you go. Join MC and CC2, and work Chart 1 all the way around. K one rnd in MC. Work Chart 2 (rabbit chart) across. Work repeats of chart 3 (background chart) across the remainder of the hat. Continue working both charts until you have completed chart 2. K one round in MC as you go, place markers as follows- k 20[22], pm. Work Chart 4 (top chart) around hat.
Decrease Rows: (switch from circular needle to dpns whenever comfortable): Row 1:\* SSK, k to within 3 sts of marker, k2tog, k1, sl marker.\* repeat from \* to \* 6 more times ( 14 sts dec). Rows 2 and 3: k all sts. Rows 4- 18[21] :Repeat these 3 rows a total of 6[7] more times (42 ( 42) sts). Row 19 [22]:\* ssk, k to within 3 sts of marker, k2tog, k1, sl marker.\* repeat from \* to \* 6 more times ( 14 sts dec). Rows 20- 22[23- 25]: k all sts. Rows 23-25[26-28]: Repeat Rows 19-22 (22-25). ( 14 (14) sts). Row 26[29]: k1, \* k 1, k2tog \* repeat from \* to end (10 (10) sts). Rows 27 -29 [30- 32]: k all sts Rows 30-35 [33-37]:Repeat these 5 rows 0ne more time. (7 (7) sts). Break the yarn, thread it on a needle and draw it through your last 7 sts. Make a 2.5 inch pompom.
FINISHING
Weave in all ends. Attach pompom.
Charts:
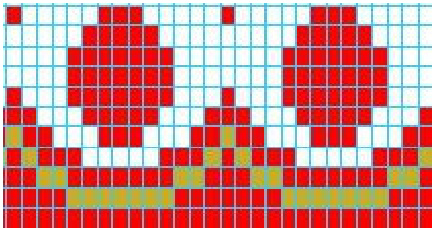
Chart 1:Bottom Chart
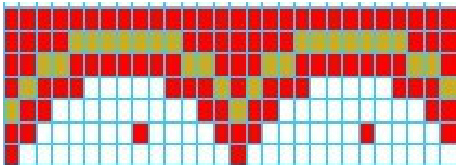
Chart 4: Top Chart
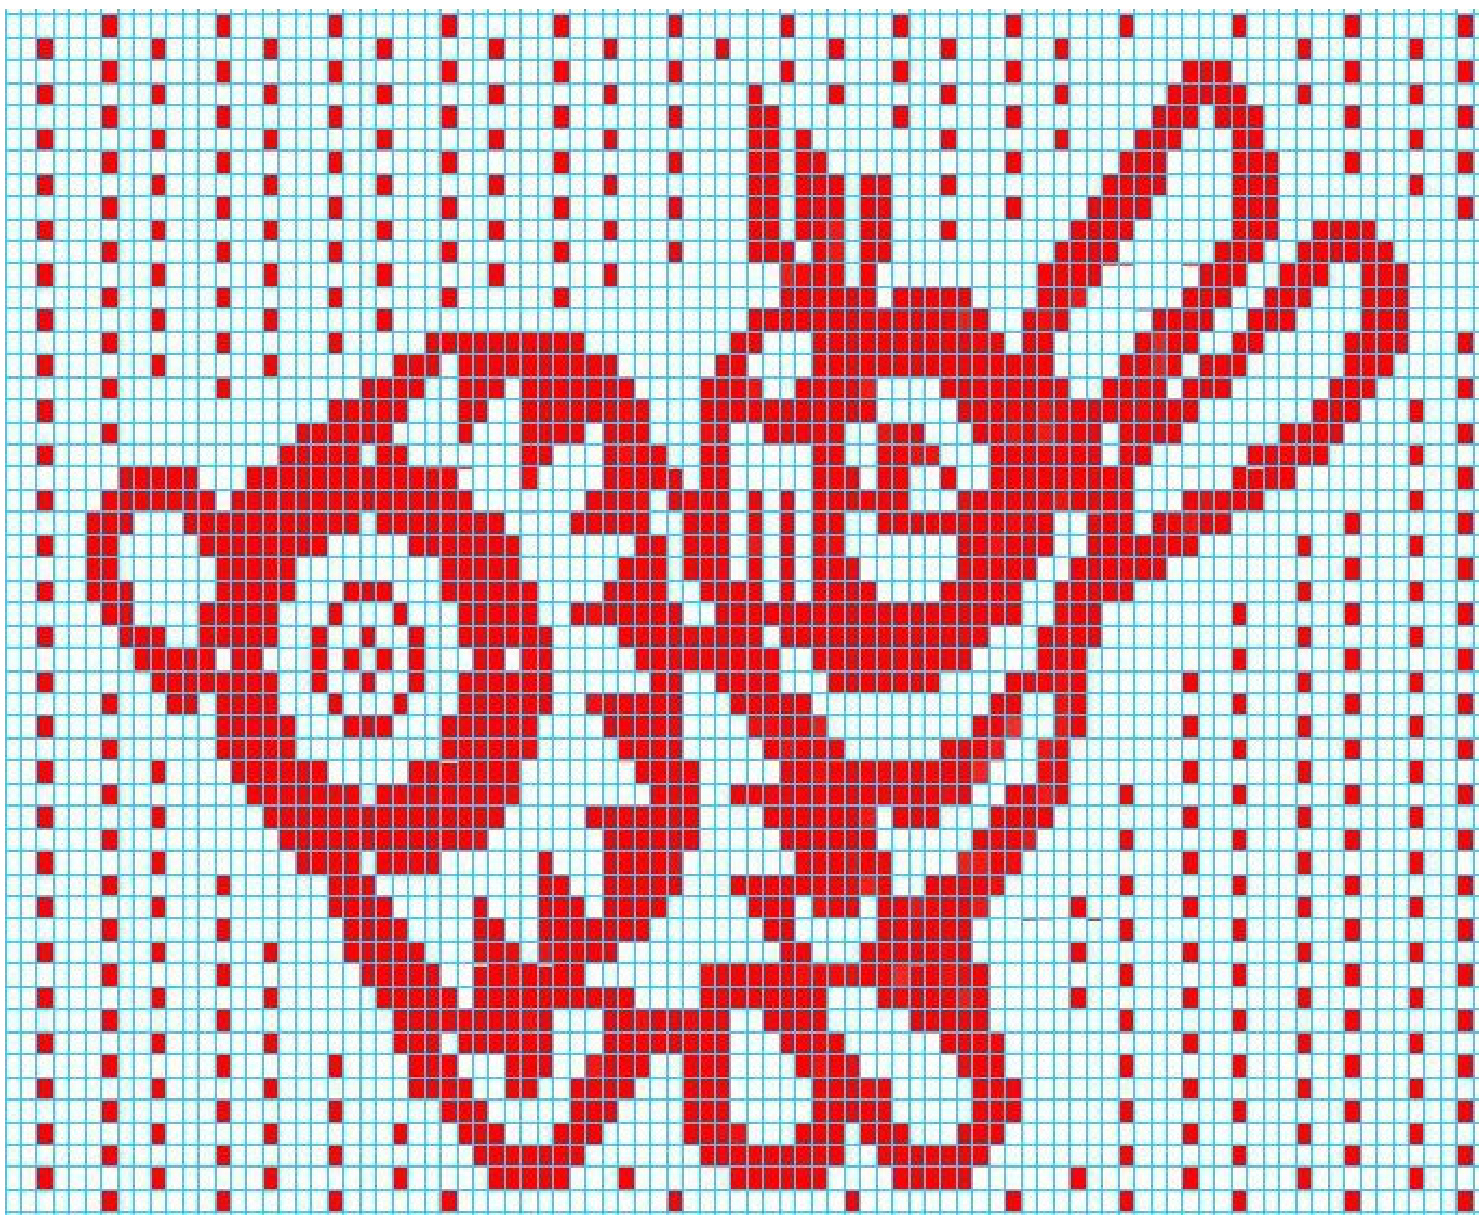
Chart 2: Rabbit Chart
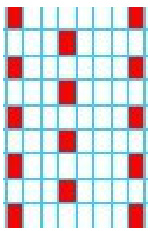
Chart 3:Background Chart


