SEAN'S QANDAHAR GLOVES
BY MEREDITH DAVEY I designed these gloves for my cousin, Sean, who is a Captain in the United States Marine Corps, and was previously stationed in Afghanistan during their coldest winter ever. I had no idea what military-issued equipment was like, but I'd wanted to send him smething personal, soa pair of fi-tp gloves seeed just the ting I tried to mae thm as warm and as useful as posibl. The tips of the midle and the index fingers are open, sohe could deal with the fiddlybits on his communications equipment. The mitten tops fold over (to keep his fingers warm) and button down firmly in front. They also button down when flded back, so thy won't lap aroud. The palms are mos seed titch, for exra traction. Thy are also superwash wool, making them machine-washable and -dryable. I even included an extra button, in case he loses one. Here is how you can make a pair of your own, for another soldier, or for someone you care about. The pattern gives instructions for average-sized men's and women's gloves, with sizing for the women's, if different, shown in italics and parentheses.
MATERIALS:
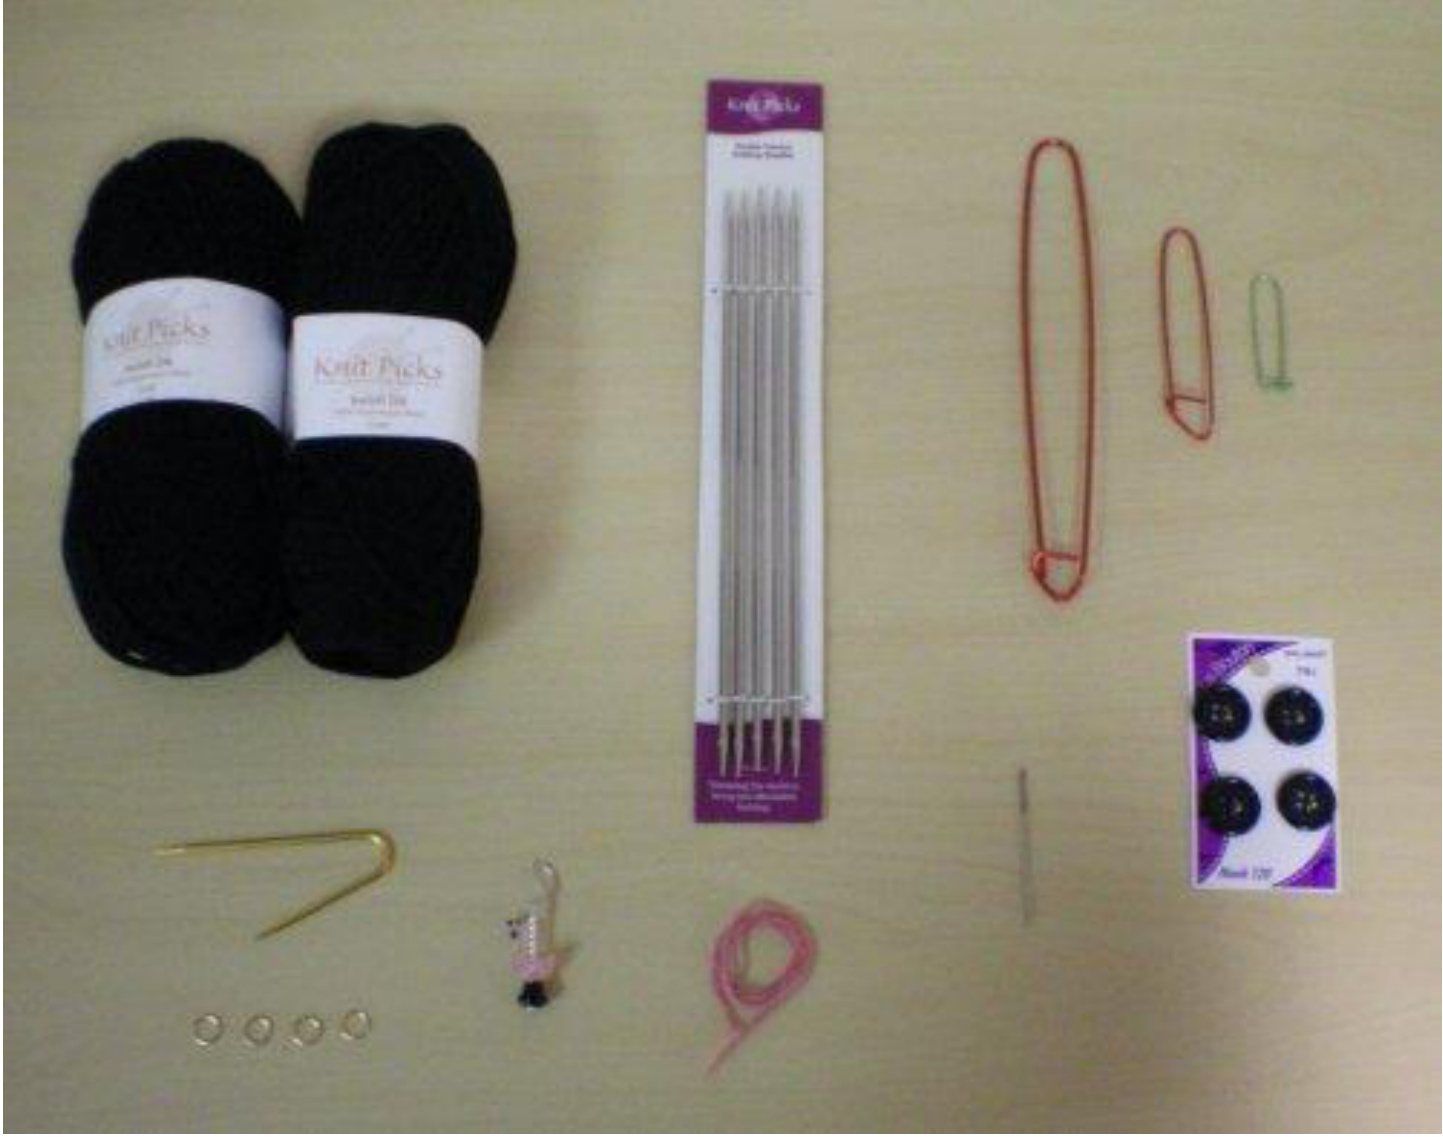
Yarn: $\underline{{3}}~50\mathrm{g}$ skeins of DK- (sport)-weight yarn (only two are shown) ·Needle: Ast offvize 4 (3dublpointed needes DPN), orthe sizeeceary tobtain th prr gaue A small cable needle—-about needle Size 3 · 4 stitch markers9 mm jump rings work well · A detachable stith markr, 'musing a beadd marke that made out of anleverback arn aste, bt paper clip or a safety pin works equally well. Stitch holders: 2 small and large Waste yarn— in a different color, so it stands out against your yarn · A blunt tapestry needle $4\;3/4"$ Buttons. (Be sure to get one extra if you're giving these as a gift. $\circledcirc$ 1. GAUGE Cast on 35 stitches and knit a swatch $4^{\mathfrak{s}}$ long. Cast off. You should have 27 (29) stitches/4 inches. If there are too few stitches,it ther newithlr nedl if tomany stithit nthernewihrge nd.Thisstockt gaewill give you 32 (34) stitches/ 4 inches for the $3\!\times\!3$ cable rib pattern, and 26 (28) stitches/4 inches for the moss stitch. The correct gauge is very important for a proper fit.
2. RIGHT HAND CAST ON
Cast on using the following k3, p3 cast-on: · Place a slip knot on the left needle. 1.Pinto the rightmost st on the left needle, place the purled st back onto the left needle (2 st total). 2. Bring the yarn to the back, then $\ast\mathbf{k}$ into the rightmost st on the left needle, place the knitted st back onto the left needle\*, repeat until you have 3 more stitches. 3. Yf, then $*_{\mathrm{p}}$ into the rightmost st on the left needle, place the purled st back onto the left needl\*, repeat until you have 3 more stitches. · Repeat 2. and 3. until you have 53 stitches, ending with 2. Yf and reneat 1 for a total of 54 stitches Join in the round over 3 needles, placing 18 stitches on each needle, being careful not to twist the stitches. Place your detachable stitch marker at the beginning of your row, and move it along with your work to keep track of where the rows begin.
3. RIGHT HAND CUFF
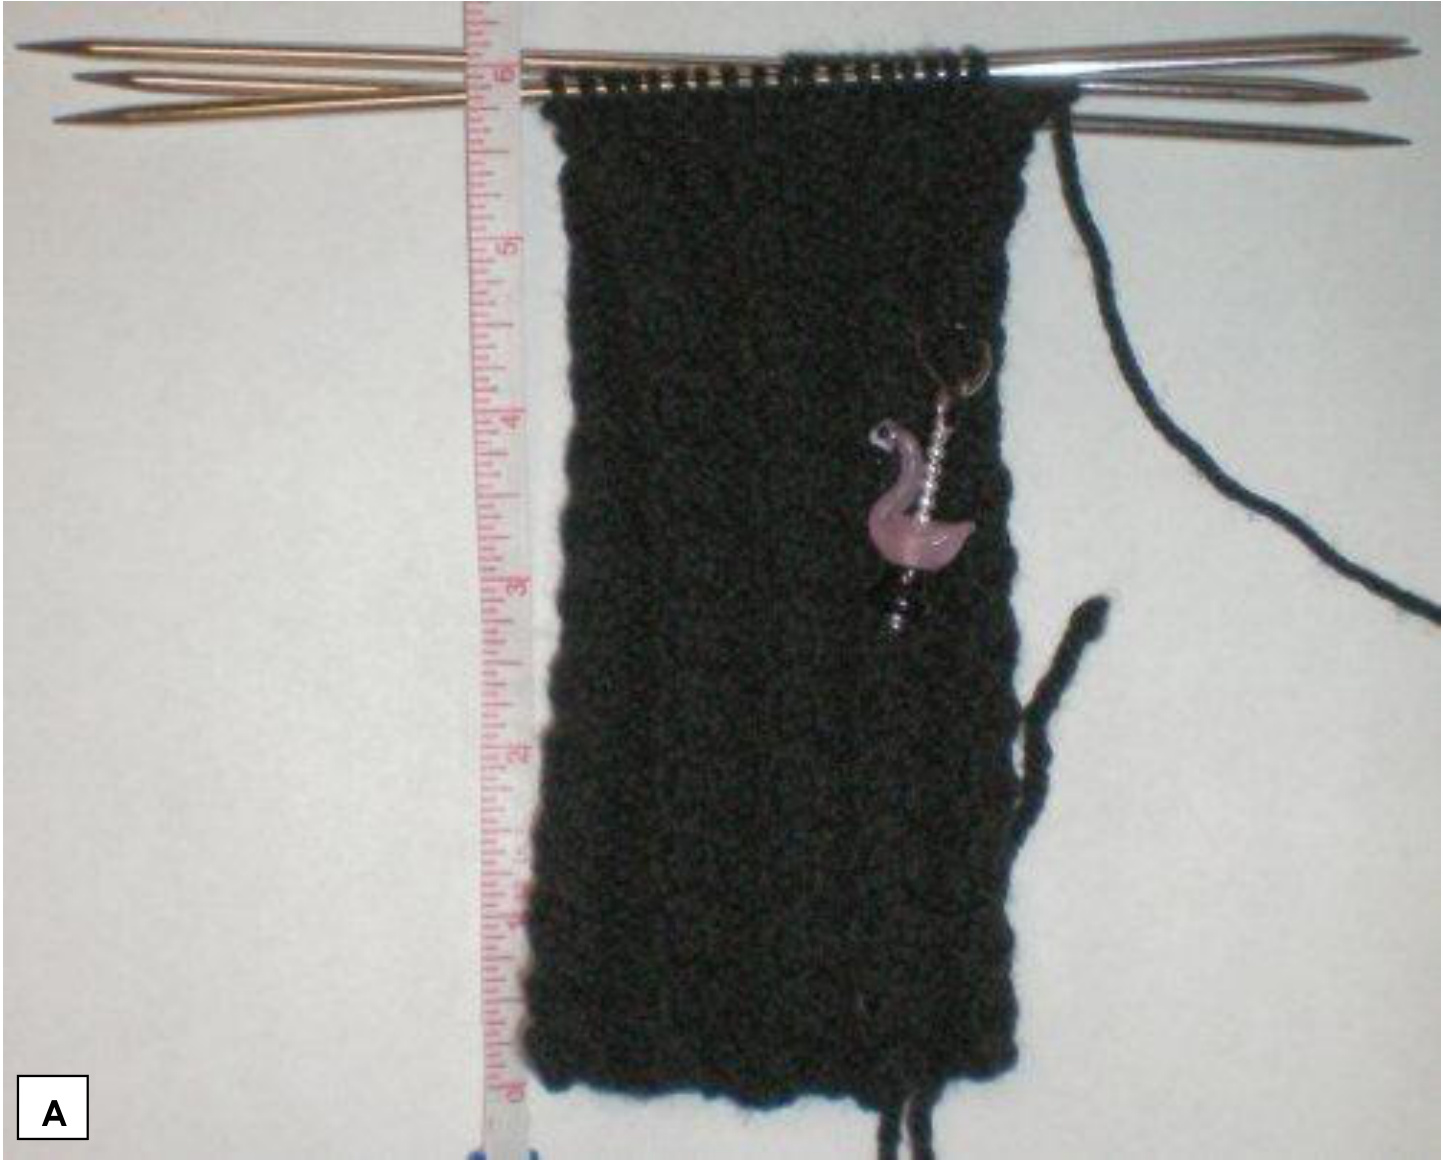
Work the $3\!\times\!3$ cable rib inthe round (see sidebar) until the cuffmeasures $6^{\,\circ}\,(5^{\,\iota}/2^{\,\mathfrak{s}})$ (Figure A).
4. RIGHT HAND LOWER HAND
At the beginning of the hand, you begin a different style of stitchingthe moss stitch (see sidebar)for the palm. Therefore, at the base of the palm, yu will derease stitchs to acmmdat a new gauge. First, rearrange the stitchs onto 4 needles as follows: Needle 1: 18 st . Needle 2: 13 st Needle 3: 12 st Needle 4: 11 st To decrease for the palm, work the $3{\times}3$ cable rib for 31 st. Over next 23 st, perform the following decrease: $*|_{\mathsf{k}3}$ $\mathrm{k}2\mathrm{tog^{*}}$ four times, then k3 (19 st total). After ths d t stihea, creain gusst aro thtAsyu k $3{\times}3$ cable rib stitches (31 st) on Needles $1\And2$ and the moss stitches (19 st) on Needles 3 & 4. For the men's gloves, work the gusset according to the following instructions: ■Rows 1-3: Work the $3{\times}3$ cable rib for 31 st. Work moss st to end. ■Row 4: Work $3{\times}3$ cable rib for 25 st. Pm. M1 purlwise. Pm. Work $3{\times}3$ cable rib for 6 st. Work moss st over 3 st. M1,p1. Pm. M1, p1. Pm. Work moss st to end. ■Rows 5-7: Work the $3{\times}3$ cable rib for 25 st. Pm. P to stitch marker. Pm. Work $3{\times}3$ cable rib for 6 st. Work moss st to end. Row 8: Work $3\!\times\!3$ cable rib for 25 st. Pm. M1 purlwise. P to stitch marker. Pm. Work $3{\times}3$ cable rib for 6 st. Work moss st to stitch marker. Remove stitch marker. M1 p1. Pm. M1, p1. Pm. Work moss st to end. Repeat Rows 5-8 until 28 rows total have been completedabout $2\,^{3}\!/\!_{4}\,^{\mathfrak{s}}$ above the finished cuff. (For the women's gloves, work: ■ Rows 1-2: Work the $3{\times}3$ cable ribfor31 st. Work mosst to end. ■ Row 3: Work $3{\times}3$ cable rib for 25 st. Pm. M1 purlwise. Pm. Work $3{\times}3$ cable rib for 6 st. Work mosst over 3 st. M1 purlwise, kl. Pm. M1 purlwise, kl. Pm. Work moss st to end. ■Rows 4-5: Work the $3{\times}3$ cable rib for 25 st. Pm. P to stitch marker. Pm. Work $3{\times}3$ cable ribfor 6st. Work moss st to end. ■ Row 6: Work $3{\times}3$ cable ribfor 25 st. Pm. M purlwise. Pto stitch marker. Pm. Work $3{\times}3$ cable rib for 6 st. Work moss st to stitch marker. Remove stitch marker. M1 p1. Pm. M1, p1. Pm. Work moss st to end. ■Rows 7-8: Same as Rows 4-5. ■ Row 9: Work $3{\times}3$ cable ribfor 25 st. Pm. M1 purlwise. Pto stitch marker. Pm. Work $3{\times}3$ cable rib for 6 st. Work mosst to Stitch marker. Remove stitch marker.Ml purlwise, kl. Pm. M purlwise, kl. Pm. Work moss st to end. Repeat Rows 4-9 until 21 rows total have been completed—about $2\,^{\iota}\!/{}_{2}^{\,\epsilon}$ above the finished cuff.) You should have 38 stitches on Needles 1 & 2 and 33 stitches on Needles 3 & 4.
5. RIGHT HAND MITTEN TOP
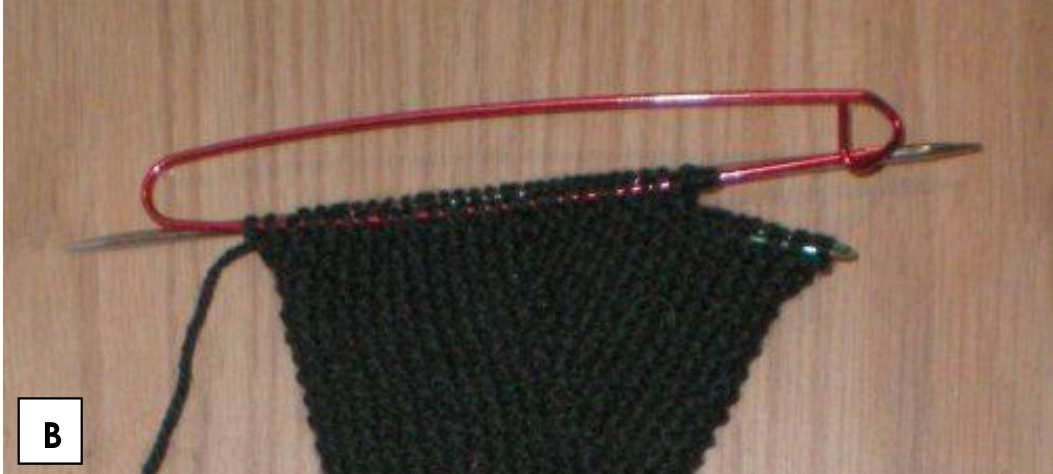
Before staring work read through th entire Mitten Tp sectionfist. Remove the detachable stitch marker and set it aside. Over the next row, remove the stitch markers as you work your way around. Work the $3{\times}3$ cable rib over 25 stitches, then p3. Place the next 15 stitches on one of the small sitch holders. Using the Backward-Loop Cast-on, cast-on 3 (I1) titches, and continue working the mos stitch to the end of the row. Place allof the mosstitches and newly cast-on stitches on the large stitch holder. Slip all of the remaining stitches onto one needle. This setup is shown in Figure B.
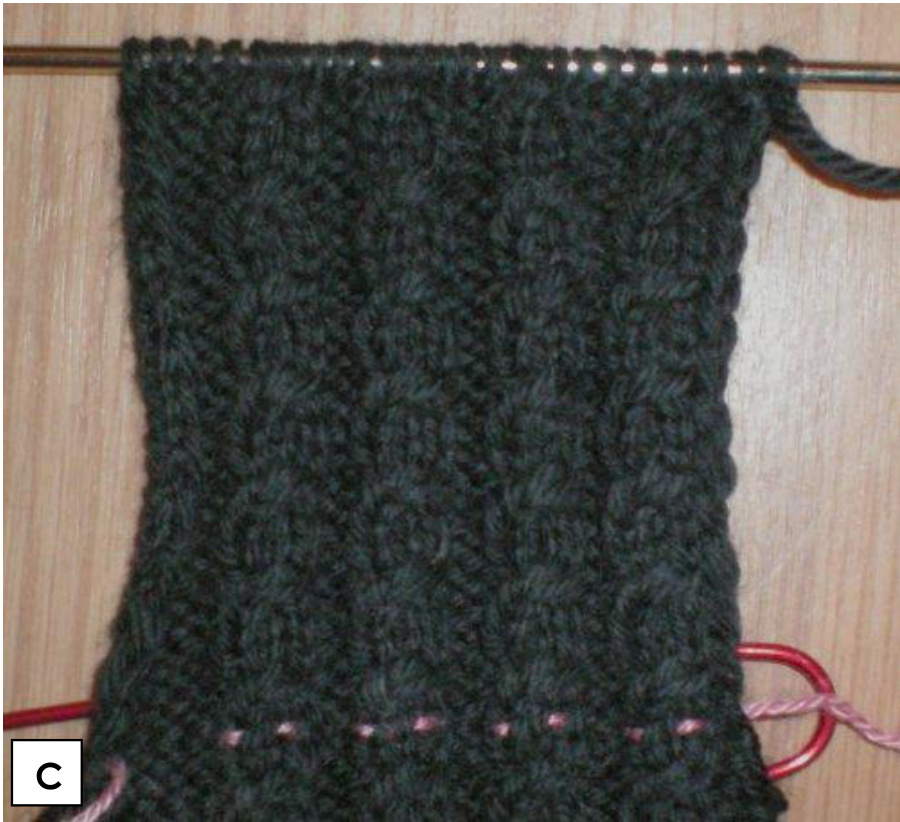
At this point, you will begin working the $3\!\times\!3$ cable rib pattern flat (described in sidebar), eo you will be knitting back and forth on only two needles. Work one row of the $3{\times}3$ cable rib pattern, continuing the purled section where appropriate. Use the blut taestry nede to thred the waste yan through this row of stitchs aferwards. (This willact as amarker to pik up stitches here later.) Continue to work the $3{\times}3$ cable rib pattern (with purled stitches at one end) for $3\,{^1\!/}_{4}\,"$ $(2\%")$ above the waste yarn thread (Figure C),slipping the frst stitch on each row. End with a WS row.
KNITTING THE MITTEN TIP:
At this point, you will begin toderease stitches for the tip of the mitten.As you do this, continue the $3{\times}3$ cablerib pattern as long as possible; work the $3\!\times\!3$ cable rib pattern between the dereases, dropping cables only if they interfere with the decreases. Work the decreases as follows: ■ Row 1: (RS) Work the $3{\times}3$ cable rib pattern to 3 st from the end. P2tog, yf, sl1. Turn. ■ Row 2: (WS) Yf, wrapping the st. Sl1, work to 3 from end, k2tog, yf, sl1. Turn. ■ Row 3: (RS) Yf, wrapping the st. Sl1, work to 1 before looped st, yf, sl1. Turn. ■ Row 4: (Ws) Yf, wrapping the st. Sl1, work to 1 before looped st, yf, sl1. Turn. ■ Row 5: (Rs) Yf, wrapping the st. Sl1, work to 3 before looped st, p2tog, yf,sl1. Turn. ■ Row 6: (Ws) Yf, wrapping the st. Sl1, work to 3 before looped st, k2tog, yf,sl1. Turn. Repeat Rows 3-6 over 6 more rows, ending with Row 4. You should have 10 unlooped stitches left on the needle. Now, you will fold over the mitten tip and increae and pick up stitches a follows: ■ Row 1: (Rs) Yf, sll, work moss st over unlooped stitches. Kbl together with the loop(s) on the st. Yf, sl1 knitwise. Turn. ■ Row 2: (Ws) Yf, sl1, work moss st over unlooped stitches. Purl together with the loop(s) on the st. Yf, sl1. Turn. ■ Row 3: (Rs) Yf, sl1, work moss st over unlooped stitches. M1. Kbl together with the lop(s) on the st. Yf, sl1 knitwise. Turn. Row 4: (WS) Yf, sl1, work mosst over unlooped stitches. M1. Purl together with the loop(s) on the st. Yf, sl1. Turn. Repeat Rows 1-4 until allbut two loped stitches are worked (ending with Row 2), at which point, work Rows 5 and 6: ■Row 5: (RS) Yf, sl1, work moss st over unlooped stitches. M1. Kbl together with the loops on the st. Turn. ■Row 6: (Ws) Work moss st over unlooped stitches. M1. Purl together with the loops on the st. Turn. You should now have 28 stitches on the needle. The finished mitten tip is shown in Figure D.

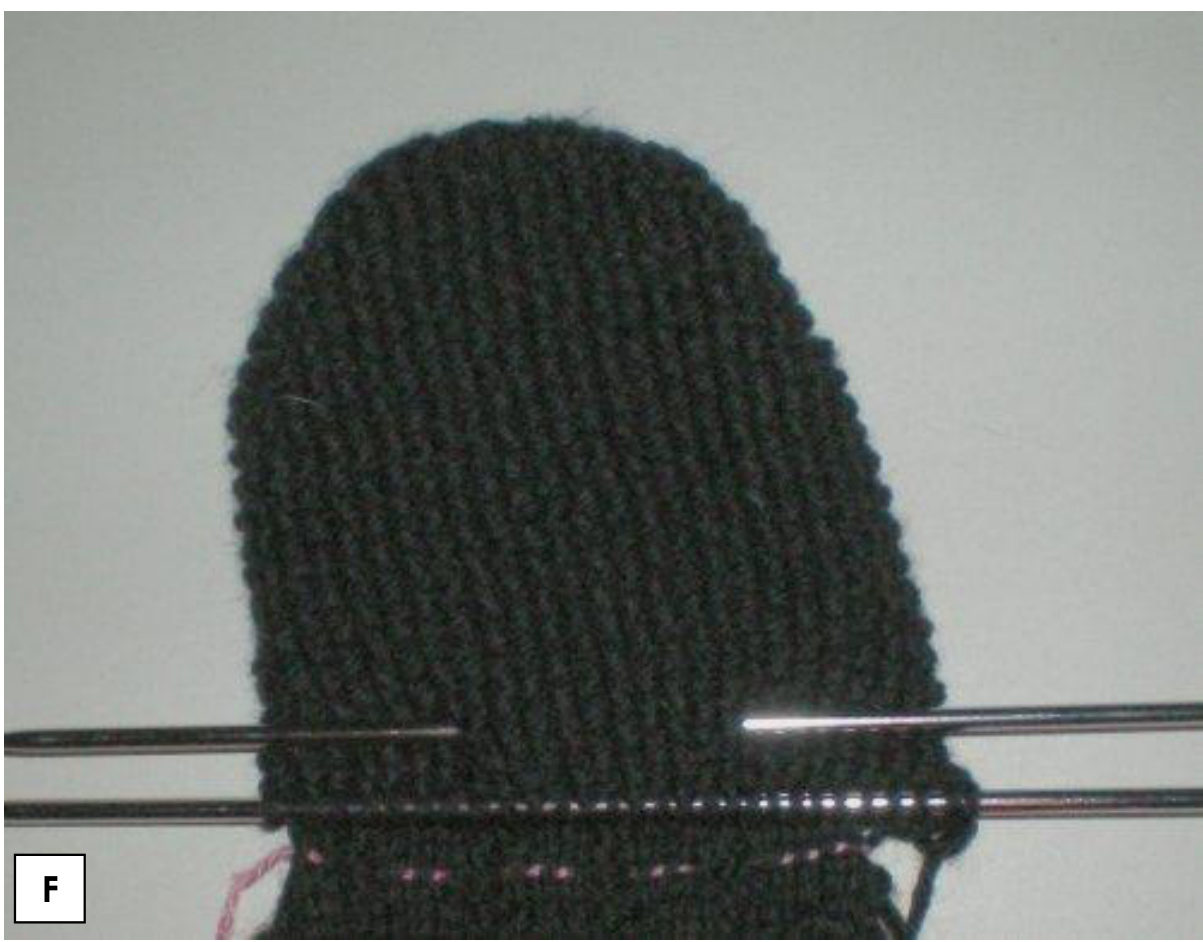
After completing the mitten tip, contiue to work the moss stitch flat down the palm, knitting the frst stitch of each row together with the slipped stitch from the beginning of each $3\!\times\!3$ cable-ribbed row from the back of the hand (see Figures E1 and E2). Continue until you reach the end of the slipped stitches. If you do not end with a WS row, work an extra row of moss stitch, so you begin the next section with a RS row. The finished mitten top is shown in Figure F.

KNITTING THE “WEDGE"AND BUTTONHOLE:
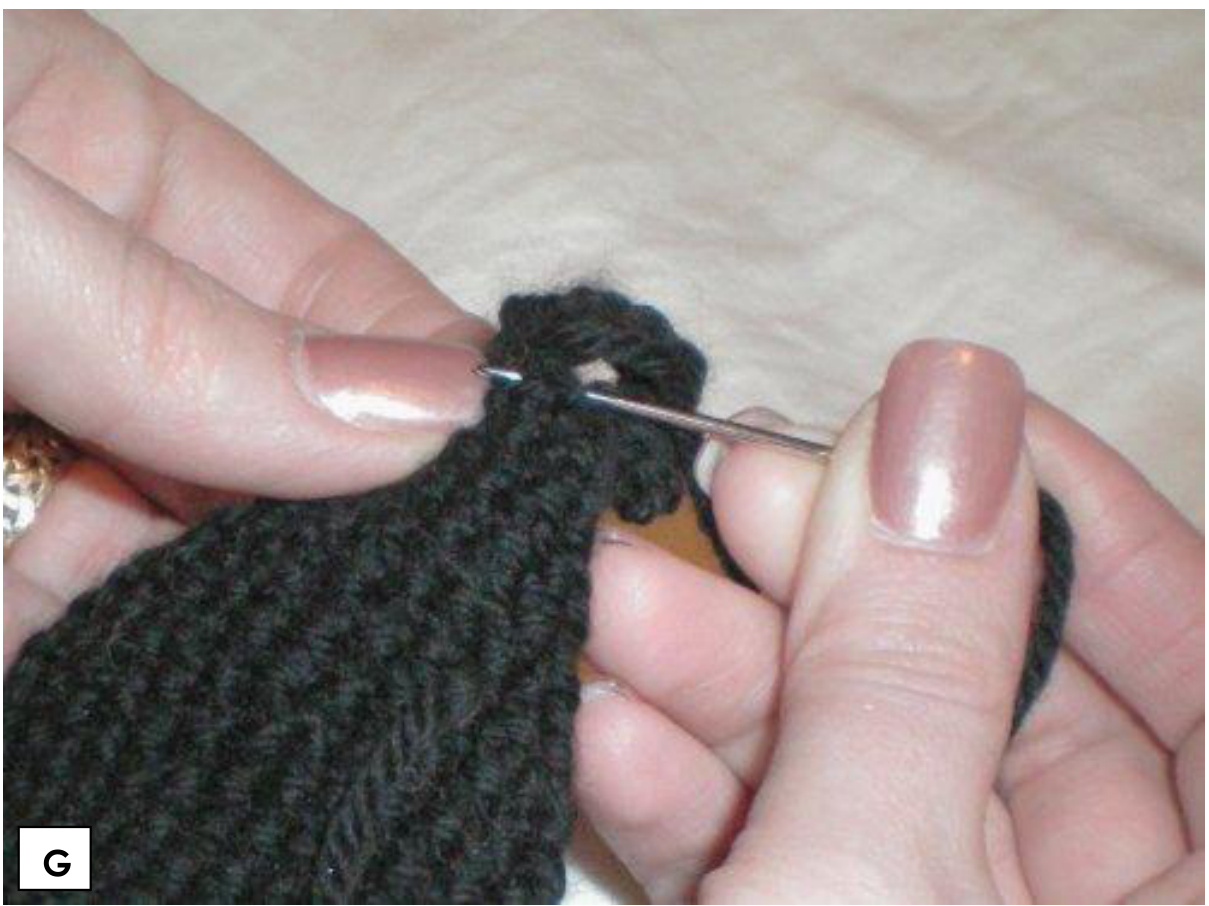
What you have just knit constitutes the main body of the Mitten Top. However, because a buton directly on the palm would be uncomfortable, you are going knit a decreasing “wedge,”" which will sreth across the palm when the Mitten Top is up and allw it to button at the wrist. In addition, this “wege” will act as a strap to hold the Mitten Top in place when it is down and buttoned at the back (see sidebar at the end). To create this decreasing “wedge", work the next few rows as shown below (continue working flat). For the men's gloves, repeat Rows 1-6 for 32 rows, ending with Row 2. (For the women's gloves, work Rows 1-2 only fo 22 rows, ending with Row 2.) ■ Row 1: (RS) Sl1,ssk, work moss st to last 3 st, k2tog, k1. ■ Row 2: (WS) Sl1, p1, work moss st to last 2 st, p2. ■ Row 3: (RS) Sl1, k1, work moss st to last 2 st, k2. ■ Row 4: (WS) Sl1, p2tog, work moss st to last 3 st, ssp, p1. ■ Row 5: Same as Row 3. Row 6: Same as Row 2. You should have 6 stitches left. To create the Buttonhole: ■ (RS) K3, atach the second ball of yarn, k3. ■ Work each se o 3 stitches separaely in garter st for $^1\!/\!_{2}^{\;\leftarrow}$ , ending with a WS row. Rejoin the two sides by $\ast\mathrm{k}2\mathrm{tog^{\ast}}$ three times. Cast offand cut a tail for weaving in on the first ballof yarn. Cut a $20^{\circ}$ tail on the second ballof yarn. Using the blunt tapestry needle, weave in the shorter loose ends. Thread the $20^{\circ}$ tailntttaestrye ad rretutbwhpstihn tideft opening FigureG. If thebutonole becmes tolare afe whip-sthing (test thisby trying to slie t button through), use extrastches to clse the hole slightly.Weave in thle nd.
6. RIGHT HAND UPPER HAND
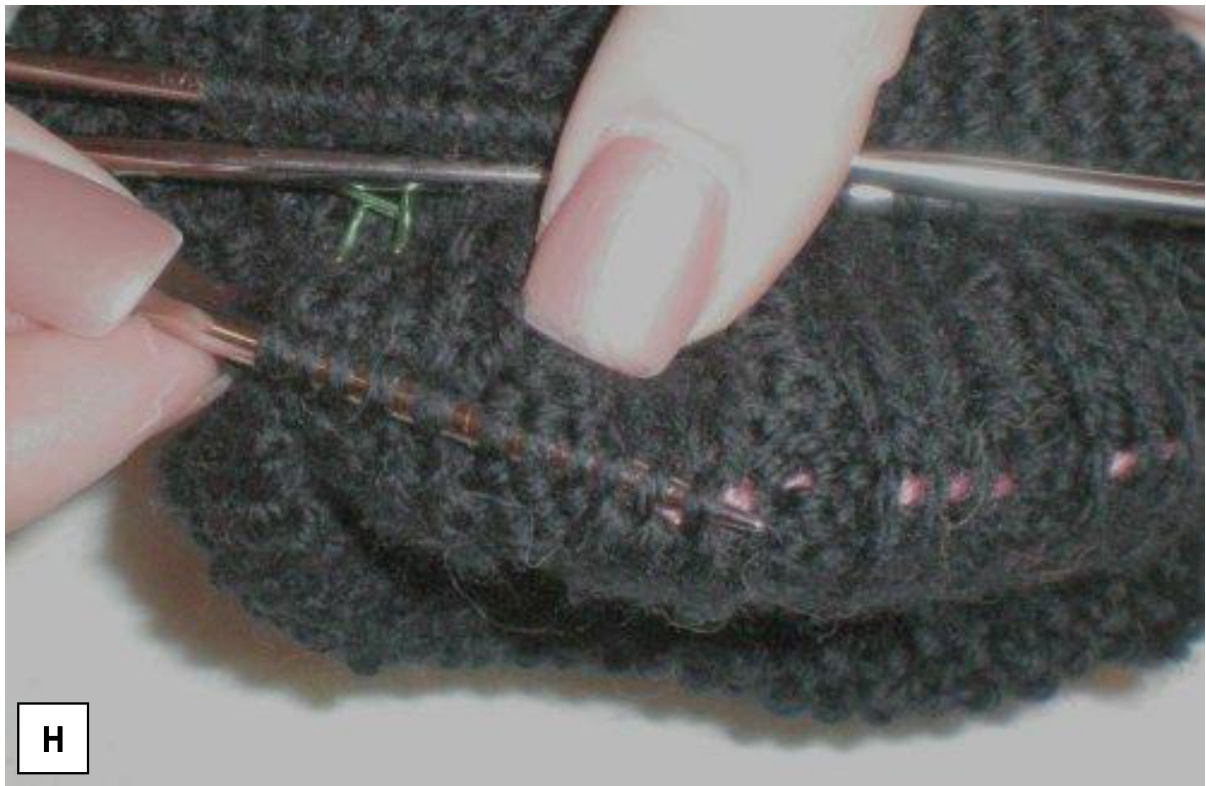
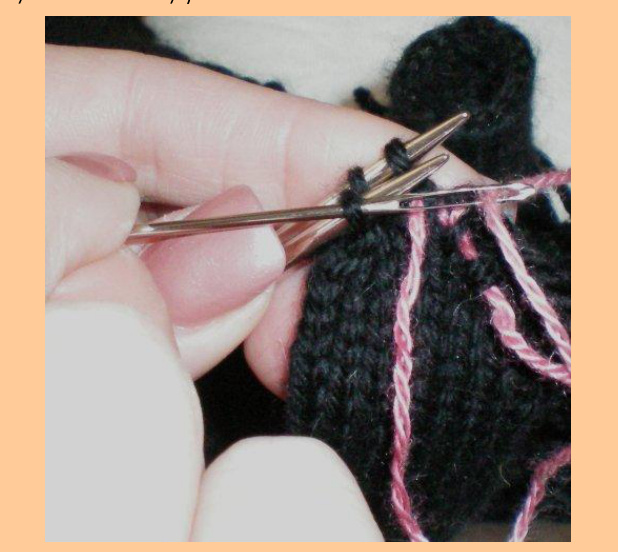
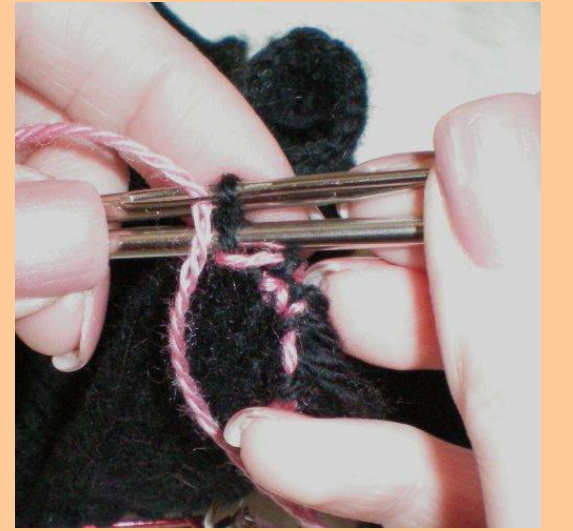
Having finished the Mitten Top, you will now continue to knit the inner glove. Pick up the stitches on the large stitch holder, and split them between 2 needles. Next, pick up the stitches threaded with waste yarn from the inside of the Mitten Top (Figure H), and split them between 2 needles. Remove the waste yarn. Move the 3 (1) Backwards cast-on stitch(es) from the moss stitch needle to the adjacent needle with the picked-up waste yarn stitches.
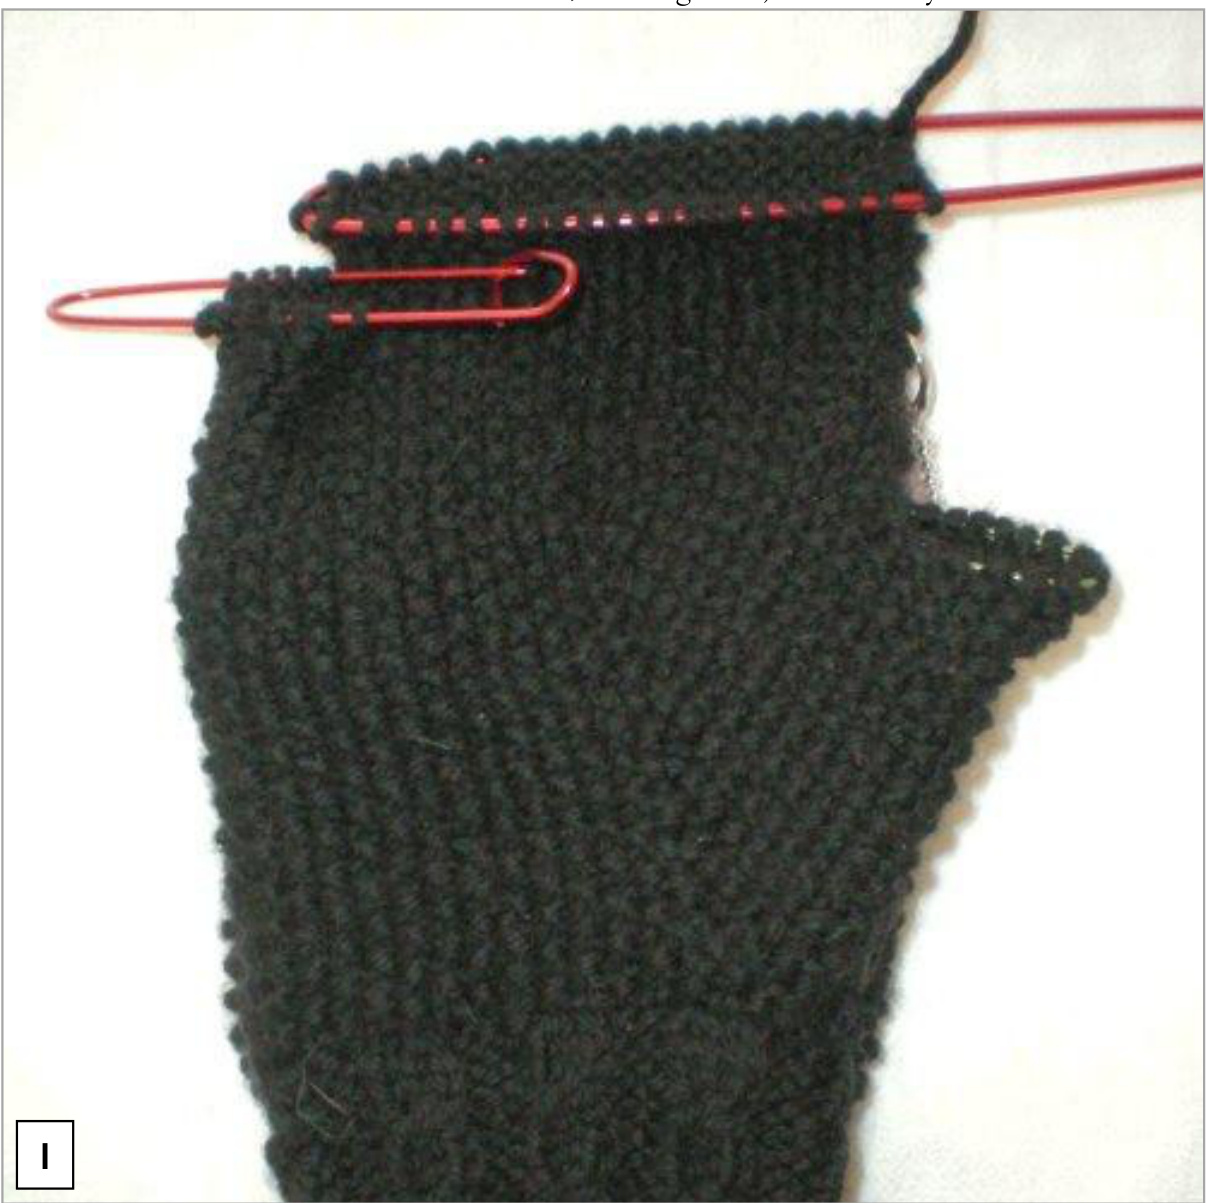
(IftheMittenTp gets inteway whle yu are kiin,folditdwandu afety p to pit to th uff)Plac yu detachable stith markerbelw the Backwards cast-on stitch. This willbe thebginning of your row. Starting here, wok the first row as follows: ■ Needles 1 & 2 (28 st): Work moss st. ■ For the men's gloves - Needles 3 & 4 (31 st): $\ast\mathrm{K}2$ , $\mathrm{k}2$ tog, $^{\,}\mathrm{k}2^{\ast}$ , repeat five times. K1. ■ (For the women's gloves- Needles 3 &4 $\left(29\,s t\right)$ $\ast K2$ , R2tog, k3, k2tog\*, repeat three times. K2.) (The decreases in the first row are necessary to change from the $3{\times}3$ cable rib gauge to a stockinette gauge.) Continue to work this pattern evenly (without decreases)mosstitch on the palm and stockinette on the back of the handfor $1\,^{1}/{}_{2}\,^{\prime}$ $(l\,{}^{l}\!/\!{}_{4}\,^{\ast\ast})$ After completing this part, work moss st for 2 stitches. Place the next 12 (11) stitches on the other small stitch holder, and use the Backward-Loop Cast-on to cast-on 2 stitches. K to end. On the next row, work moss st over 23 stitches, then $\mathrm{k\Omega}$ to end. Work this new pattern evenly for $^{1}\!/\!_{4}^{\,,\,>}$ . Place all of the remaining stitches on the large stitch holder. (You should now have all of your stitches off of needles and on stitch holders, as in Figure I.) Do not cut yarn.
7. RIGHT HAND FINGERS
If you are knitting these gloves for yourself or someone for whom thy are not a surprise, you will want to measure the person's ngers. If you are really lucky, the person for whm yu ae knitting will be ablet try thm on as you go. This willrequire switching frmmetal stch holers to waste ya tohold uknit ingers, so the peron willbe able to slip the gloves on for fitting. Do not worry, though; it is relativly easy to try on a glove with the knitting needes stillin the fingers $\circledcirc$ , so you should not need to thread in new waste yarn for try-on sessions.
INDEX FINGER:
Taking stitches from the large stitch holder, pick up and knit the 8mosstitches closest to the detachable marker. You may have to thread stitches off the stitch holder to get to them.) Backward Cast-on 1 (2) stitch(es) to join the front and back of the glove. Fnally, pick up and knit the 7(6)knitted stitches closest to thedetachable marker frm the large stith hler (placing remaining stitches back on the large stitch oler.Rearrange these stitches evenly on4 needs, so that N 1 and 4 meet at the break between the moss titching and the stockinette. Knit for $2^{\ast}$ or uintil $1^{1}/4^{\ast}\,(l^{\,\,\mathfrak{s}})$ before tip of finger. End your row at the end of Needle 4, using the detachable stitch marker if neessary to keep track of your needle positions. Cast of and cut a tail for weaving in.
MIDDLE FINGER:
Pick up and knit the next 8 (7) moss stitches from the large stitch holder. Using the Backward-Loop Cast-on, cast-on 1 (2) stitch(es) to join the front and back of the glove. Pick up and knit the next 6 (7) stockinette stitches from the large stitch holder (placing remaining stitches back on the large stitch holder). Finally, pick up and knit 3(4) stitches from the Backward Cast-on stitches at the base of the Index Finger, twisting these stitches so holes will not form. For the men's gloves, knit the first 15 stitches, then k3tog (the Backwards cast-on stitches),leaving you with 16 stitches. (For the women's gloves, knit the first 16 stitc, gtaca sts], aingyuwi8sthrne stieely that Needles 1 and 4 meet at the base of the Index Finger. Knit for $2\,^{1}\!/\!_{4}\,^{6}$ , or until $1\,{}^{1}\!/4^{\epsilon}\,\left(l\,{}^{\bullet}\right)$ before tip of finger. End your row at th d ofNede 4, using th detachale stithmarke ieessary tokep track of yu nede psitons. Cast ff, and cut atail for weaving in.
RING FINGER:
Pick up and knit the rmaining stitches from the large stitch holder, as welas 3 (4) stitches from the Backward Cast-on stitches at the base of the Middle Finger. For the men's gloves, knit the first 15 stitches, then k3tog (the Backwards cast-on stitches), leaving you with 16 stith. (For th wn's glove, kit thfirt 14 stith, thenss,ktg [thBackads can stitches], leaving you with 16 stitches.) Arrange stitches evenly on 4 needles, so that Needles 1 and 4 meet at the base of the Middle Finger. Knit for $3\,\,1\,/8^{\,\!\circ}\,(2\,\,5\,/\,\delta^{\,\!\circ})$ or until $^{1}\!/\!_{4}^{\;\leftarrow}$ before tip of finger. End your row at the end of Needle 4, using the detachable stitch marker if necessary to keep track of your needle positions. Finish using the Finger Bind-off. Finger Bind-off: Repeat the following row 2 times. ·Needles 1 & 3: Ssk, k to end. ·Needles 2 &4: K to last 2 st, k2tog. Move stitches from Needles 1 & 2 to one needle, and from Needles 3 & 4 to one needle. Cut the yarn off in a $1\,2^{\mathfrak{s}}$ tail. Bind off with Kitchener Stitch (see sidebar).
PINKIE:
Pick up and the knit 12 (11)stitches from the second small stchholder next to theRing Finger and 4 3 stitches frm th Backward cast-on stitches in the Upper Hand. For the men's gloves only, knit the second row as follows: K12, ssk, k2tog (the last 4 stitches are the Backward cast-on stitches). Arrange stitches evenly over 4 needles, so that Needles 1 and 4 meet at the base of the Ring Finger. Knit for $2{^{1}\!/}_{2}{^{\ast}\!/}\left(2^{\ast}\right)$ .or until $^{1}\!/\!_{4}^{\;\leftarrow}$ before tip of finger. End your row at the end of Needle 4, moving and using the detachable stitch marker if necessary to keep track of your needle positions. Finish using the Finger Bind-off.
THUMB:
Pick up the 15 stitches from the remaining small stitch holder. Begin the row by continuing the purling and $3{\times}3$ Cable rib patern over 10 stches, then k5. Finish the row by picking up and knitting 6 (3) stitches from the Backward cast-on stitches at the base of the Upper Hand, twisting these stitches to make the loops smaller. For the men's gloves, work the next two rows as follows: · Row 2: Work the $3{\times}3$ cable rib pattern as normal, k5, sk, k2, k2tog (19 st). Row 3: Work the $3{\times}3$ cable rib pattern as normal, k5, ssk, k2tog (17 st). (For the women's gloves, work Row 2 as follows: Row 2: Work the $3{\times}3$ cable rib patten as normal, k5, k3tog [16 st].)
1. Pass the tapestry needle through the first stitch on the front kniting needle as if to knit. Drop that stitch off the knitting needle and pull the yarn through.
3. Pass the needle through the first stitch on the back knitting needle as if to purl. Drop that stitch off the knittina needle and bull the varn throuah.
2. Slide the needle through the next stitch on the front knitting needle as if to purl. Leave this stitch on the knitting needle.
4. Slide the needle through the next stitch on the back knitting needle as if to knit. Leave this stitch on the knittina needle. Arrange the stitches on 3 needles, with Needle 1 over the $3\!\times\!3$ cable rib pattern, and Needles 2 and 3 over the knit stitches. If desired, place the detachable stitch marker between Needes 1 and 3, to mark the beginning of the row. Continue the pattern for $2^{1}\!/4^{\ast}\;(2\;\,I\,/\,\delta^{\ast})$ or until $^{1}\!/\!_{4}^{\;\leftarrow}$ before tip of finger, working the $3{\times}3$ cable rib pattern on Needle 1 and knitting the stitches on Needles 2 and 3. For the men's gloves, finish the thumb tip accordingly: Knit one stitch from Needle 1 to Needle 3, so Needle 1 has 9 stitches, and Needles 2 and 3 have 8 stitches. Finish using the Right Hand Modified Finger Bind-off. Right Hand Modified Finger Bind-off: oRow1 ■ Needl t sk, pztog, $3{\times}3$ cable rib pattern, k2tog . ■ Needles 2 & 3: Ssk, p4, k2tog. ·Row2 - Needl 1 sk, k2, kEtog. - Needle & 3 sk,k2, k2tog. · Move stitches from Needles 2 & 3 to one needle. Cut the yarn off in a $1\,2^{\mathfrak{s}}$ tail. Bind off with Kitchener Stitch. (For the women's gloves, finish the thumb tip as follows: Knit two stitches from Neede 1 to Needle 3, so Needle 1 has 8 stitches, and Nedles 2 and 3 have 8 stithes. Finish using the Finger Bind-off, continuing the $3{\times}3$ cable rib pattern durig the decrase if possible.)
8. RIGHT HAND FINISHING
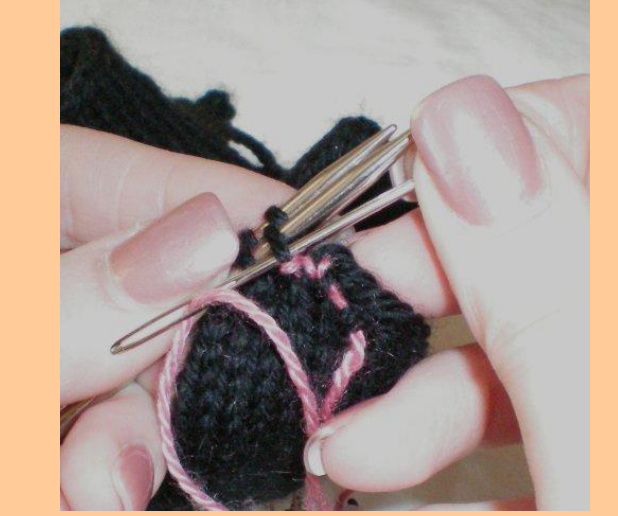
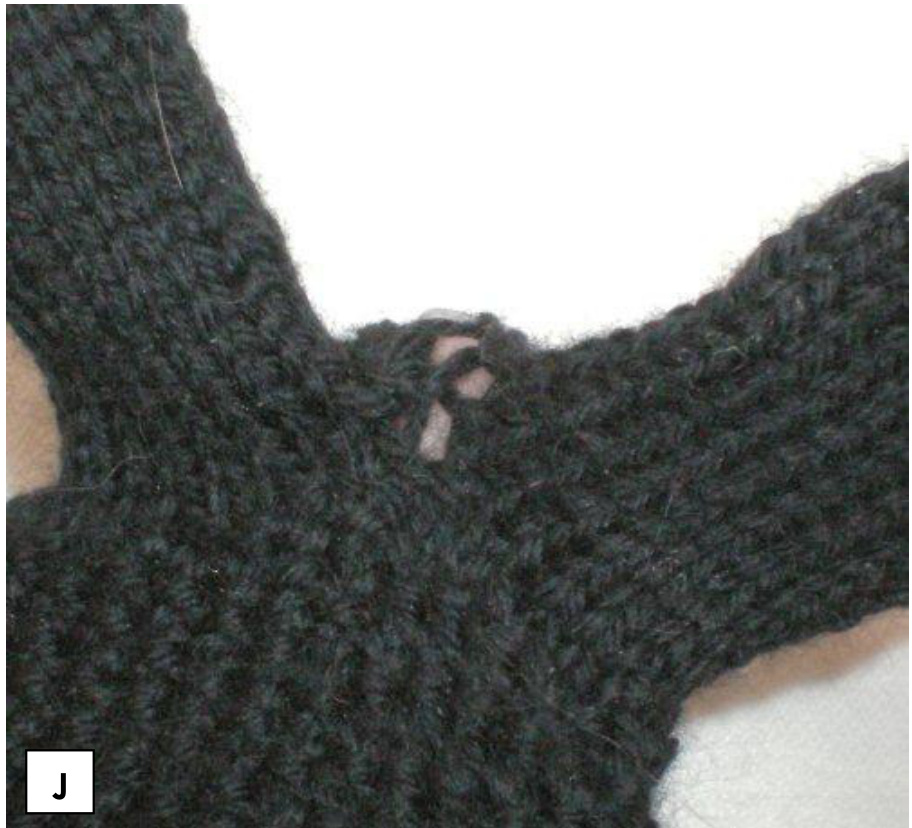
Using theblt tapestry need, weae in any lose treads. xamin bases of fngers forhls (Figure J);use le threads there to sew these holes closed. (Ifno loose thread is available, cut anew piece of yarn to do ths.)
Sew on buttons at the wrist, so the Mitten Top will lie flat when closed or folded back open and buttoned. (If you are knitting for somebody who can try the glove on, place the buttons while the person is wearing the glove.) Do not be concerned if the fingers “bunch up” inside the mitten top as you fit the buttons; the top is designed to stretch over the fingers. The buttons may be more secure i you use a sewing needl and heavy thread, instead of yarn, to attach them. 9. LEFT HAND CAST ON Do as for Right Hand. 10. LEFT HAND CUFF Do as for Right Hand.
11. LEFT HAND LOWER HAND
After fnishing the Cuff pl from Needle 1 to Needle 4. This point between Needes and 4 wil now be the beginning of your row. Rearrange the stitches onto 4 needles as follows: Needle 1: 12 st Needle 2: 11 st . Needle 3: 12 st Needle 4: 19 st Work the first row as follows: Over first 23 st, $*|_{\mathsf{k}3}$ , k2tog\* four times, then k3 (19 st total). Work the $3\!\times\!3$ cable rib for the next 31 st. For the men's gloves, the increases for the thumb gusset are then worked accordingly: ■Rows 1-3: Work moss st for $19~\mathrm{st}$ .Work the $3{\times}3$ cable rib to end. ■Row 4: Work moss for 14 st. Pm. M1,p1. Pm. M1, p1. Work moss st to beginning of $3\!\times\!3$ cable rib. Work $3{\times}3$ cable rib for 6 st. Pm. M1 purlwise. Pm. Work $3{\times}3$ cable rib to end. Rows 5-7: Work moss st to beginning of $3\!\times\!3$ cable rib. Work $3{\times}3$ cable rib for 6 st. Pm. P to stitch marker. Pm. Work the $3\!\times\!3$ cable rib to end. ■Row 8: Work mosst to stitch marker. Pm. P1 M1. Slip the next stitch marker from is current position and pm. P1 M1. Work moss st to beginning of $3\!\times\!3$ cable rib. Work $3\!\times\!3$ cable rib for 6 st. Pm. P to stitch marker. M1 purlwise. Pm. Work $3{\times}3$ cable rib to end. Repeat Rows 5-8 until 28 rows total have been completed——about $2\,^{3}\!/\!_{4}\,^{\mathfrak{s}}$ above the finished cuff. (For the women's gloves, work: ■ Rows 1-2: Work moss st for $1\,9\;s t$ .Work the $3{\times}3$ cable rib to end. ■ Row 3: Work mosst for 14 st. Pm. M1 purlwise, kl. Pm. M1 purlwise, k1. Work mosst to beginning of $3{\times}3$ cable rib. Work $3{\times}3$ cable rib for 6 st. Pm. M1 purlwise. Pm. Work $3{\times}3$ cable rib to end. Rows 4-5: Work moss st to eginning f $3{\times}3$ cable rib. Work the $3{\times}3$ cable rib for 6 st.Pm. Pto stitch marker. Pm. Work $3{\times}3$ cable rib to end. Row 6: Work moss s to stitch marker.Pm. P1 M1. Slip the next stitch marker from is crrent psition and pm. P M. Work most to begining of $3{\times}3$ cable rib. Work $3{\times}3$ cable rib for 6 st. Pm. P to tich marker. M purlwise. Pm. Work $3{\times}3$ cable rib to end. I Rows 7-8: Same as Rows 4-5. Row 9: Work moss s tostitch marker Pm. KI M1 purlwise.Sip the next stitch marke from is current psition and pm. K1 M1 purlwise. Work mosst to beginning of $3{\times}3$ cable rib. Work $3{\times}3$ cable ribfor 6 st. Pm.Pto stitch marker. M purlwise. Pm. Work $3{\times}3$ cable rib to end. Repeat Rows 4-9 until 21 rows total have been completed—about $2\,{}_{/2}^{t}{}^{\epsilon}$ above thefinished cuff.) You should have 33 stitches on Needles 1 & 2 and 38 stitches on Needles 3 & 4.
12. LEFT HAND MITTEN TOP
Begin the Left Hand Mitten Top by working moss stitch over the first $28~\mathrm{st}$ .Place the next 15 st on one of the small stitch holders, and use theBackwar-Lp Cast-on to cast-on 3 (I)st. Imediatly place themos stithes and te Backwad. Loop Cast-on stitches on the large stitch holder. Finish the row by working the $3\!\times\!3$ cable rib, threading waste yarn through each of the stitches as you knit. Work the remainder of the Mitten Top as for Right Hand.
13. LEFT HAND UPPER HAND
Pick up stitches from the large stitch holer and along the waste yarn as described for the Right Hand. Here, though, Needles 1 & 2 contain the $3\!\times\!3$ cable rib stitches and Needles $3\ \&\ 4$ contain the stitches from the large stitch holder. Place the detachable stitch markr accordingly. Starting from the beginning ofNeede 1, work the frst row of the Upper Han as follows: ■ For the men's gloves: Needles 1 & 2 (31 st): K1. $\ast\mathrm{K}2$ , k2tog, $^{\,}\mathrm{k}2^{\ast}$ , repeat five times. ■ (For the women's gloves: Needles 1 & 2 $\left(29\,s t\right)$ $\ast K2$ , k2tog, k3, k2tog\*, repeat thre times. K2.) ■ Needles 3 & 4 (28 st): Work moss st. Continue to work this pattern evenly (without decreases) for $1\,^{1}\!/\!_{2}\,^{\prime\prime}\;(I\,^{\imath}\!/\!_{4}\,^{\epsilon\epsilon})$ After completing this part, k 20 (18) st. Place the next $12\ (I\,l)$ stitches on the other small stitch holder, and use the Backward-Loop Cast-on to cast-on 2 stitches. Work mosst to end. On the next row, $\textsuperscript{k21}$ (19) st, then work moss st to end. Work this new pattern evenly for $^{1}\!/\!_{4}^{\,,\,\,\,\,\,\,\,\,\,}$ . Place all of the remaining stitches on the large stitch holder.
14. LEFT HAND FINGERS
INDEX FINGER:
Taking stitches from the large stitch holder, pick up and knit the 7 (6) knitted stitches losest to the detachable marker. Backward Cast-on 1 (2) stitch(es) to join the front and back of the glove. Finally, pick up and knit the 8 moss stitches closest to the detachable marke from the large stitch holder placing remainin stitches back on the large stitch holer). Rearrange these stitches evenly on 4 needles, so that Needles 1 and 4 meet at the break between the moss stitching and the stockinette. Knit for $2^{\ast}$ oruntil $1\,^{1}\!/\!_{4}^{\,\ast\epsilon}\,(I\,^{\ast})$ before tip of fnger. End your row at the end of Needle 4. Cast off, and cut til for weaing in.
MIDDLE FINGER:
Pick up and knit the next 6 (7) stockinette stitches from the large stitch holder. Using the Backward-Loop Cast-on, cast-on 1 (2) stitch(es) to join the front and back of the glove. Pick up and knit the next 8 (7) moss stitches from the large stitch holder. Finlly, pick u and knit 3(4) stches from theBackward Casto stcs at the baseof the IxFinger, tisting these stitches so holes will not form. For the men's gloves, knit the first 15 stitches, then k3tog (the Backwards cast-on stitches), leaving yu with 16 stithe. (For th wmen's gloves, it thefirst 1 stiths, the sk, tg [th Backwads casn stitches], leaving you with 18 stitches.) Arrange stitches evenly on 4 needles, so that Needles 1 and 4 meet at the base of the Index Finger. Knit for $2^{1}\!/\!_{4}^{\;\ast}$ or until $1\,{^1\!/^{\,6}}$ (1'") before tip of finger. End your row at the end of Needle 4. Cast off, and cut a tail for weaving in.
RING FINGER:
Pick up and knit the remaining stitches from the large stitch holder, as welas 3 (4) stitches from the Backward Cast-on stitches at thebase of the Middle Finger. For the men’s gloves, knit the first 15 stitches, thenktog (the Backwards caston stithes), aving u with 16 stth.(Fr thewn's gloveit thfirst 14 stith, thnss tog thackwas aston stithes],aigyu wisttranestiheynd s that admt at taf t Middle Finger. Knit for $3\,\,1\,/\,8^{\mathfrak{s p}}\,(2\,\,5\,/\,\delta^{\mathfrak{s p}})$ oruntil $^{1}\!/\!_{4}^{\;\leftarrow}$ before tip of finger. End your row at the end of Needle 4. Finish using the Finger Bind-off.
PINKIE:
Pick up and the knit 12 (11) stitches from the second smallstitch holder next to the Ring Finger and 4 (3) stithes from the Backward cast-on stitches in the Upper Hand. For the men's gloves only, knit the second row as follows: K12, ssk, k2tog (the last 4 stitches are the Backward cast-on stitches). Arrange stiths evenly ve4 e, o that Needs 1 nd4mt at thbas of tRing inger.Kit r $2\,{^1\!/\!\!_{2}}^{\epsilon}$ (2"),or until $^{1}\!/\!_{4}^{\;\leftarrow}$ before tip of finger. End your row at the end of Needle 4. Finish using the Finger Bind-off.
THUMB:
Pick up the 15 stitches from the remaining smal stitch holder. Begin the row by knitting 5, then continuing the purling and $3{\times}3$ cable rib pattern over 10 stitches. Finish the row by picking up and knitting 6 (3) stitches from the Backward cast-on stitches at the base of the Upper Hand, twisting these stitches to make the loops smaller. For the men's gloves, work the next two rows as follows: ·Row 2: K5, work the $3\!\times\!3$ cable rib pattern as normal, ssk, k2, k2tog (19 st). Row 3: K5, work the $3\!\times\!3$ cable rib pattern as normal, ssk, k2tog (17 st). (For the women's gloves, work Row 2 as follows: Arrangethe stitches on3 needes, with Needs 1 and 2 over the kit stitches and Needle 3 over th $3\!\times\!3$ cable rib patern. Continue the pattern for $2^{1}\!/4^{\ast}\;(2\;I\,/\,\!\vartheta^{\ast})$ or until $^{1\!}/\!\!_{4}^{\;6\epsilon}$ before tip of fnger, knitting the stitches onNeedles and 2 working the $3{\times}3$ cable ribpat.rt loehtad Knit one stitch from Needle 1 to Needle 3, so Needle 1 has 9 stitches, and Needles 2 and 3 have 8 stitches. Finish using the Left Hand Modified Finger Bind-off. · Modified Finger Bind-off:
Row 1
■ Needles 1: Ssk, p2tog, $3{\times}3$ cable rib pattern, k2tog. Needles 2 & 3: Ssk, p4, k2tog. Row 2 ■ Needl 1: Ssk, k2, k2tog. Needles 2 &3: Ssk, k2,k2tog. Move stitches from Needles 2 & 3 to one needle. Cut the yarn offin a $1\,2^{\mathfrak{s}}$ tail. Bind off with Kitchener Stitch. (For the women’s gloves, finish the thumb tip as follows: Knit two stitchs fmNd 1 tNd3 Nd 1has stits, aNs 2 3have stitch.Fnshusi the Finger Bind-off, continuing the $3{\times}3$ cable rib pattern durig the decrase if possibe.) 15. LEFT HAND FINISHING Do as for Right Hand. Congratulations! You have a finished pair of gloves! Enjoy! Meredith Davey splits her time between compulsively knitting and doing solar astrophysical research for NASA. She is happiest when she manages to combine the two, and her colleagues can attest to the fact that she knits through most scientific talks. (She thanks many of them, by the way, for their support, ideas, and remarkably intricate knowledge of the conditions Sean has been facing in Afghanistan.) She sends her best to our troops, and is heartened by the home front support she sees all around her. Photographs by Meredith Davey, Pamela Batchelor, Bess Kirnie, and Denlyn Atherton.


