Slave to the Plurk @2008 Terry Ross Designs
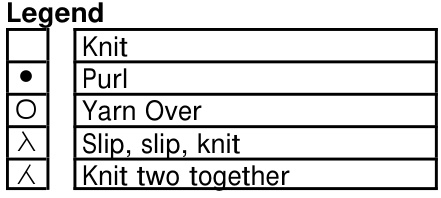
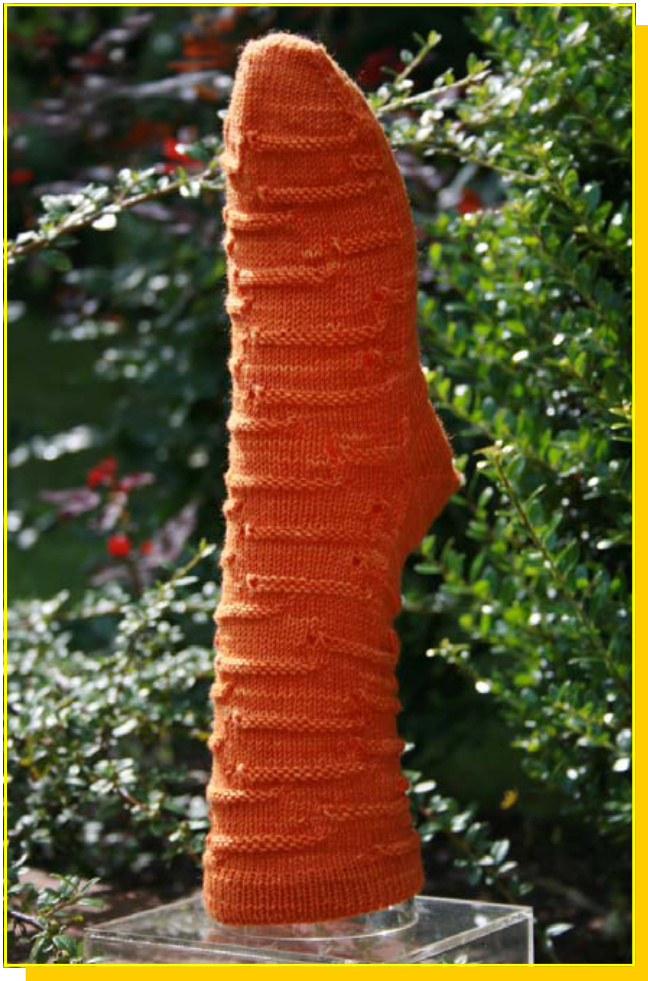
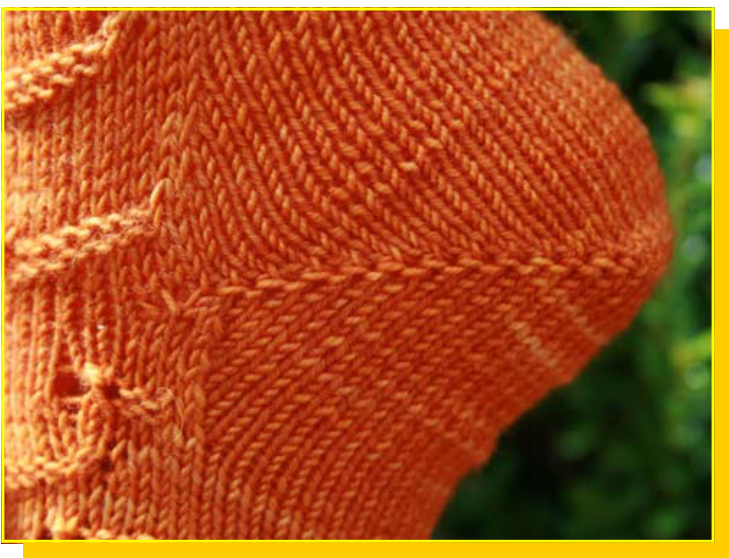
This sock is dedicated to Plurkers everywhere. You know who you are. You are that soul who is glued to the computer, a slave to the progression of the timeline across the screen. Now you can wear those timelines around your ankles, like the exquisite shackles they are, tying you to your Plurk friends with a continuous strand of yarn. But then that's pretty much what life is all about, huh? Being linked together with our friends. You may choose to work these socks either top-down or toe-up. Instructions are given for both, and the chart will work for either version. The design features a standard wedge toe, a hybrid mini-gusset/short-row heel, and a turned hem cuff. The chart features a combination YO/K2tog at each end of the purl "dialog box" motif to simulate friend avatars and message indicator graphics, however, you may simply replace those with K stitches if you prefer a design with no eyelets. Additional modifications could include placing a bead in each YO (or on the appropriate K stitches, if you decide to omit the YO/K2tog stitches). Regardless of how you decide to personalize your own Slave to the Plurk socks, I'm sure you'll enjoy knitting this easy and quick design to commemorate your own abject servitude to the Plurk! Oh, and you can Plurk me at this link: http://plurk.com/redeemByURL?from uid=345250&check=-334154897&s=1 Come check out Plurk and be my friend!
Materials:
Fingering weight yarn (Blue Moon Fiber Arts Socks That Rock lightweight in Sunstone was used here) U.S.size1 $2.25\;\mathrm{mm})$ knitting needles (2 circulars were used here to knit two socks at once) Yarnneedle
Gauge and Sizing:
8 stitches per inch and $1\,1\,12$ rows per inch, as knit here. The pattern is sized for Small (Medium, Large). Work the instructions and chart for your desired size.
Abbreviations:
K Knit P Purl M1R Make 1 right-leaning stitch (see Technique below) M1L Make 1 left-leaning stitch (see Technique below) YO Yarn over SSK Slip, slip, knit K2tog Knit two together SI Slip, as if to purl s/w/t Slip, wrap and turn (see Technique below) CO Cast on BO Bind off RS Right side WS Wrong side
Techniques:
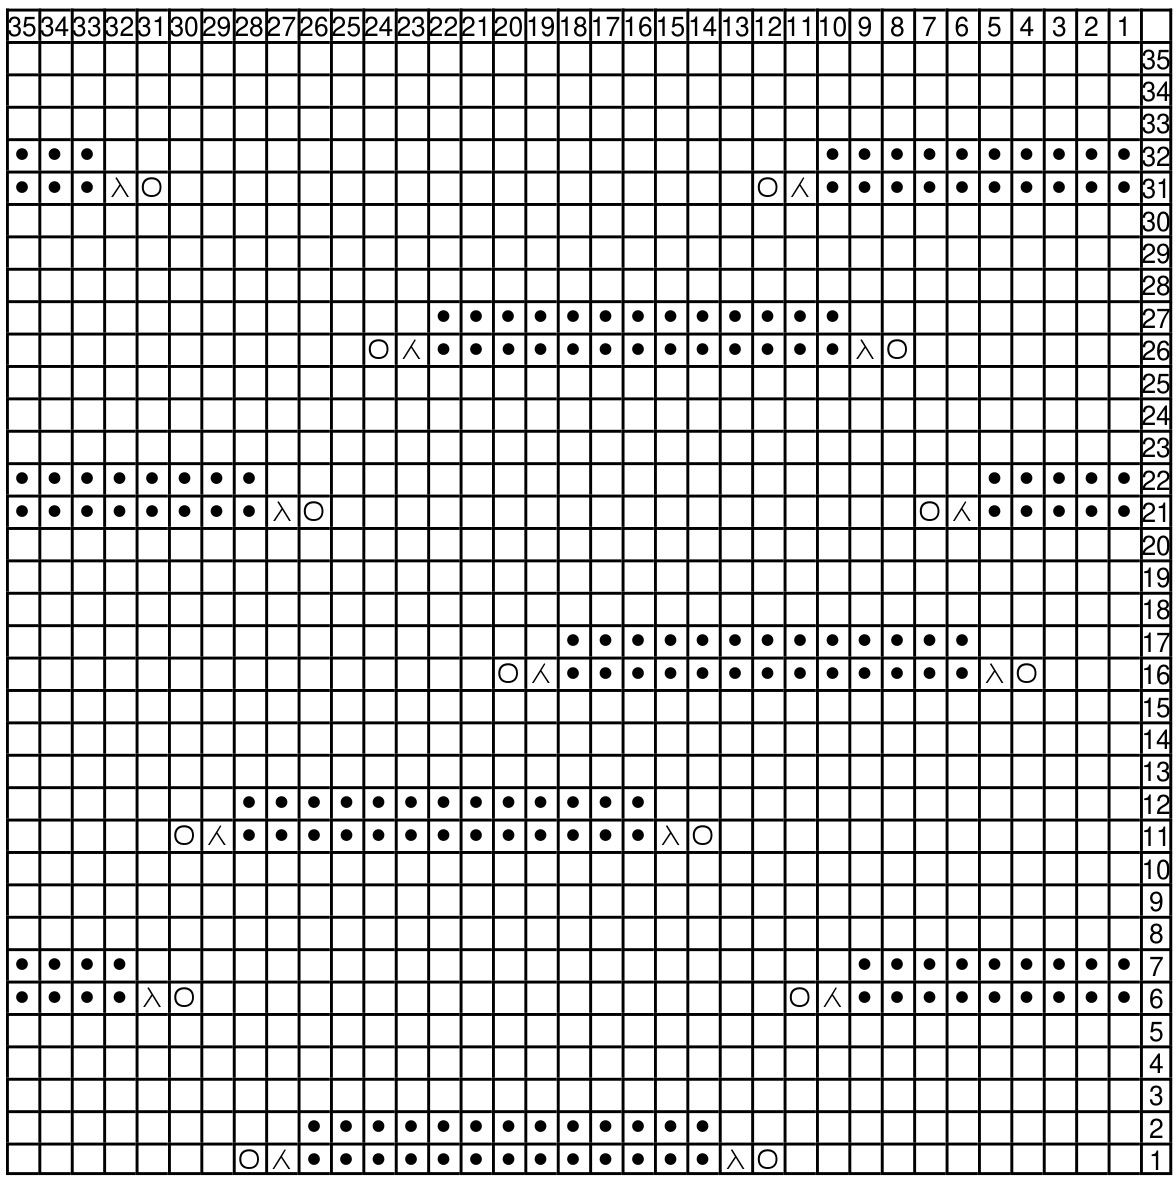
There are many ways to begin a toe up sock.Here are afewfavorites along with some excellent instructions and demonstrations: Judy's Magic Cast On can be found here on the internet - http://knitty.com/issuespring06/FEATmagiccaston.html - and also is demonstrated via YouTube by Cat Bordhi here - http://www.youtube.com/watch?v=IhBISOAhhQY Fluffy Kniter Deb has a great tutorial for Turkish Cast On here -- http://www.flufyknitterdeb.blogspot.com/2005/10/knitting-made-easier-turkish-cast-on.html The Provisional Cast On is illustrated in this video - http://www.knitinghelp.com/videos/cast-on The Figure 8 Cast On (and others) are here - http:/knitty.com/ISSUEwinter02/FEATtiptoptoes.html Use your favorite method to produce the M1R and M1L stitches. Here are a few to check out. · To M1R, lift the strand between the two stitches from back to front with the left needle; knit into the front of the lifted strand. · To M1L, lift the strand between the two stitches from front to back with the left needle; knit into the back of the lifted strand. Cat Bordhi's left and right leaning increases demonstrated - http://www.youtube.com/watch?v=SYOYMJBGxrw Slip llstitches a if to purl unless otherwise noted. Slip, wrap and turn is used in short row construction to minimize gaps between stitches. · To wrap a knit stitch, move the yarn to the front, slip the stitch to the right needle, move the yarn to the back, and slip the Wrapped stitch back to the left needle; turn the work. To wrap a purl stitch, move the yarn to the back, slip the stitch to the right needle, move the yarn to the front, and slip the Wrapped stitch back to the left needle; turn the work. Each stitch in this particular heel willbe wrapped twice - once during the decrease portion and once again when increasing. Don't be afraid of knitting from the charts. Simply look at the legend to see what the symbols mean, and then read each line from right to left, repeating it for both the front and the back of the sock leg. Work from Round 1 up the chart through Round 35, repeating as necessary to get proper sock length.
Instructions for Knitting from Top Down:
Cast on 52 (60, 70) stitches, divided evenly for instep and sole. Instep stitches are the first half of the stitches, and sole stitches are the second half. Work 8 rounds in stockinette stitch (knit all stitches), then purl 1 round. Work 8 more rounds of stockinette, then fold with wS together along the purl row. Knit each live stitch on the left needle together with the CO edge stitch at the bottom of its column of stitches to create folded hem. Work loosely enough so that the hem will comfortably pull on over your heel. After working the hem round, work 3 more rounds of stockinette stitch then begin working from the stitch chart for your size.
Hybrid Heel with Mini-gusset:
When you are ready to begin the hybrid heel, stop working the chart on the back of the sock only. Work the mini-gusset with the follow two-round repeat: Round 1 Work front of sock in pattern; K1, MR, K to the last stitch, M1L, K1 on the back of the sock Round 2 Work front of sock in pattern; K back of sock Work the increase rounds 3 (4, 5) times until there are 32 (38, 45) heel stitches.
After making gusset increases, work the short row heel as follows: Work across the instep in pattern. Mark which chart row you have just worked, and begin working the heel on the sole stitches as follows. Each wrapped stitch will end up with 2 wraps - one for the short row decreases and one for the short row increases. Row 1 K31 (37, 44), s/w/t Row 2 P30 (36, 43), s/w/t Working K on the RS and P on the WS, $^{\star}\mathsf{K}$ (or P) to the stitch before the last wrap, s/w/t\* untilthere are 12 (12, 13) unwrapped stitches between the wrapped stitches, ending with a WS row, turn work. Begin short row increases as follows, making the second wrap for each wrapped stitch: Row 1 K12 (12, 13), s/w/t Row 2 P12 (12, 13), s/w/t Row 3 K13 (13, 14), s/w/t Row 4 P14 (14, 15), s/w/t Continue to Kon the RS and P on the Ws, working one more stitch each time and wrapping the next stitch with a second wrap. When all stitches have been wrapped twice,turn the work to the RS and K acrossall hee stitches to the begining of the instep. Begin the gusset decreases as follows: Round 1 Work instep in pattern; K1, sSK, Kto the last 3 stitches, K2tog, K1 on sole. Round 2 Work instep in pattern; K all sole stitches Work the decrease rounds 3 (4, 5 times until you once againhave 26 (30, 35) sole stitches remaining. Continue working the instep in patten and the sole stitches in stockinette until you are ready to begin the toe afer completing a Round 5, 10, 15, 20, 25, 30, or 35 of the chart. Toe - Work standard wedge toe until 12 (12, 13) stitches each remain for instep and sole as follows: Round 1 K1, SSK, K to the last 3 stitches, K2tog, K1 for both instep and sole Round 2 K all stitches Cut yarn, graft toe, and weave ends.
Instructions for Knitting from Toe Up:
Toe:
Cast on 12 (12, 13) each for instep and sole using your favorite closed or provisional cast on method, or choose one as described in the technique section above. Work one round after your cast on round. The instep stitches will be the first half of the stitches, with the sole stitches being the second half of the stitches. Increase stitches on alternate rounds until there are 52 (60, 70) total stitches [26 (30, 35) each for instep and sole], as follows: Round 1 K1, M1R, K to the last stitch, M1L, K1 for instep and sole Round2 K all stitches
Instep:
Begin working from the chart for your size for the instep, K all sole stitches.
Hybrid Heel with Mini-gusset:
Use your own row gauge to determine when you need to begin the hybrid heel. The first half of the hybrid hee takes 26 (34, 42) rounds. Divideyourrwgaugeinttharopriateumf rodsfryourizehesract that wefrmyordired inishd t length to know how far to knit from the tip of the toe to the first gusset increase. Work the mini-gusset with the follow two-round repeat: Round 1 Work front of sock in pattern; K1, M1R, Kto the last stitch, M1L, K1 on the back of the sock Round 2 Work front of sock in pattern; K back of sock Work the increase rounds 3 (4, 5) times until there are 32 (38, 45) heel stitches. After making gusset increases, work the short row heel as follows: Work across the instep in pattern.Mark which chart row youhave just worked, and begin working the heel on the sole stitches asfollws. Each wrapped stitch will end up with 2 wraps - one for the short row decreases and one for the short row increases. Row 1 K31 (37, 45), s/w/t Row 2 P30 (36, 44), s/w/t Working K on the RS and P on the WS, $^{\star}\mathsf{K}$ (orP) to the stitch before the last wrap, s/w/t\* until there are 12 (12, 13) unwrapped stitches between the wrapped stitches, ending with a WS row, turn work. Begin short row increases as follows, making the second wrap for each wrapped stitch: Row 1 K12 (12, 13), s/w/t Row 2 P12 (12, 13), s/w/t Row 3 K13 (13, 14), s/w/t Row 4 P14 (14, 15), s/w/t Continue toKonthe RS and Pon the Ws,working one more stitch each time and wrapping the next stitch witha second wrap. When all stitches have been wraped twice,turn the work to the RS and K acrossall hee stitches to the beginning of the instep. Begin the gusset decreases as follows: Round 1 Work instep in pattern; K1, SSK, K to the last 3 stitches, K2tog, K1 on sole. Round 2 Work instep in pattern; K all sole stitches Work the decrease rounds 3 (4, 5) times until you once again have 26 (30, 35) sole stitches remaining.
Sock Leg:
Continueworking theinstepinpatten and the solestitchesinstockinette until you areready tobegin the toe after completing a oud5, 10, 15, 20, 25, 30, or 35 of the chart, ready to work the cuff. Work 8 rounds in stockinete stitch, then purl 1 round. Work 8 more rounds of stockinette stitch. Bind off very loosely and cut yarn, leaving 1 yard of yarn tail. Fold the cuff with WS together along the purl row and sew BO edge to the inside of the sock with the yarn tail to create the folded hem. Work loosely enough to allow the sock to fit over your heel. Cut yarn and weave ends

About the Designer -
Terry Ross is the self-published author of Twelve Bags Fulled, a collection of knitted and felted handbags. Her book is available at her website, on Amazon.com, and in many online and local yarn shops. She has designed dozens of free, downloadable felted projects for Crystal Palace Yarns. Terry also has a passion for designing and knitting socks. Look her up on Ravelry and Plurk (username: TerryRoss) and check out her website and blog as well to keep up with what Terry is knitting next. @2008 Terry Ross Designs (All rights reserved.) Many, many thanks tomy lurk friends Mintdeeand Knittingbrowforgiving the rough draft of this pattea test. Look them up on Plurk and friend them too!
Stitch Charts
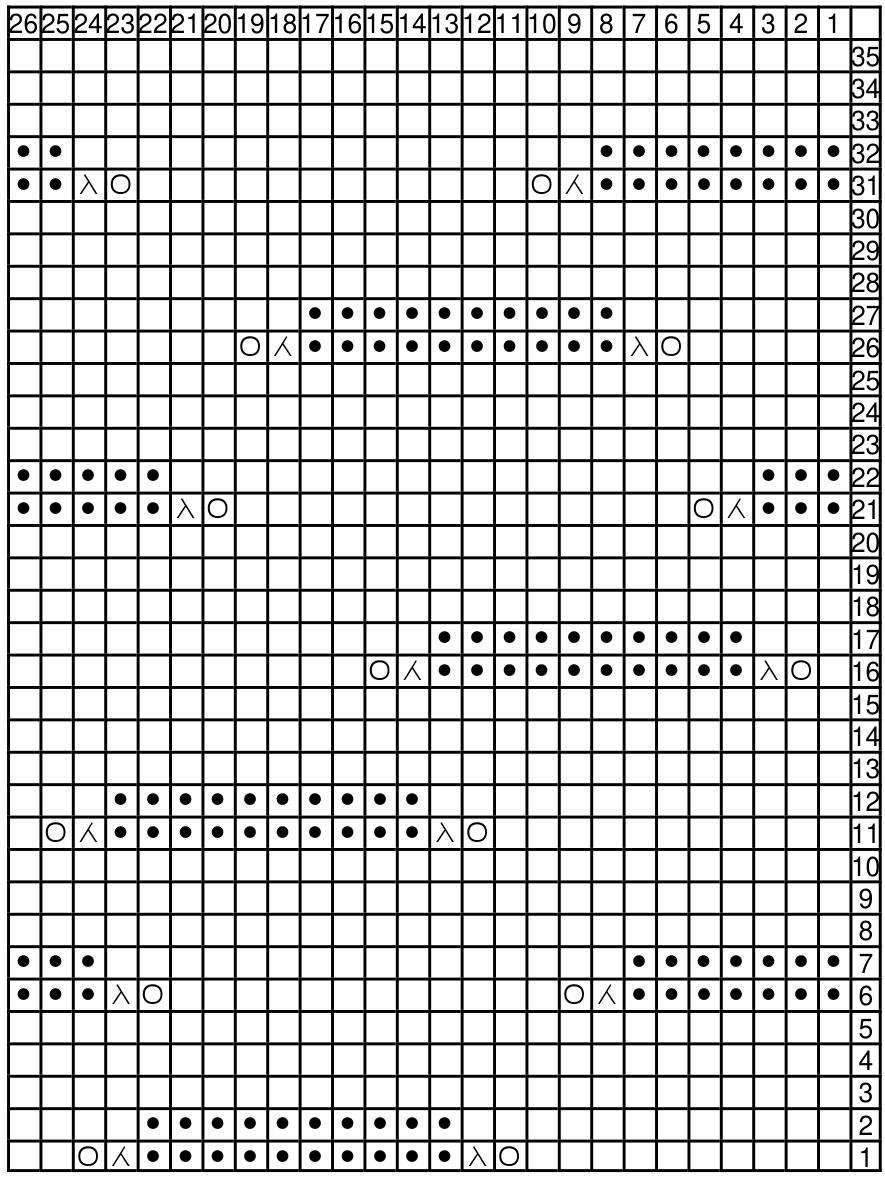
Medium
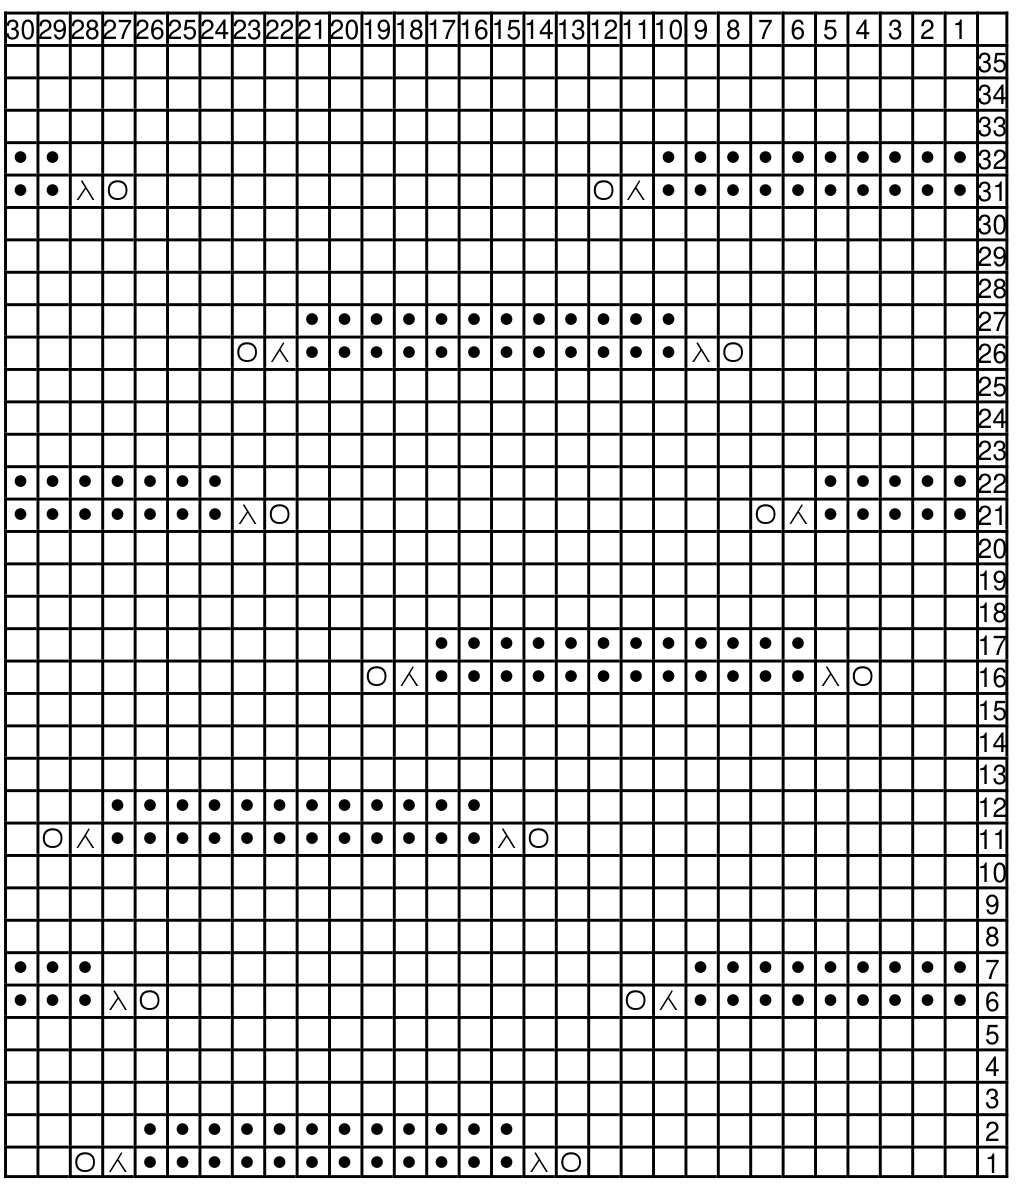
Large