Hemp Container with Lid Crochet free pattern By: Banan Felimban
Hemp Container with lid Designed by: Banan Felimban
Description:
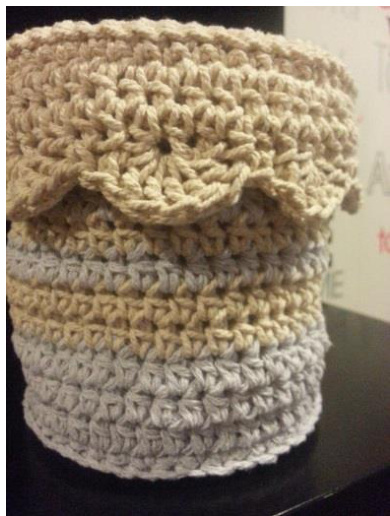
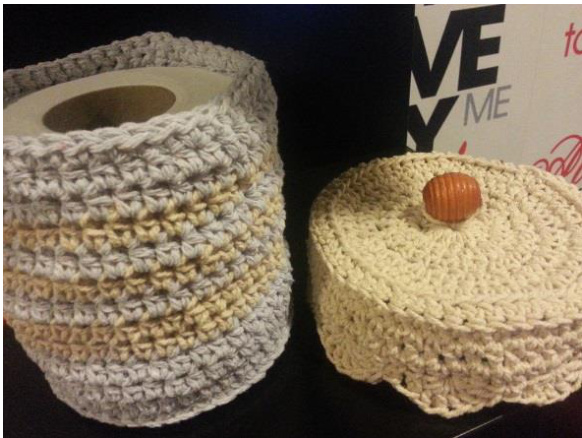
This container is the best ever. Imagine making your own size easily, no gauge required, no calculation, just crochet and stop when you're satisfied. I was looking for some containers, basket, boxes designs to make one for my bathroom to put the ER toilet paper in it and I was inspired by a basket with handle designed by Teresa Richardson. This lady is genius and her design was simple and basic. I altered and redesigned it to make an adjustable container with lid. The different thing about this pattern is that the container has a sharp edge which distinct between its bottom and body. You can see that edgy curve in the lid as well. BTW, this is my first pattern. YAY!!
Skill level: Easy
Materials: yarn, hook, bead or button, needle, scissors, and a measurement tape (optional).
Yarn: 2mm Hemp twine approx. 120G (2 balls)
Hint: You can choose any kind of yarn, but I prefer choosing some heavy yarn, affer all you want your container to have some consistency.
Hook: 5mm
Hint: If you choose to change yarn, try to use a suitable hook size that gives you tight stitches. I tried 4,5,6mm hooks and found that a 4mm hook is painful and hard to be used with hemp and a 6mm hook made the container "wobbly" while a 5mm hook was perfect. So just try and use what you prefer. Crochet Abbreviations (US terminology): Dc - double crochet Hdc - half double crochet Rnd - round Rep -repeat Sc - single crochet Sl st - slip stitch St - stitch Sts - stitches
The container
Bottom of container:
Start by making a magic loop, here is a great tutorial on how to make one: How to Do the Magic Circle Crochet Loop by Teresa Richardson from Crochet geek: http://www.youtube.com/watch?v= FHYVutk2iYY Note: Otherwise stated, work in both loops of stitches. The chains at the beginning of each round DO NOT count as stitches. Rnd 1: Ch2, make 12 hdc into the magic loop, when you finish pull the tail of the magic loop tight, join with sl st in top of 1st hdc. (12 sts) Rnd 2: Ch2, make 2 hdc in each st around, join with sl st in top of 1st hdc. (24 sts) Rnd 3: Ch2, make 1 hdc in each st around, join with sl st in top of 1st hdc. (24 sts) Rnd 4: Ch2, make 2 hdc in each st around, join with sl st in top of 1st hdc. (48 sts) Note: This is the bottom of my container that fit a toilet paper roll perfectly, if you like a smaller size stop at Rnd 3 or even 2, if you like bigger size continue working Rnd 3-4 (doubling the number of sts) and stop when you reach the desired size.
Edgy curve:
Turn your work making the wrong side (inside surface) facing you. Rnd 5: Chl, make 1 sc in front loop only of each st around, join with sl st in front loop only of 1st sc. (48 sts)
Body of Container:
Turn your work again making the right side (outside surface) facing you. Rnd 6: Ch1, make 1 sc in back loop only of each st around, join with sl st in back loop only of 1st sc. (48 sts) Rnd 7-16: C2, make 1 hdc in each st around, join with sl st in 1st hdc. (48 sts) Note: This number of rounds matches the height of the toilet paper roll. If you like shorter body make less rounds and vice versa. Rnd 17: Cl, make 1 sc in each st around, join with sl st in 1st sc. (48 sts) Fasten off and weave in the tail.
The lid
Top of lid:
Start by making a magic loop Note: Otherwise stated, work in both loops of stitches. The chains at the beginning of each round DO NOT count as stitches. Rnd 1: Ch2, make 12 hdc into the magic loop, when you finish pull the tail of the magic loop tight, join with sl st in top of 1st hdc. (12 sts) Rnd 2: Ch2, make 2 hdc in each st around, join with sl st in top of 1st hdc. (24 sts) Rnd 3: Ch2, make 1 hdc in each st around, join with sl st in top of 1st hdc. (24 sts) Rnd 4: Ch2, make 2 hdc in each st around, join with sl st in top of 1st hdc. (48 sts) Note: match the number of rounds for lid's bottom with the bottom of container, meaning if you made 4 rounds then make 4 rounds for the lid or if you made 7 then make 7. If you are wondering how to make the lid slightly bigger than the container without the fuzz of math, just make the next round no matter how many rounds you made before. Rnd 5: Ch 1, make 1 sc in each st around, join with sl st in 1st sc. hint: try to make them a little bit loose so the top of the lid doesn't curve up. (48 sts) Rnd 6: Ch1, make 1 sc in front loop only of each st around, join with sl st in front loop only of 1st sc. (48 sts)
Body of lid:
Turn your work again making the right side (outside surface) facing you. Rnd 7: Ch1, make 1 sc in back loop only of each st around, join with sl st in back loop only of 1st sc. (48 sts) Rnd 8-9: C2, make 1 hdc in each st around, join with sl st in 1st hdc. (48 sts) Note: If you like shorter body make less rounds and vice versa. Rnd 10: C1, \*sc in next st, skip 2 sts, make 6 dc in next st (shell made), skip next 2 sts\* rep \* to \*, join with 1st sc. (total of 8 shell formed) Fasten off and weave in the tail. Attach a 1" wooden bead to the center of the lid as a knob. You could use a large button, a tassel, etc.. Hope you enjoyed making it.
Edgy curve:
Turn your work making the wrong side (inside surface) facing you. P.S. This pattern is free and for personal use only. Feel free to share it with others.


