Heelix\*
Jeny Staiman, Sock Summit 2011 This class will focus on three main topics, in this order: 1. Heelix cast on with 2 yarns 2. Primer on helix knitting
Contents
Part 1: In-class assignment (partial baby sock). Part 2: Multi-size pattern (Women's S, M, L).
Materials
2 yarns: fingering weight, matching gauge, contrasting colors: MC: Darker color CC: Lighter color Needles for knitting in the round (DPNs, 2 circs, or Magic Loop) Crochet hook Scrap yarn, 3 feet
Key Techniques
Helix knitting Judy's Magic Cast On (JMCO) 2 M1 increase 3 Provisional casting on using a crochet chain Picking up provisional stitches 5 Kitchener stitch (grafting) 6 Interlock bindoff 7 Seeendnotesforadditional onlineresources on each of these techniques.
Heelix Cast On (with JMCO)
The tricky part here is to get the working strands pointing in opposite direction...

So that on the next round, they can then wrap around each other like this.
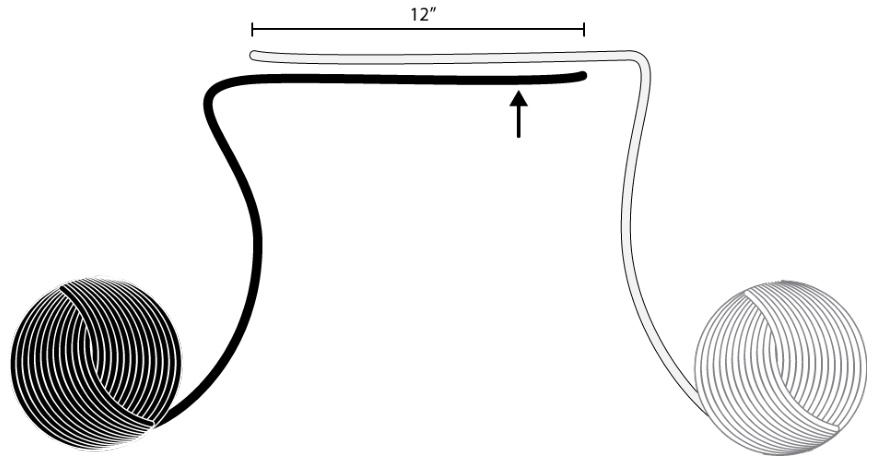
In order to do this, we'll do a modification of Judy's Magic Cast On. Setup 1: Arrange your strands so that the tails overlap each other by about 12 inches. Tie both strands together in a slipknot in the overlap area close to the end of MC, marked by the arrow.
Setup 2: With two needles, place the slipknot on the top needle. With your left hand, hold the CC tail with your forefinger and the MC working yarn with your thumb.
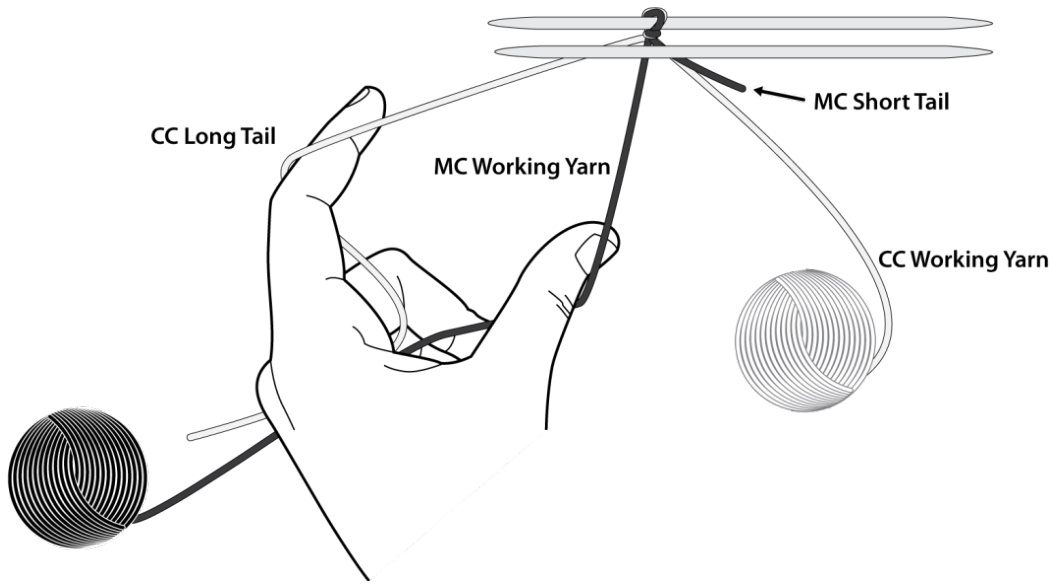
JMCO 8 sts each needle, starting on the bottom and ending on the top. Do not count the slip knot. 16 sts.
Heel

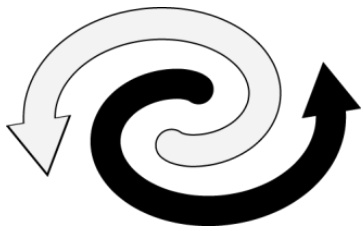
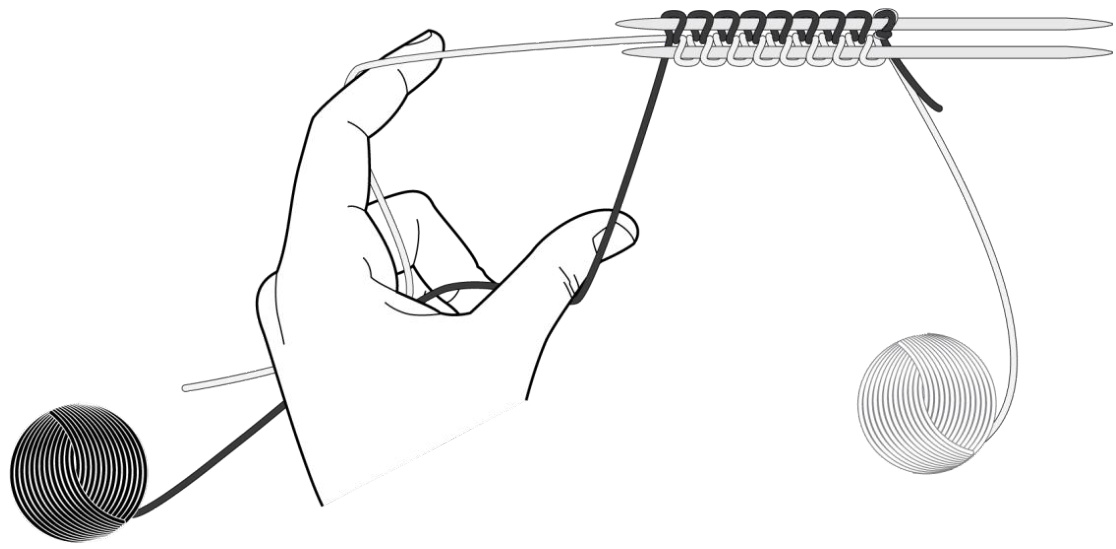
You'll work the heel using 2-strand helix knitting. Your strands will never cross each other, but will continuously wind around each other all the way up to the ankle. After casting on, rotate your work so the needles are in knitting position. Row 1 (% round): MC - k8. Now your work should lok something like this. The slipknot is still on the bottom needle.
Carefully remove the slipknot from the needle and pull to undo the knot.
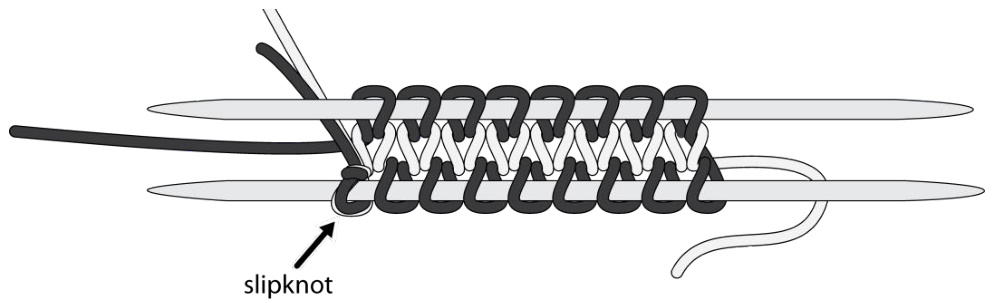
Note that the MC working strand is now stacked directly on top of the CC working strand. In helix knitting, whenever you have two live strands stacked like this, continue with the strand on the bottom. Pick up the CC strand, rotate the needles, and work the next round. DPN users: You should be able to work the entire heel on 2 needles (using a third to work the sts). Rnd 2: CC -k1, M1,\* k6, M1, k1; Repeat. 20 sts. At the end of the round, this time the CC strand will be on top of the MC strand. Pick up the MC strand, rotate the needles and continue:
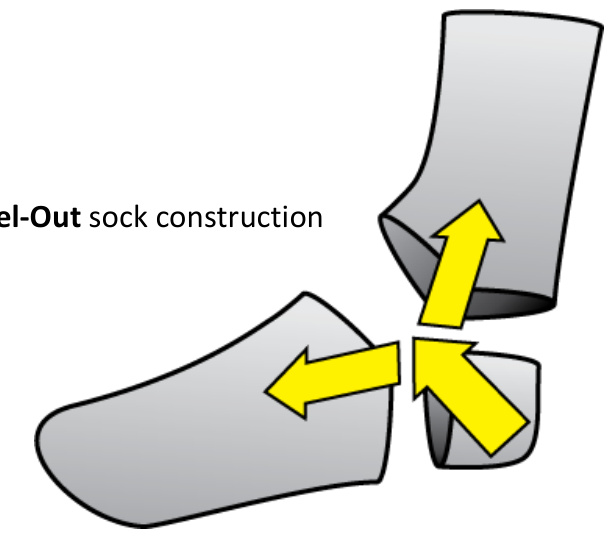
Instep bridge
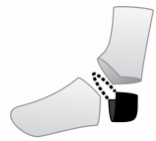
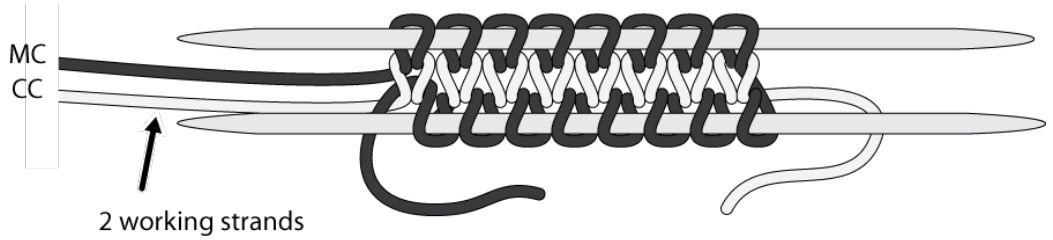
The basic 3-step technique described here can be adapted to apply to any heel-out sock worked in the round. Setup: Your work should look something like the image at the right - one working yarn at each halfway point. We will use MC as the active strand. Step 1: Use scrap yarn to bind off the CC sts (half the total sts) with Chain Bindoff. When you get to the end, replace your needle with a crochet hook.
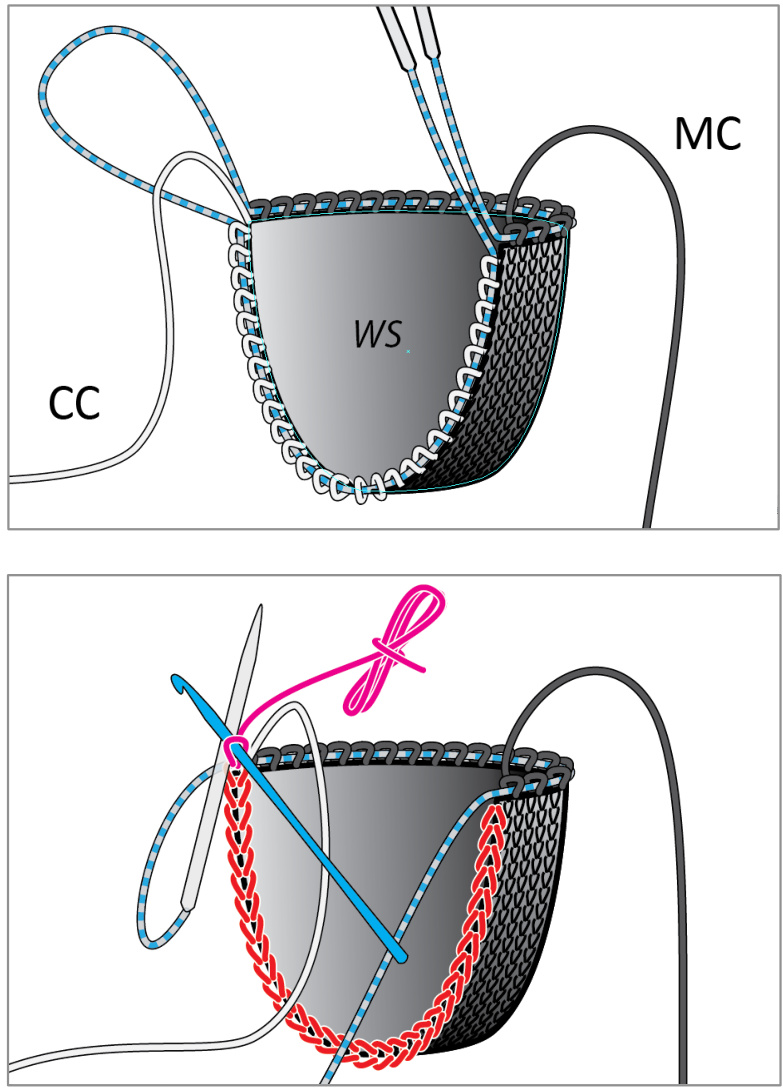
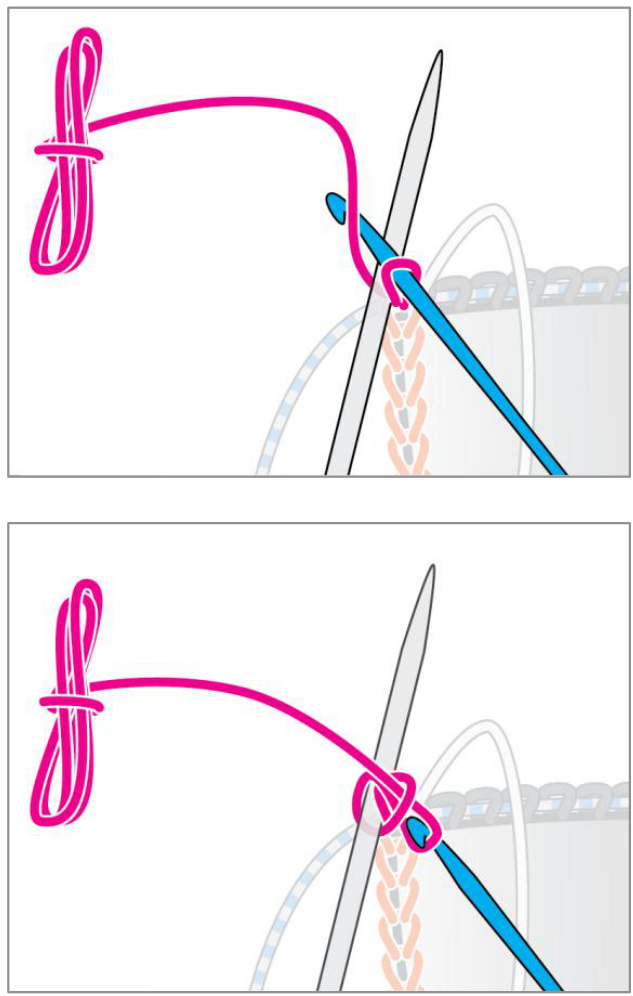
Hold a knitting needle behind the crochet hook as shown in the image to the right. Magic Loop method is shown. For 2 circs [DPNs], use 1 [2] needle[s] for heel sts, and 1 [1] needle for provisional bridge sts. There are 2 common ways to do the M1 increase (please see knitty article in endnotes). I recommend you use EZ's method here, in which you cast on a loop. Because you will have two increases in close proximity, the other method - picking up a strand from below - may pull out too much slack and give you a too-tight mitered edge. Step 2: Using Lucy Neatby's video (see Endnotes) as a guide, chain 24 loops onto your L needle. a. Wrap the scrap yarn around behind the knitting needle and in front of the crochet hook... b. Pull a loop through.
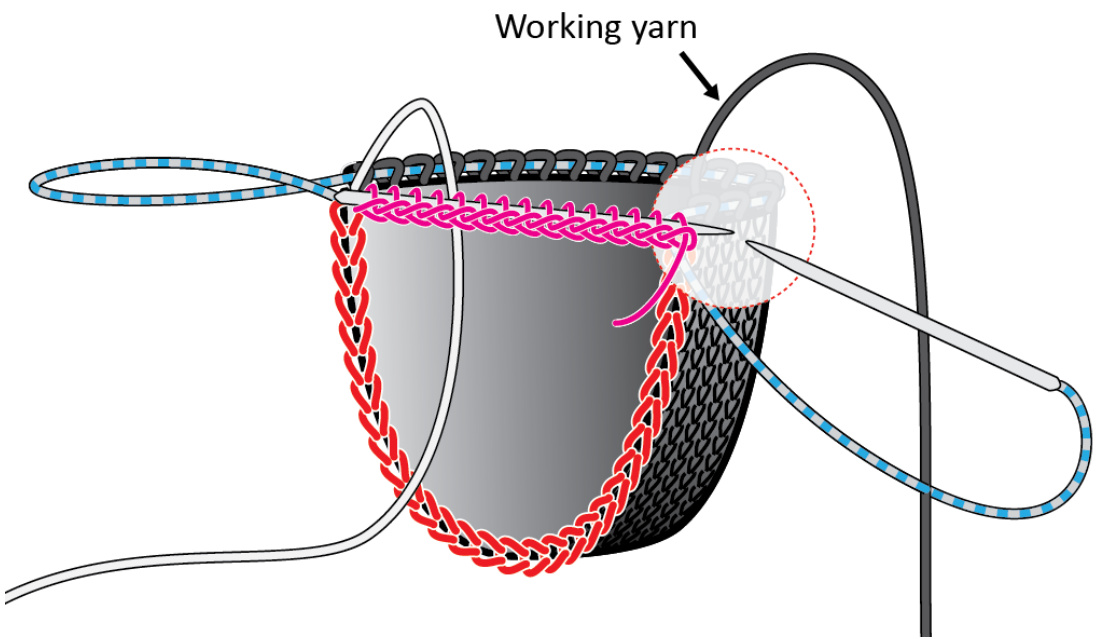
Repeat (a) and (b) until you have 24 loops on instep bridge needle. 20 sts remain on heel needle(s). Step 3: Bring your needle tips together and knit across the provisional bridge sts with your MC working yarn; then knit around the back of your heel to complete the round.
Instep Side 1

Your sock is worked in opposite directions from the instep bridge, so you can work either the cuff or the toe first. To save class time we'll just knit 10 rounds and bind off. All rounds worked with Mc. Your instep bridge counts as Rnd 1, and your starting stitch count should be 24 on the instep and 20 on the heel. Rnds 2-4: Knit. Rnd 5: ssk, k20, k2tog; k to end of round. 42 sts. Rnds 6-9: Repeat this cycle once more. (There will be 2 fewer sts between decreases.) 40 sts. Rnd 10: knit. Bind off using method of choice.
Instep Side 2

1. Pick up provisional sts along the instep bridge, and 2.Knit in the other direction. Once again, to save time we'll just knit 10 rounds and bind off. Magic Loop users: You might not have access to the working strand of CC when you start. If not, slip the heel sts purlwise from left to right needle until you do have access. Starting from the instep side, unpick the scrap yarn cast on and put the resulting instep sts on your needles. There should be 23 live loops. Pick up 1 additional st on each side of the opening, for a total of 25 instep sts.\* Then unpick the scrap yarn from the heel and put the resulting 20 sts on your needles. All rounds worked with CC. You'll find that this section is very similar to Instep Side 1. Rnds 1-4: Knit. Rnd 5: ssk, k21, k2tog; k to end of round. 43 sts. Rnds 6-9: Repeat this cycle once more. 41 sts. Rnd 10:knit. Bind off using method of choice. You may also wonder what to do about the uneven stitch count on your needles (20 on one needle, 21 on the other) once you are finished decreasing. If you were to knit this sock all the way to the toe, you can deal with it in one of two ways: 1. Add an additional decrease round in which you decrease on only one side (this is what I do in the attached pattern), or 2. Continue all the way to the end with the uneven stitch count, because you CAN graft these two sides together so long as two conditions are met: a.the stitch count differs by 1, b. the graft starts (and ends) on the side with the greater number of sts.
\* Geeknote: Why 25 instep sts?
A fundamental principle of working with provisional sts is that if you have (x) sts going one way, you will have either (x+1) or (x-1) sts going the other way, depending on how you pick up your sts. In this case Side 1 has 24 sts and Side 2 has 25 sts. Please see the endnotes for a link to a detailed blog post on this topic.
Heelix
Adult sock pattern
SIZE
Women's S (M, L) To determine your size, measure diagonally around your heel and instep.
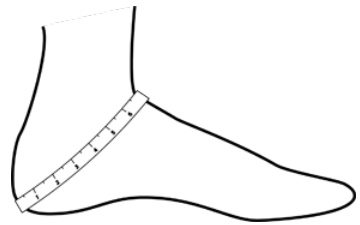
Small: 11.25-11.75 inches Med: 11.75-12.25 inches Large: 12.25-12.75 inches
FINISHEDMEASUREMENTS
Length of foot: knit-to-fit. Foot circumference: Sock is 7.5 (8, 8.5) inches unstretched. Cuff circumference: Ribbing is about 6 inches unstretched; stretches comfortably to 14 inches.
MATERIALS
Yarn Fingering-weight sock yarn in 2 contrasting colors; 50g each color. Needles 1 set US #1.5/2.5mm double-pointed needles OR 1 long Us #1.5/2.5mm circular needle for magic loop OR 2 Us #1.5/2.5mm circular needles for two-circulars Notions Tapestry needle Scrap yarn (similar weight to sock yarn), approx. 6 feet Crochet hook (size comparable to 2.5 mm)
GAUGE
32 sts/44 rounds = 4 inches in stockinette stitch.
PATTERN
Cast On
cast on method described in the class handout, JMcO 8 sts on each needle. 16 sts.
Heel
Row 1 (% round): With MC, k8. 16 sts. Rnd 2: CC - [k1, M1, k to 1 before end, M1, k1]; Repeat. 20 sts. Rnd 3: MC - Work as for Rnd 2. 24 sts. Rnds 4-7: Continue to increase 4 sts every round, alternating between MC and CC, until you have a total of 40 sts. Rnd 8: CC - Knit to end of round. Rnd 9: MC - Work as for Rnd 2. 44 sts. Alternating strands with each round, continue to increase 4 sts every other round until you have 60[64, 68] sts. End the heel as follows: CC - Work 1 round plain MC - k30[32, 34].
Instep Bridge
Follow the illustrations in the class handout to bind off % the heel sts and chain 38[40, 42] loops with scrapyarn. MC - K across the 38[40, 42] provisional loops and around the 30[32, 34] sts on the back of the heel to complete the round. 68[72, 76] sts.
Instep Side 1 (Leg)
Rounds start on the instep needle. Instep bridge counts as Rnd 1. All rounds worked in Mc. Rnds 2-6: Knit. Rnd 7: ssk, k to 2 before end of instep, k2tog; kto end of round. 66[70, 74] sts. Rnds 8-9: Knit. Rnd 10: Repeat Rnd 7. 64[68, 72] sts. Continue to decrease 2 sts on the instep every third round, until you have a total of 60[64, 68] sts again.
Cuff
All rounds worked in Mc. Continuing directly from Instep Side 1, work 12 rounds of in stockinette. Ribbing Rnd: [k2, p2] to end. Repeat Ribbing rnd until your cuff is the desired height. Second last rnd: With MC, [k1, p1] to end. Cut MC yarn. Remaining rounds worked in CC. Last round: With CC, [k1, p1] to end. Bind off with CC using the Interlock Bindoff (see Endnotes) for [k1, p1] rib.
Instep Side 2 (Foot)
All roundsworked inCC. Starting from the instep side, unpick the provisional cast-on and put the resulting 39[41, 43] sts for the instep on your needles. Then unpick the scrap yarn from the heel and put the resulting 30[32, 34] sts on your needles. 69[73, 77] sts. Magic Loop users: Slip the heel sts purlwise from left to right needle until you have access to the working strand of Cc. You'll find that this section is very similar to Instep Side 1. Rnds 1-6:Knit. Rnd 7: Ssk, k to 2 before end of instep, k2tog; k to end of round. 67[71, 75] sts. Rnds 8-9: Knit. Rnd 10: Repeat Rnd 7. 65[69, 73] sts. Continue to decrease 2 sts on the instep every third round, until you have a total of 61[65, 69] sts. Work another 2 rounds plain, then: Last shaping round: Ssk, k to end of round. 60[64, 68] sts. Once you have finished decreasing the instep, knit in plain stockinette until the foot reaches just over the pinky toe, or is about 1.5 inches from the tips of the toes.
Toe
The toe uses a combination of shaping, mitered decreases, and short rows to achieve an appearance that pairs nicely with the heel. If you prefer, any toe construction may be substituted. All rounds worked in CC. Rnd 1: K1, ssk, k to 3 before end of instep, k2tog, k1; repeat. 56[60, 64] sts. Rnds 2-3: Knit. Repeat the last 3 rounds once more. 52[56, 60] sts. Rnd 7: Repeat Rnd 1. 48[52, 56] sts. Rnd 8: Knit. Repeat the last 2 rounds 2[3, 4] more times. 40 sts. Repeat Rnd 1 twice more. 32 sts. Remaining rounds worked in MC. Repeat Rnd 1 twice more. 24 sts. Short Row 1 [RS]: K2tog, k7 to 3 before end of needle, w&t. Short Row 2 [WS]: Sl1, p5 to 2 before end of needle, w&t. Final Rnd: Sl1, k5, conceal wrap (cw), ssk; k2tog, k8, ssk. 20 sts. Graft remaining sts together (see Endnotes).
Endnotes
IHelix Knitting TECHKnitter article: http://techknitting.blogspot.com/2011/03/helix-barberpole-stripes-part-2-of.html Judy's MagicCast On My blog: http://curiousknitter.com Direct link to the article: http://curiousknitter.blogspot.com/2011/02/judys-magic-cast-on-la-jeny.html M1increase Knitty article: http://www.knitty.com/ISSUEwinter09/FEATwin09TT.php Provisional Cast On Lucy's video: http://www.youtube.com/watch?v=R3J-sUx_whE 5 picking up Provisional Stitches My blog: http://curiousknitter.com Direct link to the article: http://curiousknitter.blogspot.com/2011/06/provisional-primer.html KitchenerStitch Knitty article: http://www.knitty.com/ISSUEsummer04/FEATtheresasum04.html InterlockBindoff Knitty article: http://www.knitty.com/ISSUEss11/FEATinterlock.php Please keep in touch! Email: jeny@ curiousknitter.com Blog: http://curiousknitter.com Ravelry ID: curiousjeny


