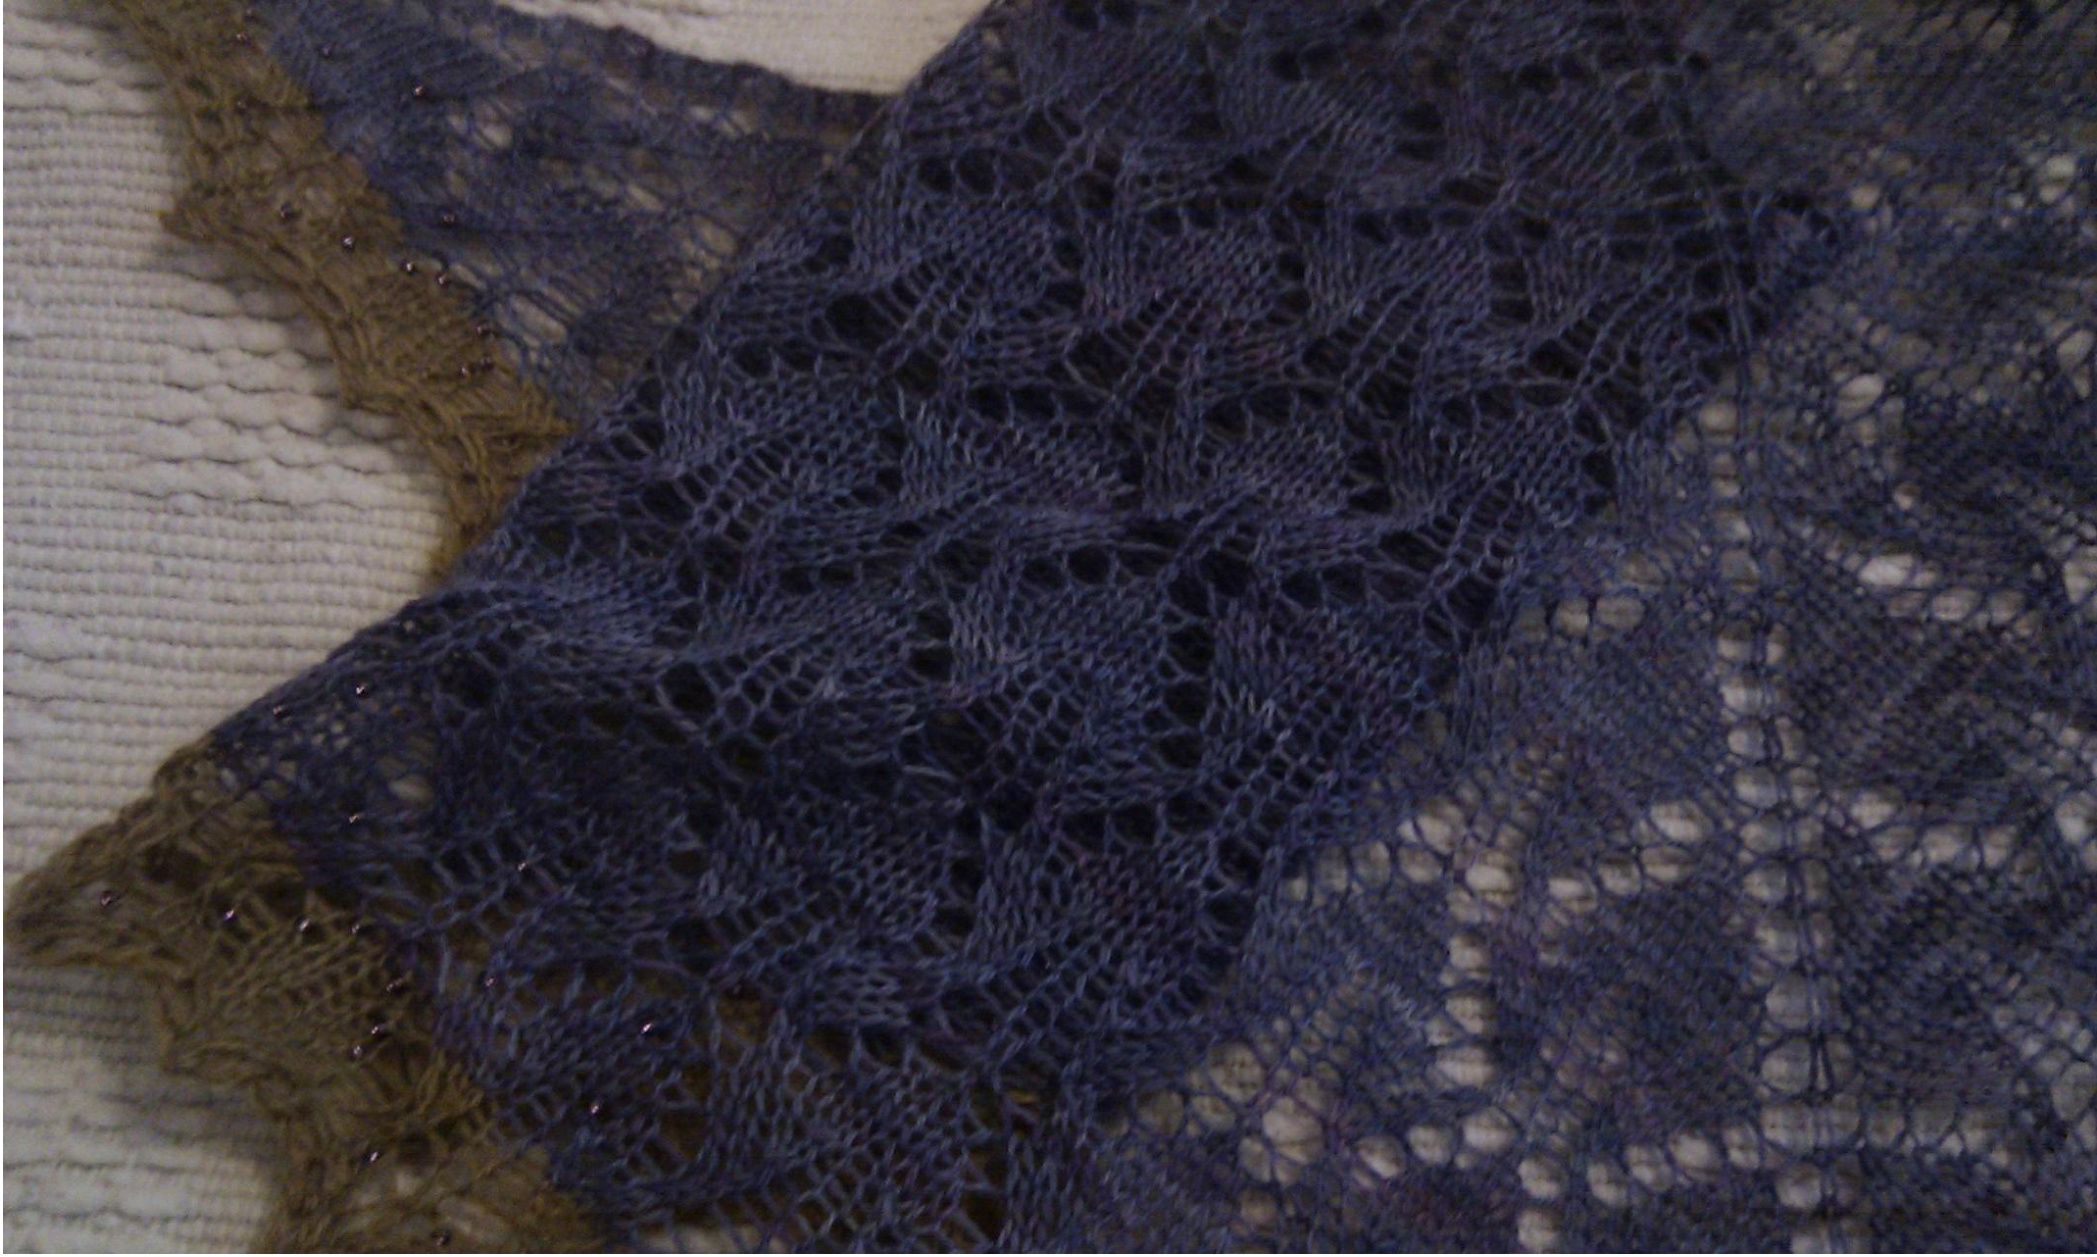
Midsummer Night
"Swift as a shadow, short as any dream, Brief as the lightning in the collied night M Midsummer Mights' Dream Full of shifting shapes and shadows, this little shawl is full of the spirit of Midsummer Night. Each pattern repeat twines around the next, producing a soft tapestry of lace and solid shapes, perfect for a semi-solid or variegated yarn. With a shimmer of beads around the edge to give it weight and sparkle,it's a magical and interesting little knit, and ideal for a piquant little holiday project. In construction it is a classic triangular shawl with the same pattern used across both the body and the border. The body is worked in one piece from the centre top, and the edge is finished with a few rows in a contrast colour. It can be as large or as small as you like. The pattern repeat uses only a few stitches, all very easy, so it's an ideal starter project. To help new shawl knitters, I have included two patterns - one with some direction for those who have made a triangular shawl before and are confident lace knitters, and longer directions for novices. To save paper, I recommend choosing your directions first, and setting your printer to only print the pages you want. ced shawl knitters should print pages 7 - 10, and new shawl knitters pages 3 The yarns used in the example are a Woolhunter Outback lace-weight for the body, and a Colourmart laceweight merino held double for the edging.
ttern support. Please message me on Ravelry, or email me at ms.mongoose@gmail.con
Midsummer Night
Dirgctions for new shaw1 knitter
'Knitting a triangular shawl for the first time can seem daunting. The first time I did it, Ijust had the charts and nearly drove myself mad trying to work out what was meant to be happening! Before you start, here's some vital information. 1. The shawl increases at three points - the far right, the far left, and the centre. There is a centre stitch not shown on most charts, between the two yarn-overs that join the pattern pieces. This is always YO, K1, YO on the right side and purled plain on the wrong side. Have a look at some pictures of triangular shawls to see what I mean - it's a line down the middle. Think of it as a join' between two back-to-back triangles and you can't go wrong. 2. There are also three garter stitches at each side which form the edging. They willof course be knit stitches on the wrong-side row. By the time you start working the lace pattern, you'll have established these and it will be easy to remember. 3. The charts are composed of a right border, a left border, and a main repeat. They make two back-to-back triangles, joined by that centrestitch. So, to sum up, in each right side row you'll be working; K3, YO (Right border chart - repeat x however many - left border) YO, centre stitch, YO (right border - repeat x however many - left border) Yo, K3 All wrong-side rows are K3, purl to last 3 stitches, K3. Because of the location of the increases, youll end up with two back-to-back triangles, with a line down the middle, each half made of symmetricallace. Time to cast on!
Materials
1. Lace weight yarn, between 400 and 600 yards for a good-size shawl in the main colour, 100 yards in contrast. 2. 2.75 needles - straight to start, circulars as the shawl gets bigger if you prefer. 3.Wool needle 4. Optional - seed beads for the border, small length of jeweller's wire for small-eyed beads or a beading needle for larger, for threading. 5. Optional - magnetic pattern-reader strip or long post-it note to keep your place in the chart
Casting On
Casting on for such a funny shape needs a bit on manoeuvring. For more information on this method, search for tab cast-on' on Ravelry. Cast on 3 stitches in your main colour. Knit 7 rows in garter stitch Row 8; Knit 3, Pick up and knit 3 stitches from the edge of the piece from the three garter-stitch ridges pick up and knit 3 stitches from thecast-on edge. Row 9; You now have nine stitches. Knit 3, purl 3, knit 3. Start increasgs You'll now be working up to the point at which you can start the charts Row 10 (Right side); K3, YO, K1, YO, K1, YO, K1, YO, K3 (Wrong side); K3, purl until last 3 stitches, K3. Repeat on all wrong-side rows Row 12; K3, YO,K3,YO,K1,YO,K3,YO,K3 Row 14; K3, YO,K5,YO,K1,YO,K5,YO,K3 Remember - I offer full pattern support. Please message me on Ravelry, or email me at ms.mongoose@gmail.com For new designs, mini-disasters and works in progress, please drop by at my blog; www.knittingmongoose.blogspot.com Hope to see you there! Row 16; K3, YO,K7,YO,K1,YO,K7,YO,K3 Row 18; K3, YO,K9,YO,K1,YO,K9,YO,K3 Row 20; K3, YO,K11,YO,K1,YO,K11,YO,K3 Row 21; K3, purl until last 3 stitches, K3 : to see the centre stitch, and two little plain stocking-stich triangles either sid You're now ready to start the lace.
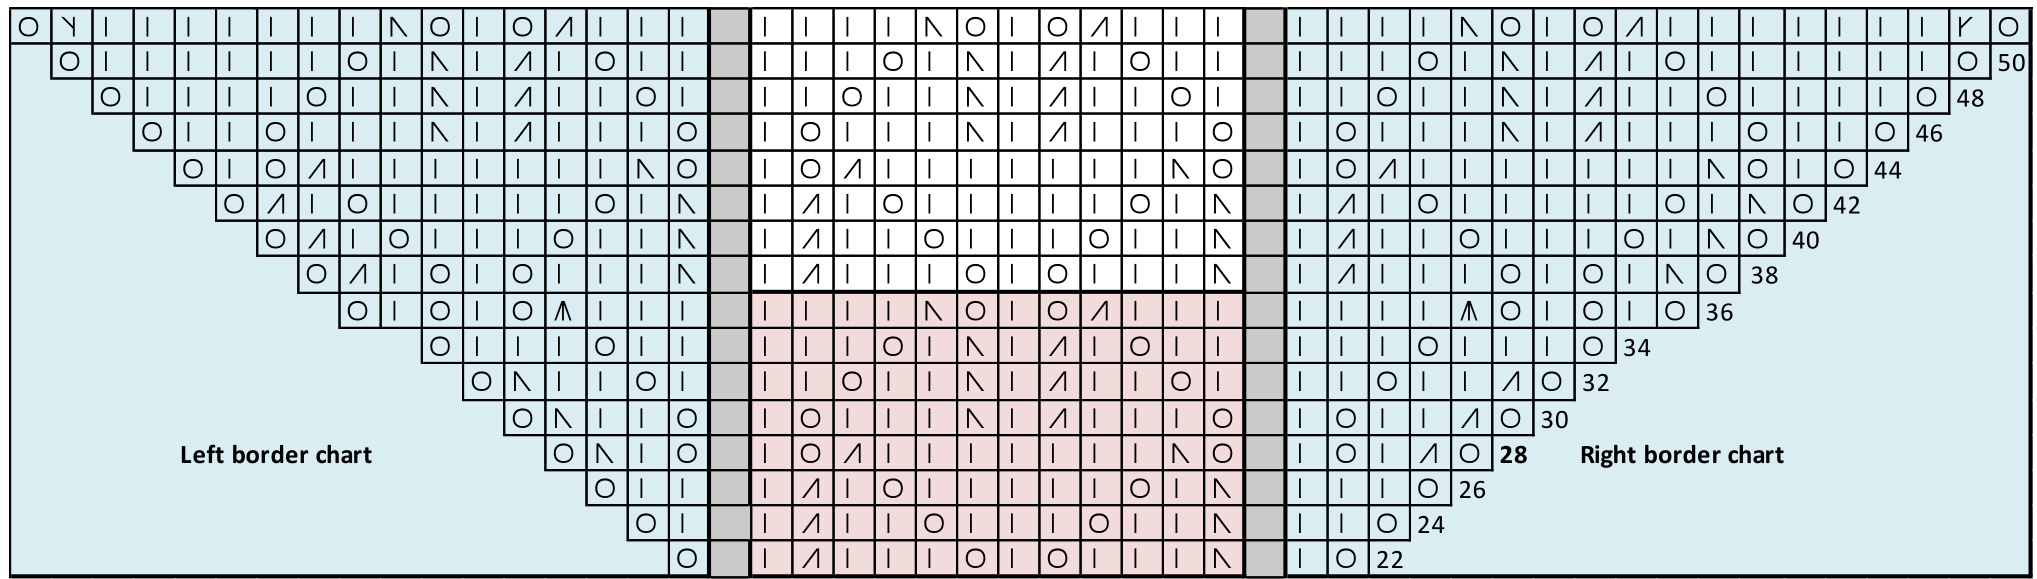
Lace Chart One (page 7)
This starts from row 22. Read the chart from right to left. The yarn over that you see at the start and the end of the row is the first two yarn overs you've already been working. So; 1. Knit across the right border, across the main repeat, which is in pink, across the left border, and you should now be at the centre stitch. 2. The left border at this stage is just that yarn over before the centre stitch - it's going to appear as you work the next row. It helps though to remember what you're doing as you go over the charts. 3. Knit the centre stitch, now you're at the first yarn over for the right border. 4. Work the right border, the main repeat, now work the left border which is again just a YO 5. Now knit the three border stitches as you've already been doing. 6. The wrong side row is also just the same as you've been doing - work the first three and last three stitches as garter stitch. 7. Continue working in this way until you reach the end of Lace Chart One. Finish with a wrong-side row. Now move onto Lace Chart Two. Remember - I offer full pattern support. Please message me on Ravelry, or email me at ms.mongoose@gmail.com For new designs, mini-disasters and works in progress, please drop by at my blog; www.knittingmongoose.blogspot.com Hope to see you there!
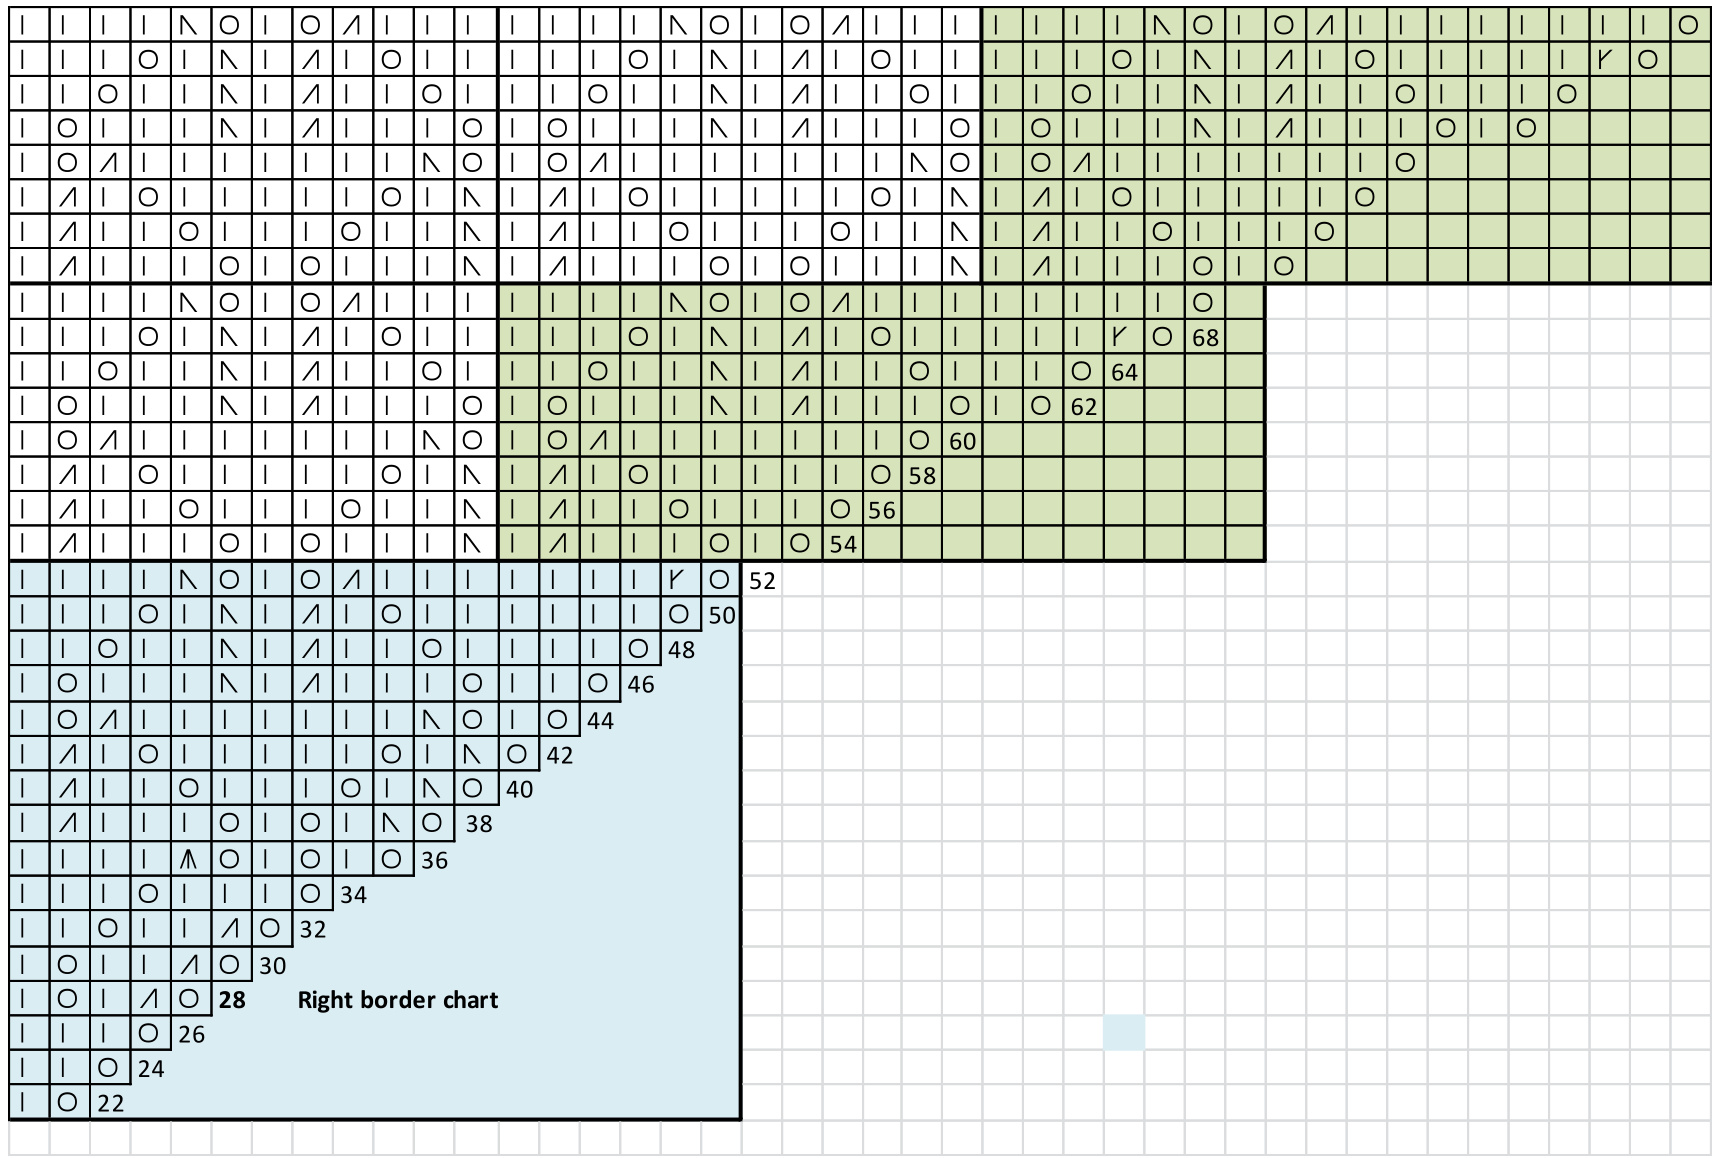
Lace Chart Two
You see now there is a much shorter border. This is the border you'll be using for the rest of the shawl. You can also see that you're now working three main repeats across the middle. This will increase by one repeat every time you complete the border pattern - you'll get used to the lace very quickly, though, and be able to see where a repeat starts and ends. Now repeat the borders (green) and the main repeat (pink) in the same order until you've reached the sort of size shawl you want. (Remember that it will grow about a third with blocking, depending on your tension) Cdging You can, when you're reaching the size you would like, thread beads into your knitting to form the border. I randomly scattered mine over the lace to give a 'shimmer effect. The best way to do this is to detach your yarn, thread plenty beads onto your yarn, reattach it and then slide the beads close to the needles when you want to attach it to a stitch. Just flick it around the needle as you knit, and the bead will sit on the stitch. For the last few rows, change to your contrast yarn to form the coloured edging. In my example I worked the last nine rows in contrast, ending at the end of a repeat. Cast off loosely, soak, block, and sew in the ends. Enjoy!
Lacg Chart Ong
| Knit2together(K2tog) | |||
| Slip,Slip,Knit (SSK) | |||
| Knit | |||
| YarnOver(YO) | |||
| Knitthreetogether | |||
| Knittwiceintonextstitch | |||
| Knittwiceintonextstitch | |||
Lacg Chart Two

ttern support. Please message me on Ravelry, or email me at ms.mongoose@gmail.con
Overview chart - how the patterns fit together
ttern support. Please message me on Ravelry, or email me at ms.mongoose@gmail.con
Midsummer Night
Directions for an experiencgd shaw1 knitter
Materials
1. Lace weight yarn, between 400 and 600 yards for a good-size shawl in the main colour, 100 yards in contrast. 2. 2.75 needles - straight to start, circulars as the shawl gets bigger. 3.Wool needle 4. Optional - seed beads for the border, small length of jeweller's wire for small-eyed beads or a beading needle for larger, for threading.
Casting On
Cast on 3 stitches in main colour. Knit 7 rows in garter stitch Row 8; Knit 3, Pick up and knit 3 stitches from the edge of the piece from the three garter-stitch ridges pick up and knit 3 stitches from the cast-on edge. Row 9; You now have nine stitches. Knit 3, purl 3, knit 3. Start incrgasgs You'll now be working up to the point at which you can start the charts Row 10 (Right side); K3, YO, K1, YO, K1, YO, K1, YO, K3 (Wrong side); K3, purl until last 3 stitches, K3. Repeat on all wrong-side rows Row 12; K3, YO,K3,YO,K1,YO,K3,YO,K3 Remember - I offer full pattern support. Please message me on Ravelry, or email me at ms.mongoose@gmail.com For new designs, mini-disasters and works in progress, please drop by at my blog; www.knittingmongoose.blogspot.com Hope to see you there! Row 16; K3, YO,K7,YO,K1,YO,K7,YO,K3 Row 18; K3, YO,K9,YO,K1,YO,K9,YO,K3 Row 20; K3, YO,K11,YO,K1,YO,K11,YO,K3 Row 21; K3, purl until last 3 stitches, K3 Start Lacg Work Lace Chart One through once to establish pattern. Note; chart shows yarn-overs at edges, but not centre stitch or the three edging stitches. Maintain these stitches as established in the starting 21 rows. All WS rows are K3, purl, K last 3 stitches. Continue with Lace Chart Two until you have are close to the border. As an option, you may want to add beads scattered randomly through the last rows. I worked one repeat with beads scattered in it. Change to contrast to work border stitches - I worked the final nine rows of a repeat in contrast. Cast off loosely, wash and block. Enjoy!


