by ChiteBuiginr
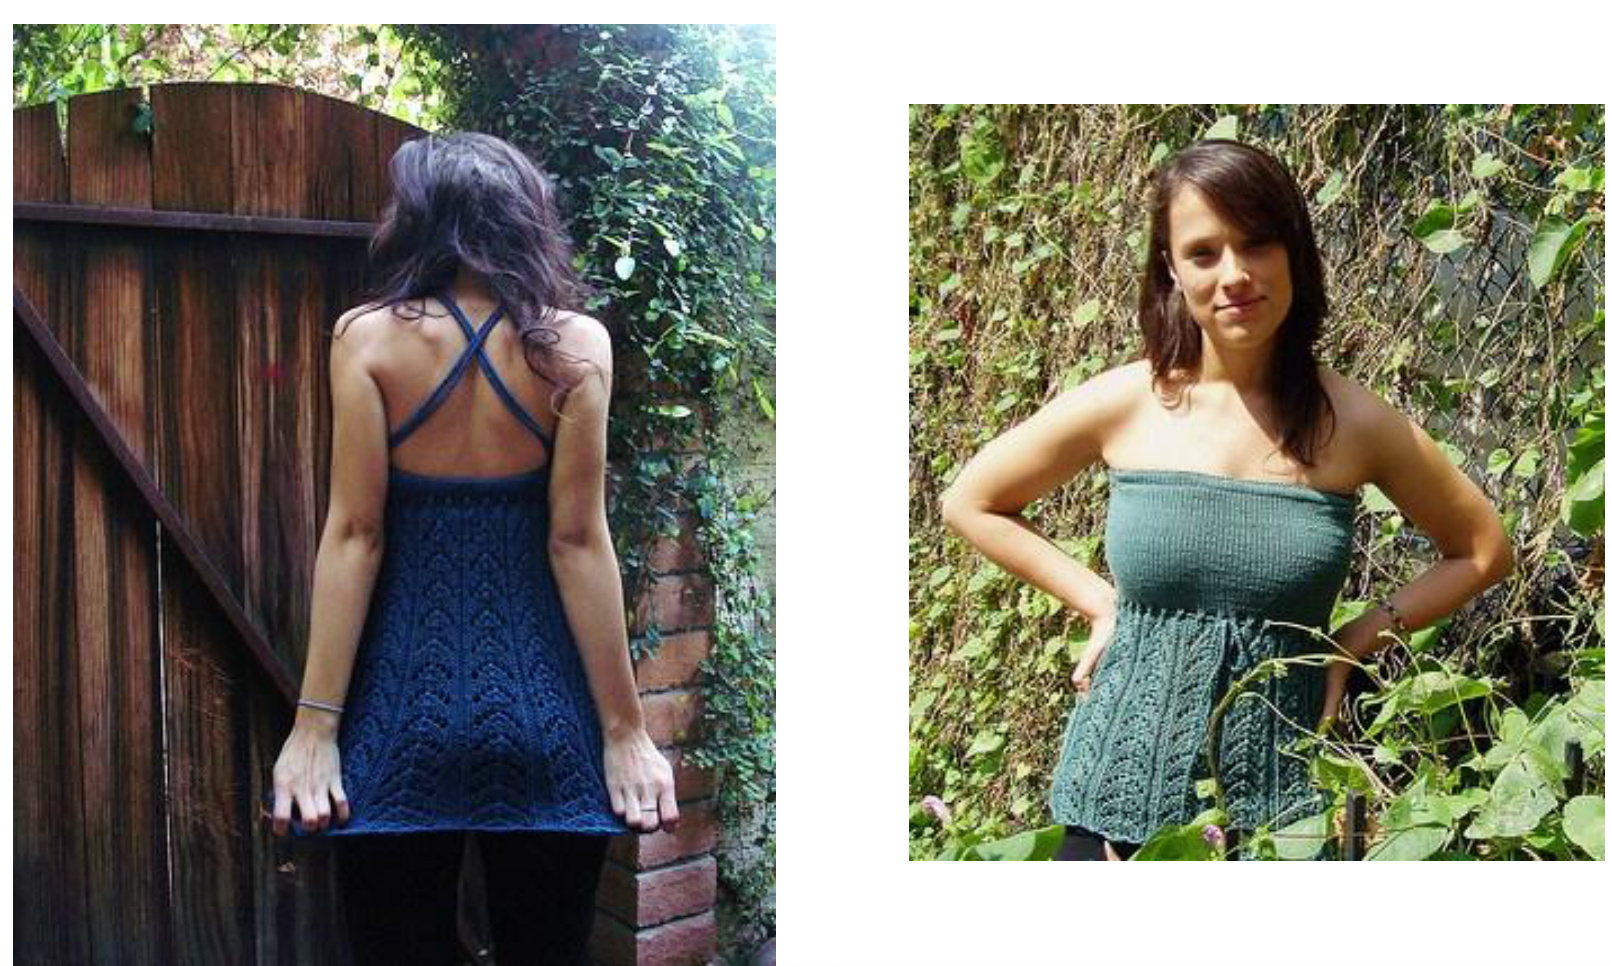
Lelah was my very first atempt at designing, named affer my gorgeous and amazing friend Lelah Olender. Visit her blog My Little Noopy and praise her wonderfulness. This is a DIY pattern in which you, the knitter, learn how to easily create a garment fitted specifically to YOUR body! The Instructions are more of a guideline as you should do the (Il promise- EASY) math, fil in the blanks provided, and knit so it fis. The Lelah top is knit from bottom-up, but can be easily reversed for top-down. Pattern calls for a variation of horse shoe lace, but you could easily substitute another with some minor math. Bust consists of a negative ease complimenting any size rack and eliminating the need for short rowing, but feel free to add some darts if that's your thing! Elastic casing on top ensures prevention of unintentional embarrassing flashing of lady lumps. Those of you searching for the SKIRT version: Use the same formula, replace the bust with a high hip measurement (But don't go too tight if you fear muffin tops) and a low hip measurement instead of under the bust. Record the distance between these 2 points for Stockinette RPl. Ihope you have fun knitting Lelah! xoxoxox Christine
Mateils Checklit
$450+$ yards of preferred worsted weight yarn (this is a rough estimate, yardage will differ in various yarns) Size 9 circulars (24" length) Size 10 1/2 circulars (24" length) Stitch Markers Matching thread (optional if you are going to "knit" your casing into the garment) Needle Elastic Band (l used 3/4") Paper, pencil and Calculator Good tape measure, plastic coated or cloth.
The Measuveweuts:
Take the following measurements and record on piece of paper. 1. Measure circumference of high bust (right under the pits) tightly (knits are stretchy!). Now round to nearest even number. Label this (A). 2. Measure circumference around where you want your hem line to fall LOOSELY. (Label this (B). 3. Measure from high bust down to hem line. (C) 4. Measure from point before bust starts to hem. (D)
Te Matt:.
1. Get out the calculator. Take your Stockinette swatch and measure SPI (Stitches per Inch) and RPI (Rows per Inch). Measure Lace swatch, record one repeat length in inches. (Example 1 repeat $=7$ inch)
Note:
2. Take rounded Bust measurement (A) and MULTIPLY by SPl. (Ex. 36" bust x 4 spi $=$ 144 stitches) -Important!! READ NOTES AND THIS PAGE CAREFULLY BEFORE STARTING. 3. Take Hem circumference (B) and MULTIPLY by SPl. (Ex. $38"\times4\ s p i=152$ stitches) To get number of CO stitches, take number obtained from hem x spi and add or subtract necessary st to get a number divisible by 1l, rounding off closest to the original. (Ex. We had 38" for the hem which $=$ 152 stitches. Divide 152 by 1l- it doesn't fit. Nor does 153, But 154 stitches willfit exactly 14 multiples of lace) -You will need to do 2 swatches, 1 in Stockinette, 1 in lace. Don't skimp on swatching! -Remember to account for the elastic; you will need to knit a little extra stockinette to fold over this. -For the best fit, do the math rather than the 2 sizes provided. You can do it, l promise, and it will be worth it! 4. Now that we know we are going to have X amount of st's for the body (We had 154 used in the example), 154 is even, so leave it. If you ended up with an odd number, you can simply add one st by yo, kl instead of yo, k2tog in the eyelet round, try to place this by BOR so ‘it's inconspicuous.
5. OPTIONAL- Take high bust to hem measurement (C) and muliply by RPl. (Ex. 16" x 6 rpi = 96 rows) Now SUBTRACT under bust to hem measurement (D) from high bust to hem measurement (C) (Ex. Let's say we C is 16" and D is $72^{\circ}$ . C minus $D=4^{\prime\prime},$ The number you get is your stockinette part, take the length of your elastic, double it (in order to fold over). Take RPl and MULTIPLY to get
6. For the lace/ botfom section take under bust to hem measurement (D), MULTIPLY by your lace repeat per inch. (Ex. called for $72^{\circ}$ of lace, one full 6 row repeat of lace equals 1 inch. $12\times6\,=\,72$ rows total and 12 repeats of lace) Fudge the numbers to retain a fll repeat. You do not want to interupt the lace mid-way through! 7. Finally, SUBTRACT high bust st count from lace st count. The number that you are left with is how many dec's you will need to perform. You may want to use this handy calculator HERE to figure out how to decrease evenly across the round.

Use the blanks to fill in your numbers
1. Cast on _ stitches on size $10\%$ circulars, mark BOR, and join without twisting. 2. Begin the horse shoe lace pattern, work rows 1 - 6 for inches or — rows. (— repeats total) 3. After finishing repeats, switch to size 9 circulars, knit one round. 4. Next round: Evenly dec -—- stitches evenly across. (\*Knit - st's, k2tog\*) 5. Next round: Knit even (use this round to count stitches) 6. Next round: \*yo, k2tog\* (remember if you ended up with an odd number begin round by yo, kl) 7. Knit - rows or until stockinetfe section is inches long. \*At this point, if you are unsure of fit, simply move st's onto a long piece of scrap yarn and try it on! 8. BO LOOSELY, lightly BLOCK using your preferred method. 9. Take elastic, and as if you were measuring yourself, wrap it around high bust, pull on it litle. You want it snug but not so tight it cuts off your circulation or makes unsightly bulges. Mark and cut. 10. Turn piece inside-out and fold over elastic (baste in place if you aren't good with sewing). Start sewing. careful not to sew into the elastic. As you near completion, you might need to gather in the back so you can continue to fold over, to do this just hold the 2 elastic ends and pull garment material to the back. When you have about an inch of sweater left, sew the 2 elastic ends together and inish sewing over the last bit. TA DAH! That was easy! Behold your perfect tube top.
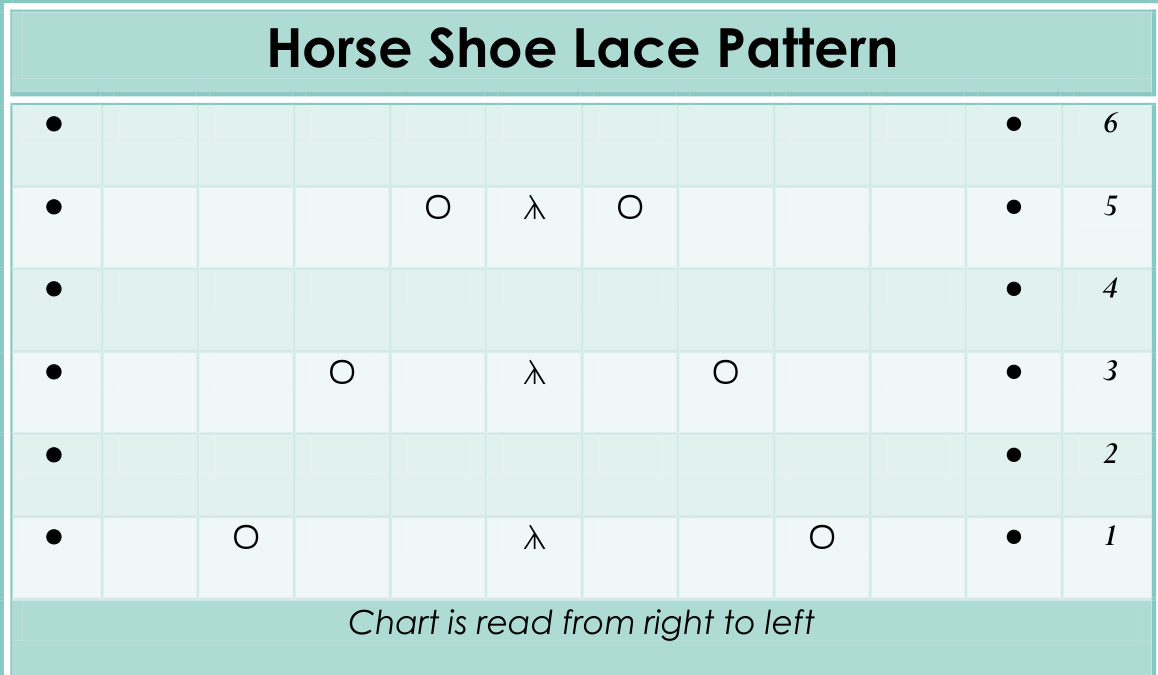
Horse Shoe aue Pittrw
1. \*P1, kl, yo, k2, sll-k2tog-psso, k2, yo, kl, p1\*. 2. \*P1, k9, p1.\* 3. \*P1, k2, yo, kl, sll-k2tog-psso, kl, yo, k2, p1\*. 4″ Rep Row 2. 5. \*P1, k3, yo, sll-k2tog-psso, yo, k3, p1\*. 6. Rep Row 2.
\*Photos on cover page courtesy of these stellar women; Right: Anna (Knitrawr on Ravelery) Find her blog http://www.YellowBirdKnits@blogspot.com Left: Carrie (CarrieM on Rav) Find her blog (and patterns!) at http://www.EveryWordsaPurl.blogspot.com D.B.A.D. This pattern and design in which it refers to is subject to copyright. You may print; use/knit this patfern for personal, non commercial use only. Reproduction of this pattern (digital, print or otherwise) is protected under federal copyright laws and may not be sold nor reproduced in any form for commercial use. Permission is granted to photocopy patterns for your personal use only. If you would like fo knit the item for charity, or for instructional purposes, you may only do so ONLY affer obtaining express written Consent from Christine Buhagiar.


