Oregon Trail Shawl
A Simple Knits design
Westward, ho!
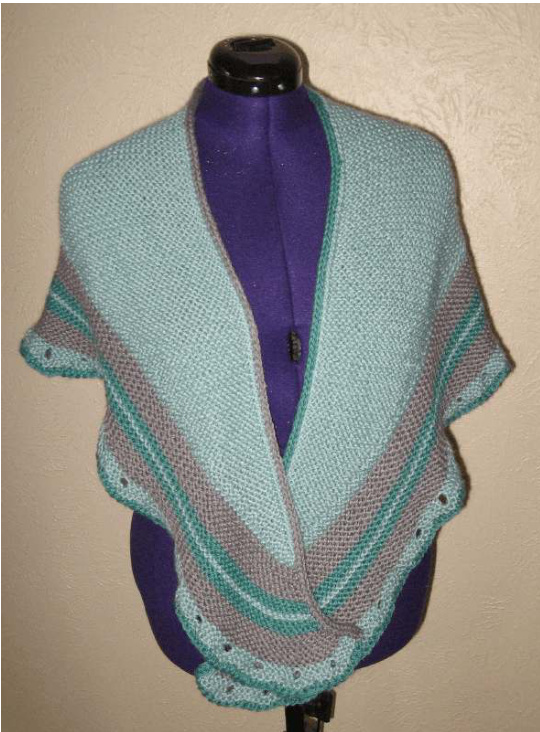
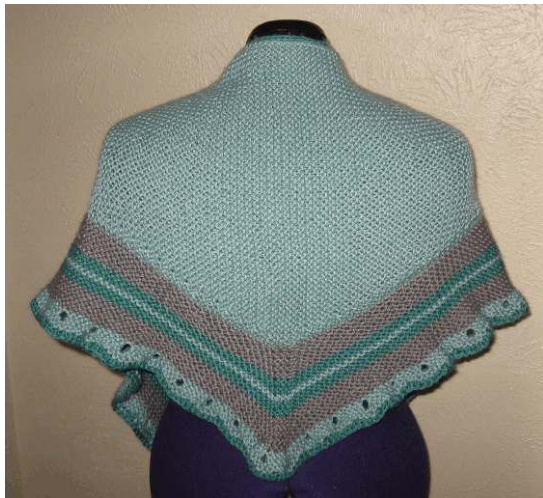
Those strong pioneer women who crossed the plains in wagon trains would have loved a warm shawl like this to wear on their long journey to their new home. For this shawl you will need about 550 yards total of a worsted or Aran weight yarn in three colors and a size 8 (5 mm) circular knitting needle. Choose a light, a dark, and a bright color that work well together. The shawl begins as a sideways knit scarf. After the scarf is finished, pick up stitches along the bottom edge and knit down in stripes. Knit a ruffle to finish the bottom edge but don't cut your yarn.Add applied I-cord along the top edge to add a little strength to the top edge and hide all your yarn tails in it. You can knit this shawl with leftover yarn from other projects and with more than three colors if you choose. Finished size is 54" wide x 20" long at the center (unblocked). Blocking isn't necessary.
@ 2014 Vicki Mikulak
All rights reserved. For personal, non-commercial use only. Questions? simple.knits@ yahoo.com Revised 12/3/2014

Materials:
550 yards of Aran or worsted weight yarn in three (or more) colors\* Circular knitting needles in size 8 (5 mm) 29"-36' 1 locking stitch marker 2 ring type stitch markers
\*Yarn Note:
I used 3 colors of Stitch Nation Bamboo Ewe: Color 1 - Beach Glass, about 334 yards Color 2 - Mercury Gray, about 132 yards Color 3 - Mermaid, about 78 yards (You may wish to have some extra yarn on hand in case you need more than estimated or want a large shawl.) Size: 20" long x 54" top edge (unblocked) Gauge: 4 sts & 8 rows = 1" in garter stitch
Key:
CO - cast on k - knit BO - bind off x- times yo-yarnover SM - slip marker RS - right side WS - wrong side st(s) - stitch(es) tbl - through back loops Slip 1 pw - slip 1 st purlwise k2tog - knit 2 sts together (1 st decrease) ssk - slip, slip, k2tog (1 st decrease) kfb - knit in front and back of st (1 st increase)
Section 1: Sideways Triangle
With Color 1, CO 4 sts.
Row 1: Knit.
Place marker on right side of fabric. This will help you remember which edge to slip the first stitch. Row 2 (Rs): Slip 1 pw, k1, kfb, k1 (or to end of row). (5 sts) Row 3: Knit. Row 4: Slip 1 pw, knit to end of row. Row 5: Knit. Rows 6-185: Repeat Rows 2-5 until you have 50 sts. Rows 186-195: Knit remembering t0 slip 1"t st pw at the RS edge. Row 196: Slip 1 pw, k1, ssk, knit to end of row. (49 sts) Row 197: Knit. Row 198: Slip 1 pw, knit to end of row. Row 199: Knit. Rows 200-375: Repeat Rows 196-199 until you are down to 5 sts. Row 376: Slip 1 pw, k1, ssk, k1. (4 sts) Row 377: Knit. Row 378: Ssk twice, pass one stitch over the other. (1 st left) Pull up on loop of last st until it is 3-4" long and cut yarn at top of loop. Pull cut piece out. Weave in this end.
Section 2: Bottom Border
Next you will pick up sts along the bottom edge working from the Rs. Row 1 (RS): First, rotate the shawl so that you can work along the bottom edge. With Color 2, put your needle under both loops of one slipped stitch along the edge, yo, and pull a loop through onto your needle. Pick up 1 loop in every slipped st across the bottom edge of the triangle. (189 sts) The braided edge formed by where you picked up sts is the Ws of your work. Colors are always changed on the Rs. Row 2: K94, place marker, k1, place marker, k94. Row 3: Kfb, knit to 1 st before marker, kfb, SM, k1, SM, kfb, knit to 1 st before end, kfb. (193 sts) Row 4: Knit. Rows 5-10: Repeat Rows 3 & 4 (3x). (205 sts) Rows 11-14: Change to Color 3, repeat Rows 3 & 4 (2x). (213 sts) Rows 15-16: Change to Color 1, repeat Row 3 & 4 once. (217 sts) Rows 17-20: Change to Color 3, repeat Rows 3 & 4 (2x). (225 sts) Rows 21-30: Change to Color 1, repeat Rows 3 & 4 (5x). (245 sts) Row 31: Change to Color 1, repeat Row 3. (249 sts) Row 32: Knit to first marker, SM, kfb, SM, knit to end of row. (250 sts) Row 33: K5, [yo, k5] to end of row. (300 sts) Row 34: As you knit this row, work a M3 in each yo you come to. (400 sts)
| M3 (makes 3 sts out of 1 yo) |
| Step 1: Insert your right needle into the yo as if to knit it. Yo, and pull needle back through hole to form a st on your right needle but leaving the original yo on your left needle tip (1't st created). Step 2: Yo your right needle (2nd st formed). |
| Step 3: Insert your right needle tip into the original |
| yo still on your left needle. Yo, and pull the needle back through (3rd st formed). Then drop the original yo from your left needle. |
Rows 35-36: Knit.
Row 37: Change to Color 3, k2, k2tog, k5, [k3tog, k5] (49x), k2t0g, k2. (300 sts)
BO Instructions:
K2 sts, then k2tog tbl these 2 sts on your right needle to bind off 1 st. (1 st on right needle) \*k1, then k2tog tbl the two sts on your right needle Repeat from \* until you have bound off all but one st.
DO NOT CUT YOUR YARN!
You will now work an applied I-cord edging to the top/neckline edge of the shawl. This will strengthen the top edge and will cover any irregularities along the edge of the shawl.
Applied I-Cord Edging:
Using the 1 st still on your right needle, C0 3 more sts. (4 sts) Knit the 4 sts. \*Then slide all 4 sts back to your left needle. K3, slip last st to your right needle. With your right needle tip pick up 1 purl bump from a garter ridge along the top edge of the shawl and k2tog this picked up st with the slipped st on your needle. Repeat from \* until you have applied the I-cord to every ridge along the top of the shawl. K4tog. (1 st) Pull up on the loop of the remaining st until it is about 4" long. Cut loop at top. Weave in this end. Weave all your loose ends along the edge of the shawl into the I-cord edge to hide them. You may wear the shawl as is or block it to make it larger.


