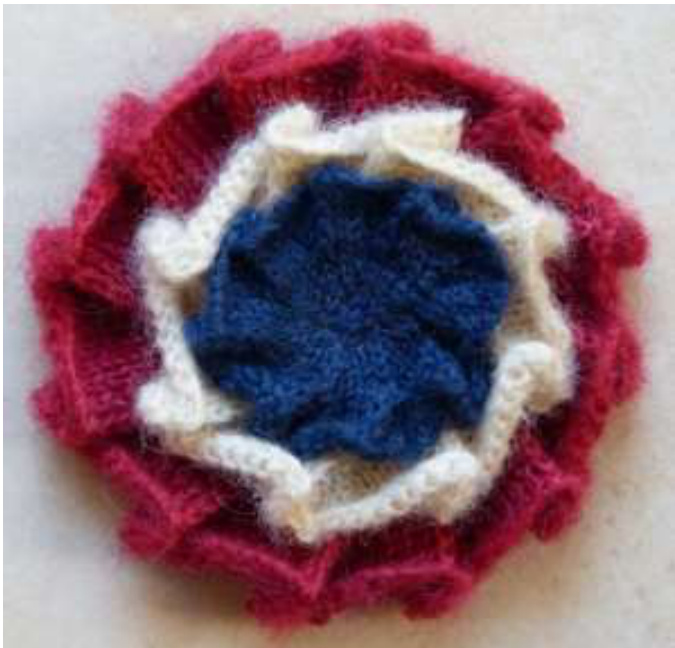
LES MIS-STYLE COCKADE, OR ROSETTE FOR COSETTE
For the fangirl, revolutionary, or prize-winning pet in your life. I made this for an Enjolras costume for school Book Week, but you could adapt the colours to suit any cause or country. Difficulty level: very fiddly, but good fun. If you can knit in the round and K2tog, you'll be fine - if you are willing to faff about with up to five needles at once on just one round in each layer. Better instructions on making pleats can be found in Montse Stanley's Knitter's Handbook, or June Hemmons Hiatt's Tbe Principles of Knitting.
Technique: this project is really a mini-tutorial in making pleats. You cast on three times the number of stitches you want in each pleat (and I added a couple of spacing stitches in between). You work an inch or so with some stitches slipped to help the fabric fold up, then you pass some stitches onto two cable needles or small DPNs. Arrange them into an S shape, and knit three layers together. Easy if you have three hands, and it will make you feel triumphantly clever.
Materials
Yarn - oddments of red, white (or cream) and blue, preferably 4ply or other fairly fine yarn. I didn't measure mine in advance, but the finished article weighs 18g including a safety pin. I used Wensleydale Longwool Sheep Shop in pomegranate (which happened to be aran weight) and cream (4-ply), with some old sock yarn for the blue. Soft or slightly faded colours look more historical. Ribbon if you want to make a rosette. Needles: two circulars, or two sets of DPNs, and/or cable needles - I used 2.5mm for a dense fabric. Darning needle for sewing in ends. Iron or steamer: this is one project which does benefit from a good flattening. Size: you can vary the size according to the yarn and needles you use, how many pleats you put in each layer, and how many stitches in each pleat. My cockade measures 4.5” or 11cm in diameter, and I chose to do twelve four-stitch pleats in the red layer, eight in the white layer, and eight threestitch pleats in the blue centre. A two-stitch pleat is really just a ripple in the fabric.
Abbreviations
Ststitch Rround Kknit Ppurl K2tog knit two together SF slip stitch purlwise with yarn in front. This makes an IF or Inside Fold stitch SB slip stitch purlwise with yarn at the back. This makes an OF or Outside Fold stitch
THE RED LAYER
Cast on 168 sts (for 4 sts x 3 layers of pleat, + two for spacing = 14. Multiply by 12 pleats = 168) Round 1 \* K5, P1, K8 \* repeat from \* to end of round. Join, making sure it's not twisted. R 2 \* K5, SF (slip next st purlwise with yarn in front) K4, SB (slip next st purlwise with yarn at the back), K3 \* repeat from \* to end of round. R 3 \*K5, P1, K8 \* repeat from \* to end of round. Purl the IF st and knit the OF st a bit more loosely, otherwise the fabric will pull up tight. R 4 repeat round 2 R 5 \* K2, K2tog, K1 P1 K8 \* repeat from \*. (156 sts) R 6 \* K4, SF, K4, SB, K3 \* repeat to end of round R 7 \* K1, K2tog, K1 P1 K8 \* repeat from \*. (144 sts) R 8 \* K3, SF, K4, SB, K3 \* repeat to end of round R 9 Pleat round - see the photos on page 7. The circulars or DPNs you are already working on will be called the right and left needles. First stage: slip the next 4sts from the left needle purlwise onto a cable needle or small DPN - this is needle B at the back. The last st will be your IF stitch. Slip the next 4sts onto another cable needle - this is needle F at the front - and swing it round anticlockwise until it is in front of needle B with the right sides of the fabric facing together. The next st on the left needle should be your OF st. For this round, slide your sts away from the tips of your needles, and keep a very close eye at all times on all of the needle tips and all of your stitches. You may want to put point protectors on the right and left needles. The second stage is to combine the sts on needles B and F to flatten the pleat, and make the final stage easier. You can use a third cable needle or DPN - needle 3 - or if you are careful, use the right needle. - One way to do this is to slip the first st from back needle B onto needle 3, then pass it over to front needle F. Use the tip of needle 3 to hook the second st from needle F (the one which began life as the first st on needle F before you moved the other one) and pass it forwards over the first st and right off the needle. Slip this first st purlwise over onto needle 3. You should have three sts on needles B and F, and one on needle 3. Repeat the process of passing a st from the back to the front needle, casting off the second st, and moving the st to needle 3, until you have 4 sts on needle 3, each with a cast-off st dangling from them. If you used the right needle, then you now need to slip the 4 sts purlwise back onto a cable needle. - After a while, I found it easier to do the combining like this. Using needle 3 (or the right needle if you are careful) slip one st from needle F, then one from needle B, until you have all eight sts side by side on needle 3, looking like alternate knit and purl sts. Then use the tip of needle B to lift up the second st on needle 3 (looking like a purl st) and pass it left over the first st and off the end of needle 3. Slip this first st back onto needle B. Repeat three times until you have four sts on needle B, each with a cast-off st hanging. The final stage is to knit the layers of pleat together. Hold the left needle with needle B close behind it, and put the tip of the right needle knitwise through the first st on both those needles. Knit the two sts together, and leave this st on the right needle. Repeat until you have four pleat sts on the right needle. Then use the tip of your left needle to pull up the last four sts until they are all snug and tight on the right needle, to avoid getting holes between the pleats. You could miss out the second stage by just lining up needle B, needle F facing inwards, and the left needle, and knitting the first st from all three needles at the same time. This would make the pleat bulkier, and it also carries a very high risk of dropping the stitches, splitting the yarn, or throwing the project in the bin. I've tried it - and if you want to, I accept no responsibility. Repeat this procedure for each group of twelve sts. The round will decrease in size dramatically - if you have been working on one circular, you will now need to switch to two circulars. (48 sts) R 10 Knit all sts except the last one R 11 K2tog (this is the first st of the next round together with the last st of the old round. This will involve some passing around of sts between needles, but it carries on a neat decrease along the line of the pleats. If you're not fussed about that, just knit the first two sts of the round together.) So the round is \* K2tog, K2 \* repeat to end of round. (36 sts) You now have three choices of how to finish - to make a single flat rosette, to knit the layers together, or to sew them together. To make a rosette, see instructions on page 5. To knit the layers together: \* K2tog, K7 \* repeat to end. If you want to keep the shaping neat, knit the first st together with the last st of the previous round as described in round 11. Then either transfer these 32 sts to some waste yarn, or leave them on spare needles. To sew the layers together: decrease a bit further (following the decrease plan for the rosette on page 5), then either cast off loosely and keep it until you are ready to sew it to the back of the white layer, or sew the live stitches to the back of the white layer.
THE WHITE LAYER
titches (for 4 sts x 3 layers of pleat, + two for spacing = 14. Multiply by 8 pleats = 11 nd 1 \* K5, P1, K8 \* repeat from \* to end of round. Join, making sure it's not twiste R 2 \* K5, SF (slip next st purlwise with yarn in front) K4, SB (slip next st purlwise with yarn at the back), K3 \* repeat from \* to end of round. R 3 \*K5, P1, K8 \* repeat from \* to end of round. Purl the IF st and knit the OF st a bit more loosely, otherwise the fabric will pull up tight. R 4 repeat round 2 R 5 \* K2, K2tog, K1 P1 K8 \* repeat from \*. (104 sts) R 6 \* K4, SF, K4, SB, K3 \* repeat to end of round R 7 \* K1, K2tog, K1 P1 K8 \* repeat from \*. (96 sts) R 8 \* K3, SF, K4, SB, K3 \* repeat to end of round R 9 Knit a pleat round as for the red layer above (32 sts) R 10 Knit one round late sewing, this is where you knit the two layers together. Make sure your red layer is on two circulars, and thread the four needle ends up through the centre of your white layer. Your left hand is now holding a needle with the white layer in front and a needle with the red layer behind. Using the white wool, put your right needle through the first white stitch then the first red stitch and knit them both together - you have one white st on your right needle. Repeat to the end of the round. If you want to sew the layers together, then miss out this round and go on to round 12.

R 12 Knit all sts except the last one R 13 K2tog (this is the first st of the next round together with the last st of the old round. This will involve some passing around of sts between needles, but it carries on a neat decrease along the line of the pleats. If you're not fussed about that, just knit the first two sts of the round together.) So the round is \* K2tog, K2 \* repeat to end of round. (24 sts) R 14 Knit one round, stop before last st R 15 \*K2 tog, K1\* repeat to end (16 sts) If you want to knit the white layer to the blue layer (and it gets harder as the circles get smaller, believe me), then transfer your 16sts to waste yarn or spare needles. If you want to sew the layers together, knit one round of \* K2tog, K2 \* repeat to end (12 sts Then either cast off loosely and keep it until you are ready to sew it to the back of the blue layer, or sew the live stitches to the back of the blue layer. If you want a flat white rosette, do one more round of \* K2tog K2 \* (8 sts), then break the yarn, thread it on a needle, pullit through the eight sts and draw up tight.
THEBLUECENTRE
Cast on 88 stitches (for 3 sts x 3 layers of pleat, + two for spacing = 11. Multiply by 8 pleats = 88) nd 1 \* K4, P1, K6 \* repeat from \* to end of round. Join, making sure it's not twiste R 2 \* K4, SF (slip next st purlwise with yarn in front) K3, SB (slip next st purlwise with yarn at the back), K2 \* repeat from \* to end of round. R3 \* K1, K2tog, K1 P1 K6 \* repeat from \*. (80 sts) R 4 \* K3, SF, K3, SB K2 \* repeat to end of round R 5 \* K2tog, K1 P1 K6 \* repeat from \*. (72 sts) R 6 \* K2, SF, K3, SB K2 \* repeat to end of round R 7 Knit a pleat round as for the red layer above, but with 3sts on each cable needle (24 sts) R 8 Knit one round R 9 \* K2tog, K1 \* repeat to end (16sts) R 10 You can knit this round together with the white layer, if you're brave, as described in round 11 of the white layer (to be honest, it gets much trickier on the smaller round). If you decide to sew the white layer instead, just knit this round. R 11 K2tog, repeat to end (8 sts)
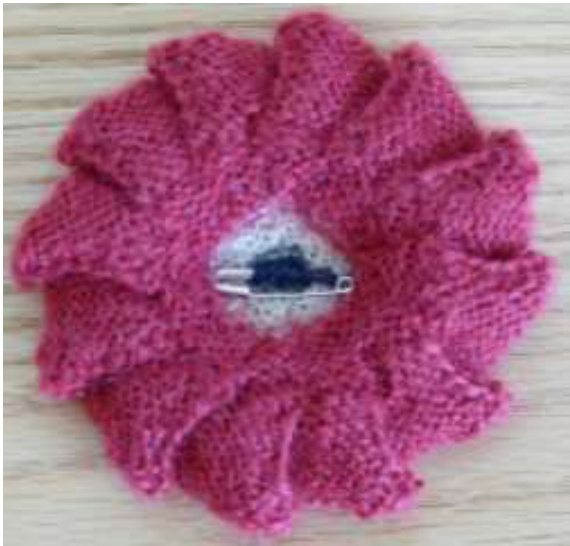
FINISHING
Break off the yarn, leaving a long tail of 8-10" or 20-25cm. Thread it on a needle, pull it through the eight sts and draw up tight. Do a couple of small sts on the back to anchor the yarn firmly, then sew on a safety pin, button, or your preferred kind of fastener. Sew layers together if you haven't already knitted them together (it would be easier to press them first). Sew in all the ends. Steam or press the layers carefully. They do tend to curl up slightly, but that gives it an attractively aged appearance. You could start with a non-curling edge such as garter or
It it's difficult to work this around the fold stitches and your pleats would be less sha1
TOMAKEA ROSETTE
Disclaimer: I must admit I haven't actually made a rosette - this is just a plan. Knit in a spirit of adventure, and remember it's a free pattern.) Follow instructions for the red layer until Round 11. R 12 \* K2tog, K7 \* repeat to end (32 sts). If you want to keep the shaping neat, knit the first st together with the last st of the previous round as described in Round 11. Then your plan of decreasing depends on how big you want the rosette. You can carry on doing rounds of \*K2 tog, K6\* repeat to end, then \*K2tog, K5\*, then \*K2tog K4\*, and so on until \*K2tog K1\* and you have eight sts remaining. Break off the yarn leaving a fairly long tail, thread it on a needle and pass it through the last eight sts, drawing them up tight. Then sew a safety pin or button, or some other kind of fastener, to the back. If this is too big, then K2tog eight times instead of four times during some rounds to decrease faster. If you want a contrasting centre, cast on 32sts in another colour, knit one round, join, and repeat that decrease plan. Sew it together. If desired, fold a length of ribbon and sew it to the back. Trim the ends prettily.
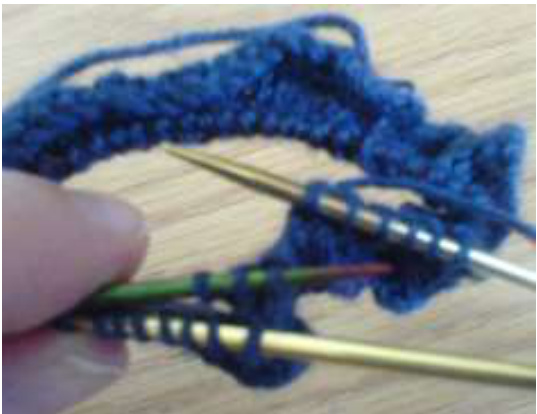
HOW TO MAKE A PLEAT
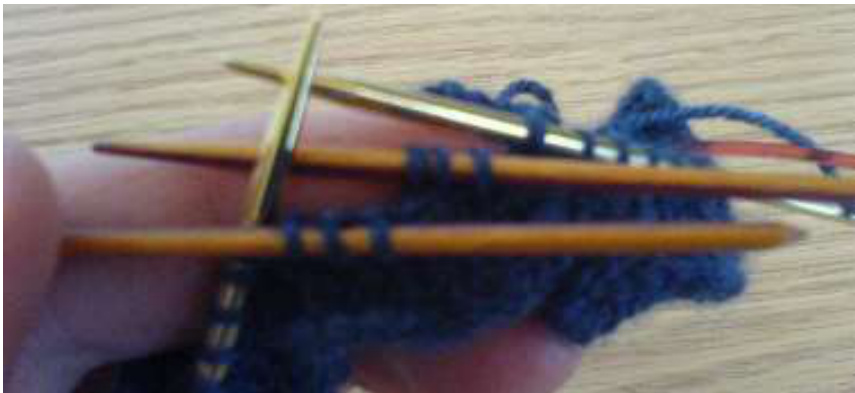
First put the next few stitches onto two cable needles or short DPNs. You may want to put point protectors on the main left and right needles to save dropping any other stitches.
Then turn the second DPN anticlockwise so it is now right-sides-facing with the back DPN
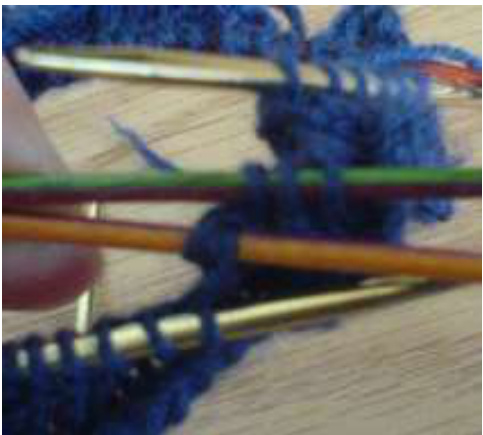
Now you have passed each st from needle F over the matching st from needle B
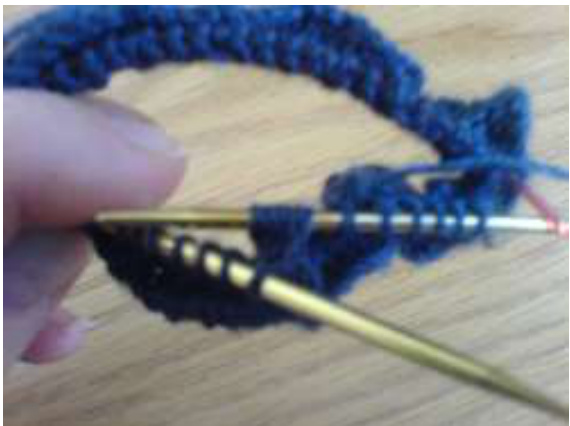
Second stage - “easier” method, after you have slipped over to the right needle alternately one st from needle F and then one st from needle B
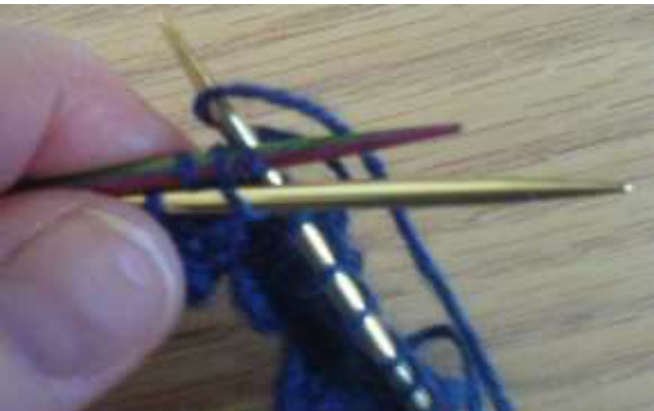
Final stage - put your right needle through the first st from each needle and knit together
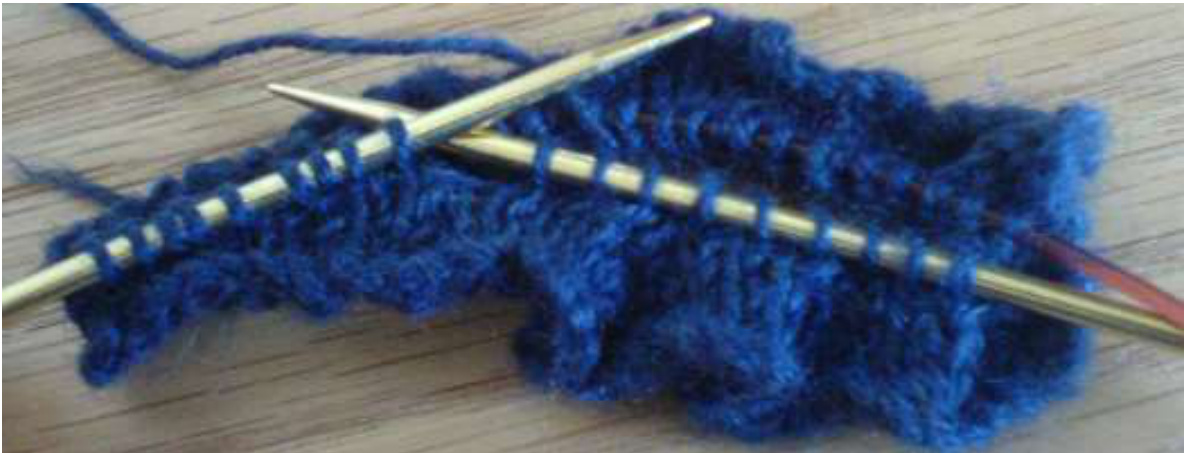
e completed pleats on the right needle, and one still to do. Tighten up the sts each tin This pattern is for personal use only. Do not sell the pattern, nor any items made from it


