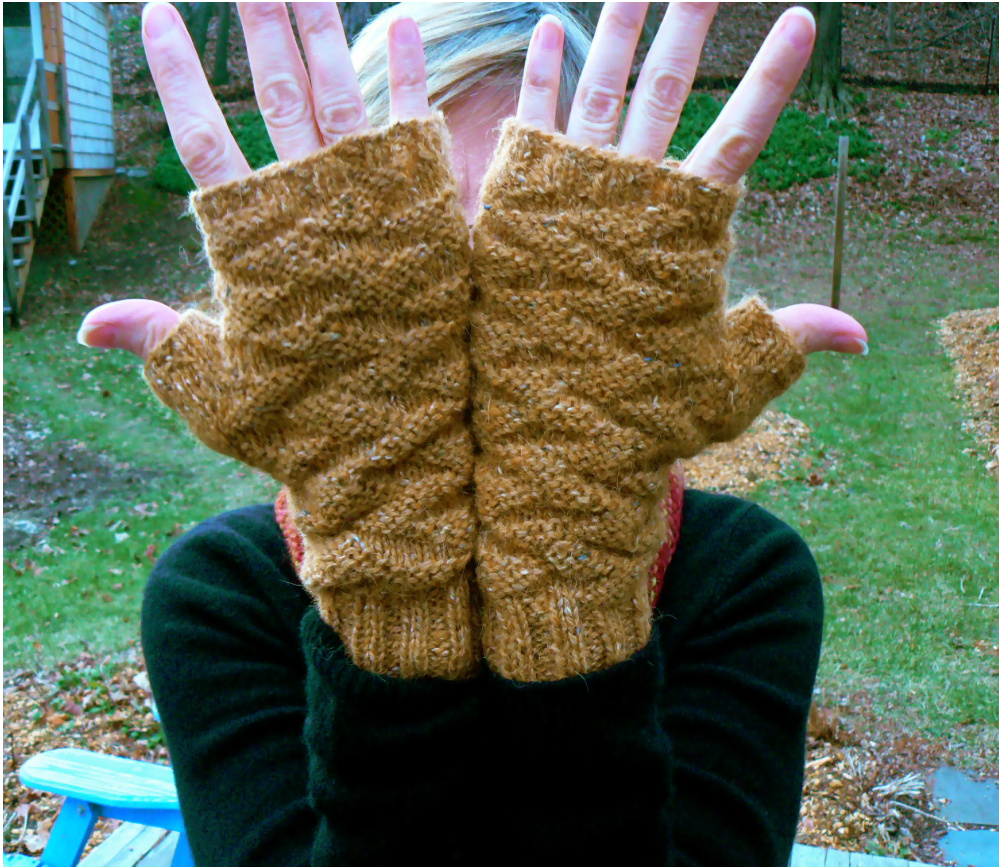
GOLDEN GEESE MITTS Based on the "Flying Geese" stitch pattern from Vogue Knitting Book
TECHNIQUES:
Knitting using double-points Chart reading Old Norwegian Cast-On (optional) 2 x 2 ribbing Gusset Increasing: M1R & M1L (Make One Right & Left) Russian Bind-Off (optional) Picking up stitches Non-floppy last stitch when binding-off (optional)
MATERIALS:
1 ball Rowan Felted Tweed (DK weight) Or any DK weight yarn Gauge: 6 sts/inch with larger needles Needles: Size US 3 DPN's (main body) Size US 2 DPN's (Ribbing) --or size needed to obtain gauge Stitch markers Scrap yarn, or stitch holder Tapestry needle
PATTERNSTEPS:
Cast-on Ribbing Change needles Body - 2 vertical pattern repeats Thumb gusset (& continuation of body) Finish body Change needles Ribbing Bind-off Thumb: Pick up stitches; st st; change needles; thumb ribbing; bind-off Weave in ends
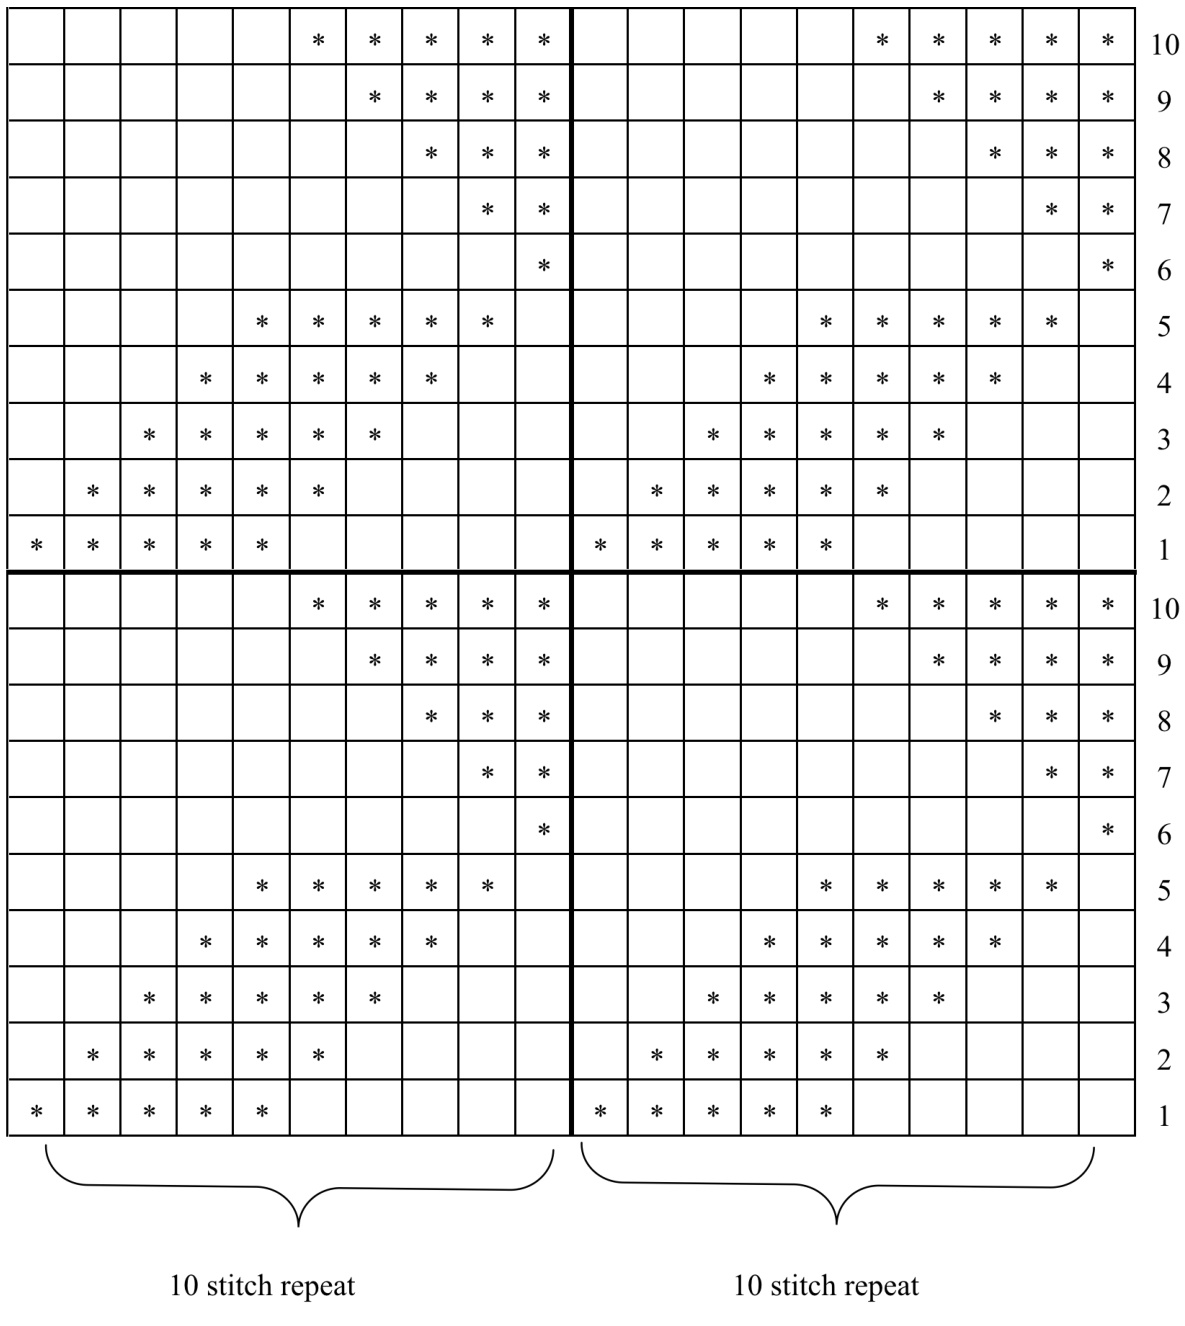
FLYING GEESE CHART
Thumb Gussset Chart
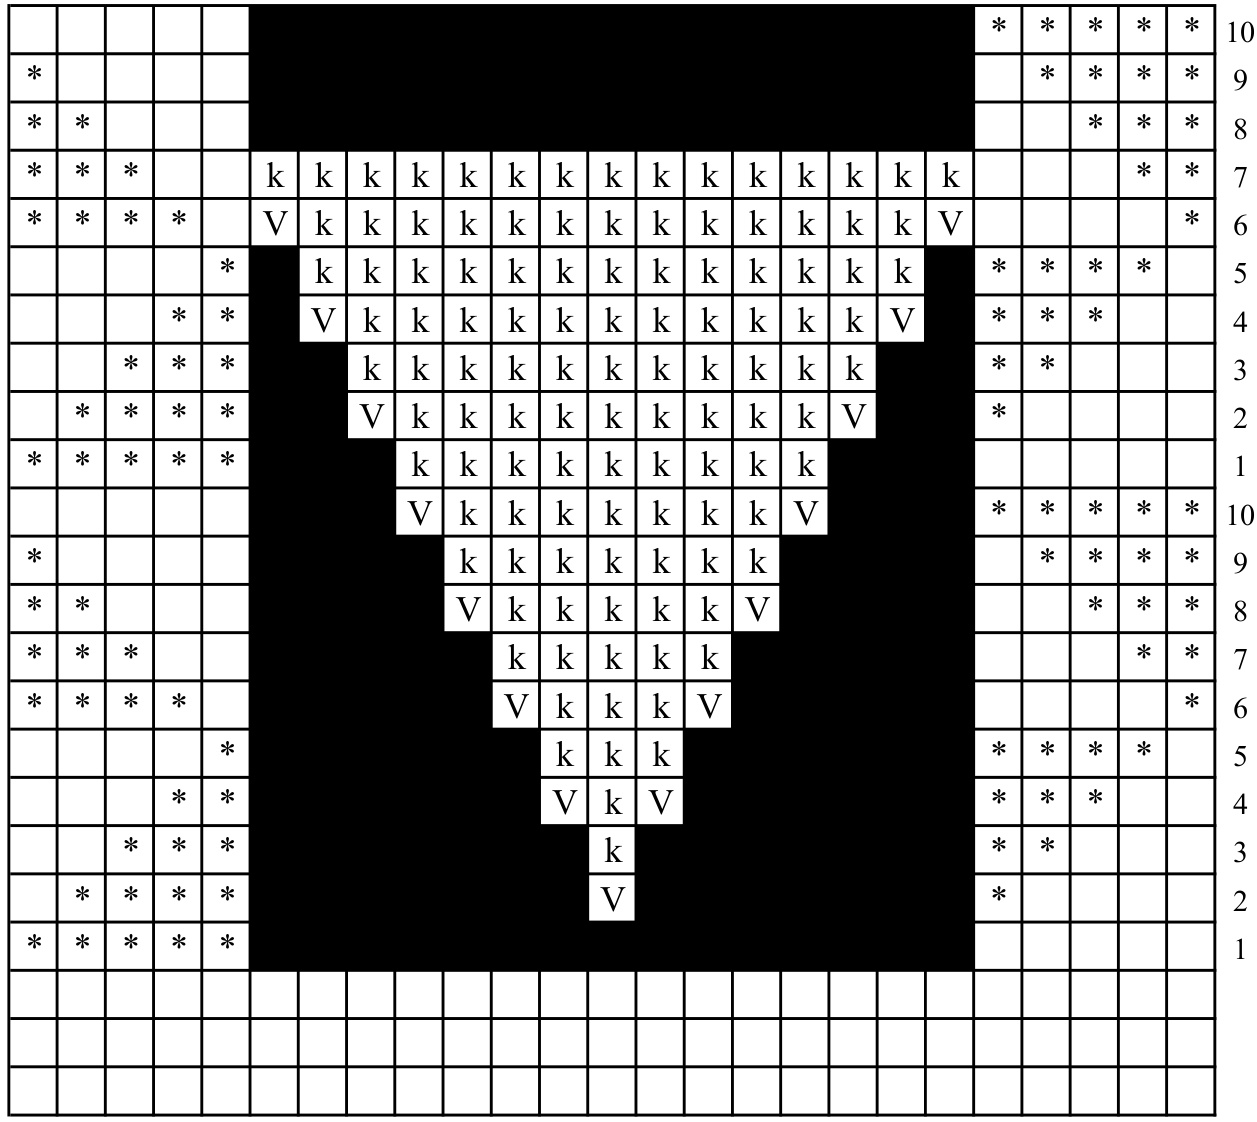
Notes: For purposes of clarity, this chart shows pattern through Row 10 of the fourth vertical repeat. Also for clarity, the stitches to be knitted on the gusset are marked with 'k'. It just helps distinguish the pattern stitches from the gusset stitches on the chart. Row 8 is when you put the gusset stitches on a holder or waste yarn and just knit across in pattern. That is why it is black in the middle and continuing up - there are "no stitches" to be worked here now. They are on the holder. Row 9, work in pattern. Row 10 and continuing, work in pattern.
SimPlE NATuRE knItSTm: GOLDEN FLYING GEESE FINGERLESS MITTS A Teaching Pattern
Instructions are especially designed and written for newish and novice knitters. There is also a detailed section at the end: "Helpful Notes for Newish Knitters." Additionally, this pattern is particularly well suited to making mistakes. (See notes.) \*\*If you are an experienced knitter, just skip along at your own pace.\*\*
Cast-on:
USING the smaller needle, and the Old Norwegian cast-on method (also known as the Twisted German Method) (see Helpful Notes, below) OR any stretchy cast-on OR a plain long-tail cast-on: Cast-on (CO) 40 stitches; divide stitches evenly on 4 dpns (OR use the Magic Loop method.) Join for working in the round, making sure the stitches are not twisted. PM (place marker) to mark beginning of round.
Ribbing:
KNIT 1 to 1 % inches of K2 p2 (2 x 2) ribbing For the sample, I knit 12 rounds. You may want less or more. Just keep track so you can duplicate on the second mitt. Hand Part I - wrist up to thumb gusset: CHANGE to larger needle. Begin the body, using Flying Geese Chart. Each needle will contain 1 horizontal pattern repeat of 10 stitches. Do 2 entire vertical repeats i.e. 20 rows. Thumb Gusset - Option 1: (see notes for Option 2) BEGIN Thumb Gusset Chart and increases, continuing in pattern while you do so. Round 1: Work in pattern as established i.e. knit this round just like you did the other "Round 1's." That is, K5, p5, to end of round. Round 2: Knit in established pattern across first 5 stitches. For this round (R2), that would be K4, pl.STOP. PM, M1 (make one stitch), PM. (See notes, below.) Work remaining stitches on this needle in established pattern. For this round (R2), that means you will p4, K1. You now have one stitch (a single increase) in between the markers. Continue working the rest of the round in established pattern. For this round, that would be K4, p5, K1. Round 3: Work in established pattern (now R3) to gusset marker. Then: SM (slip marker), K1, sm, then work remaining stitches all the way around in pattern. Round 4: Work in pattern (now R4) to marker. Then: SM, M1R, K1, M1L, SM, then work remaining stitches in pattern. (Work the other 5 stitches on this needle, and then continue in pattern to end of round.) Continue in this manner, increasing 2 stitches (1 stitch each side of gusset) every other round, and keeping in pattern, until you have 15 stitches in between the markers. Increases come as follows on these Rounds: After you knit the increases, you have: R2 - 1 st bet markers (as above) R4 - 3 sts bet markers (as above) R6 - 5 sts bet markers R8 - 7 sts bet markers R10 - 9 sts bet markers
This is the third vertical repeat. This is R2 of the fourth vertical rpt. R8 - Work across first 5 stitches in pattern. STOP. DO NOT DO ANOTHER INCREASE.\*\* Just KNIT across all the gusset stitches. STOP. Now, place these 15 gusset stitches on a holder or on a piece of waste yarn, threaded on a tapestry needle. (Personally, I find waste yarn easier because it isn't stiff and allows the thumb to curl around, making it easier to work the following rounds. It's also easier to try on the mitt with the stitches on waste yarn.) Then continue working across the next 5 stitches on this needle (Needle 1) and continue in established pattern to end of Round. (The geese come back together.) \*\* Unless you want a larger/longer thumb gusset. In that case, do another increase, do another round plain, do the first 5 stitches of the next round and then put the gusset stitches on waste yarn, as above, and proceed, making sure you stay in established pattern.
Hand Part I - thumb gusset to ribbing:
R9 and following: Continue in established pattern, working until about / "" less than desired length. For my mitt, I finished this fourth vertical pattern repeat, did a fifth repeat and then the first 5 R's, or one-half, of a sixth repeat. But try on your mitt as you go along and decide for yourself. It does not matter which Round you end on. The geese will just fly off your fingers at the end!
Top Ribbing:
CHANGE to smaller needles. Do 4 rounds of K2, p2 (2 x 2) ribbing.
Bind-Off:
USING the Russian Bind-off, OR any other stretchy bind off such as the sewn bind-off, OR a regular bind-off, bind off all stitches. (See directions under Helpful Notes for Newish Knitters, below, for how to bind-off the last stitch to avoid the 'floppy loose last stitch' problem.) The Russian Bind-Off is a wonderful knitted bind-off that makes a nice stretchy edge. This means that you can use the smaller needles for the ribbing, which pulls it in just slightly and creates a nicer, more finished look, and yet still have plenty of stretch around the knuckles. You can find an excellent video tutorial of the Russian Bind-Off here: http://www.youtube.com/watch?v=Yv6Vib66MWg&feature=related If you don't have net access, here is a description: Knit 1"t two stitches in pattern (K2) Put these 2 stitches back on the left-hand needle. Knit through the back loop. (K2tbl). --Move yarn to front -- because the next stitch is a purl stitch, you need the yarn in front. \*\*Put the stitch you just made, which is on the right-hand needle, back on the left needle. Purl this stitch together with the next (purl) stitch. (P2tog). Put this stitch back on the left hand needle. Purl it together with the next (purl) stitch. (P2tog). --Move yarn to back - because the next stitch is a knit, you need the yarn in back. Put this stitch back on the left needle. Knit this and the next stitch together through the back loop. (K2tbl). Put this stitch back on the left needle. Knit this and the next stitch together through the back loop. (K2tbl). \*Move the yarn to the front. Continue from \*\* to end.
Thumb:
CHANGE to larger needles. Move the stitches on the waste yarn onto two double points. Then, re-joining the yarn from the ball: Pick up and knit 5 stitches along the upper edge. Then knit across the 15 stitches on the other two DPNs. PM (place marker) to mark beginning of round. You will have 20 stitches total. Redistribute the stitches so that there are even numbers on each needle. (6, 8, 6). Knit 3 rounds in stockinette stitch.
Thumb Ribbing:
CHANGE to smaller needles. Work 3 rounds of 2 x 2 ribbing. Bind-off, as above for hand. Weave in all ends. Block if desired. It isn't necessary. (Sample has been blocked. I like the halo effect.)
Make second mitt same as first. Put on and wear with joy!
Pattern copyright by Patricia Frankel 2011. All rights reserved. Pattern and garments made from pattern are for personal use only and not for resale under any circumstances. Pattern may not be reproduced for sale.
HELPFUL NOTES FOR NEWISH KNITTERS
GeneralNotes: Before beginning any project: Breathe! Stretch! Fondle your yarn! First, a word about yarn. Knitting is joyous when you knit with yarn you love. It can be hellish, or at best, deadly dull, when you knit with yarn you don't love. And it is often mediocre when you work with yarn about which you feel neutral. In an average project, there are thousands of stitches. Each of these mitts contains over 3000 stitches. You make each one. Therefore, I advise purchasing ONLY yarn you love. This is triply true for new knitters. I wasted a lot of money on yarn I did not love. (Probably close to \$1000). And a lot of time knitting so-so projects. I don't do that anymore. I've pulled out a lot of projects, given the yarn away, or never finished them, because I either didn't like the way they looked in the end, or just got bored or frustrated knitting with yarn that I didn't love the look and feel of in my hands. When I say LOVE, I mean LOVE. I mean adore. I mean, you love it so much that you want to sleep with it. Just looking at it, touching it, inspires you. I do not mean "just like" or "it's okay." And I definitely do not mean "But it's on sale."I love getting yarn on sale but I learned the hard way that if I wouldn't pay full price for it, it being on sale doesn't make me love it. It just makes me love it more. At the risk of repeating myself: each project contains thousands of stitches. Each onemade by you. Now, for me, Rowan Felted Tweed is one of these yarns. It may not be for you. It's a suggestion. However, because it is a blend of merino, alpaca and viscose (rayon), and isn't a super dense 100% wool or high-twist yarn, I found it a bit stretchier and lighter than some other DKs. This made tension a wee bit fiddly at times. IF you are a brand-new knitter, you might want to make these out of a denser, springier 100% wool. Just make sure it's a wool you LOVE. After all, these take only 50g, or about 150 yards total. That's almost always just one ball or skein. So go ahead and splurge, especially if you actually plan to wear these a lot! A word about mistakes. Mistakes are inevitable, and they are lovely. Yes, lovely. Mistakes teach us patience and compassion for ourselves, and others. They help keep us nimble. Fixing them, we gain confidence. We learn to navigate both life and knitting (and they are much the same thing, I often think) with greater flexibility and skill. Leaving them alone, we learn grace, and how to let go, and how to live with imperfection. Mistakes keep us human, and humane. You will quickly figure out your own temperament with mistakes. This pattern is particularly well adapted to mistakes. After all, it's simply a series of knits and purls, in a changing series of 5 & 5. It's a nature pattern, and nature is always perfect, in whatever form it takes. So, if you find that you get off the pattern, knit 3 when you are supposed to purl 2, one option is to just pick up the pattern again and go forward. The worst thing is that it will look like geese that are flying slightly out of perfect formation ... which they often do. A word about me: I still consider myself a newish knitter, because I've only been knitting about 4 years. In the knitting world, this makes me a toddler. I decided to start designing and writing patterns because ... well, I'm like that. Also, I realized that I was spending far too much time hunting for simple but not dull patterns that seemed like 'me, and then trying to match them with a particular yarn. Or vice versa. Or else trying to figure out how to adapt a pattern. But also, I wanted to teach myself techniques one at a time, in a purposeful and gentle way, and incorporate them naturally into a pattern of my own choosing. (For example, for this pattern, I learned the Russian Bind-Off.) Finally, I wanted to offer patterns for other newish and novice knitters that were well written, would be eminently do-able, and were filled with the sort of information I wish I'd had in the beginning. I hope I have done that here, in some small way. As with everything I say, take what seems valuable and leave the rest. I've learned enough to know that there is no "right" way or "wrong" way to knit, no matter what some dogmatic people say. There is only your way. True, there are more conventional, and less conventional ways. More 'traditional and less 'traditional.' But knitting, like everything, evolves. It evolves with every one of us who does it. Find your own ways and be content.
Casting On:
There are several good tutorials for the Old Norwegian CO on the net, including youtube. I prefer this one from Knitting Help. They demonstrate a variety of cast-on methods: http://www.knittinghelp.com/videos/cast-on The videos are very clear, the needles are large and the yarn is white, making it easy to tell what is going on. It looks more complicated than it is. I first learned it for socks and it works well any time you need a stretchy cast-on. Another great one is the Estonian Cast-On, available here: http://www.knittingdaily.com/topics/sock-knitting.aspx I use DPNS, and I find it easy for this pattern, but many knitters prefer the Magic Loop. If so, feel free to use that method. However, these directions are written for DPNs. Mark the beginning and ending of the round by placing a marker next to the last stitch cast on. Obviously, if you place it after the last stitch cast on, the marker will simply fall off that needle since no stitch will hold it on the other side. Or you can knit one round and place a safety pin or similar marker directly into the first stitch of the round. If you discover that your stitches are twisted, you have a chance at the end of your first round to fix this by rotating your needle and undoing the twist.
Wrist Ribbing:
When using DPNs, each needle will have 10 stitches, or 5 'sets' of 2 x 2 ribbing. Note that the first needle will begin with K2 & end with K2. (K2, p2, K2, p2, K2). This means that the next needle will begin and end with purl! (p2, K2, p2, K2, p2). Then back to K2...K2, then p2...p2. It's easy to get confused, and think that the ribbing is a kind of 'pattern' repeat for each needle, as K2...K2. But it isn't! If you do that, you wind up with 4 knits together at one point, and 4 purls at another. Interesting, but not 2 x 2 ribbing. So remember, it's just K2, p2, all the way around. After the first round, it's easy to keep track if you just knit each stitch as you come to it, i.e. knit the knits, and purl the purls.
Hand - Up to Thumb Gusset:
Each needle will contain one horizontal pattern repeat of 10 stitches. Unlike the ribbing, this pattern DoES start over, i.e. repeat, with each needle. So, for example, on Round 1, you K5, p5. Then you begin knitting on the second DPN, with K5, p5. And so forth. Do this 4 times, until you come to the end of the round, and then start on the next round (Round 2). The chart is read Right to Left because we are doing this in the round. Thus, although some people call them rows, technically they are really rounds. They just look like 'rows' due to the flat, 2 dimensional chart. So, at the end of Round 1, return to the beginning of the chart, and start on Round 2. It's like reading Hebrew, or making a long, sharp zig-zag back to the right every time. IF this were knitted flat, the reading would reverse every time, so that the first Row (and it would technically be a Row) would be read R to L, and then Row 2 would be read L to R, and you'd be doing a small stair-step up the chart, instead of a zigzag. Generally, you can tell a chart that is meant to be knit in the round by the fact that the Round numbers are all on the Right Side. In flat Row knitting, the numbers alternate. Sometimes these are also stated as "Wrong Side" and "Right Side" but which is which depends on the pattern. The pattern repeat, horizontal and vertical, is one quarter of the Large Chart. I have included this large chart with 2 pattern repeats, horizontally and vertically, so you can get an idea what the pattern looks like when it is repeated and more easily see the 'flying geese' motif. Thumb Gusset Option 1: (For Option 2, see very end) BEFORE BEGINNING THE GUSSET: Breathe! Take a nice long breath and let it out Then PUT DOWN your knitting, get up, stretch, get a cup of tea, and READ THE DIRECTIONS FOR THE GUSSET. Look at the chart. It will become clear. It is not difficult, it just has a funny name, and so we think it must be hard. Also, because I've spelled out the steps in incremental detail, it looks complicated. It isn't. Basically, you are making (inserting) a little triangle for your thumb in between the first five and second 5 stitches on the FIRST needle. (The geese are splitting up). So, the first needle will contain the 10 stitches of the pattern, split 5 and 5 on each side of the gusset, and the gusset will continue to widen as you add increases on either side. It makes a V. (Like geese in flight). For the first increase, it doesn't matter if you go right or left. I generally just do a M1R. (See explanation of M1R & M1L if you don't know what they are.) At the very end, you will have a total of 25 sts on this needle. 5 pattern sts, 15 plain knitte gusset sts, and 5 pattern sts. The other 3 needles will not change in terms of their stitch counts. The pattern remains the same, with the exception of the interruption for the gusset. The mantra is: K5 in pattern; interrupt for gusset; K other 5 of pattern; K10 in pattern; K10 in pattern; K10 in pattern. Start next Round.
DIRECTIONS FOR M1R & M1L:
Again, the best videos are here: www.knittinghelp.com/videos/increases Basically, you are simply making a half-hitch loop with the strand of yarn between the stitches, and twistin i soi either angles, or leans, to theright or the lef, depending on which way the front strand of yarn goes, and then knitting it. The videos make it really, really clear. But if you don't have internet access, here are directions: M1R: Bring the tip of the left-hand needle under the strand of yarn that is between the stitches (also called the bar), from back to front. This makes it sit on the needle in an 'open' fashion, almost as if you had caught this strand up accidentally. You can also use your right hand needle to pick it up and put it on the needle oriented this way. Then knit this loop, through the front. Make sure you knit, because it's tempting to purl or do something 'purl like' or simply knit in the hole or something, because that is more open. If it seems easy, you're probably doing it wrong. If it seems fiddly, and you curse a couple of times, you are probably doing it correctly. Basically, you have to wiggle your needle into the loop where it's tightly crossed, so that the yarn makes a loop with the front yarn slanted to the right. If you work it the 'easy' way, you wind up with a gaping hole under the increase. M1L: Reverse the process. Bring the tip of the left-hand needle under the strand of yarn that is between the stitches from front to back. Knit this loop through the back. The same idea applies. If it's fiddly and tight, you're probably doing it correctly. The first couple are always a bit tricky. Once you have done a few, you figure out your best process. For example, I always insert my right hand needle in the opposite direction (so that it is pointing left), and pull the yarn out from the needle a little, either front or back, then hold it with my fingers, remove the needle and re-insert it in the correct direction and knit it. Again, it sounds much morecomplicated than it is. Don't worry if the increase seems tight, and pulls on the fabric a bit. This is especially true with the Rowan Felted Tweed, because of the nature of the yarn. 100% wool yarns don't seem to pull as much. But after a few rounds, it seems to sort itself out. Don't overwork it. Relax.
Avoiding the Floppy Last Stitch: (Optional)
When you get to the last stitch, bind it off together with the stitch directly below it. Because this is 2 x 2 rib, this means that your last stitch will be a purl. So, insert your needle for the purl, per the normal way, then also pick up the stitch - in this case, the purl bump below - and put it on the needle. Treat these two stitches as if they are one. For the Russian Bind-Off, this means you will purl all 3 of these stitches together. It seems like it will look terrible, but it doesn't. (Or it doesn't for me, with the DK yarn.) For other bind offs, just treat the purl and the purl below it that you picked up as one single stitch and proceed as usual. Picking Up Thumb Stitches: Breathe! This bit is just a little fiddly at first. If you have picked up stitches, you know it is as much an art as a technique. The easy part is you only have 5 stitches to pick up. The fiddly part is that you only have 5 stitches to pick up. As always, try to avoid making holes. This means that you might have to go into places that don't look quite like 'stitches' and/or pick up from the row below. RELAX! Try to do it as evenly as possible. Believe it or not, they seem to sort themselves out on the following rows even if they don't look perfect initially. Joining Yarn: When joining the yarn, for this project, I found that picking up both the yarn from the ball and the tail for the first three or four stitches after the initial picked up stitch made it easier to weave in, since you are more or less 'weaving' the tail as you go, and it closed any gap that might have wanted to open up. The double strand blended in just fine, gave it a little more 'body,' so to speak. If you do this, just make sure you knit these four stitches properly in the following st st round, as 4 sts, and not 8.
Thumb Gusset Option 2:
Instead of making the gusset in between the first and second five stitches in the pattern repeat, you can make it between full pattern repeats. I did this on the first mitt I made it at the end of R1 and before starting R2, on the last (4t"h) needle. The only issue is that the second marker either has to be a "virtual" one, because there will be no stitch on the other side of it to hold in place. (That stitch is the first stitch on Needle 1.) OR - temporarily move that stitch to Needle 4, to hold the marker in place. To use the thumb gusset chart, take a pair of scissors and cut it out, along with the two halves. Tape the halves back together, and tape the thumb gusset on the end.


