GRYFFINDOR CAMI
List of abbreviations/ symbols, and their explanations

-M:Make one right (always worked on the rs in this pattern): 1. Knit to $1^{\mathrm{{st}}}$ marker. 2. Insert L needle from BtoF under the strand that is between needles, from the previous row. This now looks like a YO loop. 3.Knit this loop, working into it in front of L needle. You have made a rt-slanting inc. -M:Make one left (always worked on the rs in this pattern) : 1. Knit to $2^{\mathsf{n d}}$ marker. 2. Insert left needle from F toB under the strand that is between needles, from the previous row. This now looks like a YO loop. 2. Knit this loop, working into it from behind L needle. You have made a left-slanting inc. : Left-slanting dec: work these 2 sts tog as follows: on rs - ssk: slip 1 st, slip another st, insert left-hand needle into F. loops and k. them together through B loops, on ws - ssp: Holding yarn in F, slip 2 sts knitwise one at a time. Slip back to L-hand needle, and p 2 together through back loops. R : Right-slant. dec: work these 2 sts tog as follows: on rs-k2tog: Insert needle through 2 sts from L to rt, and k them together as if they were 1 st. on ws-p2tog: Insert rt- hand needle through next 2 sts as if to p, and work them as one
NOTES:
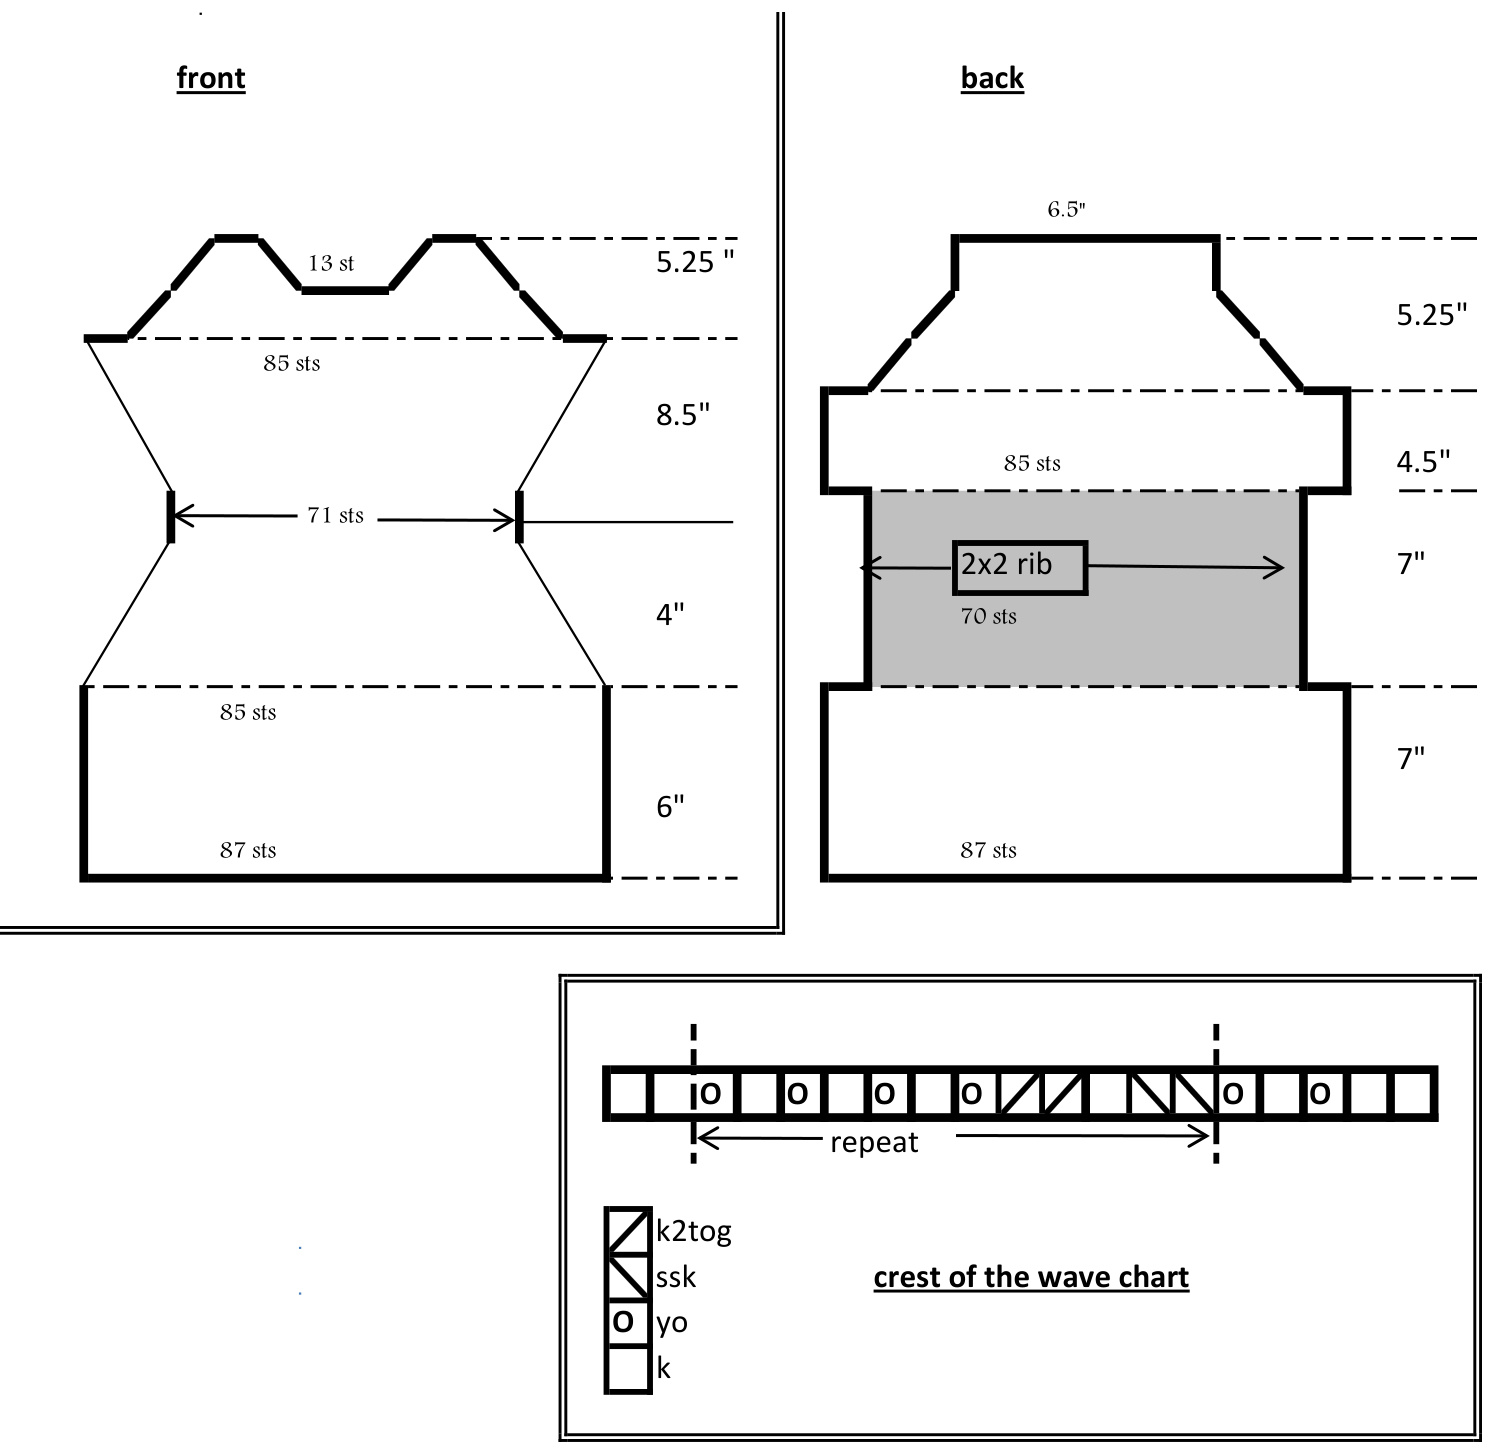
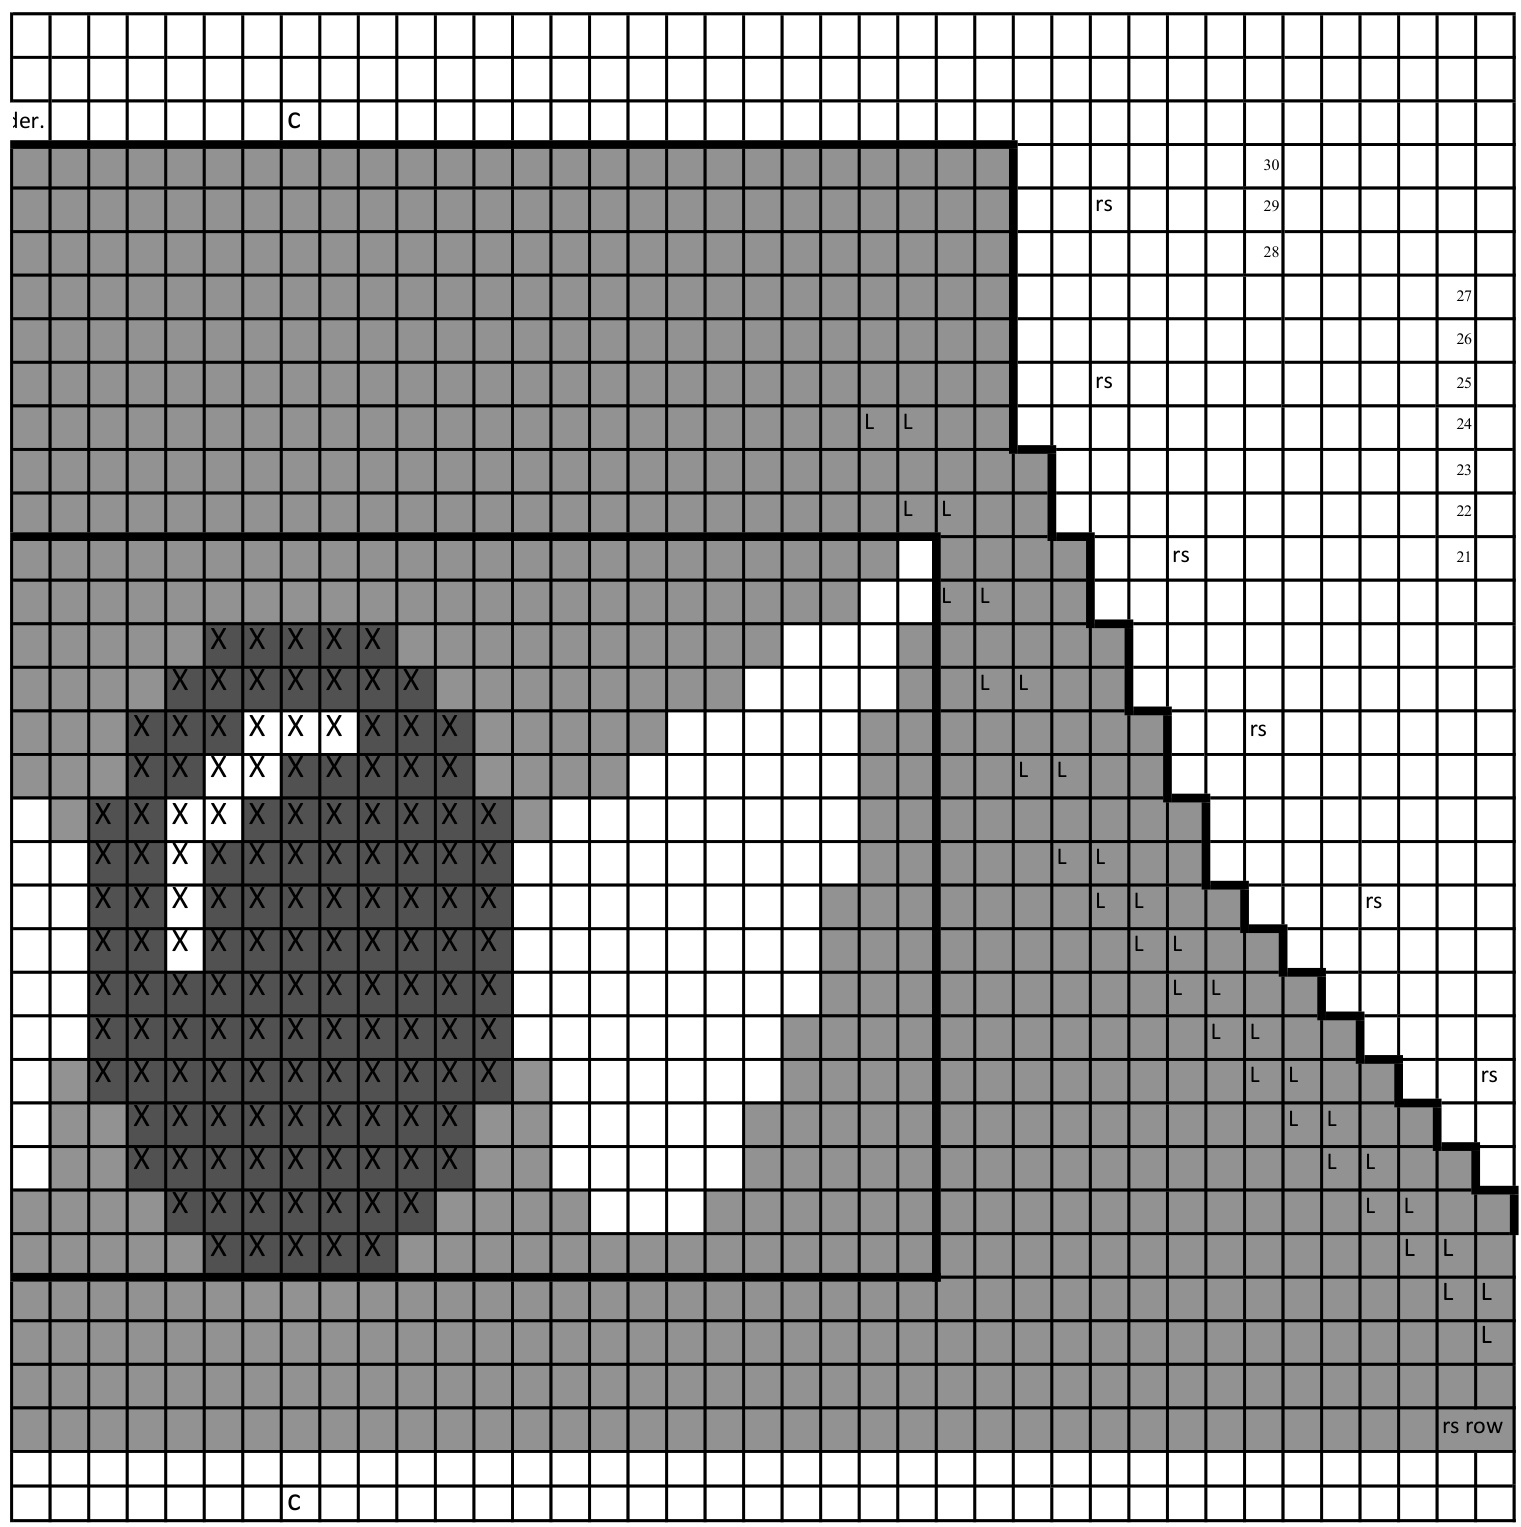
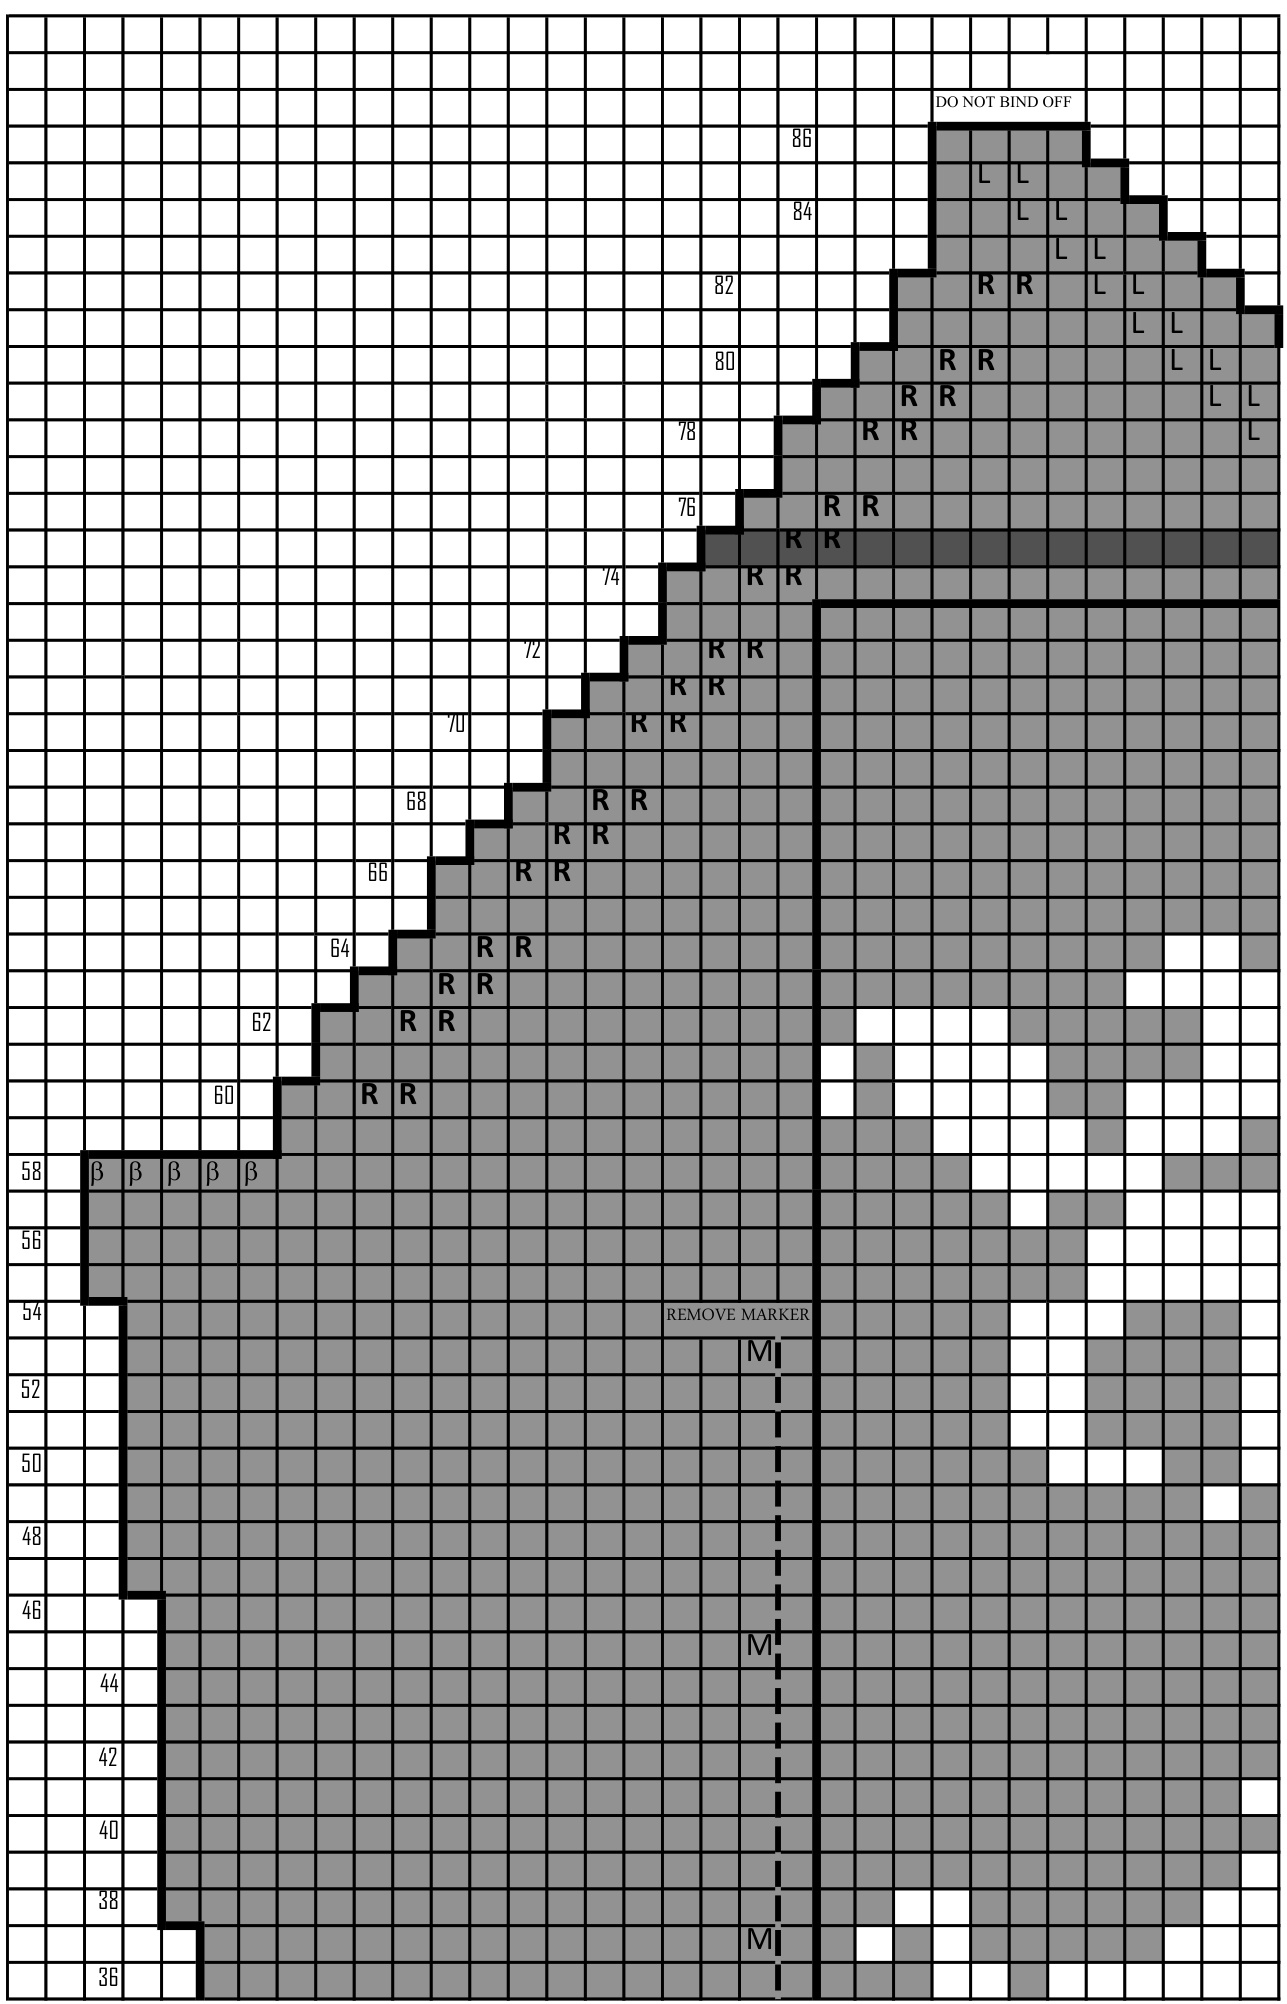
1. Swatch , swatch, swatch!!!!!!!!!!!!! 2. The original yarn, Berroco Softwist, is discontinued. Any yarn with the same gauge would work. Yarndex.com is one research resource. 3. All charts will be worked back and forth, so you will read them Rt to L on rs rows, and L to Rt on ws rows. It is helpful to highlight rs rows on charts. I have added a few random rs row labels to keepyou ontrack. 4. Intarsia charts are worked with multiple bobbins of 3-4 yards each, to enable multiple color changes in each row. 5. Arm/neck dec symbols: in lieu of typical ssk/k2tog symbols, I use LL or RR. This is because you are reading the charts back and forth, and I wanted to clarify where to make the dec.s on the ws rows. For example, at back undearm chart, on row #7 (marked with \*\* ), work as follows: working and reading from Rt. To L, k 2 st, make one single left-slanting dec utilizing the 2 stitches marked [L]· Work rest of the row as per chart. On the next row, you are purling, and reading the chart in the other direction. You will stop 4 st short of the end , work the next 2 st (both marked [L) tog in one left-slanting dec, and purl the last 2 sts. 6. For help with any stitch (such as the less-common ssp), my absolute favorite reference is The Knitter's Handbook, from Knitter's Magazine. Also check out online tutorials. 7. Make back first, to assist in determining front shoulder strap length later on.
Materials:

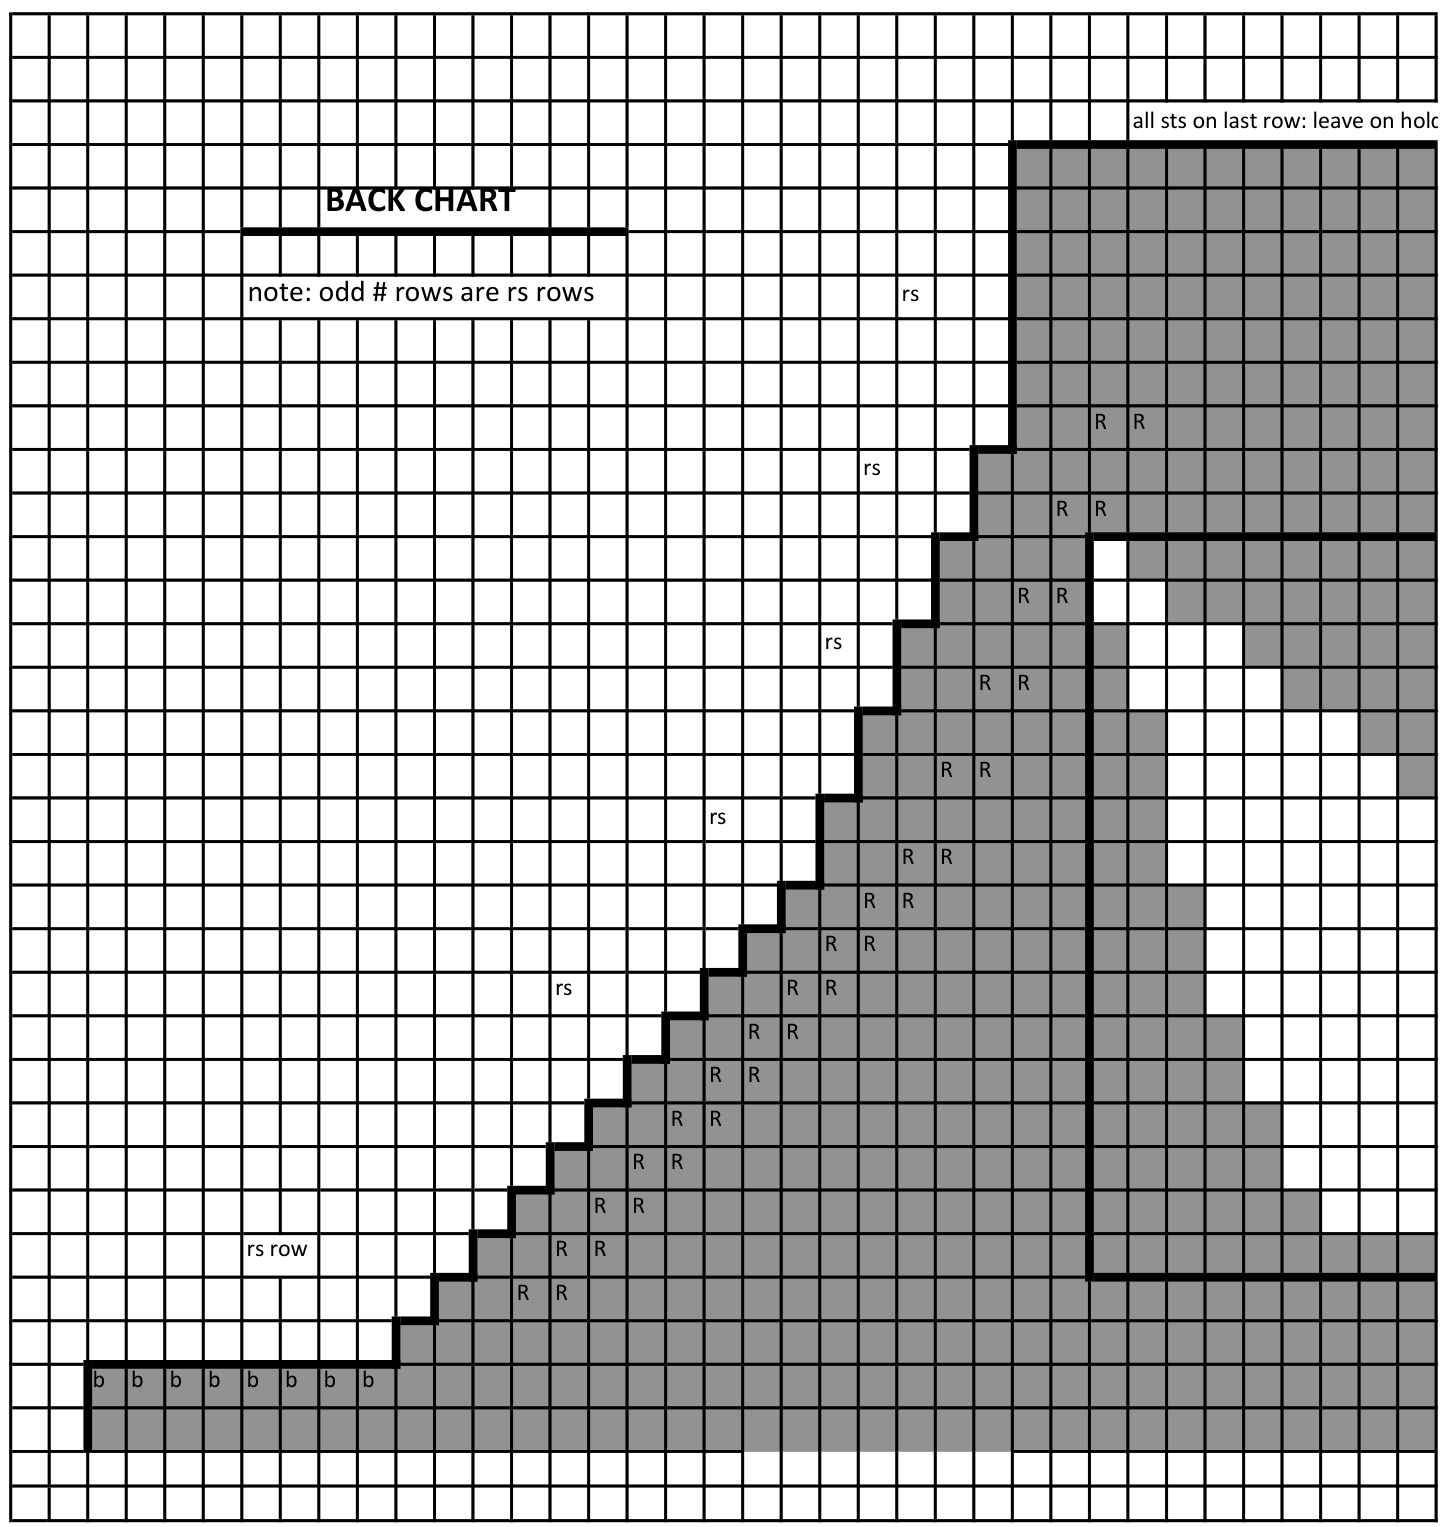
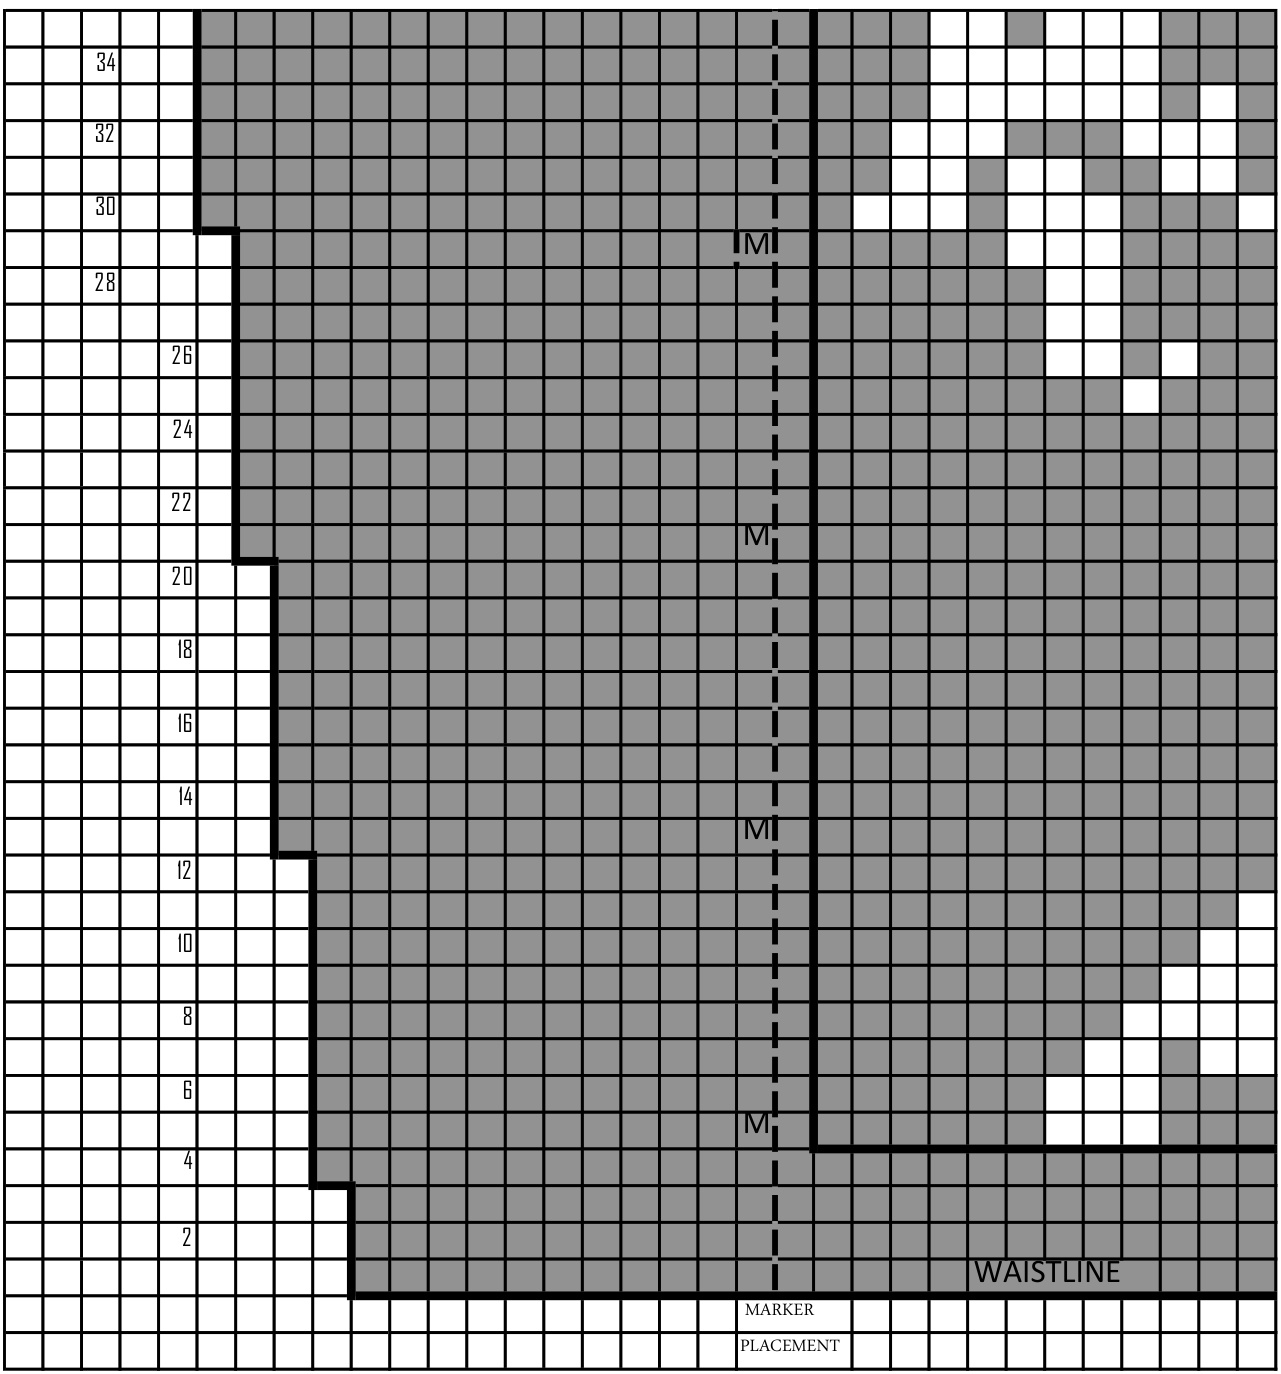
\*\*\*Before you begin, you will need to cut out and tape together the parts of the front chart and back chart, as they do not fit on one page. To assist you, I have included miniature pictorials of how the final charts should look.
Back:
1.Last on 8/ st 2. work “crest of the wave" lace edging as follows: -R 1-4: knit across. -R 5,7,9,11 (rs rows): K1, (k1, yo)twice, [ssk twice, k1, k2tog twice, (yo,k1) three times, yo] Rep [...] 5 times, then work last rep as follows: ssk twice, k1, k2tog twice, (yo,k1)twice, k1. R 6,8,10,12: purl across. 3. repeat R 1-11. Next R (dec. row): K6, ssk, K71, K2tog, k6 ( You now have 85 st). 4. next 3 R: knit across. You have completed the lace edging section. Work In St st till piece measures $7^{\prime\prime}$ from cast-on edge.
Waist rib portion:
Decrease to 70 sts as follows: on the next rs row, (k4, ssk, k4, ssk, k3, ssk). Repeat this sequence till end of row. You now have 70 sts. Change to smaller needles, and work in 2x2 rib: beg. With p2, then k2, repeat across, ending with p2. Next row: k2, p2. Rep. across. Continue to work these 2 rows for $7^{\prime\prime}$ , till garment measures $14^{\prime\prime}$ from cast on edge. Inc. to 85 sts. as follows: in st st, (k5, m1, k5, m1, k4, m1). You should have 85 sts. Work St st for 4 and $\%$ inches. Work should measure 18 and % inches from cast-on edge. Finish by knitting a ws row.
Underarm :
Begin back chart, binding off 7 sts at rt. Side of chart, k across, turn work, bind off 8 sts, p across, turn work. K2, ssk, k across. Continue to follow chart for underarm decreases, beginning snitch section on row 5. Once back chart is completed, do not bind off : leave sts on holder. Leave a tail several yards long. (Note: DO NOT weave this tail in, it will be used to crochet around the neck and underarm in the very final step!)
Front:
1.Cast on 87 st 2.work "crest of the wave" lace edging as follows: -R 1-4: knit R 5,7,9,11 (rs rows): K1, (k1, yo)twice, [ssk twice, k1, k2tog twice, (yo,k1) three times, yo] Rep [..] 5 times, then work last rep as follows: ssk twice, k1, k2tog twice, (yo,k1)twice, k1. 3.-repeat R 1-11. Next R (dec. row): K6, ssk, K71, K2tog, k6 ( You now have 85 st). 3. next 3 R: knit across. You have completed the lace edging section. Work in St st till piece measures $6^{\prime\prime}$ from cast-on edge. Last row worked should be a ws row . work 2 more R in St st .
Hip darts:
1. Next R (rs row): k 18, pm, k49, pm, work to end (85 st). work 3 R St st. 2. next R: K to 2 sts before marker, ssk, sm, knit to next marker, sm, k2tog, k to end. (83 st). 3. work 3 R St st. 4. rep steps 2 and 3 five times more(73 st). 5. work one row. Rep. step 2 (71 st). Continue sequence till piece measures ${10}^{\prime\prime}$ from cast on edge. 6. Finish up by knitting a ws row. Mark the waistline (for blocking purposes) by basting contrast yarn throughout the entire width of the previous row.
Torso:
(Note:From now on, increases and decreases are in chart form only, since they are worked simultaneously with the lion chart.) Follow front chart, making sure to begin lion chart on a rs row, and doing all M and M on a rs row as well. Dark vertical dotted lines (on either side of lion chart) represent marker placement. Work to underarm, bind off sts marked $\boxed{\upbeta}$ at beginning of next 2 rows, as per chart. Continue with dec. sequences, making all dec.s 2 st in from the edge (note: prototype pics show dec.s one st from edge; however, 2 will serve you better during finishing). Work till end of lion chart, then 2 more rows of torso chart, finishing up by purling a ws row.
Neckline:
At this point divide for the 2 sides of the neckline: you will work the Rt. Side of the chart by k2, making 1 dec., k 17, place remaining sts on holder . Turn work, p2, p2 tog, p to end. Continue to follow chart, till you have 4 sts. Remaining. Knit these 4 sts in St st or in i-cord (your choice), for the shoulder strap. Work to desired length. Place sts on holder. Leave a couple of yards of yarn hanging. Pick up the left-most 18 sts from the held stitches, for the left side of the neckline. You will leave the center 13 sts on the holder (they will be finished later with a crochet border). Work back and forth on the last part of the chart. Knit the 4 remaining sts in St st or in i-cord (your choice), for the shoulder strap. Work to desired length. Place sts on holder. Leave a couple of yards of yarn hanging.
Finishing:
Weave in ends, except for long tail left at top of back. If desired, outline golden snitch ball in chain stitch embroidery (see my "before" and "after" project pics). Block pieces. Sew sides together, leaving a $6^{\prime\prime}$ slit at each hip. Try on, adjust strap length. If you prefer , cross straps in back. Graft each strap to 4 external held sts. Weave in strap yarn ends. Crochet edging: With crochet hook and yarn tail from back, work single crochet sts (sc) across rs of back, into each held st. skip strap area by working behind strap with 1 or 2 chain stitches, then continue to sc around underarm, taking care not to stretch out or gather the fabric. The exact number of stitches depends on how tight you crochet... A good estimate is to sc into 2 eyelets (2 rows), and skip one. Skip the front strap area by making 1 or 2 chain stitches and working behind the strap, then continue to sc around neckline, as for underarm. As you reach the 13 held center sts, tighten up this corner/transition area to avoid loose "holes" in the knitted fabric. Work the center 13 stitches in a crochet picot stitch (many online tutorials available). Work behind strap as previously, and work around second underarm. Weave in this end and any other remaining ends.
for fun: Gryffindor "G"

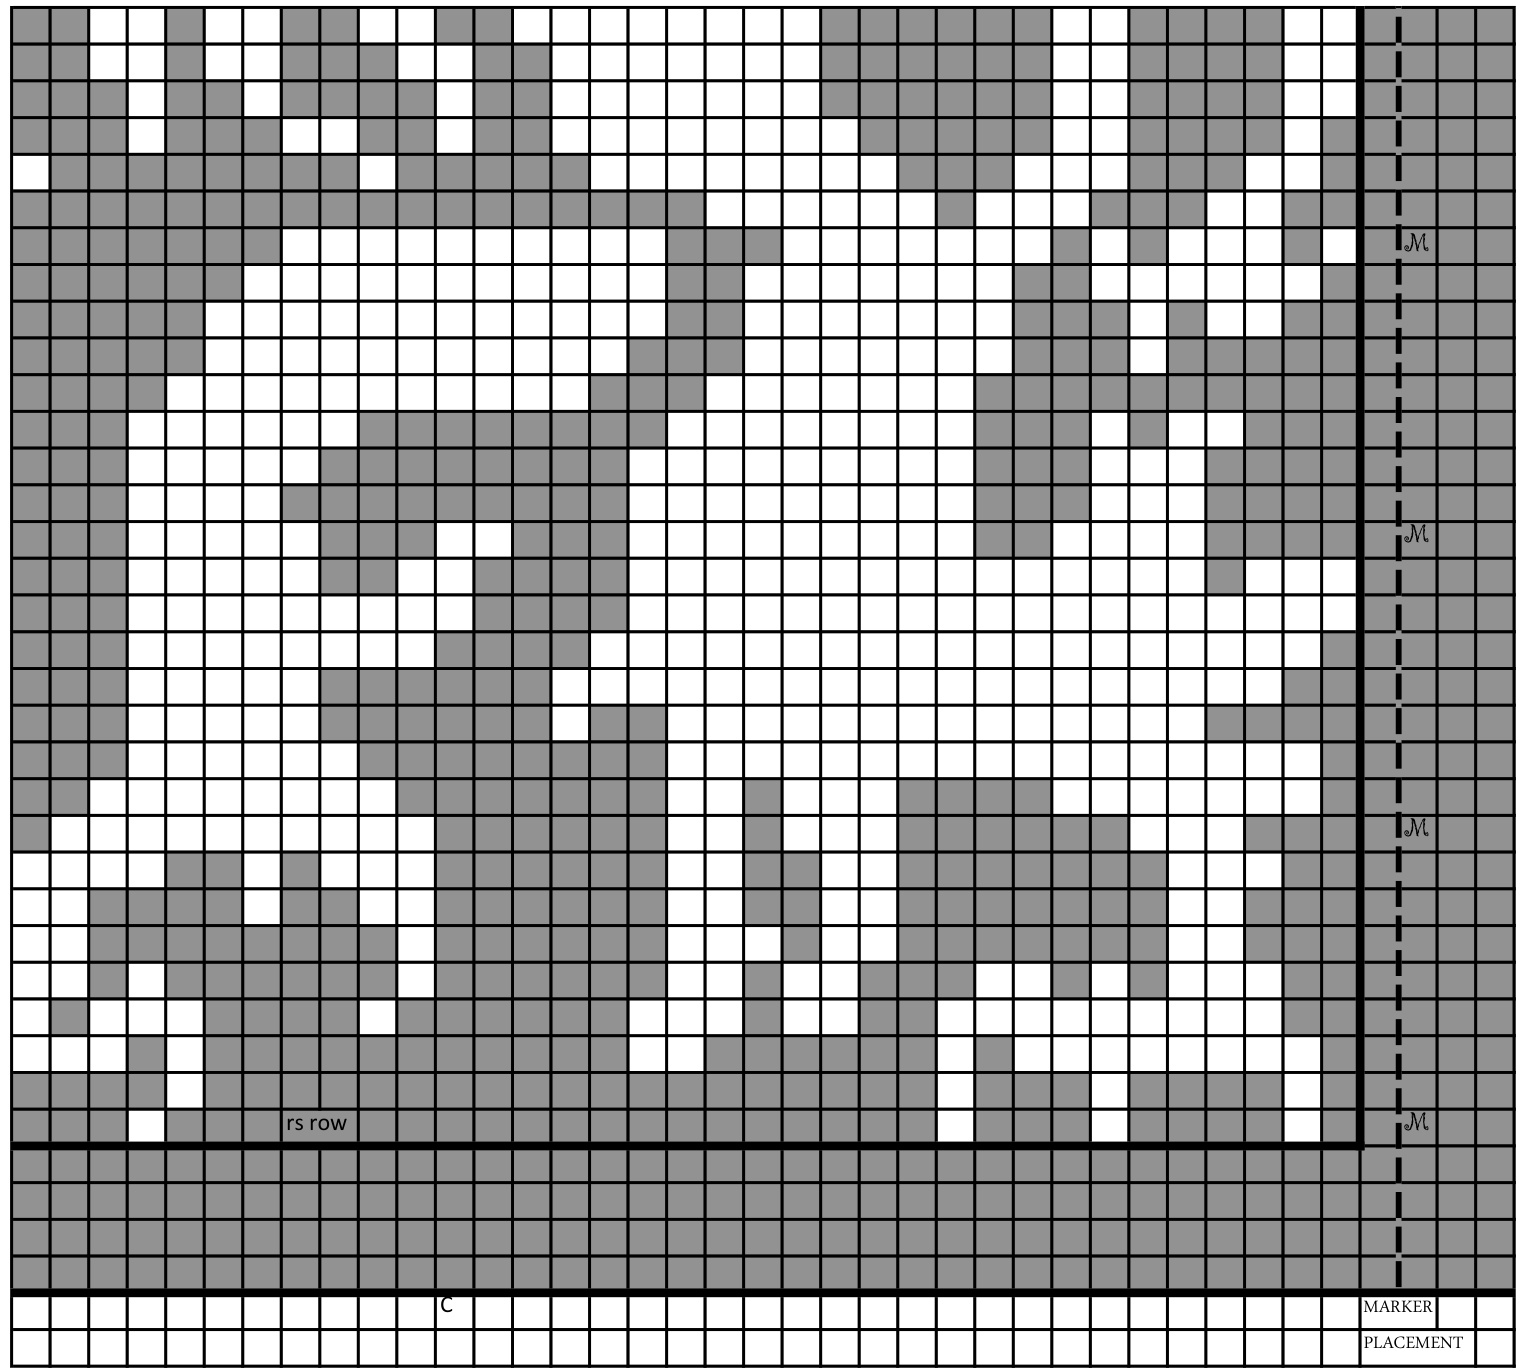


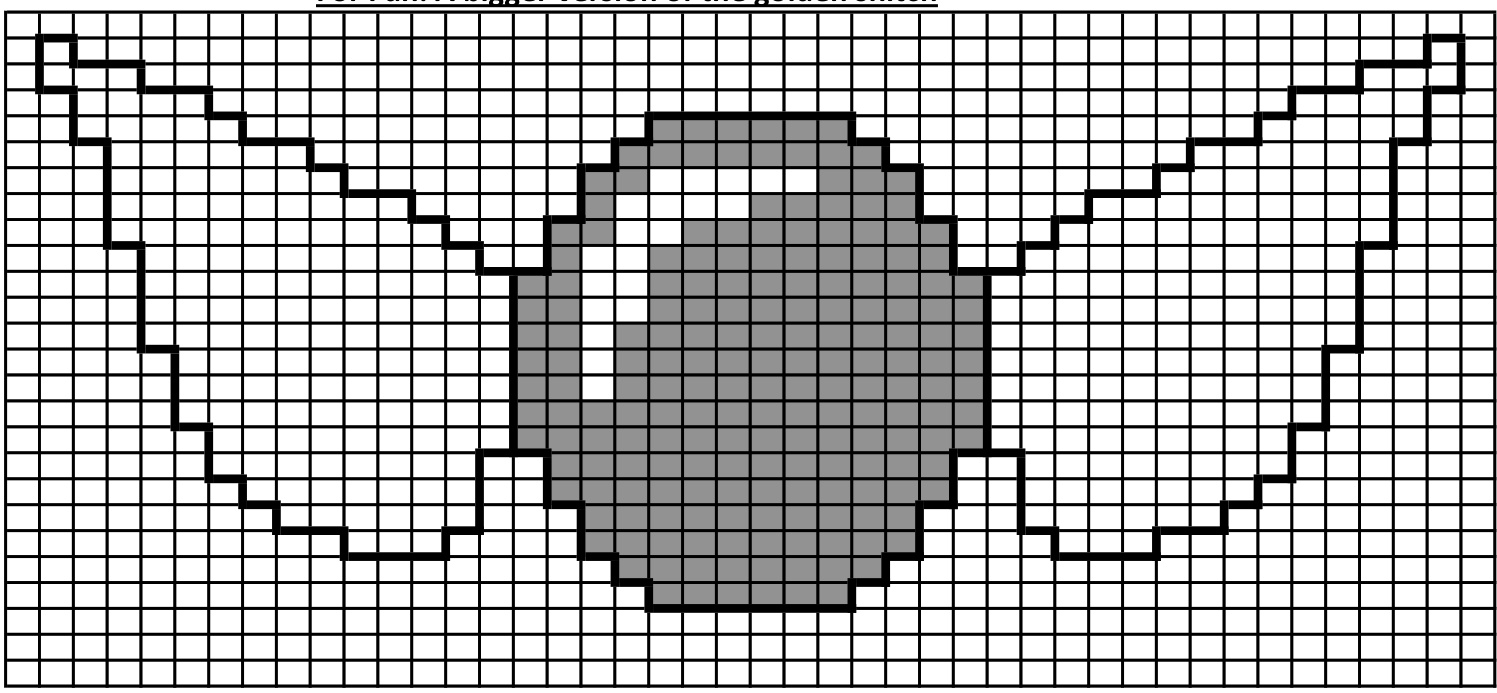
For Fun: A bigger version of the golden snitch