Braided Mitts
By Melody Parker Narvaez
Materials: Jill Draper Makes Stuff "Hudson" worsted-weight Superwash Merino 218 yards, 100g. Uses less than one skein. Needles: Double pointed needles (or long circs for magic loop) in sizes 5 (3.75mm) and 7 (4.5mm), or size needed to get gauge. Also, a cable needle or spare DPN to use for cabling.
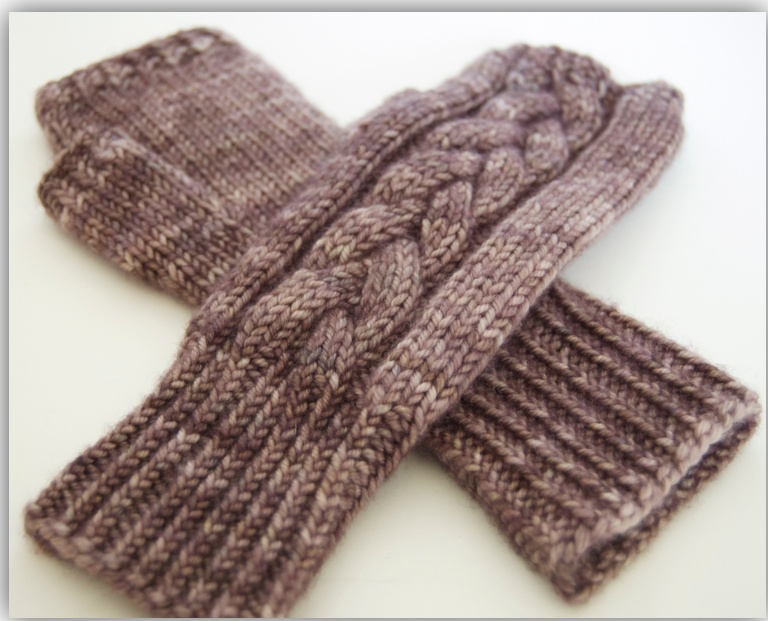
Gauge: 22 stitches and 30 rows to 4" square in stockinette stitch with larger needles. (5.5 sts /in] Size: Women's one size fits most. Length of hand and thumb are your choice. 1x1 Twisted Rib: Just like a regular 1x1 rib (K1, P1), but knit allthe Knits through the back loop. M1: Make one. Pick up the strand between stitches, inserting the tip of the left-hand needle from front to back, and knit it through the back loop. Kf+b: Knit front and back. Knit into the front of the stitch (as you normally would), but don't drop the stitch from the left hand needle. Then bring the yarn forward and purl into the same stitch. One stitch increased. C8F: Cable 8 front. Place 4 stitches on a cable needle or spare dpn and hold them in front of your work. Knit the next 4 stitches from the left hand needle, then knit the 4 held stitches. C8B: Cable 8 back. Place 4 stitches on a cable needle or spare dpn and hold them in back of your work. Knit the next 4 stitches from the left hand needle, then knit the 4 held stitches. : Options: This pattern sets you up with a 12-stitch stockinette panel down the middle of the back of the hand. Because it is divisible by both 3 and 4, there are several other cable options that would fit into 12 : stitches very nicely! Horseshoe, X-and-O, 4-strand woven braid, or even just a single large rope cable are : just a few examples of what would work. My pattern uses a 3-strand braid, as seen in the photo.
\~Pattern\~
Cuff: With smaller needles, CO on 36 using a stretchy cast on (I recommend German Twisted Cast On) and join to work in the round, making sure that your work is not twisted. Knit 20 rounds (about 2.5") in 1x1 twisted rib. If using DPNs, arrange stitches so that there are 18 stitches on 1st needle and 9 each on the 2nd and 3rd. If using "magic loop", work Needle 1 stitches on one side and Needle 2 and Needle 3 stitches on the other side. The back of the hand will be worked on Needle 1, and the palm is divided evenly between Needles 2 and 3. Body: Changing to larger needles, knit increase round as follows: Needle 1: K1, Kf+b, P2, K3, M1, K4, M1, K2, Kf+b, P2, K2 (22 stitches) Needle 2: K4, M1, K5 (10 stitches) Needle 3: K4, M1, K5 (10 stitches) For the body of the mitt, the stitches on 2nd and 3rd needles will be all knits (stockinette) Cable pattern for back of hand—to be done on Needle 1:
Left Hand:
Right Hand:
Round 1: K2, P3, K12, P3, K2 Round 2: same as Round 1 Round 3: K2, P3, K4, C8B, P3, K2 Round 4: same as Round 1 Round 5: same as Round 1 Round 6: same as Round 1 Round 7: K2, P3, C8F, K4, P3, K2 Round 8: same as Round 1 Round 1: K2, P3, K12, P3, K2 Round 2: same as Round 1 Round 3: K2, P3,C8F,K4,P3,K2 Round 4: same as Round 1 Round 5: same as Round 1 Round 6: same as Round 1 Round 7:K2,P3,K4,C8B,P3,K2 Round 8: same as Round 1 Repeat the above pattern on needle 1 and work stockinette on needles 2 and 3 until work measures desired distance between thumb and cuff (I placed mine at about 2.75" from cuff and about 5.5" from C0 edge). Now it's time to place waste yarn for thumb. Make a note of what row you are on so you can make the second mitt match. Continue as before with cable pattern on Needle 1, and knit in waste yarn for the thumb on the palm side (Needles 2 and 3) as follows:
Left Hand:
Right Hand:
Needle 2: K all stitches (10) Needle 3: K3, K5 with waste yarn, slip waste yarn stitches back over to left needle, and knit across waste yarn stitches and last two stitches. Needle 2: K2, K5 with waste yarn, slip waste yarn stitchesback overtoleft needle, and knit across waste yarn stitches and last 3 stitches. Needle 3: K all stitches (10) Continue in pattern until the hand is about 1cm shorter than you want the finished length to be. Mine was about 6" from the cuff or 8.5" from the C0 edge. End with Round 3 or Round 7 (cable rounds) in the pattern.
Decrease round:
Needle 1: K2, P2tog, P1, K2, K2tog, K4, K2tog, K2, P1, P2tog, K2 (18 stitches) Needle 2: K4, K2tog, K4 (9 stitches) Needle 3: K4, K2tog, K4 (9 stitches) Work 2 rounds in 1x1 twisted rib. Bind off loosely in 1x1 twisted rib or your favorite stretchy B0. Thumb: Carefully remove the waste yarn. You will have 5 live stitches on the bottom and 4 on the top. Slip the stitches onto needles and be sure that they are sitting correctly and won't be twisted after you knit them. Attach yarn, leaving a good long tail on the inside, and knit the 5 stitches on the bottom row. With a new needle, pick up and knit two stitches in the corner between the bottom and top needles, and knit two stitches from the top needle. With a new DPN, knit the last two stitches from the top and pick up and knit 3 stitches in the final remaining corner. You should have 14 stitches total. \*\*\* Hint for picking up stitches: If you pick up stitches right at the edge o the corner, you're more likely to have big holes there. I like to pick my stitches up 1 stitch in/down/up from the edge. But don't worry too much-- you've left yourself a long enough tail at the base of the thumb to weave together any gaps from the inside during finishing. (Also, the more you fuss with picking up stitches, the bigger those holes will be!) Knit (stockinette) until your thumb is about 1cm shorter than you want it to be. (Mine was 12 rounds to make a 2" thumb.) Knit 2 rounds of 1x1 twisted rib, and bind off loosely in twisted rib or your favorite stretchy B0. Finishing: Turn the mitt inside-out and use the tail at the base of the thumb to seal up or graft any gaps if needed, and weave in all ends.


