Snowball Knity and Designs
Jane Bennet's Flower Headband
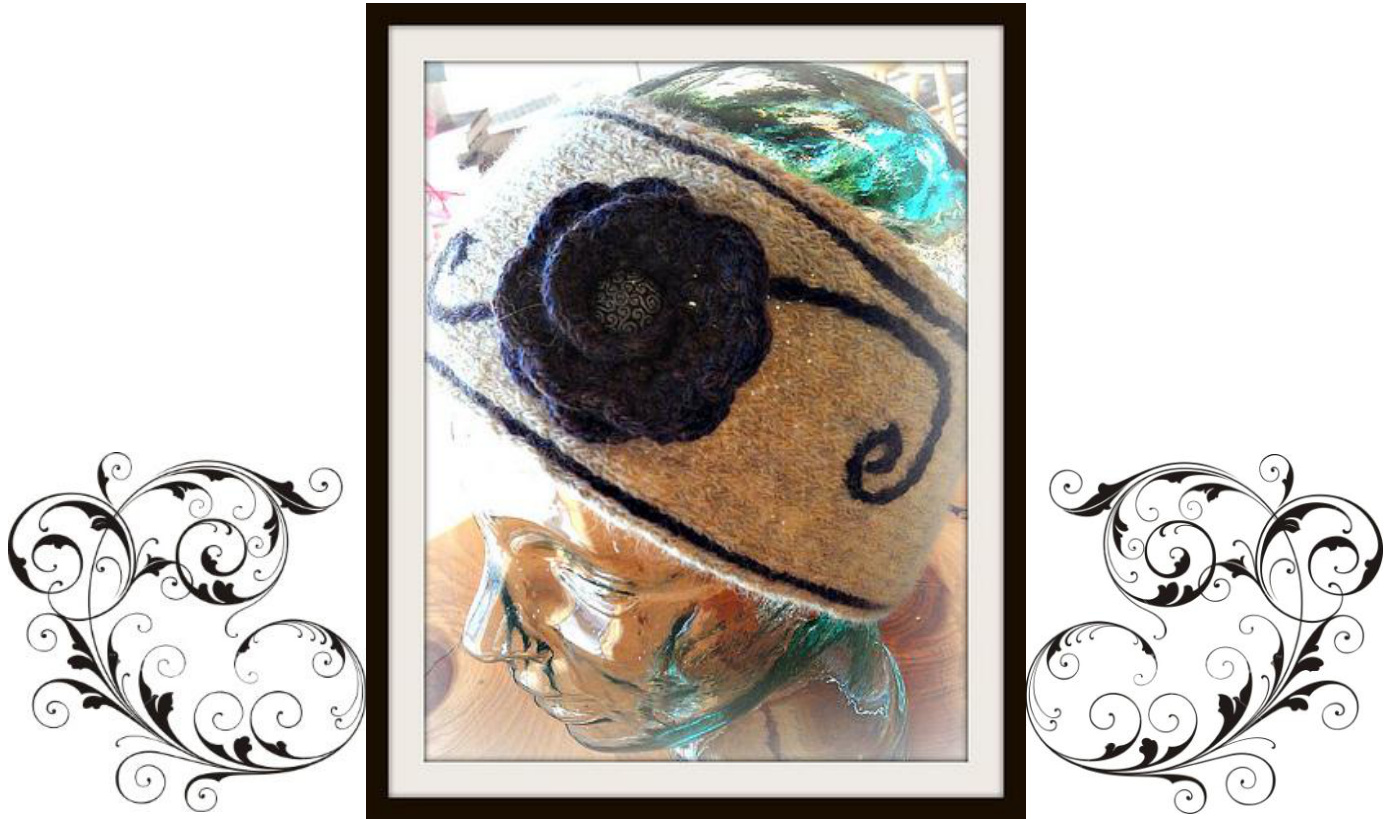
A knitted headband with crochet accents, based on what you may find Jane Bennet (from Jane Austen's Pride and Prejudice) wearing on her many walks through the English countryside. Yarn: 1 skein main color (MC) approx. 109 yds. Worsted weight yarn 1 skein contrasting color (CC) approx. 60 yds. Worsted weight yarn (Shown in Rowan Lima colors #890 Bolivia and #884 Cusco) Needles: US 8 (5mm) straight or circular needles Size E Crochet needle Materials: 2 buttons (1 for middle of flower and 1 for attaching headband) darning needle, 2 stitch markers, and scissors. Published by Snowball Knits and Designs@. To be knit up for personal or non-commercial use only.
Pattern:
1. Using MC and either straight or circular needles CO 8 sts. 2. (RS) P1, K1, P1, PM, K2, PM, P1, K1, P1. (8 sts) 3. (WS) K1, P1, K1, SM, P2, SM, K1, P1, K1. (8 sts) 4. P1, K1, P1, SM, M1, K2, M1, SM, P1, K1, P1. (10 sts) 5. K1, P1, K1, SM, P4, SM, K1, P1, K1. (10 sts) 6. P1, K1, P1, SM, M1, K4, M1, SM, P1, K1, P1. (12 sts) 7. K1, P1, K1, SM, P6, SM, K1, P1, K1. (12 sts) 8. Repeat rows 6 and 7 continuing to increase 1 stitch after the first marker and 1 stitch before the last marker on every right side row until you have 22 stitches (ending with a WS row). 9. (RS) P1, K1, P1, SM, K16, SM, P1, K1, P1. (22 sts) 10.(WS) P1, K1, P1, SM, P16, SM, P1, K1, P1. (22 sts) 11. Repeat rows 9 and 10 until piece measure 20 inches from cast on edge (ending with a WS row). 12.Button hole row: (RS) P1, K1, P1, SM, K5, BO 6 sts, K5, SM, P1, K1, P1. 13.(WS) K1, P1, K1, SM, P5, CO 6 sts, P5, SM, K1, P1, K1. 14.Begin decrease: P1, K1, P1, SM, SSK, K until 5 sts remain, K2tog, SM, P1, K1 P1. 15.K1, P1, K1, SM, P until marker, SM, K1, P1, K1. 16. Repeat rows 14 and 15 until 8 sts remain (ending with RS). 17.(WS) BO all sts. Weave in all ends.
Chained Border:
You will now use your crochet hook and CC to make a border inside the "purl channel" along the edge of the headband. The "purl channel" is the 3rd stitch in from the edge of the headband. 1. Using a size E crochet hook and starting at the end without the buttonhole, hold the CC yarn at the back of the purl channel and pull a loop through with a hook. Chain loosely in every stitch to the end of the purl channel. 2. Fasten off the chain and weave in all ends.
Crochet Flower and Accent:
1. Using CC and your size E crochet hook, Ch 35. 2. Dc in 5th ch from hook, \*ch 1, skip 1, (dc-ch-dc) in next ch, repeat from \* across. Turn. (16 sts) Published by Snowball Knits and Designs@. To be knit up for personal or non-commercial use only. 3. Ch 3 (creates a dc), 5 dc first in ch-space, \*sc in next ch-1 space, 6 dc in next ch-1 space (creates your shell stitch) repeat from \*, ending 6 dc in last ch-1. (16 shells created). 4. Fasten off, leaving 6 in to seam the flower to the headband. 5. Thread needle with tail and weave to base of last st. Starting at that end, roll first shell tightly to form center bud; anchor at base of shell with 2 sts. Roll remaining strip to form flower, then secure by stitching in and out through layers of foundation ch at bottom of flower. 6. Attach the flower to the headband, weaving it in securely. 7. Using one button, attach the button to the middle of the flower. 8. The scroll to each side of the flower is a simple crochet chain, the exact chain that was already done to outline the headband. Start under one side of the crocheted flower, using CC and your crochet hook, and chain through the headband until you have created your desired look. (The scroll shown in the picture was done simply turning the headband while doing the chain to create the spiral). 9. Repeat step 8 on the opposite side of the flower. 10. Fasten off and weave in all ends.
Button Hole Completion:
One of the last things is to crochet a tight border onto the button hole to help secure it, and not cause it to stretch over time. 1. Using CC and your crochet hook, start at one side of the button hole and sc around the whole button hole. Pattern Abbreviations approx—approximately BO— bind off CC— contrasting color Ch- chain CO—cast on DC- double crochet in;ins—inch; inches K-knit K2tog- knit two stitches together M1-make one left, take the left-hand needle and pick up thebar between the stitches from front to back, as shown in the picture. Use the right needle to knit this bar through the back loop MC——main color mm——millimeter(s) P- purl PM- place marker RS- right side SC- single crochet SM- slip marker SSK- slip, slip, Insert left needle into the front loops of the slipped stitches and knit them together from this WS- wrong side 2. Once you come back around to where you started fasten off. Weave in any ends. 3. Finally, secure the second button to the opposite side of the headband from the button hole. Make sure to line up the button to the location of the button hole so the button fits perfectly. Block the headband as needed and wear out on your own stroll through the countryside! Published by Snowball Knits and Designs@. To be knit up for personal or non-commercial use only.


