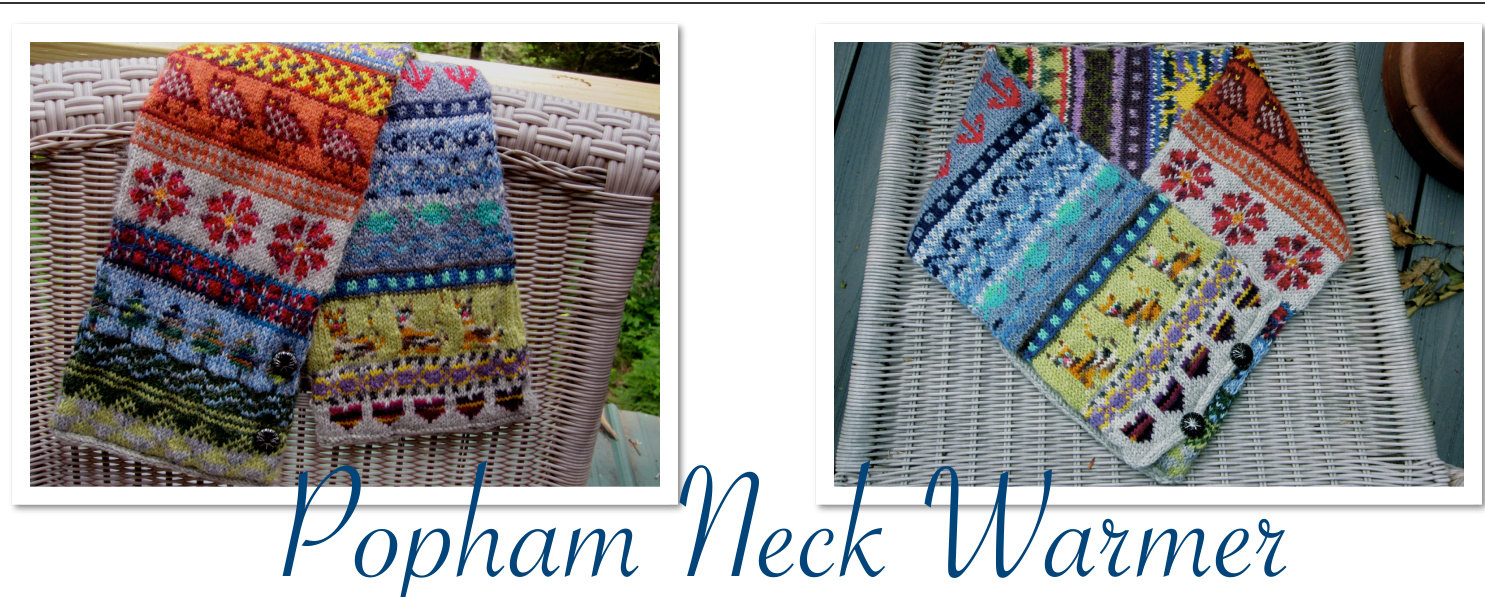
Winter is coming! If you go walking down at the end of any of those long points on the Midcoast of Maine - Popham, Reid State Park, Pemaquid - you need one of these to bundle up around your neck and chin. If you are like me and do not like pulling a cowl on and off over your head, or one that hangs down droopily and must wrap more than once around your neck, you'll like this design for its shortness and its buttons! This is a recipe that will keep you warm plus allow you to practice your stranded knitting designs and use up all those littleballs of left over sock yarn! Popham is compact and wraps closely around your neck with the two short ends overlapping in front and buttoning. The tubular knit-in-the-round construction makes it thick and very warm. The basics are given below but the stranded designs are adaptable to your whim. This scarf is a take off on Wendy Johnson's Leftovers Cowl and Jill McGee's My Favorite Things Cowl. Be sure to check their patterns out on Ravelry. So here's the recipe in the form of some basics plus some suggestions for making up your own combination of designs: Basics: Use a 16" circular needle and cast on 96 stitches. Or you can use two needles for 48 stitches each. Join and knit in the round. In the end, 48 stitches will make up one side of the scarf, and 48 will make up the other. In my case both sides are identical in design. Knit a half inch or so in waste yarn to start. When you finish the scarf you will flatten the tube, join the front and back with a 3 needle join and then apply an I-cord edge to each end. On the cast on edge this will require picking up the stitches above the waste yarn and removing the waste yarn. You may wish to use a provisional cast on instead. All of this may make more sense at the other end of the pattern. Needle Size: 4, 5 or 6 depending on yarn weight. My first scarf was on 4's and my second one (which was largely sport yarn) was on 6's. The first one has a firm fabric; the second is looser and softer. Gauge: Not important but a finished scarf width of about 8" is good. If you were to use all fingering yarn and a smaller needle I would recommend casting on more stitches - probably 12 as that will be easier to adapt to most patterns. Length: Again, not super important. My first is 33" long and the second only a little longer Stitch markers: Place one at the start of the round and another between the 48th and 49th stitch dividing the scarf into a front and a back Visit my site at MaineStory.info Knit ME Something Warm & Cozy 2014 Pat Higgins
Popham Neck Warmer
Page 2 Yarn: Mostly I used fingering, Sport and DK - the mix seems to work out ok, and the scarf does not look too Warped. I try to knit the fingering in combo with the heavier weights. Too many fingering yarns in the same pattern band would probably narrow the scarf. Also I knitted loosely for the thinner yarns and tried to be a little tighter on the thicker yarns. Alternatively a thinner fingering yarn could be knit in a double strand if you really want to use it at all. Colors: Well, it is like color theory in quilting. If you don't combine your lights and darks, your brights and dulls, then you end up with murky color schemes. Contrast is a must. Also I try to introduce a color in one band as a contrast and then have it be a major color part of the next pattern change - for example there is purple in the variegated background of the sun band and the next band has considerably more purple - not the same purple or the same yarn but purple none the less. Patterns: There are lots of good charts on Ravelry or you can do a Google image search for a subject and add knitting chart stranded. (For example: cat + knitting chart). In addition there are some very good books by Alice Starmore, Mary Jane Mucklestone and others. You can also read up in any of these about chart knitting, color, etc. I try to alternate a narrow pattern with a wide pattern. Pattern motifs that divide evenly into the 48 stitch width of the scarf are easiest to handle. So look for a chart with a repeat that is that is 12, 8, 6, 4, 3 or 2 stitches wide. But don't despair if you want to use a favorite pattern that does not work in evenly. (For example a 9 stitch repeat divides into the 48 five times with a remainder of 3 stitches.) You can spread the unused stitches out between the motif repeats or you can begin and end each scarf side with the extra stitches. So in the example of the 9 stitch pattern, begin each row with 2 stitches in the background color then do 5 repeats of the motif ending with an extra background stitch for 48 total. Move your marker and repeat for the second side of the scarf. Many designs work upside down or right side up, but some have a definite orientation. You don't want your scarf to have designs at one end that are definitely upside down. For this reason knit the first third of the scarf with the charts followed from bottom right to left and upwards as usual. As you approach the middle of the scarf use designs that have no up-down orientation, for example snowflakes. After you cross around to the other side and begin knitting down to the end of the scarf you will need to knit your patterns upside down for them to appear correctly orientated. This is easier than it sounds. Just turn the pattern book or page upside down and start knitting in the ‘new' lower right corner. Yarn management: I do a terrible job at this and usually end up with some snarling. Fortunately the rows are short. One thing to be certain of is that, when knitting color changes throughout the rows, you bring your background yarn up from below the other yarns and your primary yarn(s) over the top of the background yarn when you begin to knit in a different color. Another thing to remember is knit loosely! Some logistics: You don't really need to worry about long floats on the back of your knitting as it will all be encased inside the scarf. I do find that it helps to strand super long floats into the knitting because I don't want to inadvertently tighten up the fabric by tightening up on the float. So I still tack in the middle of a float that is 8-10 or more stitches long. Ditto for weaving in ends. Most ends can just be tied off in some fashion but not totally woven in. If there are a lot of ends in a single place you might want to manage them in a way that doesn't cause a lump. Visit my site at MaineStory.info Knit ME Something Warm & Cozy @ 2014 Pat Higgins Page 3
Popham Neck Warmer
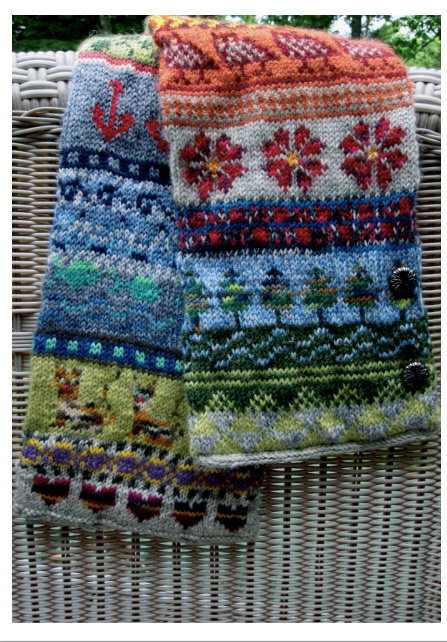
Finishing: When you think your neck warmer is long enough, try it on. The two ends should cross over your chest and throat with the ends lining up as shown in the pictures. You may find you wish to add another row or two or a whole design. When you are satisfied with the length you are ready to begin finishing the edges. First join the fronts and backs of each end of the scarf. Fold the scarf in half at the start and middle stitch markers. There should be 48 stitches on each side/needle. You can pull the excess cable out between the 48th and 49th stitch at the middle marker if using one needle. Move the stitches for the two sides down to the needle points and hold the two together in your left hand. Use a 3rd needle (I use a straight needle not a dpn) to join the two sides by sticking the point through the first stitch on the front needle and then the first stitch of the back needle (both ^as if to knit'). Knit this stitch by pulling your working yarn through the two stitches and letting them both fall off their needles. You now have one stitch on your third or working needle, and 47 on each of the other two needles points. Continue knitting each front stitch to its corresponding back stitch until you have used up all the stitches and have 48 newly joined stitches on your working needle. Do not break the yarn as you will use it as is to knit the i-cord. The starting end of the scarf will be done in the same way. Just pick up your stitches and remove the waste yarn. You can easily find other directions on how to do this on the internet. Look up three needle bind-off but be aware that you will not actually bind-off - ie. pass the first stitch on the working needle over the second stitch and so on until no stitches are left on any of the three needles. You will have just joined the 96 stitches into 48 stitches and closedtheend When it comes time to three-needle the second scarf end.be aware that you want the two ends to match. The 3 needle bind-off makes up with a smooth knit appearance on the right side and a pearled nubbly appearance on the wrong side. Make sure your ends match! The second step is the applied i-cord. Start on the beginning end of your knitting on the right side. Use two double point needles of the same size you used on your neck warmer. Remove 4 stitches at the working yarn end of the beginning of your knitting. Knit two rows of i-cord. This will allow you some ease to bend the i-cord around to run parallel to the edge. Knit the first 3 stitches of the third row of i-cord, slip the 4th stitch as if to knit to the working dpn. Now knit the next available stitch (the 5th stitch) from the needle containing the 3-needle-joined stitches. Pass the slipped stitch over this last stitch. Stitches should be snug but not tight. Continue all the way across in this manner until there are 4 stitches left. Knit 2 rows of unattached i-cord. Now 3 needle bind-off (on the back side) or graft, the 4 icord stitches to the 4 remaining stitches on the bind-off needle. Make the attached I-cord with buttonhole loops to accommodate a 1/2 to 5/8" button. Pick up your 4 i-cord stitches and begin as before. Apply 10 j cord stitches. \*On the next round K3 and slip one as usual. K2tog from the 3-needle bind-off stitches onto the working needle and pass the slip stitch over. Now knit 2 rows of i-cord plain without attaching to make room for the button. Then repeat the icord row with the K2tog at the attachment.\* Knit 14 rows of attached i-cord and repeat \*\* the buttonhole rounds. Finish the row as you did the other end of the scarf. Sew buttons on neck edge or the bottom edge of beginning end of the scarf to line up with button holes. See pictures.
Visit my site at MaineStory.info Knit ME Something Warm & Cozy @ 2014 Pat Higgins


