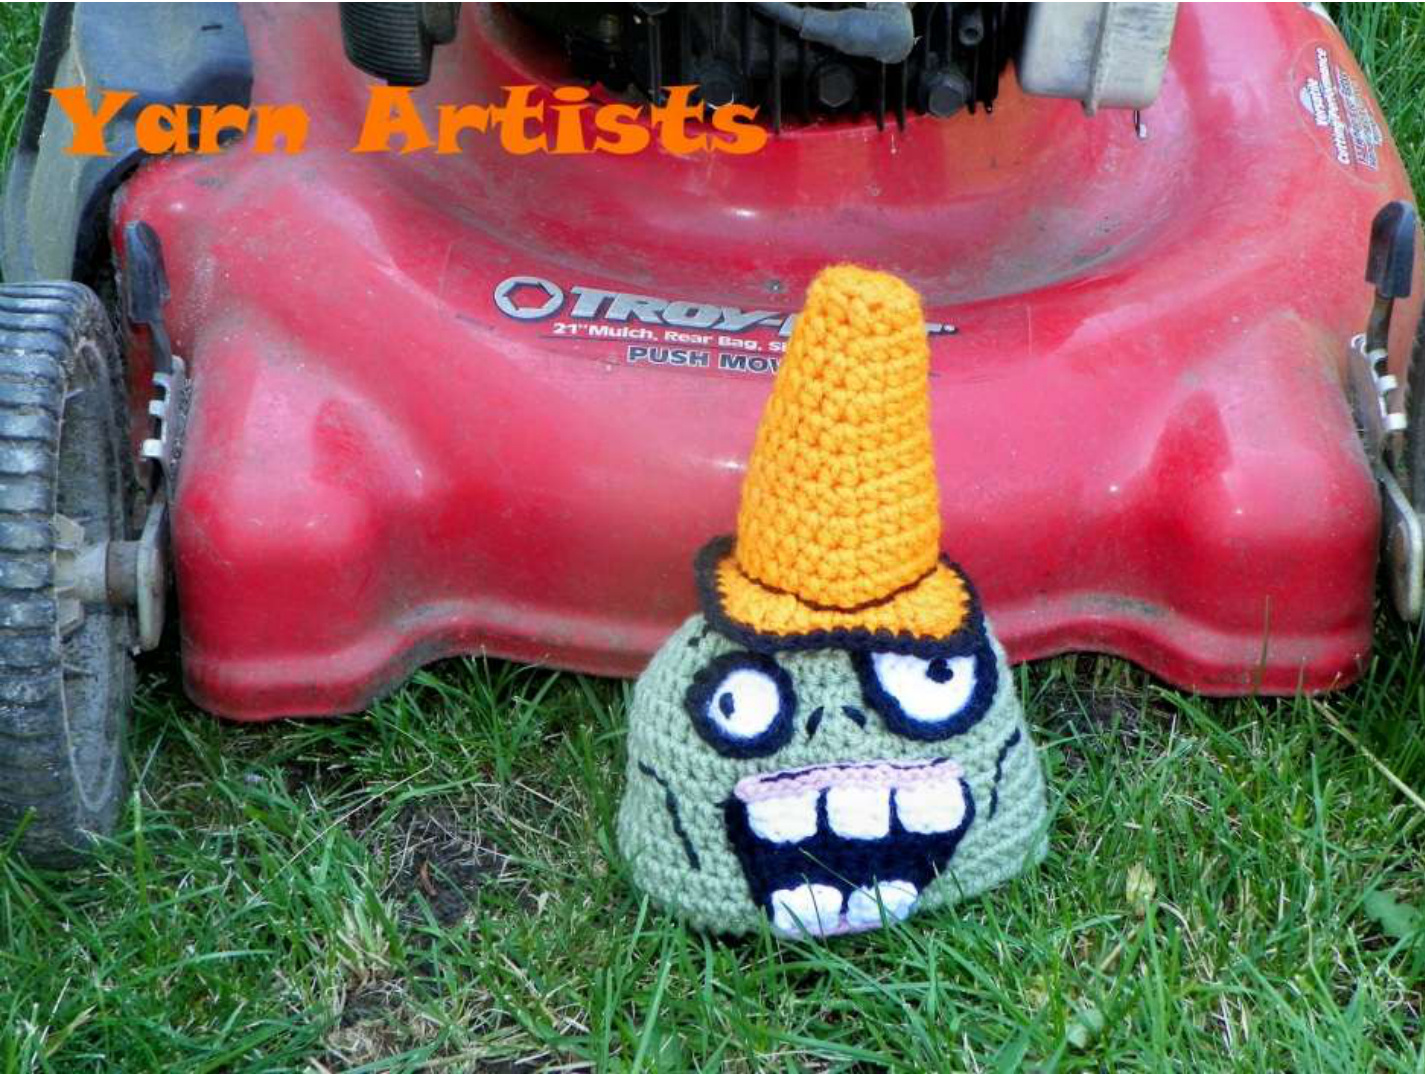
Conehead Zombie Hat Pattern By Yarn Artist Designs
Materials Needed:
1 ball of Frosty Green - Red Heart Yarn 1 ball of Pumpkin - Red Heart Yarn Small amount of White, Black, and Pink - Red Heart Yarn HHook I Hook YarnNeedle
Abbreviations:
st = stitch sts = stitches sc = single crochet hdc = half double crochet dc = double crochet BLO = back loops only FLO = front loops only sctog = single crochet two stitches together hdctog= half double crochet two stitches together dctog =double crochet two stitches together ch = chain sl st = slip stitch tc = triple crochet Notes: Throughout the pattern, Chain 1 will equal a single crochet. Chain 2 will be equal to a half double crochet. Chain 3 will be equal to a double crochet. I didn't work this hat in a continuous round, but can work yours in a round if you would like. Finish last row of hat with a few sc and a sl st, before making the reverse single crochets on the finishing round.
Stitch Gauge:
Using the H hook and worsted weight yarn: 7 hdc and 4 rows = 2” square The height of each stitch doesn't matter as much, you will continue to work the hat until you reach a certain length for each size. Use whatever hook needed to obtain this gauge on the hats. I went up a hook size to gain an inch in certain sizes, so you will also need to go up a hook size on those hats.
Finished Size:
Newborn - circum. 13"-14", hat height 6" 3-6 Months - circum. 14"-17", hat height 6.5"-7"" 6-12 Months - circum. 16"-19", hat height 7.5" 12-24 Months - circum. 18"-20", hat height 8" Child 3-10 years- circum. 19"-20.5" hat height 8.5" Teen - circum. 20.5"-22" hat height 9"-10" Adult - circum. 21.5"-22.5 hat height 9"-10" Hat Pattern Newborn: H Hook and Red Heart Frosty Green Yarn Ch 3, sl st to form ring Round 1: Ch 2, 6 hdc in ring, sl st to ch 2 (7) Round 2: Ch 2, hdc in same st, 2 hdc in each st around, sl st to ch 2 (14) Round 3: Ch 2, 2 hdc in next st, \*hdc in next st, 2 hdc in next stitch\* repeat from \* around, sl st to ch 2 (21) Round 4: Ch 2, hdc in next st, 2 hdc in next st, \*hdc in the next 2 sts, 2 hdc in the next\* repeat from \* around, sl st to ch 2 (28) Round 5: Ch 2, hdc in next 2 sts, 2 hdc in next st, \*hdc in the next 3 sts, 2 hdc in the next\* repeat from \* around, sl st to ch 2 (35) Round 6: Ch 2, hdc in the next 3 sts, 2 hdc in the next st, \*hdc in the next 4 sts, 2 hdc in the next\* repeat from \* around, sl st to ch 2 (42) Round 7: Ch 2, hdc in the next 4 sts, 2 hdc in the next st, \*hdc in the next 5 sts, 2 hdc in the next\* repeat from \* around, sl st to ch 2 (49) Round 8: Ch 2, hdc in each stitch around, sl st to ch 2 (49) Round 9: Repeat round 8 until the height of your hat measures 6" Finishing Round: Ch 1, reverse sc around, sl st into ch 1 (49) Fasten off and leave a long tail to weave into hat. Hat Pattern 3-6 Months: H Hook and Red Heart Frosty Green Yarn Ch 3, sl st to form ring Round 1: Ch 2, 7 hdc in ring, sl st to ch 2 (8) Round 2: Ch 2, hdc in same st, 2 hdc in each st around, sl st to ch 2 (16) Round 3: Ch 2, 2 hdc in next st, \*hdc in next st, 2 hdc in next stitch\* repeat from \* around, sl st to ch 2 (24) Round 4: Ch 2, hdc in next st, 2 hdc in next st, \*hdc in the next 2 sts, 2 hdc in the next\* repeat from \* around, sl st to ch 2 (32) Round 5: Ch 2, hdc in next 2 sts, 2 hdc in next st, \*hdc in the next 3 sts, 2 hdc in the next\* repeat from \* around, sl st to ch 2 (40) Round 6: Ch 2, hdc in the next 3 sts, 2 hdc in the next st, \*hdc in the next 4 sts, 2 hdc in the next\* repeat from \* around, sl st to ch 2 (48) Round 7: Ch 2, hdc in the next 4 sts, 2 hdc in the next st, \*hdc in the next 5 sts, 2 hdc in the next\* repeat from \* around, sl st to ch 2 (56) Round 8: Ch 2, hdc in each stitch around, sl st to ch 2 (56) Round 9: Repeat round 8 until the height of your hat measures 6.5"-7" Finishing Round: Ch 1, reverse sc around, sl st into ch 1 (56) Fasten off and leave a long tail to weave into hat. Hat Pattern 6-12 Months: H Hook and Red Heart Frosty Green Yarn Ch 3, sl st to form ring Round 1: Ch 2, 8 hdc in ring, sl st to ch 2 (9) Round 2: Ch 2, hdc in same st, 2 hdc in each st around, sl st to ch 2 (18) Round 3: Ch 2, 2 hdc in next st, \*hdc in next st, 2 hdc in next stitch\* repeat from \* around, sl st to ch 2 (27) Round 4: Ch 2, hdc in next st, 2 hdc in next st, \*hdc in the next 2 sts, 2 hdc in the next\* repeat from \* around, sl st to ch 2 (36) Round 5: Ch 2, hdc in next 2 sts, 2 hdc in next st, \*hdc in the next 3 sts, 2 hdc in the next\* repeat from \* around, sl st to ch 2 (45) Round 6: Ch 2, hdc in the next 3 sts, 2 hdc in the next st, \*hdc in the next 4 sts, 2 hdc in the next\* repeat from \* around, sl st to ch 2 (54) Round 7: Ch 2, hdc in the next 4 sts, 2 hdc in the next st, \*hdc in the next 5 sts, 2 hdc in the next\* repeat from \* around, sl st to ch 2 (63) Round 8: Ch 2, hdc in each stitch around, sl st to ch 2 (63) Round 9: Repeat round 8 until the height of your hat measures 7.5" Finishing Round: Ch 1, reverse sc around, sl st into ch 1 (63) Fasten off and leave a long tail to weave into hat. Hat Pattern for 12-24 Months: I Hook and Red Heart Frosty Green Yarn Ch 3, sl st to form ring Round 1: Ch 2, 8 hdc in ring, sl st to ch 2 (9) Round 2: Ch 2, hdc in same st, 2 hdc in each st around, sl st to ch 2 (18) Round 3: Ch 2, 2 hdc in next st, \*hdc in next st, 2 hdc in next stitch\* repeat from \* around, sl st to ch 2 (27) Round 4: Ch 2, hdc in next st, 2 hdc in next st, \*hdc in the next 2 sts, 2 hdc in the next\* repeat from \* around, sl st to ch 2 (36) Round 5: Ch 2, hdc in next 2 sts, 2 hdc in next st, \*hdc in the next 3 sts, 2 hdc in the next\* repeat from \* around, sl st to ch 2 (45) Round 6: Ch 2, hdc in the next 3 sts, 2 hdc in the next st, \*hdc in the next 4 sts, 2 hdc in the next\* repeat from \* around, sl st to ch 2 (54) Round 7: Ch 2, hdc in the next 4 sts, 2 hdc in the next st, \*hdc in the next 5 sts, 2 hdc in the next\* repeat from \* around, sl st to ch 2 (63) Round 8: Ch 2, hdc in each stitch around, sl st to ch 2 (63) Round 9: Repeat round 8 until the height of your hat measures 8" Finishing Round: Ch 1, reverse sc around, sl st into ch 1 (63) Fasten off and leave a long tail to weave into hat. Hat Pattern Child 3-10 Years: H Hook and Red Heart Frosty Green Yarn Ch 3, sl st to form ring Round 1: Ch 2, 9 hdc in ring, sl st to ch 2 (10) Round 2: Ch 2, hdc in same st, 2 hdc in each st around, sl st to ch 2 (20) Round 3: Ch 2, 2 hdc in next st, \*hdc in next st, 2 hdc in next stitch\* repeat from \* around, sl st to ch 2 (30) Round 4: Ch 2, hdc in next st, 2 hdc in next st, \*hdc in the next 2 sts, 2 hdc in the next\* repeat from \* around, sl st to ch 2 (40) Round 5: Ch 2, hdc in next 2 sts, 2 hdc in next st, \*hdc in the next 3 sts, 2 hdc in the next\* repeat from \* around, sl st to ch 2 (50) Round 6: Ch 2, hdc in the next 3 sts, 2 hdc in the next st, \*hdc in the next 4 sts, 2 hdc in the next\* repeat from \* around, sl st to ch 2 (60) Round 7: Ch 2, hdc in the next 4 sts, 2 hdc in the next st, \*hdc in the next 5 sts, 2 hdc in the next\* repeat from \* around, sl st to ch 2 (70) Round 8: Ch 2, hdc in each stitch around, sl st to ch 2 (70) Round 9: Repeat round 8 until the height of your hat measures 8.5" Finishing Round: Ch 1, reverse sc around, sl st into ch 1 (70) Fasten off and leave a long tail to weave into hat. Hat Pattern Teen: I Hook and Red Heart Frosty Green Yarn Ch 3, sl st to form ring Round 1: Ch 2, 9 hdc in ring, sl st to ch 2 (10) Round 2: Ch 2, hdc in same st, 2 hdc in each st around, sl st to ch 2 (20) Round 3: Ch 2, 2 hdc in next st, \*hdc in next st, 2 hdc in next stitch\* repeat from \* around, sl st to ch 2 (30) Round 4: Ch 2, hdc in next st, 2 hdc in next st, \*hdc in the next 2 sts, 2 hdc in the next\* repeat from \* around, sl st to ch 2 (40) Round 5: Ch 2, hdc in next 2 sts, 2 hdc in next st, \*hdc in the next 3 sts, 2 hdc in the next\* repeat from \* around, sl st to ch 2 (50) Round 6: Ch 2, hdc in the next 3 sts, 2 hdc in the next st, \*hdc in the next 4 sts, 2 hdc in the next\* repeat from \* around, sl st to ch 2 (60) Round 7: Ch 2, hdc in the next 4 sts, 2 hdc in the next st, \*hdc in the next 5 sts, 2 hdc in the next\* repeat from \* around, sl st to ch 2 (70) Round 8: Ch 2, hdc in each stitch around, sl st to ch 2 (70) Round 9: Repeat round 8 until the height of your hat measures 9"'-10" Finishing Round: Ch 1, reverse sc around, sl st into ch 1 (70) Fasten off and leave a long tail to weave into hat. Hat Pattern Adult: H Hook and Red Heart Frosty Green Yarn Ch 3, sl st to form ring Round 1: Ch 2, 10 hdc in ring, sl st to ch 2 (11) Round 2: Ch 2, hdc in same st, 2 hdc in each st around, sl st to ch 2 (22) Round 3: Ch 2, 2 hdc in next st, \*hdc in next st, 2 hdc in next stitch\* repeat from \* around, sl st to ch 2 (33) Round 4: Ch 2, hdc in next st, 2 hdc in next st, \*hdc in the next 2 sts, 2 hdc in the next\* repeat from \* around, sl st to ch 2 (44) Round 5: Ch 2, hdc in next 2 sts, 2 hdc in next st, \*hdc in the next 3 sts, 2 hdc in the next\* repeat from \* around, sl st to ch 2 (55) Round 6: Ch 2, hdc in the next 3 sts, 2 hdc in the next st, \*hdc in the next 4 sts, 2 hdc in the next\* repeat from \* around, sl st to ch 2 (66) Round 7: Ch 2, hdc in the next 4 sts, 2 hdc in the next st, \*hdc in the next 5 sts, 2 hdc in the next\* repeat from \* around, sl st to ch 2 (77) Round 8: Ch 2, hdc in each stitch around, sl st to ch 2 (77) Round 9: Repeat round 8 until the height of your hat measures 9"'-10" Finishing Round: Ch 1, reverse sc around, sl st into ch 1 (77) Fasten off and leave a long tail to weave into hat.
Time to add the face
Face for Adult/Teen/Child:
Larger Right Eye: H Hook Adult/Teen/ Child
Using white yarn, Ch 2. Round 1: Sc 6 in 2"d ch from hook Round 2: 2 sc in each st. (12) Round 3: 2 sc in each st. (24) Round 4: \*2 sc in next sc, 1 sc in next st. Rep from \* to first st in round (36) Round 5: Join black yarn, Sl st to first st. Ch. 1. In FLO, Sc around. (36) Fasten off. Leave a long tail for sewing. For the eye, make a French knot in the center with black for the pupil.
Smaller Left Eye: H Hook Adult/Teen/ Child
Using white yarn, Ch 2. Round 1: Sc 6 in 2"d ch from hook Round 2: 2 sc in each st. (12) Round 3: 2 sc in each st. (24) Round 4: Join black yarn, Sl st to first st. Ch. 1. In FLO, Sc in next 8 sts, Hdc in next 4 sts, Sc in next 8 sts, Hdc in next 4 sts. Sl st to first st. Fasten off. Leave a long tail for sewing. For the eye, make a French knot off to the left side (not quite center) with black for the pupil.
Mouth w/black: I hook for Teen/Adult; H Hook for Child
Row 1: Ch 15, hdc in the 3rd ch from hook, hdc in the next 12 sts, turn (14) Row 2: Ch 1, hdctog, hdc in next 8 sts, hdctog, sc, turn (12) Row 3: Ch 1, hdc in the next 8 sts, hdctog, sc, turn (11) Row 4: Ch 1, hdctog, hdc in the next 7 sts, sc, turn (9) Row 5: Ch 1, hdc in the next 8 sts, sc, turn (9) Row 6: Ch 1, hdctog, hdc in the next 4 sts, hdctog, sc, turn (7) Row 7: Ch 1, hdctog in next 4 sts, sc, turn (5) Sc around the mouth. At the top of mouth, sc 3 in each corner, when you come around to the bottom, only 1 sc in those corners, so that it curves a little more. Fasten off, weave in end.
Teeth- Make 5: I Hook Adult/Teen/ Child
Using White Yarn; Row 1:Ch. 3. Turn Sc in next 2 sts, Row 2:Ch. 1 Turn Sc in next 2 sts. Row 3:Ch 1. Turn. Sc in next 2 sts. Ch 1. Sc around three sides of the tooth. Fasten off. Leave long tail for sewing on to the mouth.
k Healthy Gums for the Undead : I Hook Adult/Teen/ Child
Top set of teeth (sl st together, follow instructions below) With Pink yarn, ch 1, sl st into one tooth, sl st two more times across top of tooth, ch 2, sl st in next tooth, sl st 2 more times across top of tooth, ch 2, sl st in last tooth on top, sl st 2 more times across top of that tooth, ch 1. (Fasten off. Leave a long tail to sew teeth to the top of the mouth.) Bottom set of teeth (sl st together, follow instructions below) With Pink yarn, ch 1, sl st into tooth, sl st 2 more times across top of tooth, ch 2, sl st in next tooth, sl st 2 more times across that tooth, ch 1. (Fasten off. Leave a long tail to sew teeth to bottom of the mouth.)
Face for Newborn to 24 Months:
Larger Right Eye: H Hook for Newborn-24 months Using white yarn, Ch 2. Round 1: Sc 6 in 2"d ch from hook Round 2: 2 sc in each st. (12) Round 3: 2 sc in each st. (24) Round 4: Join black yarn, Sl st to first st. Ch. 1. In FLO, Sc around. (24) Fasten off. Leave a long tail for sewing. For the eye, make a French knot in the center with black for the pupil.
Smaller Left Eye: H Hook for Newborn-24 months
Using white yarn, Ch 2. Round 1: Sc 6 in 2"d ch from hook Round 2: 2 sc in each st. (12) Round 3: Join black yarn, Sl st to first st. Ch. 1. In FLO, Sc in next 4 sts, Hdc in next 2 sts, Sc in next 4 sts, Hdc in next 2 sts. Sl st to first st. Fasten off. Leave a long tail for sewing. For the eye, make a French knot off to the left side (not quite center) with black for the pupil.
Mouth w/black for Newborn-24 months H hook
Row 1: Ch 12, hdc in the 3"d ch from hook, hdc in the next 9 sts, turn (11) Row 2: Ch 1, hdctog, hdc in next 5 sts, hdctog, sc, turn (9) Row 3: Ch 1, hdc in the next 5 sts, hdctog, sc, turn (8) Row 4: Ch 1, hdctog, hdc in the next 4 sts, sc, turn (6) Row 5: Ch 1, hdc in the next 5 sts, sc, turn (6) Sc around the mouth. At the top of mouth, sc 3 in each corner, when you come around to the bottom, only 1 sc in those corners, so that it curves a little more. Fasten off, weave in end.
Teeth- Make 5: H Hook for Newborn-24 months
Using white yarn: Rowl: Ch. 3. Turn Sc in next 2 sts, Row 2:Ch. 1 Turn Sc in next 2 sts. Row 3: Ch 1. Turn. Sc in next 2 sts. Ch 1. Sc around three sides of the tooth. Fasten off. Leave long tail for sewing on to the mouth.
Pink Healthy Gums for the Undead : H Hook for Newborn-24 months
Top set of teeth (sl st together, follow instructions below) With Pink yarn, ch 1, sl st into one tooth, sl st two more times across top of tooth, ch 2, sl st in next tooth, sl st 2 more times across top of tooth, ch 2, sl st in last tooth on top, sl st 2 more times across top of that tooth, ch 1. (Fasten off. Leave a long tail to sew teeth to the top of the mouth.) Bottom set of teeth (sl st together, follow instructions below) With Pink yarn, ch 1, sl st into tooth, sl st 2 more times across top of tooth, ch 2, sl st in next tooth, sl st 2 more times across that tooth, ch 1. (Fasten off. Leave a long tail to sew teeth to bottom of the mouth.)
Finishing the Face with Accents: Back Yarn and Yarn Needle:
Once you have sewn the teeth with gums onto the mouth and the 2 eyes, you can sew the face onto your hat. You can stray from the pattern and get creative. NO two zombies look the same!! They all have their own battle scars. Now, there are other accents which you can add to give your zombie face more expression. The cheekbones are backstitched
under the eyes and off to the sides of the mouth. They look sort of like 7's. The left cheekbone is a 7 and the right cheekbone is a backward 7 (See picture) Also there is a furrowed brow that gives him a discouraged look. Just backstitch two or three squiggly lines in the center of the Zombie's forehead. Between the eyes, add some nostrils. Just make 2 diagonal lines, one larger than the other. They will be closer at the top and spread out towards the bottom. (See picture).
Cone to Protect your Zombie's Head: H Hook (All sizes
Using two strands of pumpkin orange together, Ch 4. Sl1 st to make a circle. Round 1: Ch 2. Do 7 Hdc into the circle. Sl st to beginning. (8) Round 2: In BLO, Ch2. Hdc in the same st. Hdc in the next 3 sts. 2 hdc in the next st. Hdc in the next 3 sts. Sl st to beginning of round. (10) Round 3: In both loops, Ch2. Hdc in the same st. Hdc in the next 4 sts. 2 hdc in the next st. Hdc in the next 4 sts. Sl st to beginning of round. (12) Round 4: Ch2. Hdc in the same st. Hdc in the next 5 sts. 2 hdc in the next st. Hdc in the next 5 sts. Sl st to beginning of round. (14) Round 5: Ch2. Hdc in the same st. Hdc in the next 6 sts. 2 hdc in the next st. Hdc in the next 6 sts. Sl st to beginning of round. (16) Round 6: Ch2. Hdc in the same st. Hdc in the next 7 sts. 2 hdc in the next st. Hdc in the next 7 sts. Sl st to beginning of round. (18) Round 7: Ch2. Hdc in the same st. Hdc in the next 8 sts. 2 hdc in the next st. Hdc in the next 8 sts. Sl st to beginning of round. (20) Round 8: Ch2. Hdc in the same st. Hdc in the next 9 sts. 2 hdc in the next st. Hdc in the next 9 sts. Sl st to beginning of round. (22) Round 9: Ch2. Hdc in the same st. Hdc in the next 10 sts. 2 hdc in the next st. Hdc in the next 10 sts. Sl st to beginning of round. (24) Round 10: Ch2. Hdc in the same st. Hdc in the next 11 sts. 2 hdc in the next st. Hdc in the next 11 sts. Sl st to beginning of round. (26) Round 11: Ch2. Hdc in the same st. Hdc in the next 12 sts. 2 hdc in the next st. Hdc in the next 12 sts. Sl st to beginning of round. (28) FOR NEWBORN TO 24 MONTHS only STOP HERE!! (All other sizes...continue on) Round 12: In FLO, Ch 1. \*Hdc in next st, Dc in next st, and 3 tc in the “corner stitch . Dc in next st. Hdc in next st. Sc in the next two sts. Repeat from \* 3 times till you get back to the beginning. (36) Round 13: Change to Black: In both loops sc around the edge of the hat, work 2sc in each corner. Fasten off. Using black yarn and yarn needle, accent the bottom of the cone between rounds 11 and 12 by backstitching around the hat. Round 12: Ch2. Hdc in the same st. Hdc in the next 13 sts. 2 hdc in the next st. Hdc in the next 13 sts. Sl st to beginning of round. (30) Round 13: Ch2. Hdc in the same st. Hdc in the next 14 sts. 2 hdc in the next st. Hdc in the next 14 sts. Sl st to beginning of round. (32) Round 14: Ch2. Hdc in the same st. Hdc in the next 15 sts. 2 hdc in the next st. Hdc in the next 15 sts. Sl st to beginning of round. (34) Round 15: Ch2. Hdc in the same st. Hdc in the next 16 sts. 2 hdc in the next st. Hdc in the next 16 sts. Sl st to beginning of round. (36) Round 16: Ch2. Hdc in the same st. Hdc in the next 17 sts. 2 hdc in the next st. Hdc in the next 17 sts. Sl st to beginning of round. (38) Round 17: Ch2. Hdc in the same st. Hdc in the next 18 sts. 2 hdc in the next st. Hdc in the next 18 sts. Sl st to beginning of round. (40) Round 18: Ch2. Hdc in the same st. Hdc in the next 19 sts. 2 hdc in the next st. Hdc in the next 19 sts. Sl st to beginning of round. (42) Round 19: Ch2. Hdc in the same st. Hdc in the next 20 sts. 2 hdc in the next st. Hdc in the next 20 sts. Sl st to beginning of round. (44) Round 20: Ch2. Hdc in the same st. Hdc in the next 21 sts. 2 hdc in the next st. Hdc in the next 21 sts. Sl st to beginning of round. (46) Round 21: Ch2. Hdc in the same st. Hdc in the next 22 sts. 2 hdc in the next st. Hdc in the next 22 sts. Sl st to beginning of round. (48)
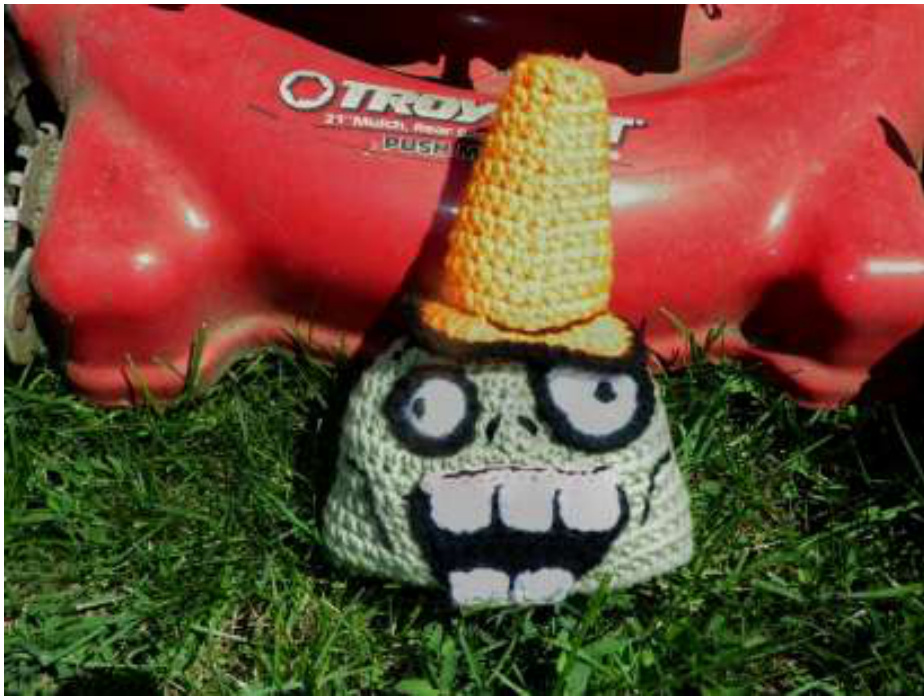
Finishing Adult/Teen/Child Hat
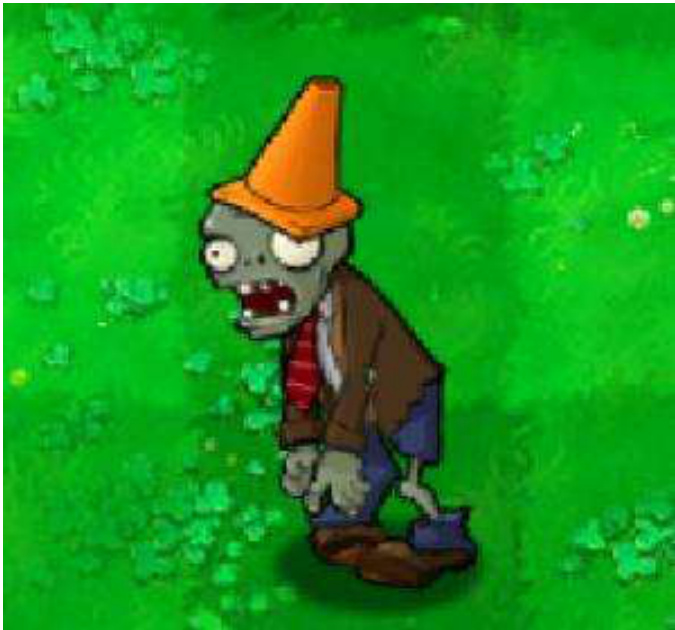
Round 22: In FLO, Ch 1. Sc in same hole. Sc in next 5 sts. \*2 hdc in next st. Sc in next 5 sts. Repeat to the beginning of round. (56) Round 23: In both loops, \*Hdc in next 3 sts, Dc in next st, and 3 tc in the “corner stitch" Dc in next st. Hdc in next 3 sts. Sc in the next five sts. Repeat from \* 3 times till you get back to the beginning. (64) Round 24: Change to Black: In both loops sc around the edge of the hat, work 2sc in each corner. Fasten off. Using black yarn and yarn needle, accent the bottom of the cone between rounds 21 and 22 by This was the inspirational picture behind this hat. Make sure to attach your hat a little off to the side, too We covered a lot with this pattern. I hope you had fun with it. Get your mowers out...so you can get those zombies before they get you...LOL.
@ Copyright Notice: You have permission to sell the finished product locally and online. Please mention Yarn Artists as the designer of the pattern. Rewriting, reselling, distributing, or copying this pattern isn't allowed. Thank you again for your purchase and have fun!


