
ants Vs Zombies Amigurumi Pattern
Materials needed:
Various colors of ww yarn like yellow, pumpkin, various shades of green,light brown, red, black, and dark red—depends on which amigurumi you will be making. A pair of scissors Yarn needle Size F (3.75) hook or size needed to get tight stitches in ww yarn, if the stitches are not tight the stuffing will show through Stitch markers Black safety eyes (9mm) Felt sheets in white and grey Fabric/Craft glue -I used this to make eye dots in all the ami's with felt eyes or/and teeth If you wish to make desktop versions of these, you will need sticks (l used lollipop sticks which I wrapped in yarn), small terra cotta pots and foam for inside pots. {Pic 1 at the top of the page shows them potted, the way I made them for the e-game swap—swamps42 my partner in the swap took the photo at the top.} Abbreviations PM = place marker Sc = single crochet dc = double crochet hdc = half double crochet trc = triple crochet Sc2tog = single crochet two together St = stitch Ch = chain
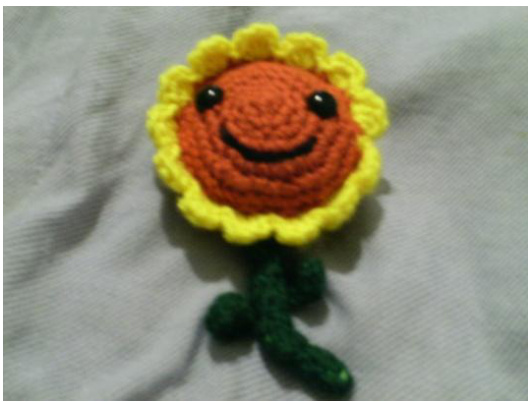
Sunflower
All of these plants are worked in the round, move marker up with each round to help keep your place. With pumpkin yarn for center of sunflower Ch 2, then make 5sc in the 2nd ch from the hook, Pm last sc made. 5sc Row 1: 2sc in each sc around. 10sc Row 2: Sc in each sc around. 10sc Row 3: 2sc in each sc around. 20sc Row 4: Sc in the next sc, 2sc in the next sc around. 30sc Row 5: Sc in the next 2sc, 2sc in the next sc around. 40sc Row 6&7: Sc in each sc around. 40sc End off. Make 2 centers. With yellow yarn pull up loop in any sc on the outside of one of the sunflower centers, {Sl st in first sc - hdc, 3dc,hdc in next sc - skip next sc - sl st in next sc} repeat from { to } around the flower—this will make 13 petals. End off and weave in all ends. Place black safety eyes (l used 15mm but use whatever you have) in center with the petals and add a stitched smile. Then sew the second center to back, stuffing firmly before sewing up all theway.
Plant Stem and Leaf
If you do not want put plants in a pot, like the second time I made these to be like real amigurumi because they were toys for my daughter. I designed a simple stem and leaves for use on any of the potted style plants that you don't want to put in a pot. For stem, with green yarn Ch 8 st, then sc in 2nd ch from hook and all the remaining chs (7sc), then ch1 turn. Row 1: Sc in each sc and then ch 1 turn. Row 2: Repeat row 2 until the strip measures 4 inches. Fold lengthwise wrong sides together and then stuff lightly and sew up ends—stitch to plant. For the leaf, Ch 6 and sc in 2nd ch from hook, then dc in next 2 ch, trc in next ch, dc in next ch and hdc in the last ch. End off and weave in ends. Make 2 or 3 and attach to Stem.
Jalapeno Pepper
For some reason I did not have a picture of just the jalapeno. With red yarn ch 2, 4 sc in the 2nd ch from the hook. 4sc Row 1: Sc in each sc around.4sc Row 2: Sc in next sc, 2 sc in the next sc around. 6sc Row 3-5: Sc in each sc around.6sc Row 6: 2sc in the next sc, sc in the next sc around. 9sc Row 7: Sc in each sc around. 9sc Row 8: 2sc in the next sc, sc in the next sc around. 14sc Row 9: Sc in each sc around.14sc. Row 10: 2sc in the next sc, sc in the next sc around. 21sc Row11-12: Sc in each sc around. 21sc Row 13: Sc in the next 2sc, sc2tog around. 14sc Row 14-15: Sc in each sc around. 14sc Row 16: Sc in the next 2sc, sc2tog around.11sc Row 17: Stuff jalapeno firmly and continue to sc in the next 2sc, sc2tog around until you have 6 sc left. End off and weave in ends and sew closed. For the top of the Jalapeno, ch 2, 6sc in the 2nd ch from the hook. Then 2sc in each sc around for 12sc total. Sl st in the first sc and end off. For stem, ch7, sc in the 2nd ch from hook and remaining ch for 6sc total. End off and sew to stem to circle and then to top of jalapeno. I used white felt for jalapeno face like one big circle and one little circle and a rounded off triangle for a mouth, I drew on details with a sharpie and used craft/fabric glue to attach it. Here you could also use safety eyes or stitch on details-choose whatever is easier for you. In the above picture I stitched all the details on.
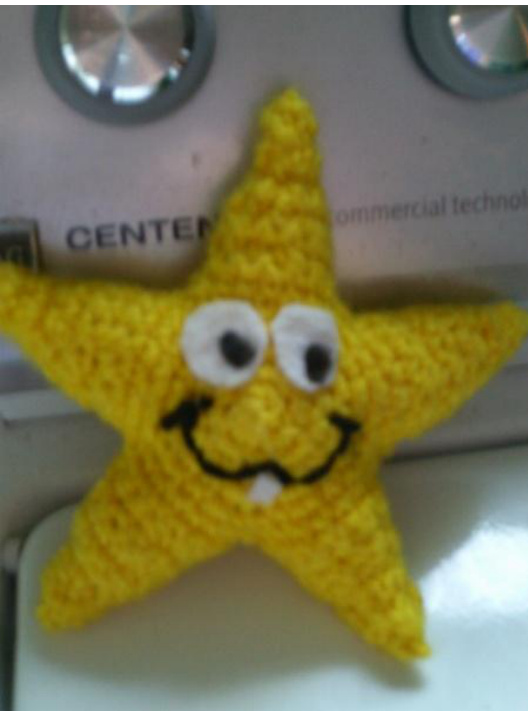
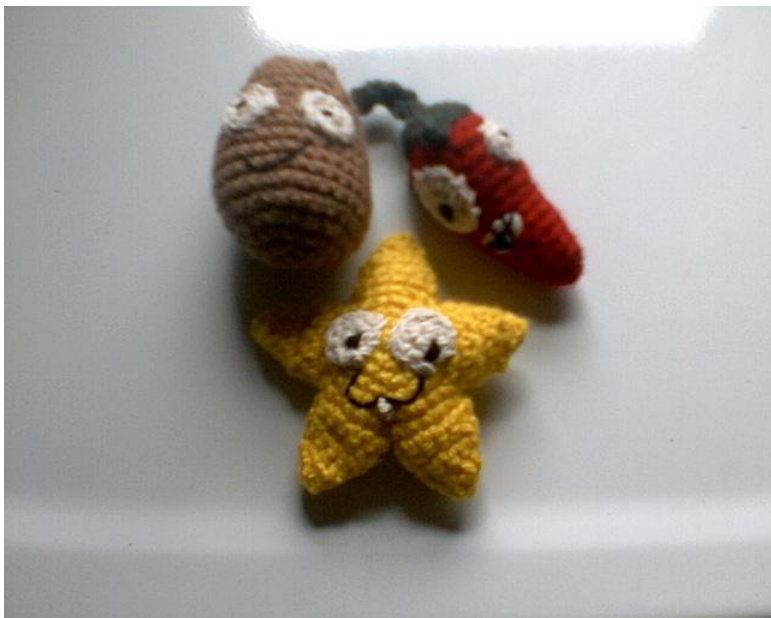
Star Fruit
Make 2 of these for Star fruit body with yellow yarn ch 2, 5 sc in the 2nd ch from the hook.5sc Row 1: 2sc in each sc around.10sc Row 2: Sc in next sc, 2sc in the next sc around. 15sc Row 3: Sc in next sc, 2sc in the next sc around.20sc Row4: 2 sc in each sc around.40sc For the first leg, sc in the next 8sc - ch 1 turn.8sc Leg Row 1: Sc2tog -sc in the next 4sc-sc2tog - ch 1 turn. 6sc Row 2: Sc in the next 2sc-sc2tog-sc in the next 2 sc - ch 1 turn. 5sc Row 3-4: Sc in the 5sc remaining - ch1 turn. 5sc Row 5: Sc2tog-sc in the next sc-sc2tog - Ch 1 turn. 3sc Row 6-7: Sc in each of 3 remaining sc - ch 1 turn. 3sc. Row 8: Sc2tog and sc in last sc, turn.2sc Row 9: Sc last 2 sc together and end off. Repeat leg section 4 more times, each time stating by sc in the next 8sc of the star fruit body. Repeat this process with both bodies and when both sides have 5 arms weave in ends, and sew together sewing shut while stuffing firmly. I used white felt and yarn to add details to this one, I used felt for the eyes and tooth and yarn for the mouth. I used a sharpie to dot the eyes. I glued them in place with fabric/craft glue.
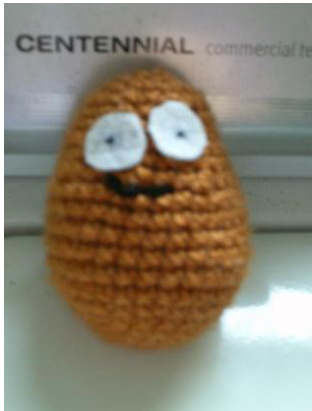
Wall Nut and Tall Nut
With light brown yarn, ch 2, 6 sc in the 2nd ch from the hook. 6sc. Row1: 2sc in each sc around. 12sc Row 2: Sc in the next 2sc, 2sc in the next sc around.16sc Row 3: Sc in each sc around. 16sc Row 4: Sc in the next 3sc, 2sc in next sc around. 20sc Row 5: Sc in each sc around. 20sc Row 6: Sc in next sc, 2 sc in the next sc around. 30sc. Row 7: Sc in each sc around.30sc. Row 8-12: Repeat row 7. 30sc Row 13: Sc in the next 2sc, sc2tog around. 24sc Row 14-15: Sc in each sc around. 24sc Row 16: Sc in the next 2sc, sc2tog around. 18sc Row17-18: Sc in each sc around.18sc Row 19: Sc in the next 2sc, sc2tog around.12sc Row 20: Stuff firmly and then sc in the next 2sc, sc2tog around. 6sc End off. I used white felt and a black sharpie for the eyes and black yarn for the mouth on this one. For the Tall -nut, with light brown yarn follow steps directions for the Wall nut to row 12, (repeating row 7---9 more times)-- that is 15 times total, then do rows 13- 20 of wall nut to finish tall nut. I used the same white felt and yarn to make the face on the tall nut.
Basic Large Peas
I used a basic large and basic small peashooter together to make a split pea, but you can use just the basic large and make a peashooter, gatlin pea, and repeater and make it blue to make a frozen pea shooter. You can use the basic small and make 3 to make a three-peater which is why I designed a basic large and small so that you can make whatever pea you want. With green yarn, ch 2, 6sc in the 2nd ch from the hook. 6sc Row 1: 2sc in each sc around. 12 sc Row 2: Sc in next 2sc, 2sc in the next sc around. 16sc Row 3: Sc in each sc around. 16sc Row 4: Sc in next 2sc, 2sc in the next sc around. 20sc Row5: Sc in each sc around. 20sc Row 6: Sc in next 2sc, 2sc in the next sc around. 25sc Row 7-8: Sc in each sc around. 25 sc Row 9: Sc in next 2sc, sc2tog around. 20 sc Row 10: Sc in next 2sc, sc2tog around. 16sc Row 11-12: Sc in each sc around. 16sc Row 13: Sc in next 2sc, 2sc in the next sc around. 20sc Row 14: Sc in each sc around. 20sc End off. Add black safety eyes (l used 9mm) now. For the mouth, with black yarn ch 2, 5sc in the 2nd ch from the hook. Row 1: 2sc in each sc around. 10sc Row 2: 2sc in each sc around. 20sc End off and sew to front mouth opening of pea, stuff firmly before sewing the last few stitches. Peas are all about the details the split pea is a peashooter and a repeater stuck together, the repeater has eyebrows, I stitched mine on with black yarn. A gatlin pea has dark marks under his eyes and a hat.
Basic Small Peas
With green yarn, ch 2, 6sc in the 2nd ch from the hook. 6sc Row 1: 2sc in each sc around. 12 sc Row 2: Sc in next 2sc, 2sc in the next sc around. 16sc Row 3: Sc in each sc around. 16sc Row 4: Sc in next 2sc, 2sc in the next sc around. 20sc Row5-7: Sc in each sc around. 20sc Row 8: Sc in next 2sc, sc2tog around. 16sc Row 9: Sc in next 2sc, sc2tog around.12sc Row 10: Sc in each sc around. 12sc Row 11: Sc in next 2sc, 2sc in the next sc around. 16sc : Sc in each sc around. 16sc. End off and place black safety eyes now. small pea mouth, with black yarn ch 2, 4sc in the 2"d ch from the hook. Row 1: 2sc in each sc around. 8sc Row 2: 2sc in each sc around. 16sc End off and sew black circle into mouth opening, stuff firmly before sewing up last few stitches.
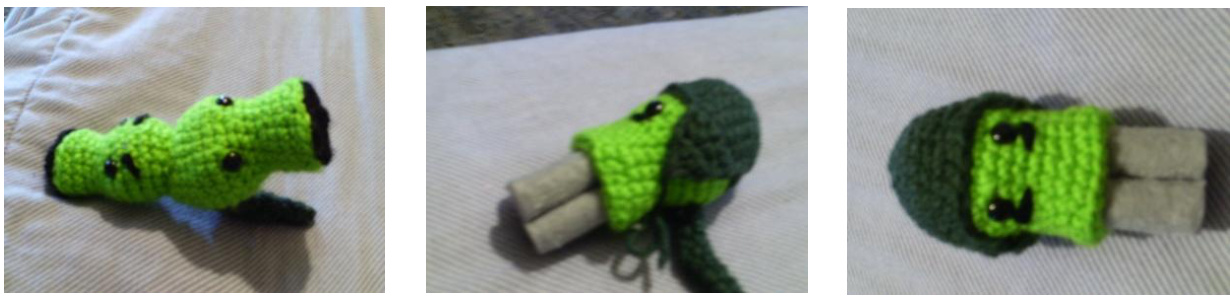
Gatlin Pea
For this pea make the large basic pea stuffing only the round head part, you will be putting 4 rolls of gray felt into the hole for shooters. For this I cut 4 felt rectangles that would stick out about an inch or so and glued them into tight rolls. I then glued the top 2 rolls to the bottom 2 and glued the inside of the mouth and inserted them into the opening. I used fabric/craft glue that takes overnight to dry completely but it is very sturdy, you could also crochet the tubes but they are small and I found it easier to use felt. For the Gatlin pea army hat, with dark green yarn ch 2, 6sc in the 2"d ch from the hook. 6sC Row 1: 2sc in each sc around. 12sc Row 2: Sc in next 2sc, 2sc in the next sc around. 16sc Row 3: Sc in the next 3sc, 2sc in the next sc around.20sc Row 4-5: Sc in each sc around. 20sc Row 6: Sc in next 2sc, 2sc in the next sc around. 24sc Row 7: Sc in each sc around. 24sc (for the flap) Ch 1 turn. Row 8: Sc in the next 5 sc-ch 1 turn.5sc Row 9: Sc2tog-sc in next sc-sc2tog-ch 1 turn. 3sc Row 10: Sc in each sc around-ch 1 turn. 3sc Row 11: Sc3tog and end off leaving a 3 inch tail for tying around head. For 2nd flap skip 7sc (so that you are on opposite side of hat) follow row 8 -11 for making the flap. Weave in ends and leaving flap strings to tie hat on the pea.
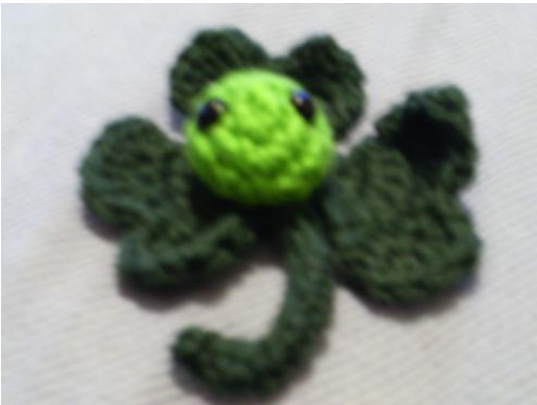
Blover
le center ball, with green yarn ch 2, 6sc in the 2nd ch from the hook. 6s Row 1: 2sc in each sc around. 12sc Row 2: Sc in the next 2 sc, 2 sc in the next sc around. 16sc Row 3: Sc in next 2 sc, sc2tog, until 6 sc remain, place black safety eyes, stuff and sew up. Putting 2 eyes in this small space is tricky so if you have some smaller than 9mm this is a good place to use them. Make 3 of these petals for the blover, with dark green yarn ch 2, 2sc in the 2nd ch from the hook-ch 1 turn. 2sc Row 1: Sc in both sc-ch 1 turn. 2sc Row 2: 2sc in each sc around-ch 1 turn. 4sc 3: Sc in the next sc, 2sc in the next 2 sc, sc in the last sc-ch 1 turn. 6sc Row 4: Sc in each sc around- ch 1 turn. 6sc 5: 2sc in the next sc, sc in the next 4 sc, 2sc in the last sc- ch 1 turn. 8: Row 6: Sc in first sc, 2hdc in next sc, dc trc dc in the next sc, sl st in the next 2sc, dc trc dc in next sc, 2hdc in next sc, sc in the last sc. End off and then sew all 3 to back of blover ball. I also made a stem for this plant, you could also add leaves if you wanted too.

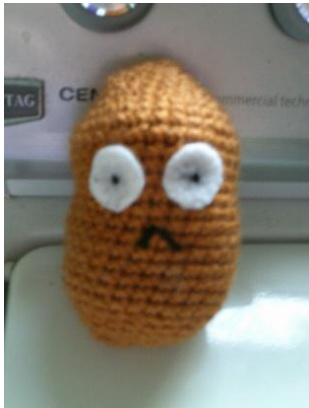
Basic Disembodied Zombie Head
With pale green yarn ch2, 6sc in the 2nd ch from hook. 6sc Row 1: 2sc in each sc around. 12sc Row 2: Sc in the next sc, 2sc in the next sc around.18sc Row 3: Sc in the next 2sc, 2sc in the next sc around. 24sc Row 4: Do uneven increase on this row until you have 32sc, example sc in 5 then 2 in next sc-—-then sc in 3 and then 2sc in the next sc, then sc in the next 6 or whatever and increase—the point is to be uneven so your zombie head is a little misshaped. 32sc Row 5-7: Sc in sc around. 32sc Row 8: Sc in the next 4sc, sc2tog around. 26sc Row 9: Sc in the next 14sc, then sc2tog 6 times,. 20sc Row 10: Hdc in the next 14 sc, sc in the last 6 sc. 20sc Row 11: Sc in each sc around. 20sc Row 12: Sc in the next 10sc, sc2tog 5 times. 15sc Row 13: Sc in the next 10sc, sc2tog 3 times. 12sc Row 14: Sc in each sc around and end off. Now using dark red yarn, Ch 6 turn and sc in the 2nd ch from hook and in the remaining ch. (5sc) then sc in the end and 5sc in the opposite side the ch and sc in the end12sc total. I used this color because it is intended to look like the inside if the zombie mouth. I cut 2 different size circles of white felt for eyes and little nips of it for the teeth, attached with craft glue. I stitch lines in for a nose and forehead wrinkles, and separated black yarn to leave random stray hair. For zombie accessories, I used a free amigurumi safety cone pattern But also a small bucket would be cute. Be Calm and Crochet On


