Slobber Soaker
Me: \*Hubbie, we need to get more bibs for Baby. He soaks 4 a day!" Hubbie: \*Why don't you knit Some?" Hubbie should know better than to challenge me to make something. When he would give me that look of, “I think you need a break from knitting," I could say, "You're the one who told me to knit!' Now, after about a week of trial and error
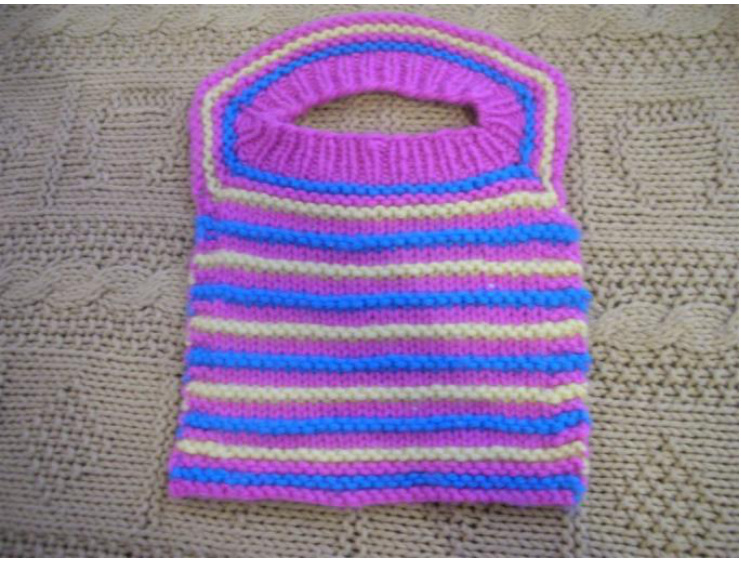
and 5 different bibs, I finally came up with a pattern I like that I am willing to share with the world. Not only does it look super cool, but it works great! No annoying snaps or Velcro to scratch the baby. It slips nicely over their head. If you use superwash wool or cotton, you can just throw it in with the laundry. If you use regular wool, just gently rub a little dish soap in it, rinse in cool water, and let dry on the dish rack. Wool has the great quality of retaining its warmth even when wet which is great for a slobber soaked bib. Unlike cotton, wool doesn't wick so even though the wool is wet, baby won't be. It knits up super quick for a last minute baby gift Best ofall, it takes very little yarn, so you can use up all those little bits of wool you have laying aro und just in case. \*Knowledge ofcircular knitting needed Materials: less than 1 skein worsted weight yarn, superwash wool is the best, acrylic works as well, can be 1-3 colors (or more !). $16^{\circ}$ circular needle US $\#8$ $(5\,\mathrm{mm})$ or size needed to obtain gauge. Gauge: 18 sts $\mathbf{\Deltax}\,28$ rows per 4' Size: Fits babies newborn through 18 months. Small (large) Customizing Instructions are on pg 3.
Neck section:
1. CO 50 sts (50) loosely. Join ina round being careful not to twist stitches. Place a marker to mark the beginning of the round (this marker will be called #1). 2. $^{*}\mathrm{K}1$ , pl; repeat from \* around. 3. Repeat step 2, until neck band measures 1". 4. K2, place $2^{\mathrm{st}}$ marker, k23, place $3^{\mathrm{nd}}$ marker, k2, place 4th marker, k23, beginning round marker becomes the $1^{\mathrm{st}}$ marker. 5. Kib in the first s, $^{*}\mathrm{k}$ tol st before $2^{\mathrm{nd}}$ marker, fb, slip marker, kfb,repeat from \* 3 times, knit to 1 st before $1^{\mathrm{st}}$ marker, kfb. Total of 8 increases each increase round. 6. Purl next round. 7. Repeat steps 5 and 6 until there are 27sts (29st) between the $2^{\mathrm{nd}}$ and $3^{\mathrm{rd}}$ marker. 8. Knit to $3^{\mathrm{rd}}$ marker,bndoffloselyall sttwee $3^{\mathrm{rd}}$ and the $4^{\mathrm{th}}$ markers, between $4^{\mathrm{th}}$ and $1^{\mathrm{st}}$ markers, and then between the $1^{\mathrm{{st}}}$ and $2^{\mathrm{nd}}$ markers. You will now be knitting the 27sts (29 sts) between the $2^{\mathrm{nd}}$ and $3^{\mathrm{rd}}$ markers, back and forth. For multi-colored striped bib work as follows\*:
Bib section:
Row 1: With B yarn, knit across. Row 2: Knit across. Row 3: With A yarn, knit across. Row 4: K3, purl to last 3 sts, k3. Row 5: With C yarn, knit across. Row 6: Knit across. Rows 7-8: repeat rows 3-4. Repeat these 8 rows until bib sections measures 4". Work 1 more inch with yarn A, pattern in garter st (knit only, no pur ling). \*you can work the bib in one color, just omit the color changing part. Feel free to experiment with different patterns/designs in the body of the bib. Have fun!
Customizing Instructions:
Bib can be worked in any size yarn. For custom bib, select desired yarn and knit a swatch larger than $4\mathrm{~x~}$ $4^{\circ}$ with recommended needle size (see yarn package). Measure how may stitches you knit in $4^{\,,}$ (or10 cm). Divide that number by 4 and you get how many stitches per inch (round to the nearest $^{1}\!/\!_{4}\!\!>$ ).This number we wil allG. A. G_ $^{*}11=.$ , round up to the nearest even number. Enter this number after A in the pattern. B. G_ $/2{=}$ C. B_ $\:2=\:$ .. Enter this number after C in the pattern. D. $\mathrm{G}^{\ast}\,6.25\mathrm{=}\phantom{}$ , round up to the nearest even number. Enter this number after D in the pattern.
Neck Section:
1. CO (A) loosely. Join in a round being careful notto twist stitches. Place a marker to mark the beginning of the round (this marker will be called #1). 2. $^{*}\mathrm{K}1$ , pl; repeat from \* around. 3. Repeat step 2, until neckband measures 1". 4. K2, place $2^{\mathrm{nd}}$ marker, knit (C), place $3^{\mathrm{rd}}$ marker, k2, knit (C),place $4^{\mathrm{th}}$ marker, knit to beginning. 5. Kfb in the first st, $\ast\mathbf{k}$ to1 st before $2^{\mathrm{nd}}$ marker, kfb, slip marker, kfb, repeat from $^*3$ times, knit to 1 st be fore $1^{\mathrm{{st}}}$ marker, kfb. Total of 8 increases each increase round. 6. Purl next round. 7. Repeat steps 5 and 6 until there are $\displaystyle(\mathrm{D}_{-})$ between the $2^{\mathrm{nd}}$ and $3^{\mathrm{rd}}$ marker. 8. Knit to $3^{\mathrm{rd}}$ marker, bind off loosely all sts between $3^{\mathrm{rd}}$ and the $4^{\mathrm{th}}$ markers, between $4^{\mathrm{th}}$ and $1^{\mathrm{{st}}}$ markers, and then between the $1^{\mathrm{{st}}}$ and $2^{\mathrm{nd}}$ markers. You will now be kniting the D ) sts between the $2^{\mathrm{nd}}$ and $3^{\mathrm{rd}}$ markers, back and forth. For multi-colored striped bib work as follows\* :
Bib Sections:
Work the same as above on $\mathtt{p g}\,2$
Custom Example:
+Example: My gauge is 25 sts per 4."\* $25/4\mathrm{{=}}\,6.25$ $\mathrm{G}\!=6.25$ Multiplied by 11 it is 68.75. The closest even number is 68 so I will CO 68 sts. Markers would be placed as follows: k2,marker, knit $68/2-2=32$ , marker, $_{\mathrm{k}2}$ , marker, k32, marker.


