Double Rolled Mittens
By Merrie Davidson (based on a technique described by Robin Hansen in her book, Favorite Mittens: Best Traditional Mitten Patterns from Fox and Geese and Fences and Flying Geese and Partridge Feet, Down East Books, (2005).
This is a super warm mitten, for cold winters (perfect for Minneapolis in 2010-2011 when it's been cold and snowy). Size isn't too important. The larger the mitten, the more body warmth there'll be to keep your hands warm! It's similar to thrummed mittens, but much less fussy to make. It has more roving on the inside, but it's also more compacted. If you use feltable (not superwash) wool for the roving, it will felt after wear and keep you even warmer. Size: Adult woman or man
Materials
Super Bulky Yarn \~95 yards. Suggested yarns: Malabrigo Rasta Roving \~ 3 ounces (Of course you can use batts or rolags, if you prefer. Top won't be as warm as roving, batts, or rolags.)
Needles
USsize8 USsize10 4 double pointed needles or 2 circular needles or 1 circular needle - 32-47 inches or 1 circular needle -8 inches If you using an 8 inch needle, you'll need double pointed needles for the tip of the mitten and the thumbs or size needed to obtain gauge Gauge te, with roving held behind, 9 stitches and 14 rows = 4inches/10 cm with larger needle: Basically, you weave in the roving like you do when you need to carry floats across a large number of stitches, as in 2-color, stranded knitting. If you do stranded, 2-color knitting - especially if you hold each color in separate hands - you should have no problem at all learning this. If you haven't knitted stranded, this will be an easy introduction to 12 of the technique. Especially if you haven't done 2-color knitting as describe above, I suggest you relax (ha ha) when you're starting and plan on your knitting to be your swatch. (I mean it's only 22 stitches. You can't make a smaller gauge swatch anyway.) If you have to pull out the knitting a few times for practice, do so. Just enjoy yourself and fel how soft and wonderful knitting with roving is. Links to videos made by other wonderful people: Preparing roving: http: //www.youtube.com/watch?v=rCPIczeciKk Weaving in roving/floats: http:/www.youtube.com/watch?v=mblEFDWNQyl
Cuff
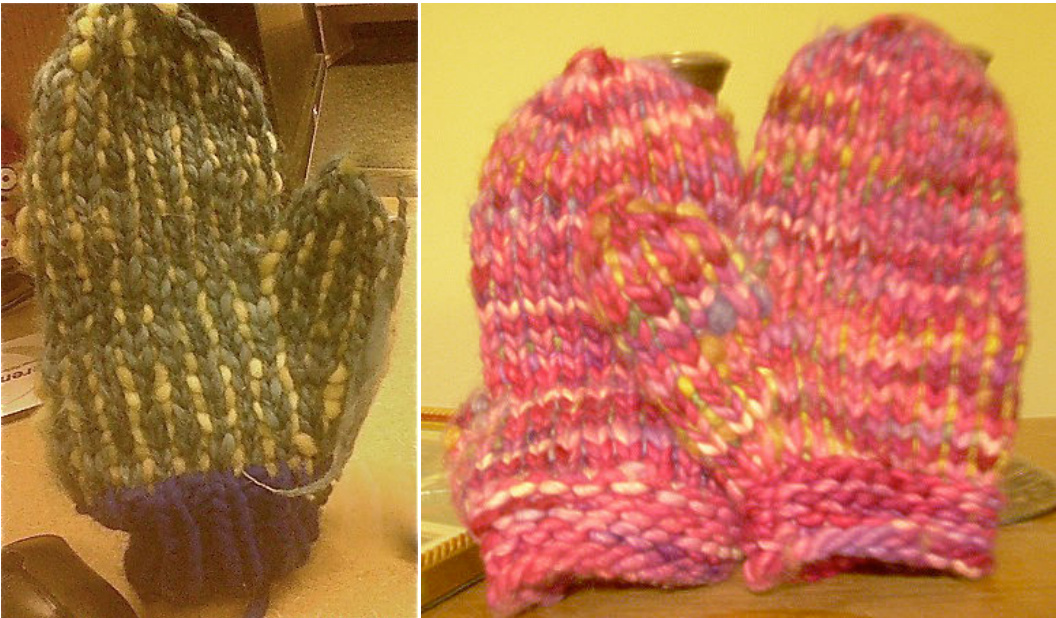
The cuff is knit without the roving. The blue-green mitten is made with a ribbed cuff. The pink 1s are made with a garter stitch cuff. Choose whichever you'd like or make up one of yol Ribbed Cuff: With smaller needles, cast on 26 stitches. Ribbing: Round 1: \* K1, P1 \* around Repeat round 1 for 10 rounds (or however long you'd like the cuff) Garter Stitch Cuff: With larger needles, cast on 20 stitches. Round 1: Knit Round 2: Purl Repeat these 2 rounds 3 more times (4 garter stitch bumps). Next Round: Knit
Preparing Roving
You can make a bunch of strips all at one time or make them as you need them for your mitten. I make them as I go along. Then I don't have to worry about them compressing as they wait for me to gettothem. Pull out a strip of about 12 inches of roving. If you bought your roving or processed it yourself a while ago, it's probably a little bit compressed. You want your roving to be light and airy. The lighter and airier your roving, the more warm air it can capture, and the warmer your mittens will be. Generally you'll want to split the roving in half lengthwise. Widen the roving by grabbing the roving on each side at on end and spread it apart, a little at a time. Move up the strip, spreading it sideways asyougo. Now, you're going to pullthe strip lengthwise, again a little bit at a time. You want your strip to be about an inch wide. Don't worry too much about how even it is all the way up. There will probably some areasthat arethicker thanothers. Here's a video that shows how to do it: http://www.youtube.com/watch?v=rCPIczecikk The teacher doesn't widen it. If your roving isn't too compressed, you don't have to. Hand Now we'll start weaving in the roving with the yarn. Robin Hansen, in her book, Favorite Mittens: Best Traditional Mitten Patterns from Fox and Geese and Fences and Flying Geese and Partridge Feet, says that she's tried figuring out how to do this if you knit continental (with your yarn in your left hand), but hasn't be able to do it. So, you'll need to throw your yarn with your right hand. I hardly ever think there are techniques that require a particular way of knitting. I'm hoping someone out there can figure this out. Anyway, here's how to do it, throwing with your right hand. Hold the yarn in your right hand and the roving in your left hand. First stitch: Knit your first stitch like you normally do. Second stitch: Start to knit the stitch, putting your needle into the loop on the left-hand needle. With your left hand, place the yarn OVER the right-hand needle. (For the first stitch, I generally wrap the roving around the needle, but you don't have to.) Throw the yarn around the right-hand needle and pull the yarn under the roving and through the loop on the left needle. Third stitch: Hold the roving UNDER the left-hand needle, and knit into the stitch normally, without catching the roving. Fourth stitch: Again, place the yarn OVER the left-hand needle, and knit the stitch like you did for the first one. Continue in this manner, placing the roving OVER the needle for one stitch and then UNDER the needle for the next stitch all the way around. Here's a video that shows you how to do this holding yarn in your left hand, instead of fiber. But you do it the same way. (You might want to just grab the roving, instead of holding it over your index finger.) http:/ /www.youtube.com/watch?v=mblEFDWNQyl If you look in the back, you'll see the yarn is being woven into the inside of the mitten. Round 1: K1, k2tog, k2, k2tog, k3, k2tog, k2, k2tog, k3, k2tog, k2, k2tog, k1 (20 stitches) Thumb Gusset Round 2: k1, pm, m1, k1, m1, pm, k18 (22 stitches) Rounds 3-4: knit around Round 5: k1, pm, m1, k3, m1, pm, k18 (24 stitches) Rounds 6-7: knit around Round 8: k1, pm, m1, k5, m1, pm, k18 (26 stitches) Rounds 9-10: knit around Round 11: k1, pm, m1, k7, m1, pm, k18 Round 11: (remove stitch markers in this round) Cast on 1 stitches using back cast on. Place 9 stitches on waste yarn. Knit around (20 stitches) Gussetcompleted Round 12: k1, Knit the 1 cast on stitches through the back, K18 (20 stitches) Rounds 13-28 (16 rounds or until the mitten reaches your little finger): Knit around. Begin Decreases Round 29: (k1, SSK, K4, K2tog, k1 ), 2 times (16 stitches) Round 30: Knit around. Round 31: (K1, SSK, K2, K2tog, K1) 2 times (12 stitches) Round 32: Knit around Round 31: (K1, SSK, K2tog, K1) 1 times (8 stitches) Round 32: Knit around Cut yarn, thread yarn through stitches and weave into the mitten.
Thumb
You are going to pick up stitches from the waste yarn, 2 side stitches, and the 1 cast on stitches (that you added when you placed the stitches on the waste yarn). Weave in the roving as you cast on stitches. Set up: Round 1: Pick up 9 stitches from the waste yarn. Pick up a stitch on the side of the yarn (between the live stitches and the cast on stitches.) Pick up the 1 cast on stitch. Pick up a stitch on the side of the thumb. You have a total of 12 stitches on your needle. Round 2: K8, SSK, K2tog. (10 stitches) Rounds 2-7: Knit around (or until it covers your thumb.) Round 8: (K2tog, K1) 2 times, K2tog twice. (6 stitches) Round 9: K2tog 3 times (3 stitches) Cut yarn and weave into the thumb.


