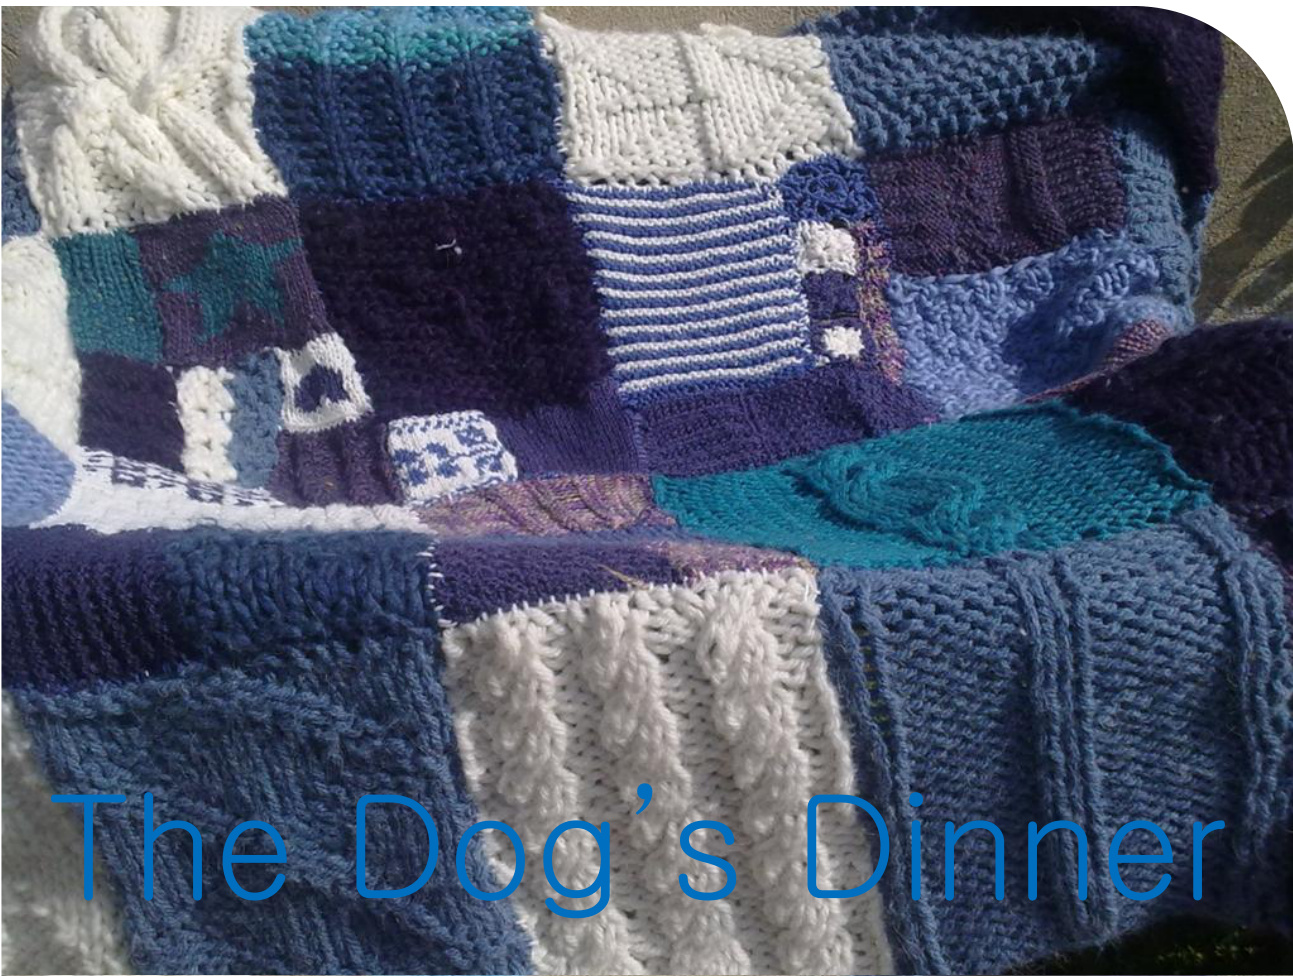
Introduction I have knitted on and off - badly - and in a very limited way since I was a child. The time came, when after knitting a million garter stitch scarves I thought I would learn to do more. But I couldn't conceive of knitting a hat, let alone a jumper - what did all those abbreviations in the patterns mean anyway? So I got a few books from the library and started to knit a few flat swatches of different stitches, learning what the abbreviations meant as I went and as a new stitch called for a new technique. I started off with just the combinations of knit and purl stitches with just a couple of different rows to the pattern. As I gained confidence I then moved onto then more complicated gansey patterns and then on to try every technique from cabling, slip-stitching, fair-isle to intarsia. After just a few bits I was hooked and realised I couldn't throw all my beautiful samples away. I had to do something with them. This was the birth of the dog's dinner - a recipe that is ideal for any beginner knitter to work their way through some new techniques in a painless way. This is a free pattern, and unlike my paid-for patterns has not been test knitted or edited. Nor does it give yarn and gauge requirements or contain explanations for every technique. This is a chatty first person description of what I did rather than what you get in my paid for patterns, which is exact instructions to create a replica piece. In any case the nature of this project is that you find your own way, researching new techniques as you go, and make something totally unique that You love. Make it with whatever yarn you like in the colours that speak to you and to a size that will be useful toyou. Skiu Level:
Beginner
Skily requireol: If you can knit and purl, cast on and off, then you can start. The aim is to try a new stitch pattern on every square. Some squares could also use techniques new to you - such as cabling or colourwork. Neeouey. I used 9mm ( Us 13 )for super chunky yarns, 5/6mm (us 8/10) needles for the aran yarns and 4mm needles for the DK/sport yarns. Oh yes, there is also a really dodgy bit of crochet on a 5mm hook Gauge is not critical on this project as every sample will be different. There are a few techniques to get a similar size on each sample though and these are explained below This list is not exhaustive as my afghan was made using scraps and bits too!: Sirdar Big Softie Sirdar Indie Wendy Serenity The recipe This blanket is made mostly of super chunky weight yarn. Super chunky yarn knits up to make an expanse of fabric really fast and means that this project won't take you forever even if you are still quite a slow knitter (most of us pick up speed as we practice). Using super chunky I could make a new section in an evening easily, even when I was still really slow at working out how to work a new stitch pattern. Most satisfying. But as you'll notice, I also used scraps of thinner yarns too to give the piece some texture and variety, but this meant thinking a bit more when I sewed it together (see below). Essentially you can use any amount of any colour and any weight of yarn you choose. But it will be an easier option to use all the same weight.
Resourcey
You will need a good stitch library website or a book. Free online stitch dictionaries include: http://www.knittingfool.com http://www.knittingpatterncentral.com/directory/stitches.php http://www.vogueknitting.com/resources/stitchionary.aspx Method 1. Choose a stitch pattern. Unless you are very adventurous, start with stitches that are knit and purl combinations and have a small number of stitches in the repeat and a small number of rows in the repeat. All stitch patterns work on a given number of stitches, which will be given in the stitch instructions. This might be something like “multiples of 4" or "multiples of 4 +2", which in the latter case means you need to cast on a number divisible by 4 and then add 2 more stitches. Stitch patterns may also be the same every row, or have different instructions for each row of the pattern and therefore need to be worked over a certain number of rows if you want to complete the pattern. If you want to know more about how to understand the instructions for stitch patterns , read this article:
http://www.dummies.com/how-to/content/reading-stitch-patterns-for-knitting.html
2. Cast on and knit a reference shape. Cast on a number of stitches that works for your chosen stitch pattern and looks about the width you want for each panel of the afghan. Knit until you have about the length you want and cast off (for my dimensions see the section on sizing below). If you want an exact size you will need to measure the piece after knitting a few repeats of the pattern and see how many stitches there are to the inch (or cm) and then adjust your stitch count accordingly. This is called creating a gauge swatch and is a useful skill for when you want to make things that need to be an exact size (like garments). Often knitters will even wash a gauge swatch as the size can change a bit after washing. I didn't bother with this for this piece as I was happy with an irregular look. 3. Repeat with your next stitch pattern. You can use stitch patterns that have exactly the same number of cast on stitches which will give you approximately - but not exactly - the same size piece, adjust the number of cast on stitches by doing a quick gauge swatch, or just create a patchwork of all different sized pieces which will need piecing together at the end. I used a 17 stitch wide panel as my reference so I looked for stitch patterns that could fit into this - or one stitch either side (i.e. 16 or 18 wide). I never counted the number of rows - I just held a new piece up against my reference panel to see if it seemed long enough, allowing a row for the cast-off. Some useful facty about how knitting behavey ·Bear in mind that some kinds of stitch patterns pull in along the width to a greater extent -- cable patterns in particular. A rule of thumb is to add 1 or two stitches to your piece for every 4 stitches in your cable to keep the width the same as a non-cabled piece of knitting the same number of stitcheswide. Some stitch patterns curl at the edges, others lay flat. If you want the edges of your blanket all neat and flat, research patterns that lie flat to go around the edge. You can sew the curling patterns into the middle where they will held flat. Garter stitch, moss stitch, seed stitch, half linen stitch and basketweave are all easy stitches that lie flat. If you want to find out why certain patterns curl, so that you can decide which ones to use read this article: http://techknitting.blogspot.co.uk/2007/03/mysteries-of-knitting-part-1-tale-of.html Some of the stitch patterny I useod : Where I have been able to find similar patterns to those I used online I have provided a link - most comprehensive stitch dictionaries will also contain variations of these classic stitches. Knit and purl combinations:
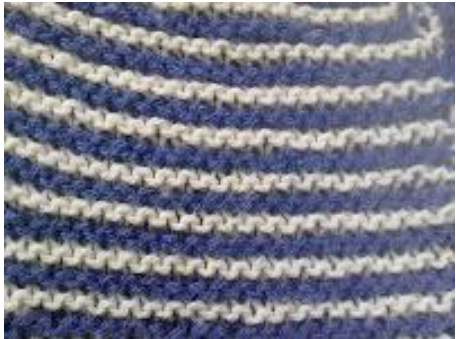
Garter stitch stripes (http://www.dummies.com/how-to/content/how-to-knit-colored-stripes.html)
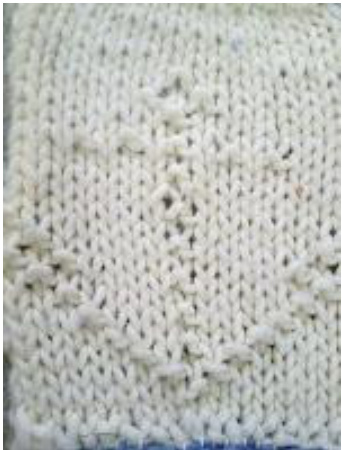
Chevrons (http://www.knittingfool.com/Stitchlndex/StitchDetail.aspx?StitchID=119)
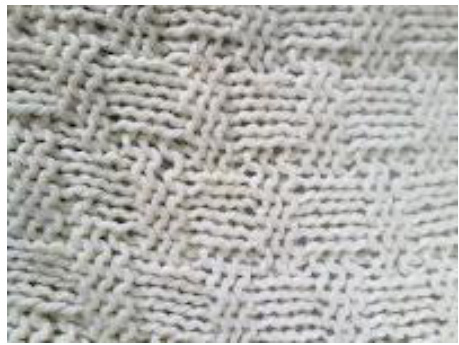
Basketweave (http://www.knittingfool.com/Stitchlndex/StitchDetail.aspx?StitchlD=201
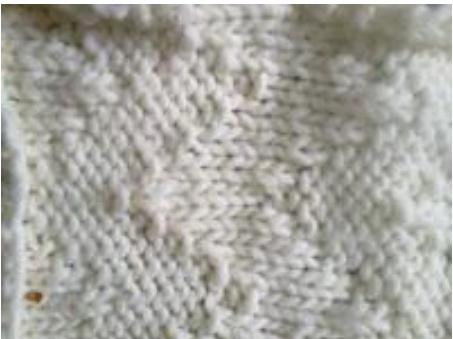
Gansey anchor pattern More knit purl combinations: moss stitch: http://www.knittingfool.com/Stitchlndex/StitchDetail.aspx?StitchlD=85 stockinette stitch: http://www.knittingfool.com/Stitchlndex/StitchDetail.aspx?StitchlD=167 ·seed stitch: http://www.knittingfool.com/Stitchlndex/StitchDetail.aspx?StitchlD=84 2x2 rib: http://www.dummies.com/how-to/content/how-to-rib-stitch.html Cable patterns: 3 x 4 stitch cables: http://www.dummies.com/how-to/content/knitting-cables.html 1 x 6 stitch cable: http://www.dummies.com/how-to/content/knitting-cables.html braided cable: http://www.dummies.com/how-to/content/how-to-knit-a-braid-cable.html 1 x 12 stitch cable: http://www.dummies.com/how-to/content/knitting-cables.html basic open cable: http://www.dummies.com/how-to/content/how-to-knit-an-opencable.html Nautical cable: http://www.knittingfool.com/Stitchlndex/StitchDetail.aspx?StitchlD=1703 Textured and bobble stitches rosette stitch: http://knitpurlhunter.com/blog/?p=1181 tweed stitch: http://newstitchaday.com/how-to-knit-the-tweed-stitch star stitch: http://www.theweeklystitch.com/2011/07/star-stitch.html basic bobble stitch http://newstitchaday.com/?s=bobble+stitch Intarsia and stranded colour work rectangles stranded colour pattern heart pattern Sizing My reference panel was about 20 cm wide by 25 long so I decided to make my blanket six of these panels by four so I made up 24 in total, although some of these were in turn made up of smaller swatches . This was enough to wrap around one adult comfortably. You can make your reference panel any size and make the blanket up of any number of panels to make anything from the dog's blanket to a bedspread. Leave nice long ends of yarns each panel to sew them together with. Colour anod design Why should the dog care? But if you do...I went with a basic two colour design of blue and cream but in pretty much any shade of blue I liked from pale to darkest blue although all soft toned blues. I added just a couple of highlights of jade green and a couple of bits of multicoloured yarn, which had a blue running through it to tie it in. Other options that should work harmoniously \* One colour in every shade of that colour \* Multi-coloured but using the same depth of tone (so pastels or clashing rainbow brights) \* Monochromes - black, white and all shades of grey \*Any single colour with white/cream or black/grey
Constructing:
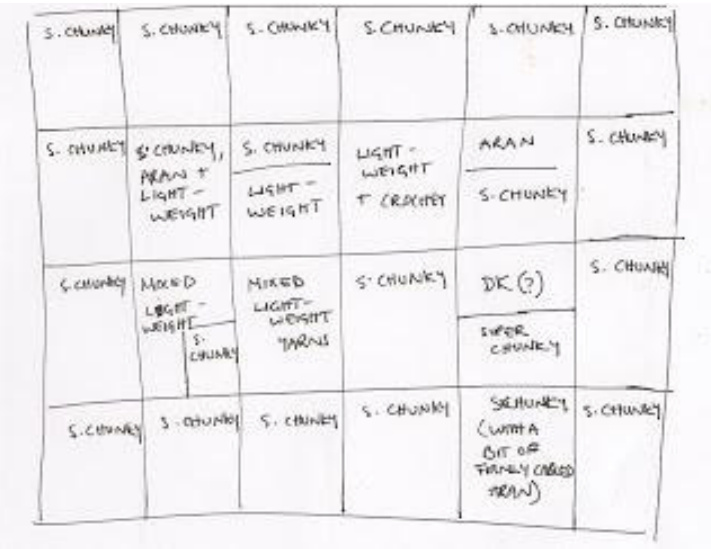
One thing I was thinking about of during the project was that your "normal" pattern doesn't really use wools of different weights in the same piece. I was concerned that the weight of the chunky panels would pull on the finer fabrics and distort them. Also I didn't want the edges to feel thin. So I decided to make sure that the patchwork panels of smaller stuff were in the middle surrounded by chunky panels, and separated by them as much as I could. I added chunky bits to the edges of some of the panels so that where two thinner panels were adjacent they had some thicker bits to hold them together. This also had the effect of blocking some of the lace stitch bits and tighter patterns because they were stretched to fit the adjacent panels. After some years of continuous family use, this seems to be holding up OK. Obviously if you use allthe same weight of wool you won't have this problem. Also I tried, whilst deciding where to place each panel, to put those that had come out narrower next to those that had come out wider to even out the sizing. I simply sewed every panel together with blanket stitch using the end yarns where I had left them long enough and wove in the ends. Blanket stitch gave a very rustic and obvious join that I was looking for on my blanket. For more invisible joins try mattress stitch. There is also knack to weaving in neatly so that the ends don't come put again (have a look at some you-tube tutorials for various techniques such as duplicate stitch). It can also be good to do this a bit at a time as you go because it is a long old job if you are doing a big piece. Below is a plan of how I put the pieces together (by weight of wool)
Using this pattern & queries This pattern is for personal use only. I have any queries please feel free to contact me through Ravelry. My username is lizjuk.


