Godmother's Socks
Supplies: Yarn: 80grams/340 yds. fingering-weight yarn (also called “very fine") I recommend a light, solid or semi-solid color; I used Tonal Apricot in “Wool Socks for Summer? bamboo-blend by “Some Assembly Required" [OPTION: use $^{16+}$ grams contrasting/coordinating solid color for lace portion only] Needles: size US $1\;\%\:(2.5\;\mathrm{mm})$ , or size that gets you the desired gauge: EITHER one or two circular needles and 2 same-size dpns, OR 4 or 5 dpns. Notions: yarn needle for darning in ends, about $18^{\circ}$ of smooth scrap yarn in fingering-weight for a provisional cast-on, and crochet hook in appropriate size range (about $2\cdot2.5\;\mathrm{mm}$ ) for provisional CO.
Gauge:
8.5 stitches and 11 rounds per inch over stockinette stitch 10 stitches and 11 rounds per inch over k3-p1 rib, unstretched If you use a looser gauge or thicker yarn, you'll get a larger sock. Size: to fit foot $8\;3/4^{\circ}{\mathrm{-}}\;9\;1/4^{\circ}$ long, 8"” around knuckles, 9" instep, or thereabouts
Construction Notes:
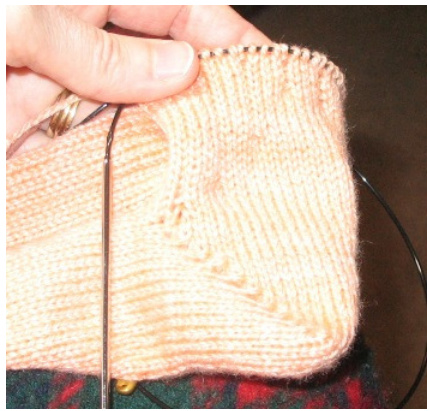
These anklet socks are worked toe-up, with what Nancy Bush calls a “flat toe'” and a short-row heel. The increases begin right away in the first round after the cast-on, to prevent little “ears" at the corners. K3-p1 ribbing begins very soon thereafter, extending from the toe, over the instep, and into and up the cuff. Then, instead of casting-off, the cuff is topped with a sideways lace edging. I have written the instructions for Magic Loop, but using 2 circs translates directly, and dpns can certainly be used with a little mental juggling. Tip for nice even ribs: Often when knitting ribs, the last k before the p is wider than its neighbors. To counteract this, ry giving the working yarn a little extra pull while your RH ndl is positioned $*_{\mathrm{in^{*}}}$ the first purl st and you're about to wrap the yarn.
Abbreviations:
$\mathrm{{Dpn}(s)=0}$ double-pointed needle(s) Dec $=$ decrease Inc $=$ increase $\mathrm{LH=}$ left hand $\mathrm{W}\mathbf{S}=$ wrong side $\mathrm{RH}=$ right hand $\mathbf{RS}=$ right side $\mathrm{K}2\mathrm{tog}=\mathrm{kni}$ t two together . $\mathrm{k}3\mathrm{tog}=\mathrm{knit}$ three together ${\mathrm{Kfb}}={\mathrm{knit}}$ into the front and then the back of the next stitch $\mathrm{Kbf=knit}$ into the back and then the front of the next stitch, for use with twisted sts $\mathrm{Ndl}=$ needle $\mathbf{Rd}(\mathbf{s})=$ round(s) Ret $=$ return a stitch to the LH needle, without twisting it $\mathbf{Ret}(\mathbf{tw})=$ return a stitch to LH needle twisted, by inserting left needle's tip into the front of the stitch from right to left and pulling the stitch off the right needle (actually we will be doing this to untwist a stitch that is backwards on the needle) $\mathsf{S l}(\mathbf{k})=$ slip as if to knit $\mathrm{{Sl}}({\mathfrak{p}})=$ slip as if to purl $\mathrm{St}(\mathrm{s})=$ stitch(es) $\mathrm{SSK=Sl(k)}$ , sl(k), insert LH needle tip into fronts of these 2 sts from L to R and k2tog $\mathrm{SSSK=}$ same as above, but slipping 3 stitches individually instead of 2 $\mathrm{SSP=Sl(k)}$ , $\mathrm{sl}(\mathbf{k})$ , ret 2 one-at-a-time, p2tog by taking the RH needle tip behind, entering the back of the 2 loops from left to right, and purling them together from that position ${\boldsymbol{\mathrm{SSSP}}}=$ same procedure as SSP, but with 3 sts instead of 2 $\mathrm{YO}=$ yarn over, bringing yarn between needle tips and over RH ndl from front to back $\mathrm{{bYO=}}$ backward YO, bringing yarn over RH ndl from back to front
Special Techniques and References:
Godmother's Edging - Barbara Walker's A Second Treasury of Knitting Patterns, p. 361. Judy's Magic Cast-On - http://www.knitty.com/ISSUEspring06/FEATmagiccaston.html http:/ /youtube.com/watch?v=lhBISoAhhQY (with a slight variation) Kitchener stitch/Grafting of garter stitchhttp://www.youtube.com/watch?v=YxEec2W6UcI (my own demonstration) http://www.knitty.com/issuesummer04/FEATtheresasum04.html Provisional cast-on - http://www.youtube.com/watch?v=aqWfea8oOH8 (my own demonstration) http://www.knitty.com/issuewinter02/FEATtiptoptoes.html (also short-row toe/heel here) Short-row heel - Priscilla Gibson-Roberts' Simple Socks: Plain & Fancy, pp. 39-42. My own, 3-part demonstration of this technique may be viewed on YouTube: Part 1: http://www.youtube.com/watch?v=OttSoJoa4nU (starting & turning) Part 2: http://www.youtube.com/watch?v=mZCtOPmi204 (middle, more turning) Part 3: http://www.youtube.com/watch?v=CjwvMu2TN3A (completing) http://knitty.com/ISSUEwinter02/FEATtiptoptoes.html http://nonaknits.typepad.com/nonaknits/2005/04/yarn_over_short.html Instructions: Leaving a taillong enough to darn in later, Cast on 20 stitches (10 sts on each ndl using Judy's Magic Cast On as detailed in the knitty article listed above.
Toe:
Rd 1: An increase rd. (Kfb in $1^{\mathrm{{st}}}$ st, k7, kfb, k1) on first needle. Stitches on $2^{\mathrm{nd}}$ ndl are twisted and will require special handling, so kbf, k7tbl, kbf, kltbl -- 24 sts (12 each ndl) Rd 2: Inc at 4 points again, by kfb in $1^{\mathrm{st}}$ and penultimate (second-to-last) sts on each ndl. Rd 3: Repeat rd 2, increasing 4 more stitches. -- 32 sts (16 on each ndl) Rd 4: Before you begin, count sts to be sure you have 16 sts on each ndl. If not, add some compensating incs where needed. Otherwise, if all is well, work this round EVEN. Rd 5: Another inc rd., like rd 2. -- 36 sts (18 on each ndl) $1^{\mathrm{st}}$ $(\mathsf{k}3,\mathsf{p}1)\mathsf{x}4$ $_{\mathrm{k}2}$ Rd 6: Begin instep pattern stitch, working ndl thusly: , end .Keep solendl(s) in plain stockinette stitch. No incs on this rd. Continue alternating inc rds and even rds until you have... -- 64 sts (32 on each ndl). Gradually convert more knits to purls on the instep, keeping the k3-p1 rhythm, as sufficient sts become available at each side. However, don't purl a $1^{\mathrm{st}}$ ,last, or penultimate st, as this will interfere with your inc line. Wait to purl them until they're away from the edge or you're done with increasing.
Rd 20: Check that all is well. You should have 32 sts on each ndl, and the instep ndl should read: k2, p1, $(\mathbf{k}3,\mathbf{p}1)\mathbf{x}7,$ k1. If you have too few sts, rd 21 will be the place to make any compensating incs. If you have too many, it would be better (IMO) to go back and undo an inc in an earlier rd than to dec at this point. You have now completed the toe-shaping, and we'll proceed to the foot proper.
Foot:
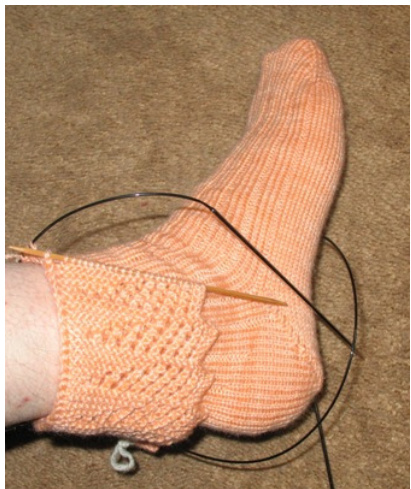
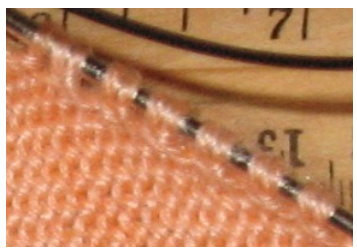
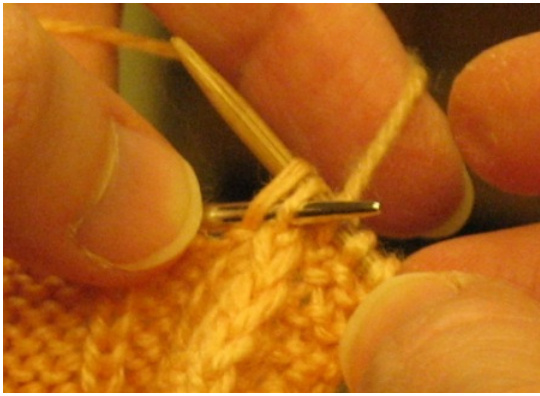
Work even for 55 more rds (75 total), until sock measures $6\,\%^{\,\circ}$ Begin short-row heel shaping, using the 32 sts on the sole ndl. [You may wish to switch to dpns for this portion of the pattern. I usually do. Also, I find photos to be very helpful guidance for new techniques; I highly recommend you check out one or more of the tutorials listed above as links in the References section.] The following directions for turning the heel I adapt from Simple Socks: Plain & Fancy by Priscilla Gibson-Roberts. Heel: (Demonstration videos available on YouTube. Links are on page 2.) [This section uses a lot of abbreviations - keep p.2 Abbreviations section handy.] 1. Knit across all but the last st on the bottom ndl; i.e., k31. Turn. 2. Purl-side WS) facing,bYO and p30, stopping ne st before the end of the ndl. Tun. 3. RS facing, YO and ${\bf k}29$ , one st fewer than before, stopping when you get to the paired st/YO of the previous row. [Check the book or a tutorial to see how to recognize this point. Pretty crucial. You can see some “pairs"' in the small inset photo, below.] Turn. 4. Continue this process: YO (or bYO if on WS) at the beginning of each row, end row by working one st fewer than before, stopping at the paired st/YO of the previous row.
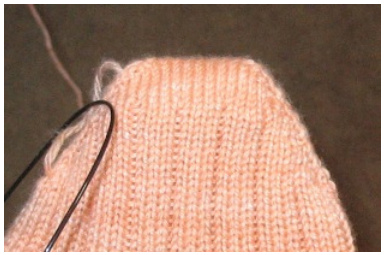
between the YOs. The last turn should bring the RS facing. YO and work up to the first available YO at the far side. Adjust the stitch mount of the YO by Sl(p), ret(tw). Then k2tog, joining the YO with the next st on the LH ndl. This will divide that next st/YO pair, leaving a YO as the next st on the LH ndl. Turn. 6. WS facing, bYO and purl to the first available YO on the far side of the sole. Join this YO with the next st on LH ndl with an SSP. Turn. 7. RS facing, YO and knit to the first available YO on the far side. The next 2 loops on LH ndl are both YOs. $\operatorname{Sl}({\mathfrak{p}})\times2$ , ret(tw)x2 [one st at a time], k3tog, joining the 2 YOs with the next st on LH ndl. Turn. 8. WS facing, bYO and purl to the first available YO on the far side. The next 2 loops on LH ndl are YOs. Join these with the next st on LH ndl with an SSSP. Turn. 9. Continue in this manner until all the YOs of the heel-back have been consumed in the decs of the heel-base. When you're about done there should be a single YO at each end of the heel ndl(s). On the last turn, the RS will be facing you. YO and knit across the heel ndl(s) to the YO ending the far side. [see Note] Move this YO to the instep ndl. Begin that ndl with a k2tog dec that joins the YO with the first st. Work across the instep ndl in pattern, pausing before the last st. [see Note] Place the YO that's ahead of you on the heel ndl onto the instep ndl, and join the final instep st with this YO using an SSK dec. Be sure that you have the proper stitch mounts on both of the decs. Heel is now complete. [Note: The final dec on the heel may appear to gape, the sts having loosened while you were working the heel. To close the gap during this row/round, pick up one st in the gap and place it on the instep ndl before moving the YO. Then include the new st in your dec by working SSK instead of SSK, and/or k3tog instead of k2tog.]
Ankle:
You are now back to working in the round. Keeping the ribbing steady on the instep ndl, begin convering the back of the cuff into ${\tt k}3{\tt-p}1$ as follows:
Rds 1-4 -- K2, p1, k across to last 2 sts on back ndl, end p1, k1.[4 rounds] Rds 5-9 -- K2, p1, (k3, p1), k 19, (p1, k3), pl, k1. [5 rds] Rds 10-15 -- K2, pl, (k3, pl)x2, k11, (pl, k3)x2, pl, kl. [6 rds] Rds 16+ -- K2, p1, (k3, p1)x7, p1, k1 across back and front ndls. Both ndls should now be the same, and you should see k3- p1 ribbing smoothly encircling the entire sock.
Cuff:
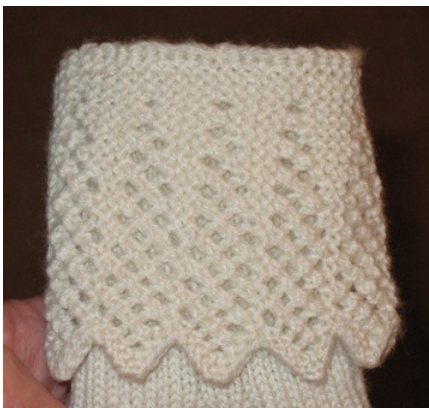
Work around in k3-p1 for 35 more rds, just over $3^{\circ}$ [Option for using a second color for the lace portion: work the last round of the cuff in the new color.] Edging: (Demonstration videos on YouTube; see Links on page 2.) Get out an empty dpn in the same size you're using for the cuff. With $18^{\circ}{-}20^{\circ}$ or so of fingering-weight scrap yarn and a compatible crochet hook, provisionally cast on 24 sts over the dpn.(http://www.youtube.com/watch?v=aqWfea8oOH8) We'll be using this to attach a sideways edging around the top of the sock cuff, the back side of the sock first, in the direction opposite to how you've been working up to now. You may notice that I avoid calling either side the “right side" or “"wrong side” - that's because the way you knit the edging is different from the lace's orientation when you wear the sock. So, in hopes of avoiding confusion, I call the rows by the direction you knit: either “"outward-bound" or “inward-bound", depending on whether you are knitting out away from or in toward the sock body. Godmother's Edging: Row 1 (outbound) - Sl(p), k3, (YO, k2tog)x7, YO, k2. Rows 2, 4, 6, and 8 (inbound) - Knit to last lace-st, SSK (or SSSK) together with next one (or two) sock-cuff sts. [Note in pattern tells which dec to use when] Row 3 - Sl(p), k6, (YO, k2tog)x6, YO, k2. Row 5 - S1(p), k9, (YO, k2tog)x5, YO, k2. Row 7 - Sl(p), k12, (YO, k2tog)x4, YO, k2. Row 9 - S1(p), k23. Row 10 (RS) - Bind off 4 sts, k18, SSK or SSSK to join to sock. Repeat Rows 1 - 10. Key: $1=\mathrm{Knit}$ on “outward-bound"” rows (odd # rows go out from sock, read char R-to-L) $-=\mathrm{Knit}$ on “inward-bound"’ rows (even # rows go toward sock, read chart L-to-R) $\mathbf{\Sigma}^{\bigcirc}=\mathbf{\Sigma}\mathbf{Y}$ arn over
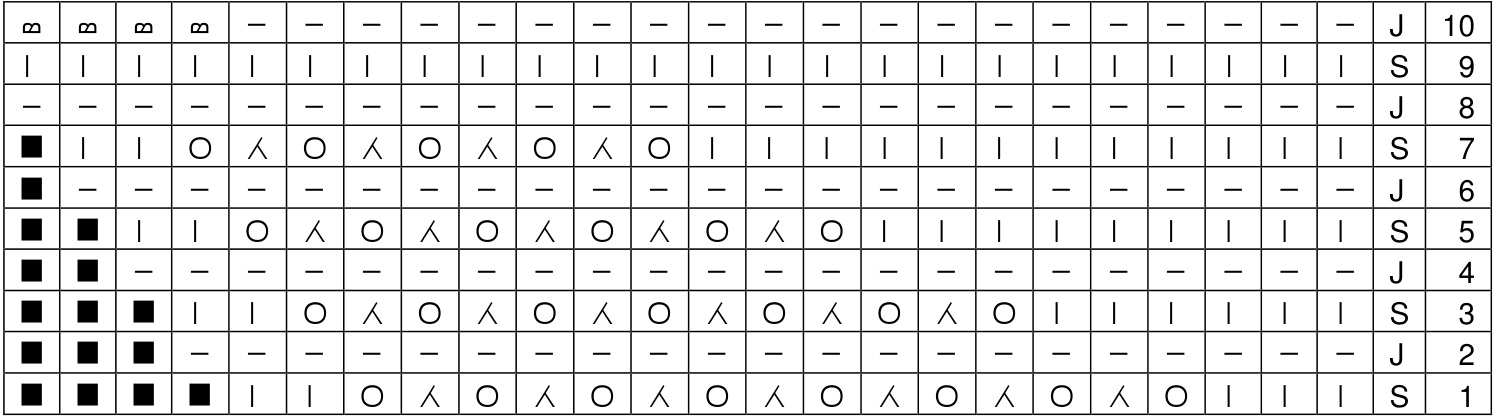
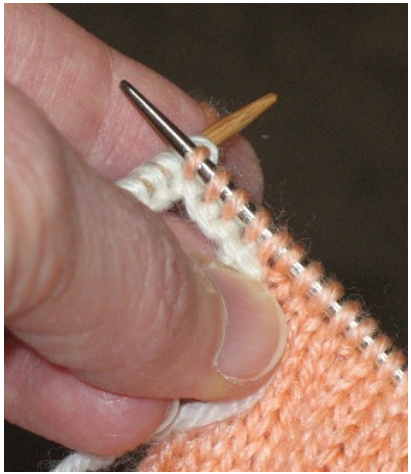
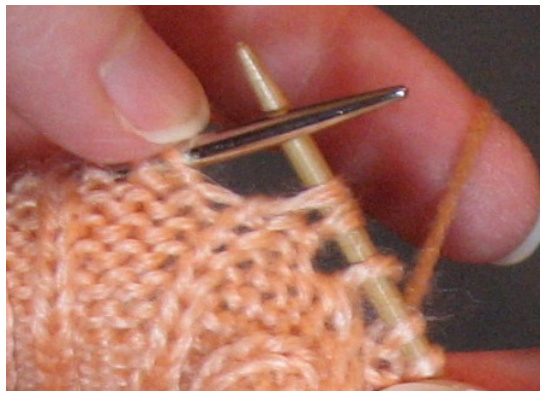
$\infty=\mathrm{Bind}$ off this stitch $\mathrm{S}=\mathrm{Slip}$ as if to purl, with yarn in front $\mathbf{\partial}=\mathbf{No}$ stitch here yet $\mathbf{J}=$ Join lace edge to sock, with either SSK or SSSK Getting this edging started can be the most challenging part. Look closely at the left photo. See the working yarn coming from the right-most st on the metal needle? That's the last stitch you worked on the sock cuff. See all the purl stitches below that needle? That's the inside of your sock cuff. We're about to start working back the way we came, attaching the edging one (or two) sts at a time. The photo at right shows this step from the outside of the sock-cuff. Insert your sock needle into the first of your provisional cast-on stitches. With your same working yarn, start knitting “upward’ or "outward” along the dpn, away from the sock. Knit 24. Turn. (Video demo of this is here:
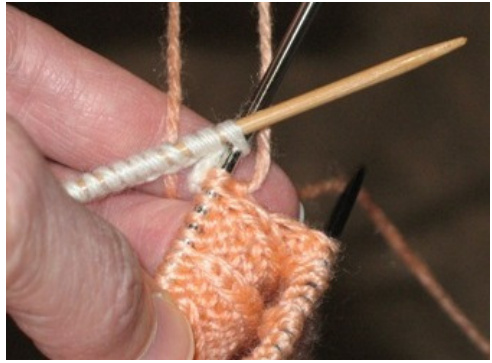
http://www.youtube.com/watch?v=HKUQrnSOj9Q Work Row 10 back “down" the dpn toward the sock, as follows: Bind off 4 sts, k18, SSK, uniting this last lace st on dpn with one st from the sock. [See photo, left]
Turn the whole thing around. With yarn in front, Sl(p) the first st, move the yarn to the back, and continue to work the lace pattern beginning with Row 1. On odd rows, you'll be looking at the outside of your cuff and working awav from the sock. On even rows. you'll be seeing the inside of your sock-cuff and working toward the sock, ending with a dec to join the edging to the cuff. \*Important\* -- about which dec/join to use: On even rows, where you join the lace and cuff, you'll be looking at the WS of the sock's ribbing. It should look like p3-k1, with single columns of knit sts standing out from a purl background. Every time (except the very first time) you come to $a$ last $p$ before a $k$ , and are ready to join the lace to the sock, Slip(k) 3 sts instead of 2, [See photo, right.] being the last st of the lace and the next 2 sts of the sock cuff, both the purl and the knit sts. Now SSSK. This rhythm will match up the row and stitch gauges of the two pieces you are joining.
Continue to work the edging around the cuff. The last row you work should be a Row 7. Unzip or unpick your provisional cast-on, slipping the freed-up loops onto a second dpn. Cut your working yarn, leaving $18^{\circ}$ or so of tail to use for grafting and darning in. Graft the 2 ends of the lace edging together. (Demonstration video: http://www.youtube.com/watch?v=YxEec2W6UcI ) Adjust tension of your sts after you've finished grafting. Cleverly darn in all ends.
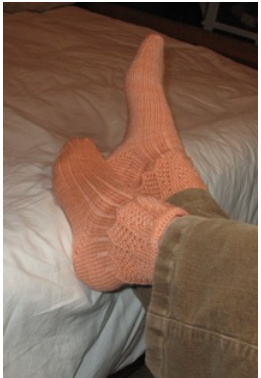
Done! (Ta-da! Good for you!)
Styling/Blocking:
After finishing, you may wish to wet block the lace portion to stretch it out. The cuff will hang just fine without stretching, but if you want to try for a different drape, and if your yarn has enough natural-fiber-content to hold to a stretch when dry, you can wet/wash the sock (or just the cuff portion), stretch out the lace, and lay it out flat on a towel to dry. For maximum stretch, you'll want to pin the lace out with rustproof pins, one at each point and a few along the join with the ribbing. Tip for dpn users for making the edging-knitting more manageable, thanks to Laurie in Maine: slip/work your last round of cuff onto 1 or 2 circular needles, instead of dpns. The added flexibility of the cord makes the bi-directional knitting/attaching go more smoothly.
Sizing Options:
For higher insteps, invisibly add a few pairs of stitches (either at the sock sides or center of the sole, in the plain stockinette areas) before you get to the heel, work the heel on half of the new total of sts, then decrease back down to 64 after heel-shaping is done. Perhaps hide the decreases in the new purl columns as you begin the ankle rib patterning. Adjusting the overall size of this pattern, particularly in the upper leg, is a bit difficult. The math gets pretty tricky, especially at the top where you join on the edging and have to consider stitch-multiples and row-multiples, horizontal and vertical gauges, and matching them all up. If you want a larger or smaller sock, please read on.
Variation 1: Change width by changing gauge.
The original pattern is worked over 64 stitches at 8.5 sts/inch in stockinette, and fits a foot from $8^{\prime\prime}–9^{\prime\prime}$ around. If, however you use yarn and needles that give you a different gauge, the same 64 stitches in the pattern will yield a different circumference to your finished sock and that sock will therefore fit a different size of foot. You can then add or leave out rounds of length, to fit. It's the width that takes some arithmetic to figure. Here's a table of possible gauges (measured in stitches per inch over stockinette) matched with foot sizes (measured in inches around the widest part of the foot). The sock will be much more snug on the upper end of each width range.
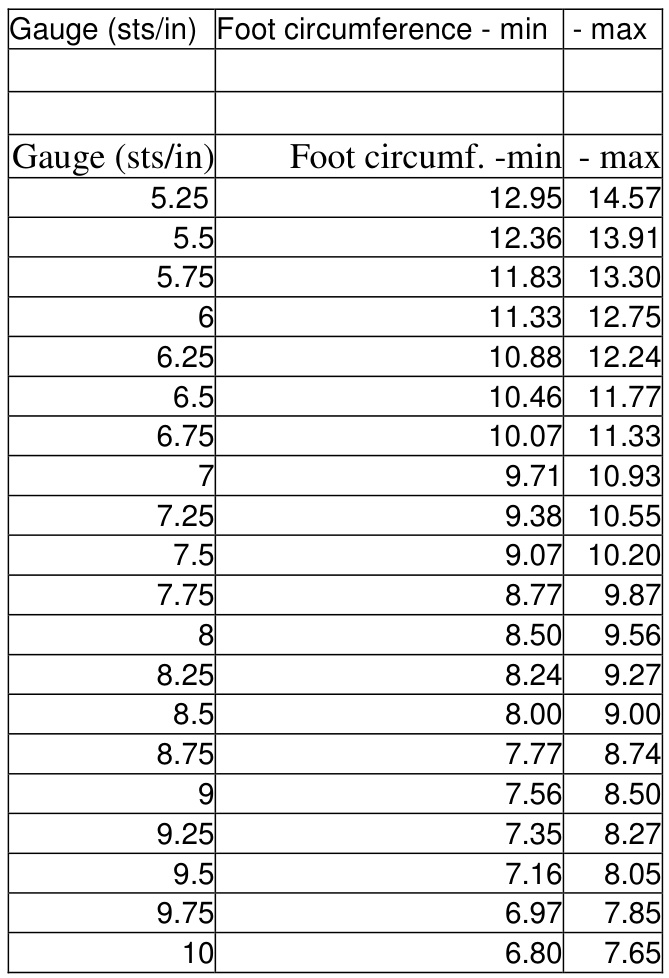
Please keep in mind that, although these measurements look oh-so-very accurate with all those decimal places, that's just because I got them from the calculator. They are still just as approximate as the $8^{\prime\prime}-9^{\prime\prime}$ measurement of my own foot with which I started.
Variation 2: Changing width by changing stitch-count
The original pattern uses 64 stitches. Here are instructions for achieving 2 other possible stitch-counts. 68 stitches. Same cast-on. Same beginning of ribbing pattern, but you'll end up on round 21 with k3, p1, .., p1,k2 on the instep needle, and 34 plain stitches on the sole. Same heel, but on 34 vs 32 stitches. For the ankle, the ribbing on the rear needle will begin with k1, p1, k to last st, p1 for 4 rounds; then $_{\mathrm{k}1}$ , p1, (k3, p1), k23, (p1, k3), p1 for 5 rounds; then k1, pl, $(\mathbf{k}3,\mathbf{p}1)\mathbf{x}2$ , k15, (p1, k3)x2, p1 for 6 rounds; then k1, p1, $(\mathrm{k}3,\mathrm{p}1)\mathrm{x}3,\mathrm{1}$ $\boldsymbol{\mathrm{k7}}$ $({\mathfrak{p}}1,\ker3)\mathrm{x}3$ , p1 for 7 rounds; then kl, pl, $(\mathtt{k}3,\mathtt{p}1)\mathtt{x}8$ for the remaining $3^{\prime\prime}$ of ankle, about 30 more rounds. Instep needle and sole needle will not begin in same place in the 3-1 rhythm, but should flow together to be 3-1 all around: instep ends with k2, sole begins with kl; sole ends with pl, instep begins with k3. When you get to the cuff, alter the joining rhythm as follows: instead of slipping 3 stitches and SSSK-ing whenever you come to a last-purlstitch, you must occasionally slip only 2 stitches and SSK, as if they were “normal': slip only 2 once somewhere in the middle of the back needle and once more somewhere on the front needle (note that this does not count the very first join, where you slipped only 2 eventhough it was a last-purl). This rhythm should make your lace and sock both come out evenly and finish at the same time. Same cuff grafting. 72 stitches. Same cast-on. Begin foot ribbing on round 6 (an even rd with 36 sts): k1,p1, $(\mathrm{k}3,\mathrm{p}1)\mathrm{x}4$ on the 18 sts on instep needle; plain stockinette on sole. Continue adding stitches “in pattern” to foot, ending up on rd 23 with k2, p1, (k3, p1) x8, k1 over the 36 sts on the instep needle. Same heel technique, but on 36 vs 32 stitches. For the ankle, begin the rear ribbing with k2, p1, $\mathbf{k}$ across to last 2 sts, p1, k1 on the heel/sole needle; same for 4 rds. Then $_{\mathrm{k}2}$ , p1, (k3, p1), $\mathrm{k}23$ , (p1, k3), p1, k1 for 5 rounds. Then k2, p1, $(\mathbf{k}3,\,\mathsf{p}1)\mathbf{x}2$ k15, (p1, k3)x2, p1, k1 for 6 rounds. Then k2, p1, (k3, p1)x3, k7, $({\mathfrak{p}}1,\ker3)\mathrm{x}3$ , pl, k1 for 7 rounds. Then k2, p1, $(\mathrm{k}3,\,\mathsf{p}1)\mathrm{x}8,$ k1 for the rest of the ankle, about 30 more rounds. Note that instep and sole needle (should) have the same arrangement of stitches, beginning with $_{\mathrm{k}2}$ and ending with $_{\mathrm{k}1}$ , for a smooth rhythm of 3-1 all around sock. When you get to the cuff, alter the joining rhythm as follow: the very first join you do is a normal slip 2 SSK, but the second one is a last-purl-before-a-knit stich and, unlike the original pattern, you will make this a slip 3 SSSK like the other last-purls. This should have your sock cuff and lace cuff finish evenly. Same cuff grafting. Itruly hope you enjoy knitting these socks, original or varied, and are pleased with your results.


