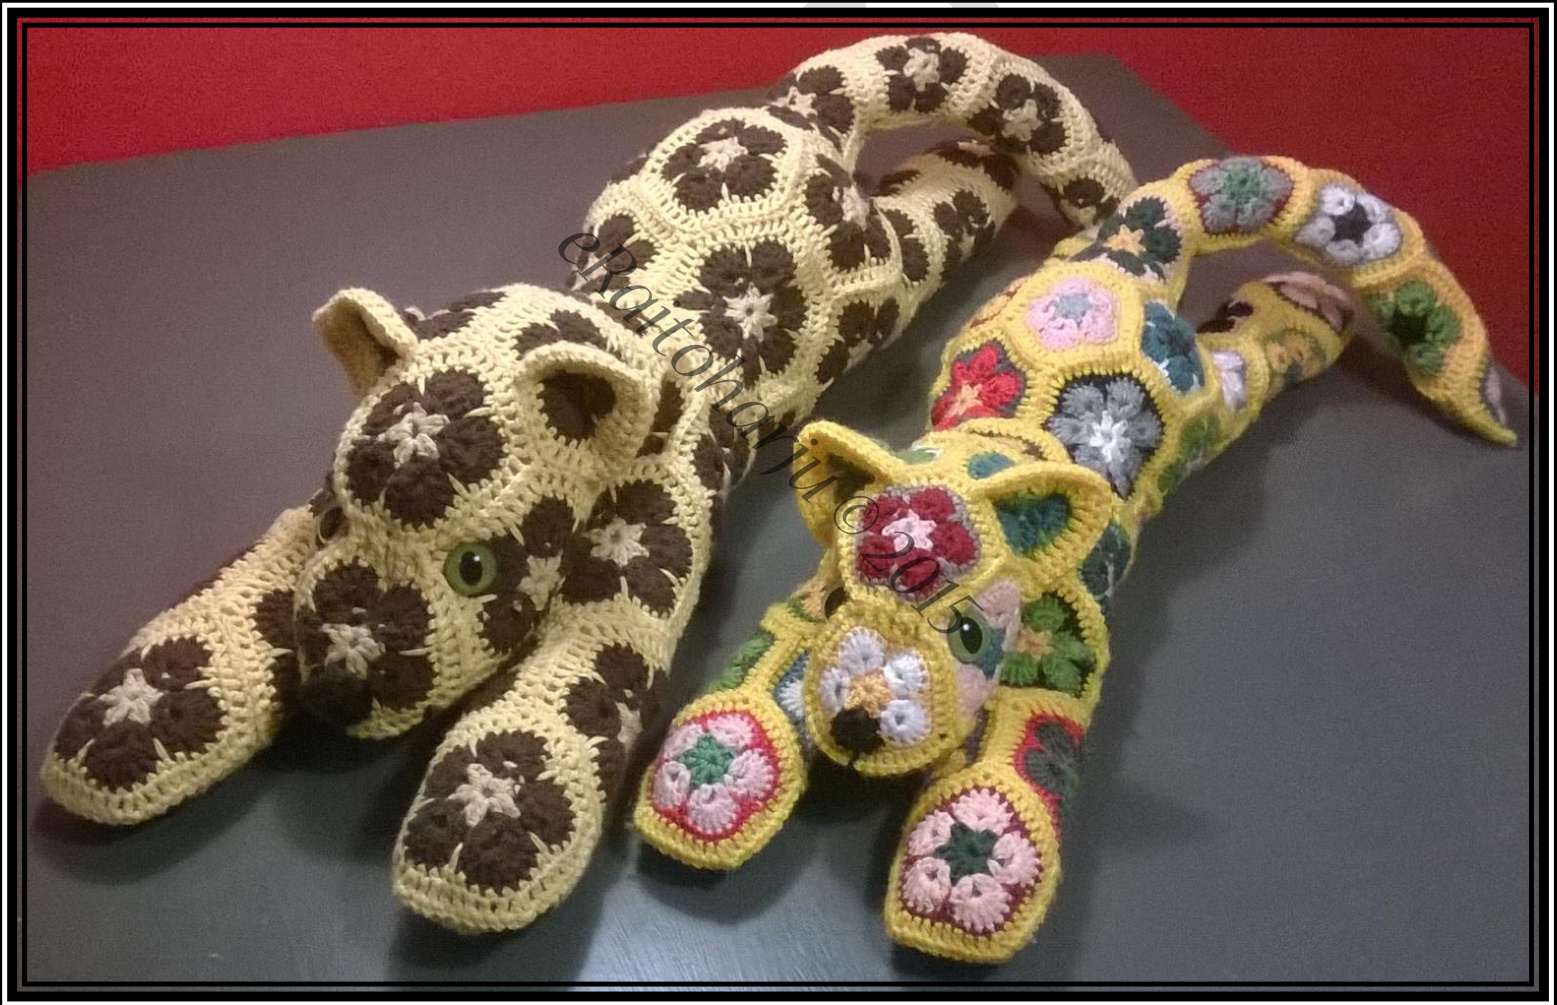
\~LAZYLEOPARD\~
A design pattern by eRaitoharju, 2015 This is an African flower based crochet pattern to make a Lazy Leopard. This patter does not contain instructions how to make African flowers, only the pattern how you can construct a Lazy Leopard using these motifs. You can sell the finished Leopards you have made (no mass production), but please do not share copies (electronic or other) of this pattern or its sections, figures or modified versions of it. Do not modify these instructions and represent the pattern as your own. Thank you for appreciating the work that has gone into making this pattern. I hope you will enjoy making your own Lazy Leopard.
Before you start:
1. This pattern does not include instructions how to make African flowers. Only tips how to make the few modified versions needed to make this animal. You will need to know how to make square, pentagon, hexagon and heptagon African flowers to complete this pattern. 2. You can join your pieces by crocheting or by sewing. I have joint the pieces by crocheting as I go. I also hate fastening yarn off, so I have tightened the ends by knotting them, as they are almost all left inside the Leopard. 3. You can choose the yarn for this pattern as you please. You can also use yarns that are somewhat similar but not the same. Just choose your hook accordingly. You should use the smallest hook you can manage for your yarn. That way the stuffing will not show or leek from the final product. The selection of yarn and hook will affect the size of the final Leopard and the amount of yarn you need (I used total about 800 m of yarn for the larger Leopard in the pictures). Just make sure you have enough of the yarn you are using in the outmost round and joining of the African flowers. 4. I have used l5mm safety eyes for my Leopard. You can also use sew in eyes. Cat eyes are most suitable for this pattern. Remember that the eyes you choose effect whether you can give the toy to small children or not. 5. To make the instructions shorter and easier to read by glance, I have replace the names of the motifs being made in each step by the number of their corners accordingly Square = FOUR Pentagon = FIVE Hexagon = SIx Heptagon = SEVEN 6. There are two types of modified African flowers in this pattern. They are described in more detail when they should be made, but be aware for the coming NOSE-FIVE (without a two double crochet in one corner) and EARFOUR with an extra round of double crochets to make the ears bigger. 7. To complete a Lazy Leopard you will make two FOURs, XXX FIVEs, XXX SIXs and XXX SEVEN, so altogether XXX motifs 8. Note that there are pictures of Lazy Leopard in the end with each motif specified so you may use as a checklist, when you are making the second or third Leopard and want to have short "instructions". Lazy Leopard Crochet Pattern
Front legs
1. Make one complete FIVE (Fig. 1.) 2. Make one FIVE and attach it to previous one from three sides (Fig. 2.). Side view in Fig. 3.

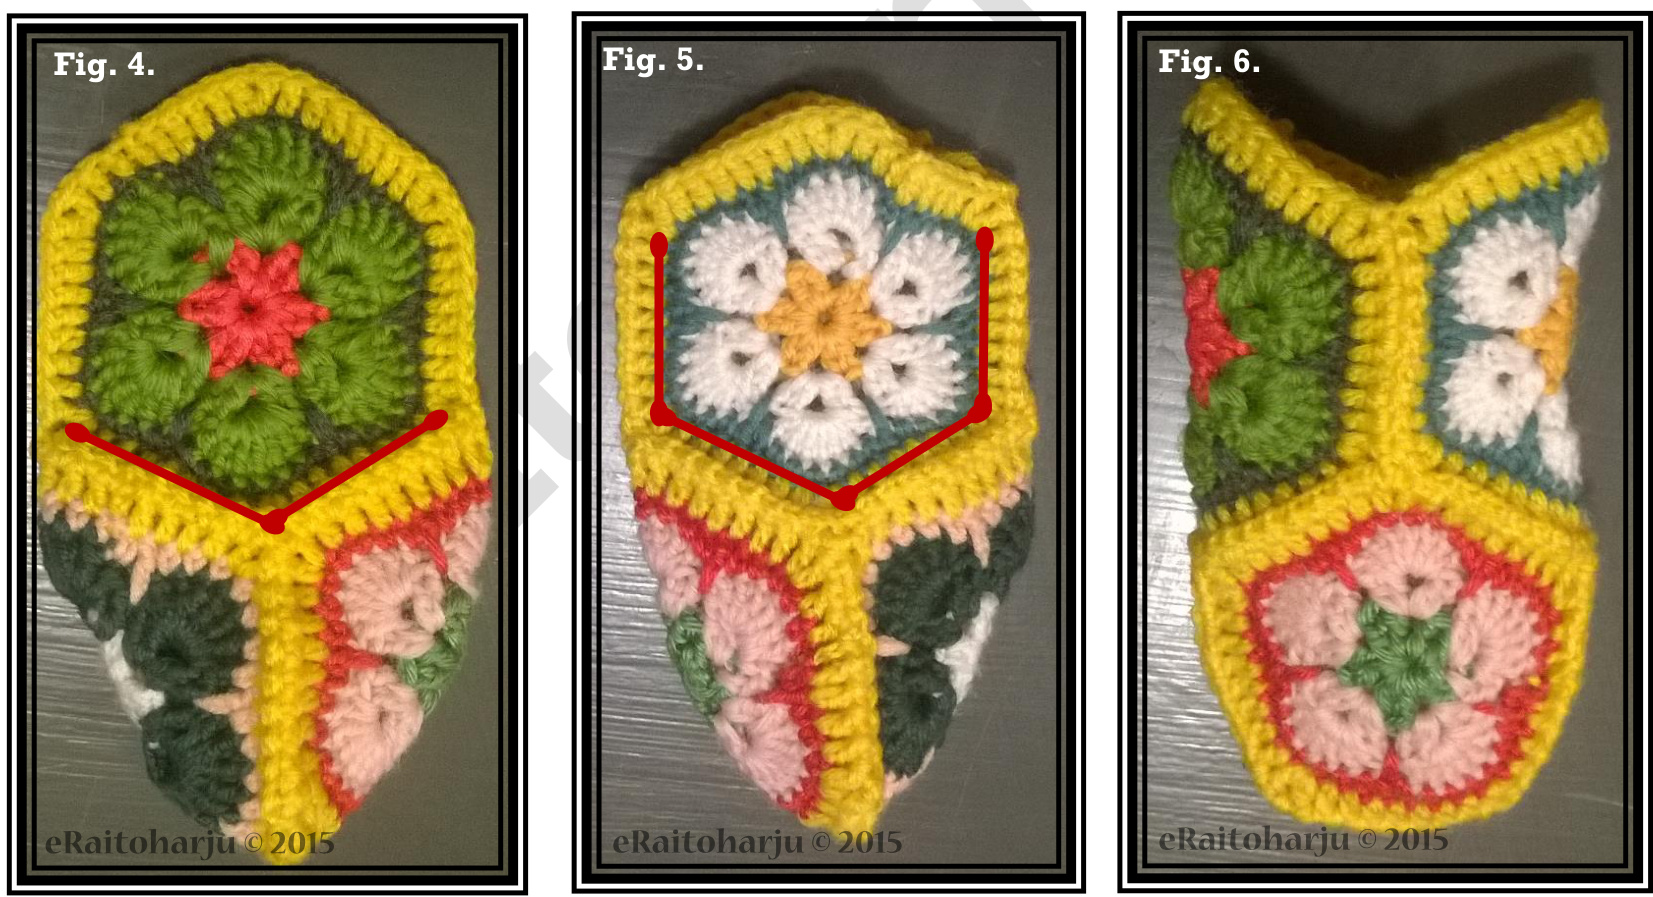
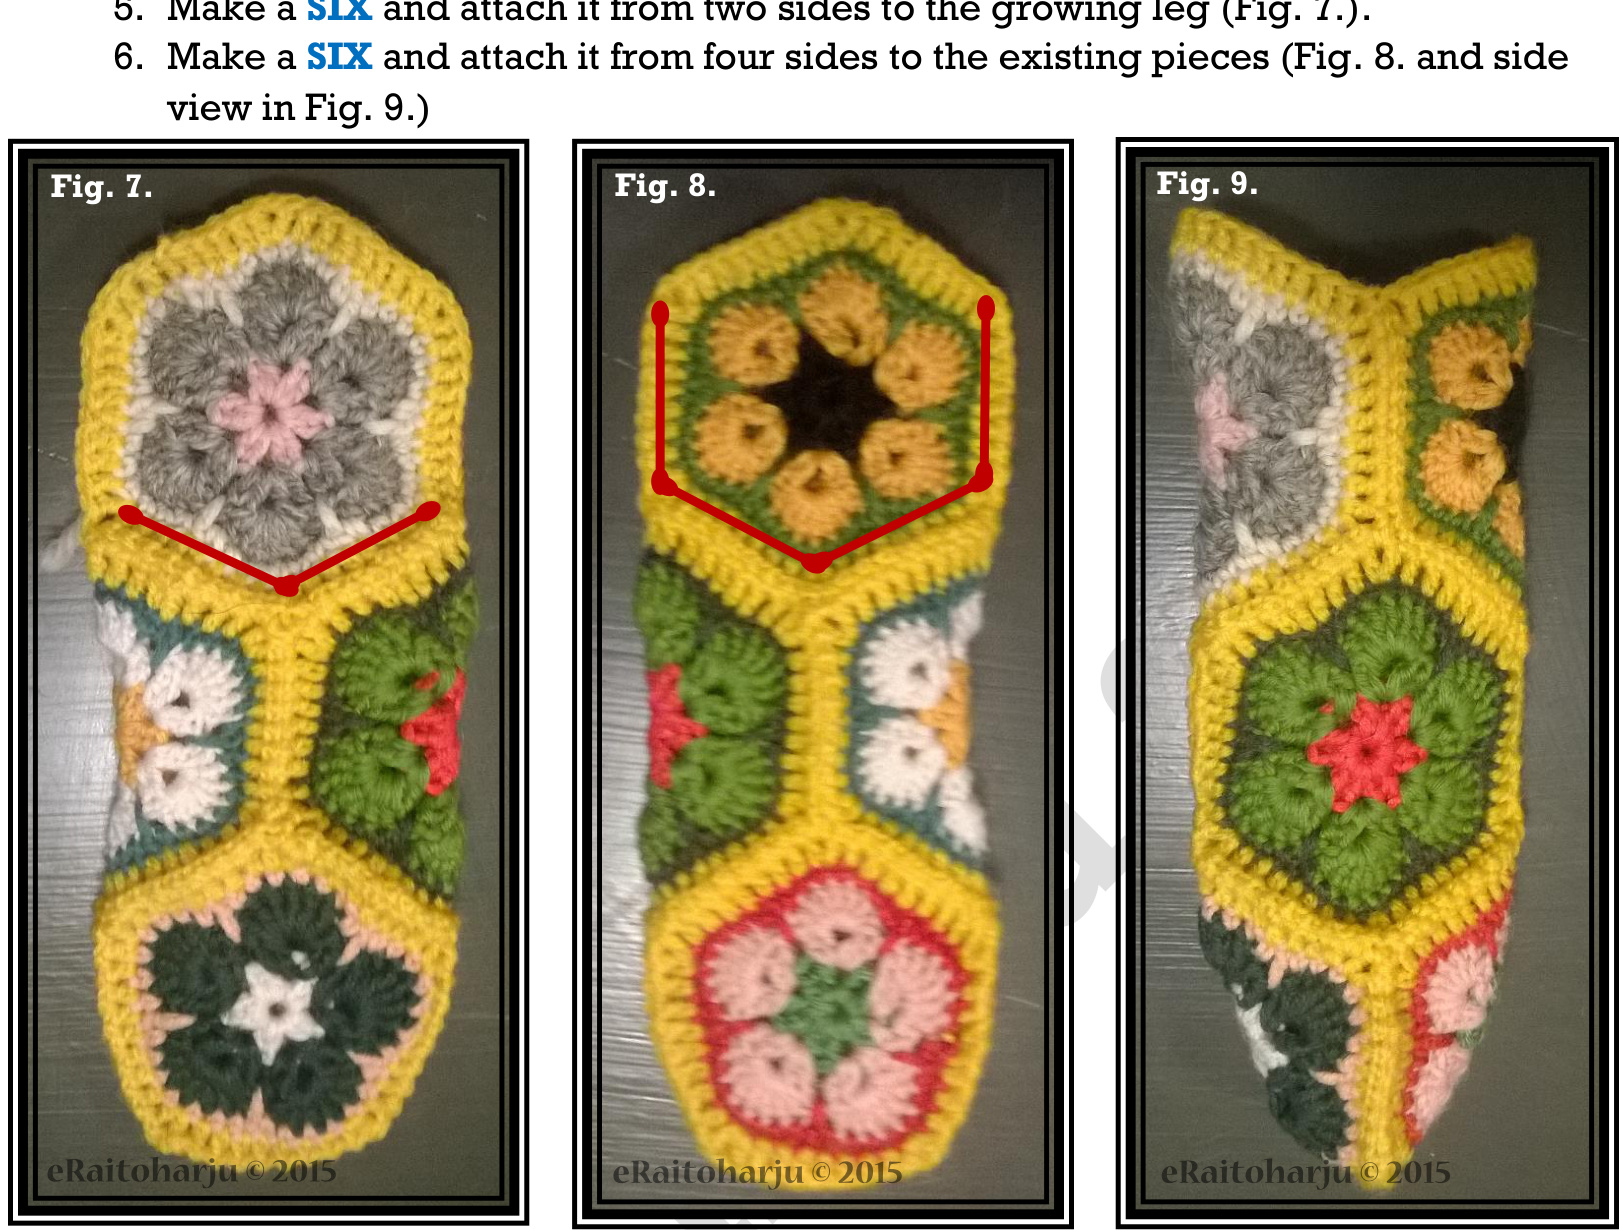
3. Make a SIX and attach it from two sides to the feet (Fig. 4.). 4. Make a SIX and attach it from four sides to the existing pieces (Fig 5. and side view in Fig.6.)
Make another font leg just like the first one. Lazy Leopard Crochet Pattern
Chest and shoulders
7. Make a SIX and attach it from two sides to the two front legs (Fig. 10.). 8. Make a SIX and attach it next to the previous SIX from one side and on top of the right leg from two sides (Fig. 1l. and side view in Fig. 12.)
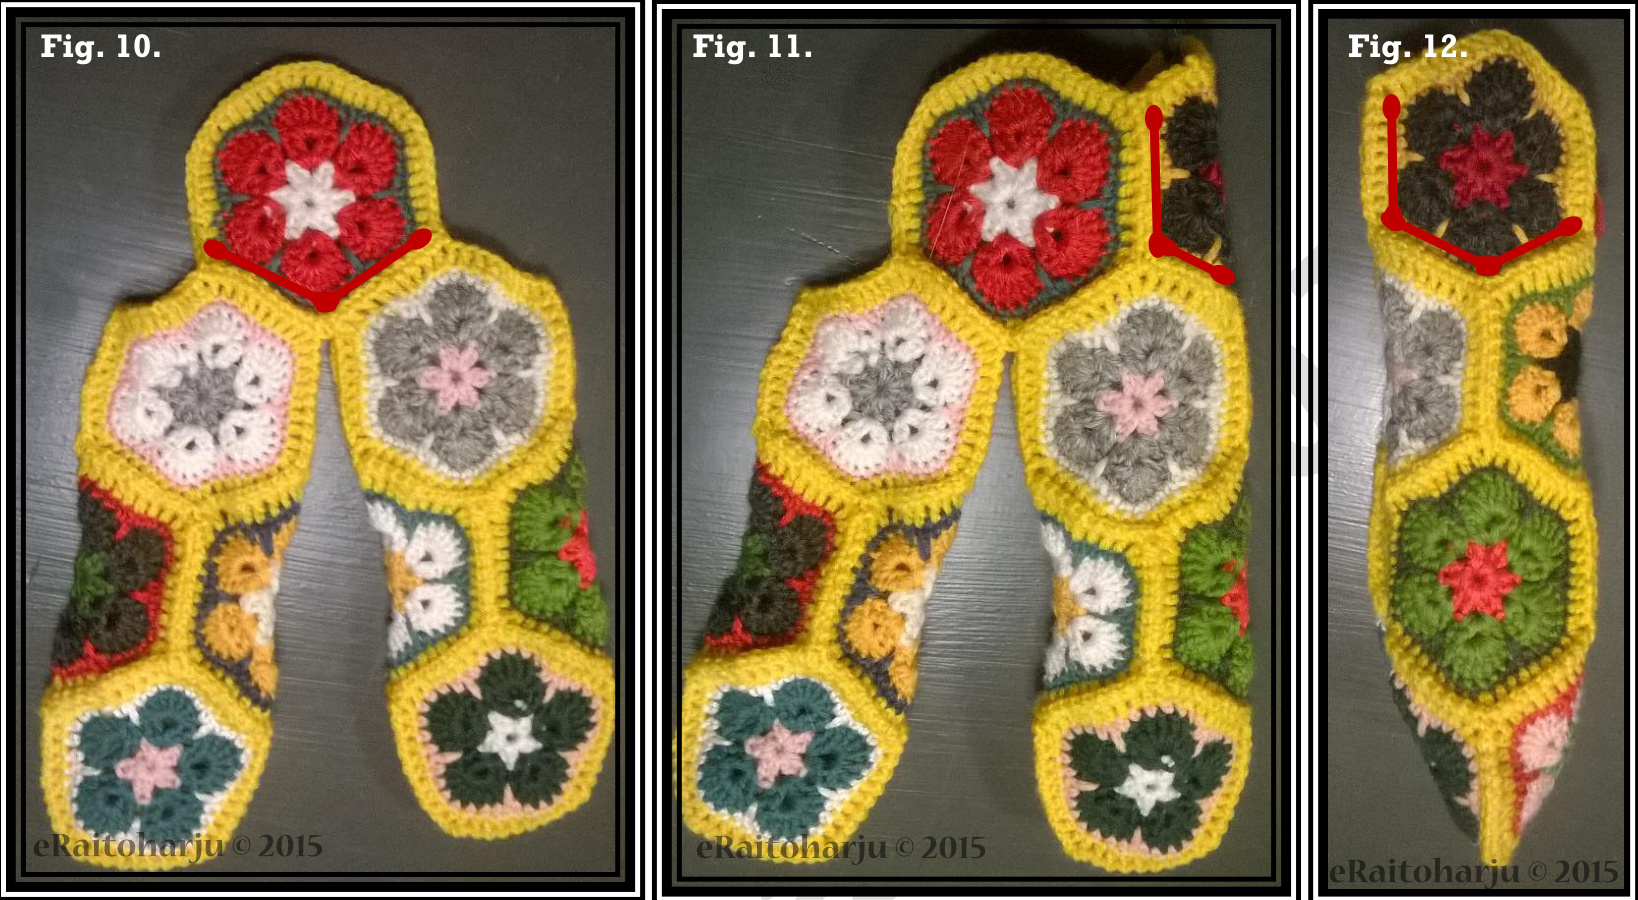
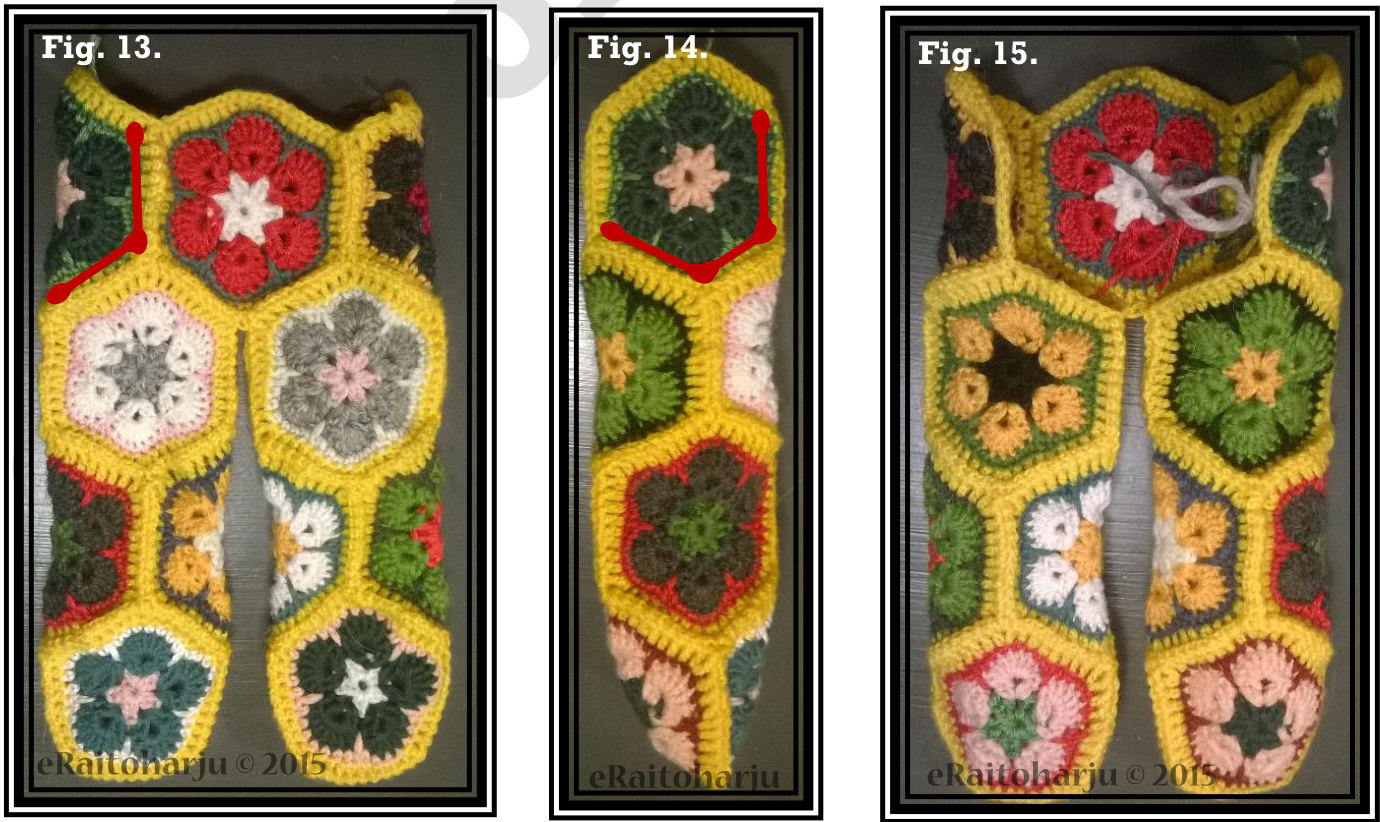
9. Make a SIX and attach it to the left side of the center piece as a mirror image of step 8. (Fig. 13. side view in Fig. 14. and view from the top in Fig. 15.).
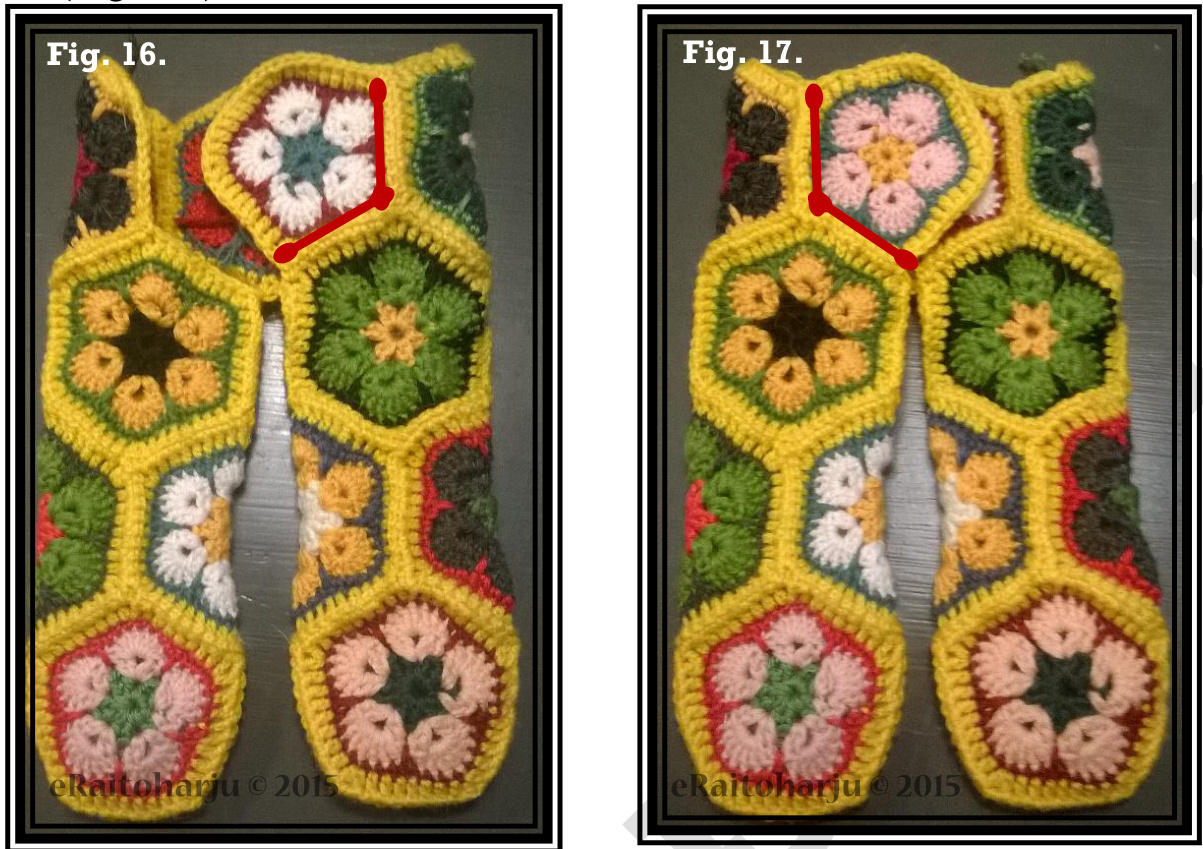
10. Make a FIvE and attach it to the front leg and shoulder piece from two sides (Fig. 16.). 11.Make a FIvE and attach it to the other front leg and shoulder piece from two sides (Fig. 17.).
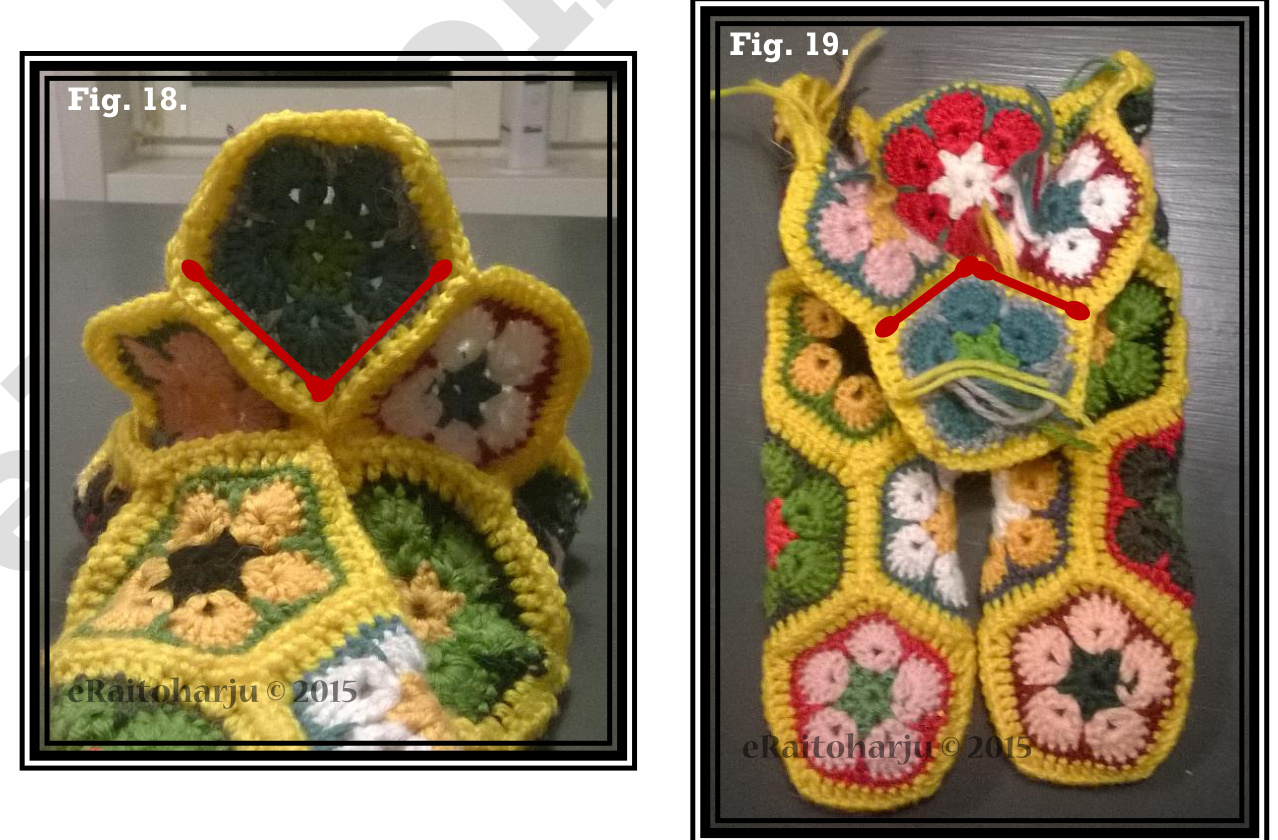
12. Make a FIVE and attach it to the two previous FIVEs (steps 10. and 1l.) from two sides (one side per FIVE) (Fig. 18. and view from above in Fig. 19.).
Head
13. Make a NOSE-FIVE (Fig. 20.). This is a normal hexagonal African flower, but on in one corner in the outmost round do not crochet two double crochets into same stich to form the corner. This motif is attached to the last FIVE (made in step 12.) so that the round edge is furthest from the last motif (Fig. 21.).
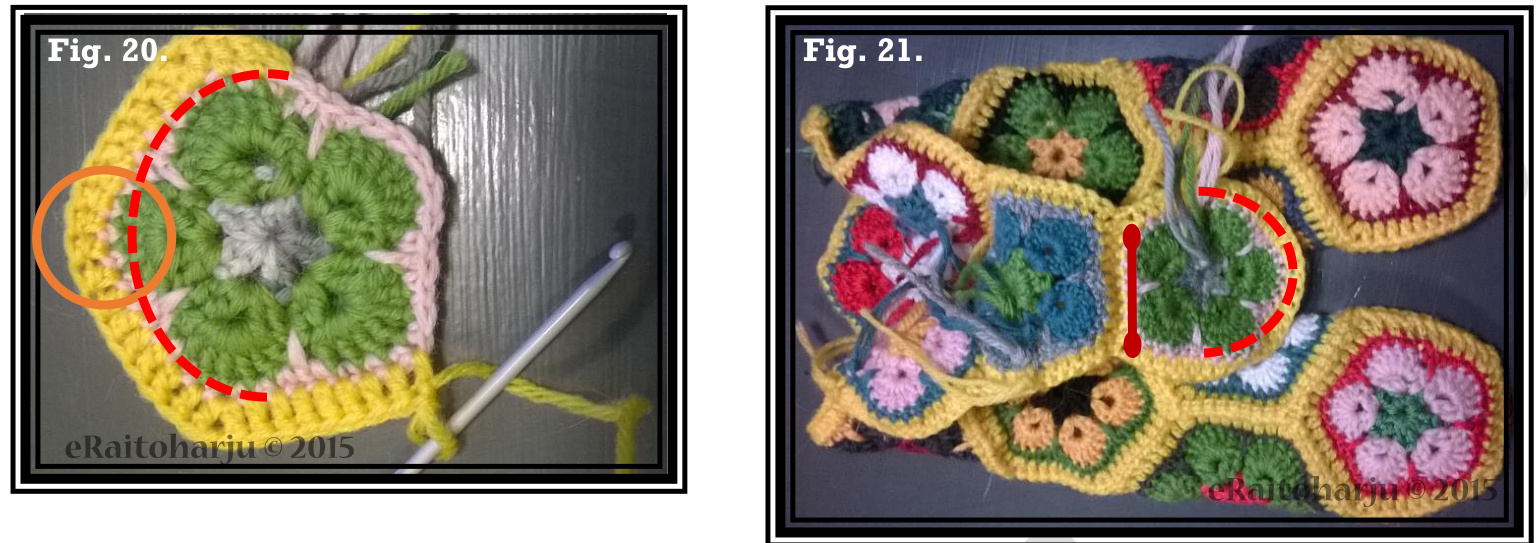
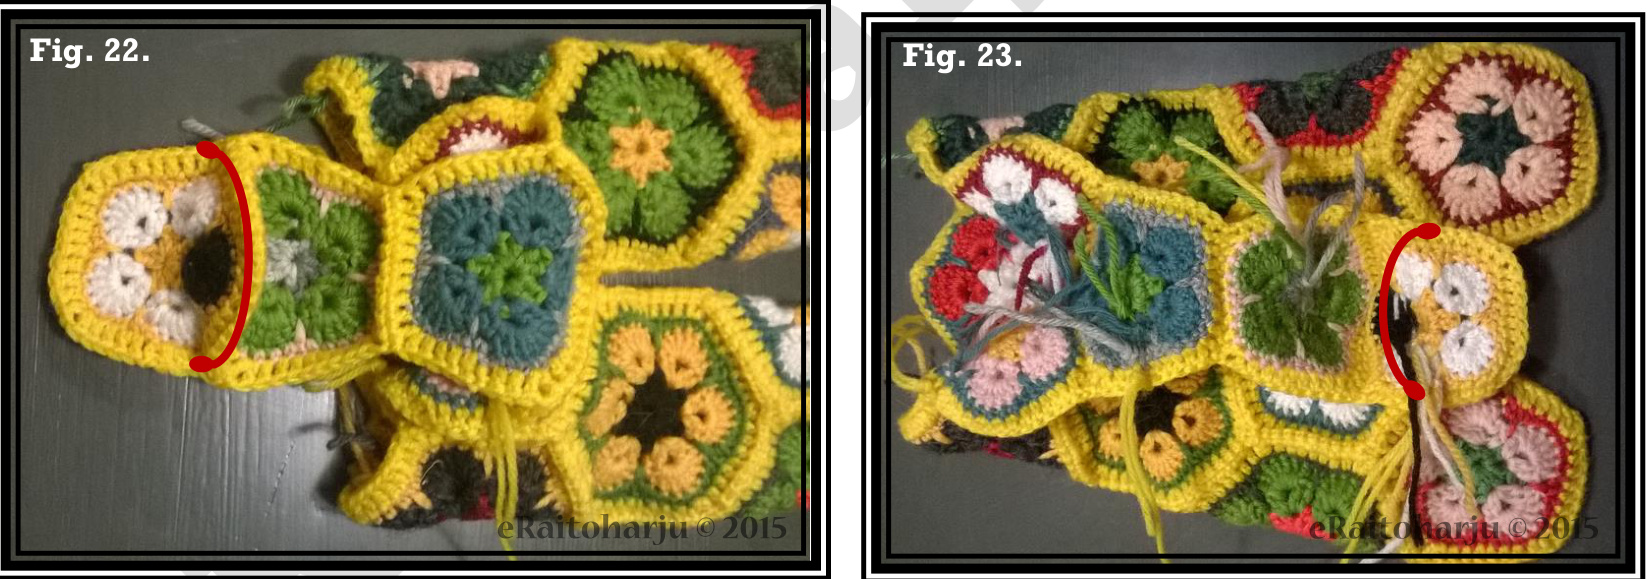
14. Make another NOsE-FIvE. If you want, you can make the pedal closest to the round edge with black or dark brown to make the nose. Attach the round edge to the round edge of the previous NOSE-FIVE (Fig 22. and 23.).
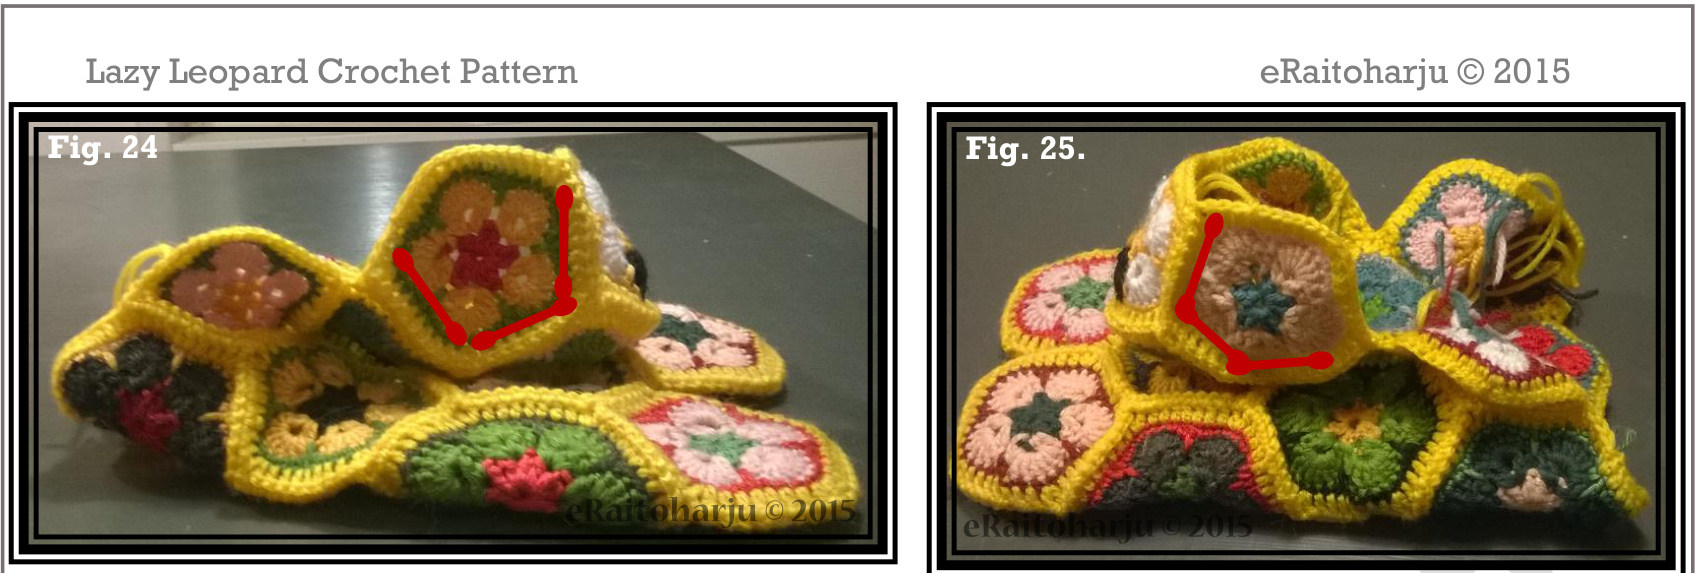
15. Make a FIVE and attach it to the right side of the last three FIVEs you have made (in steps 12, 13 and 14) from three sides (Fig. 24.). Do not attach it to the side neck piece (made in step 1l. Fig. 17.). 16. Make a FIVE and attach as previous FIVE (step 15.) but to the left side (Fig. 25.). Do not attach it to the side neck piece (made in step 10. Fig. 16.).
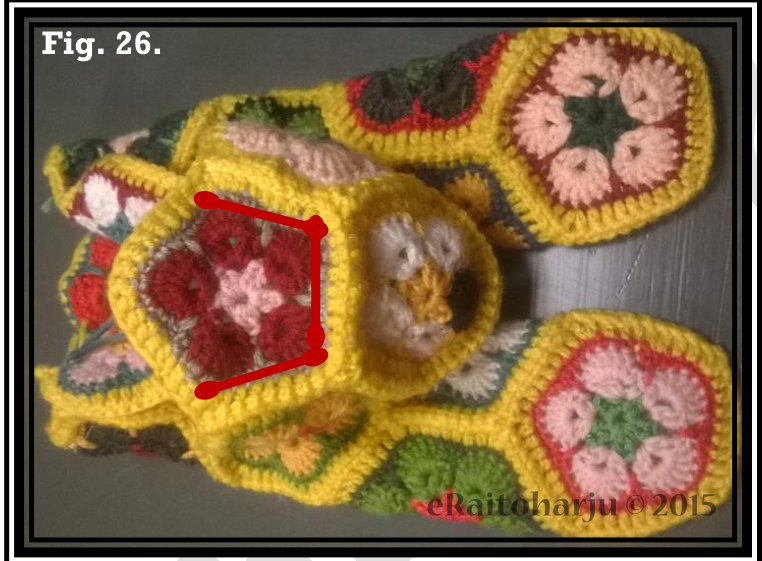
17. Make a FIVE and attach it to the last to FIVEs you made (made in steps 15. and 16.) and the second NOSE-FIVE (made in step 14.) from three sides (Fig. 26.).
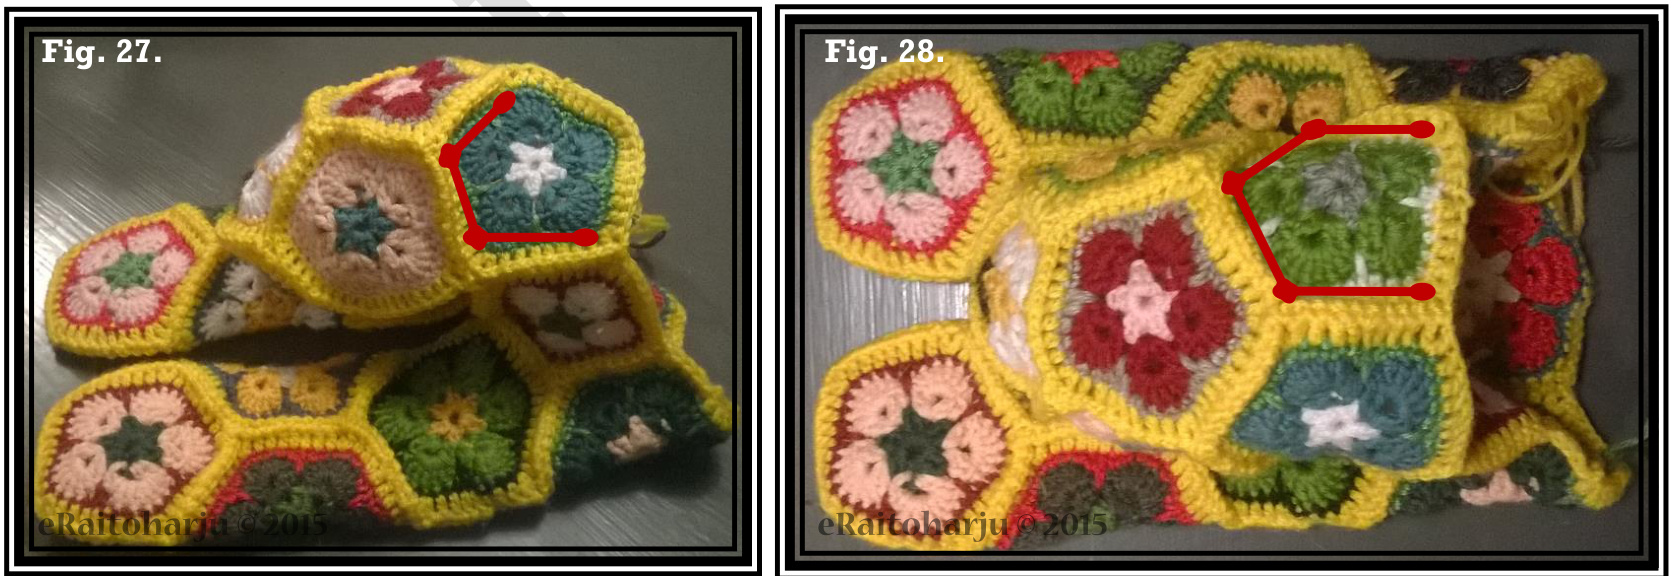
18. Make a FIVE and attach it to the forehead, cheek and side of the neck motifs from thee sides (Fig. 27.). 19. Make a FIVE and attach it to the previous FIVE (made in step 18.) forehead, cheek and side of the neck motifs from four sides (Fig. 28.).
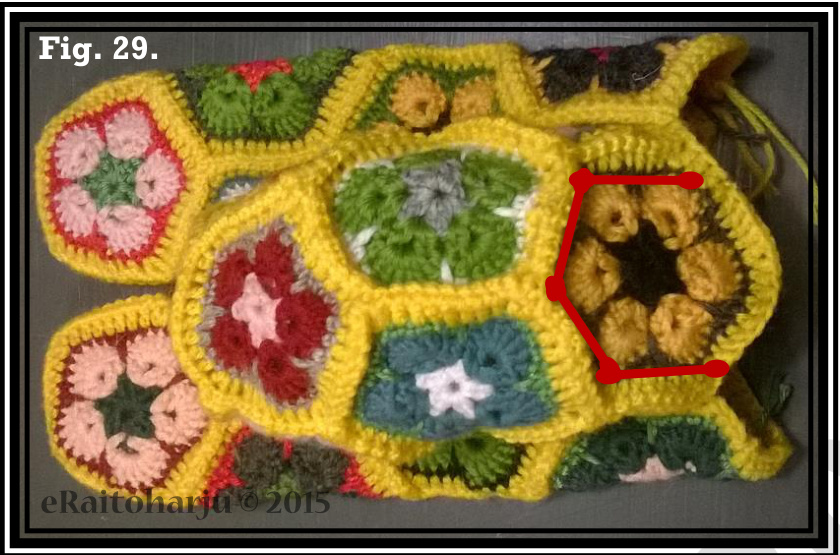
20. Make a SIX and attach it from four sides (to last two FIVEs you made in steps 18. and 19. and to the two side neck motifs) to finish the head (Fig. 29.).
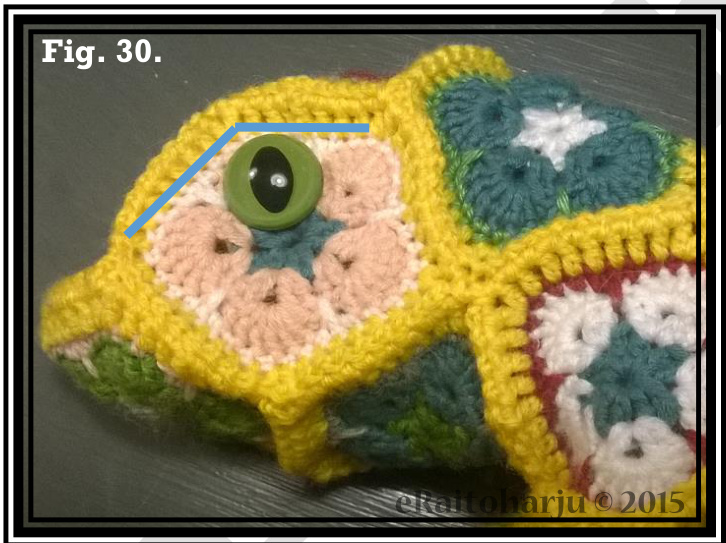
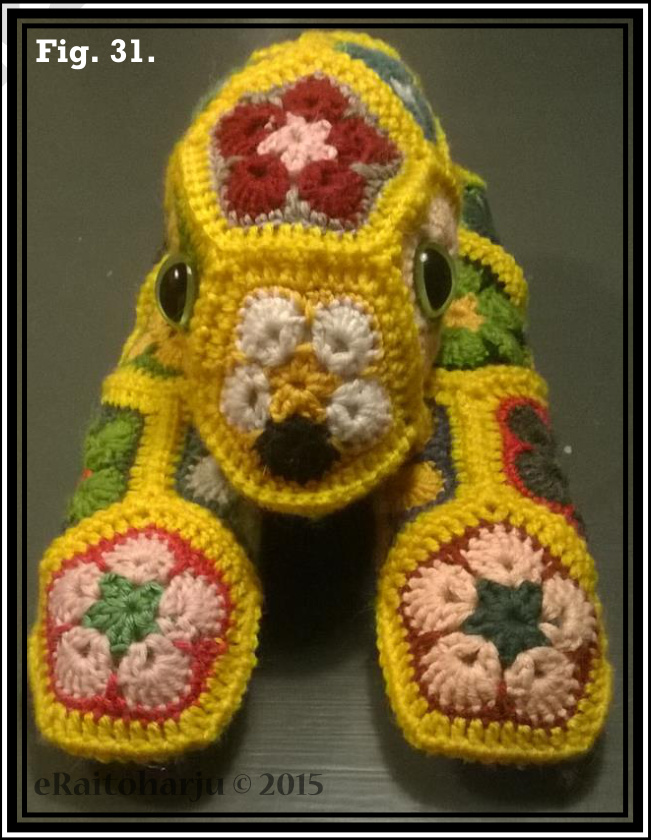
21. If you are using safety eyes or similar, you should attach the eyes now. The eyes should be attached near the corner (highlighted with blue) of the cheek piece (made in Fig. 30.). My leopard is the size that the peg can be pushed through the hole in the African flower pedal. If you Leopard is bigger, you should try to get the eye closer to the corner. If your eyes can be stitched on, attach them later. 22. Stuff the head and front legs (Fig. 31.). Stuff loosely as this is a lazy animal. Do not worry if your leopard is looking like a lizard now. That will be fixed with ears and some stiches later.
Body
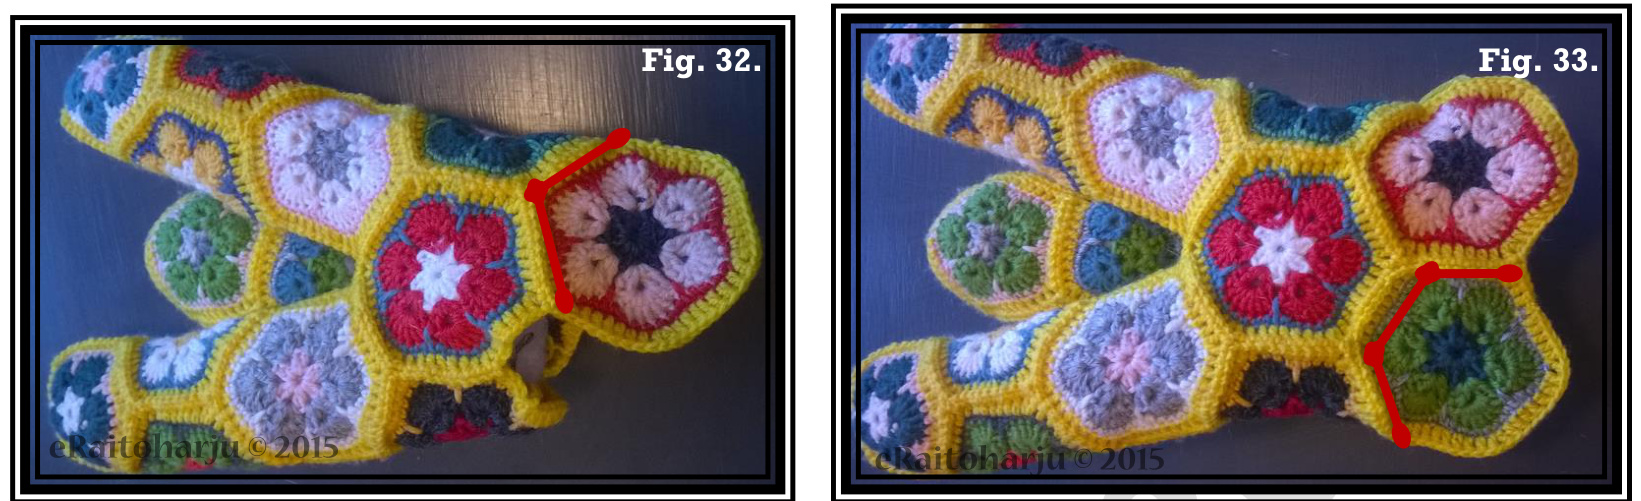
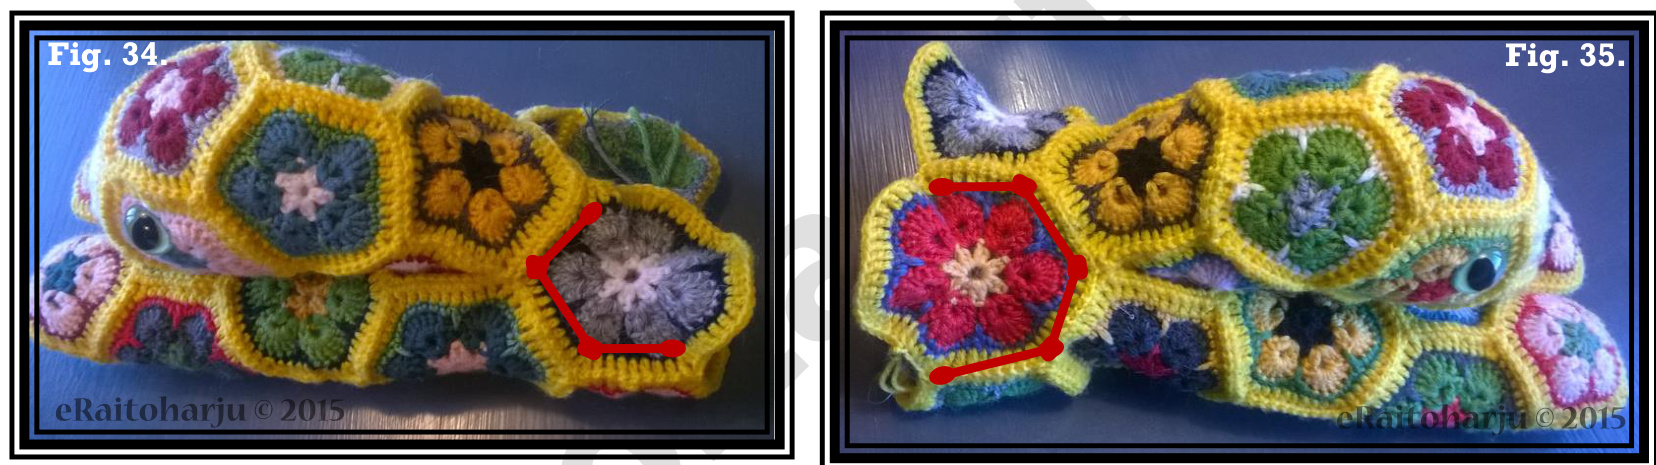
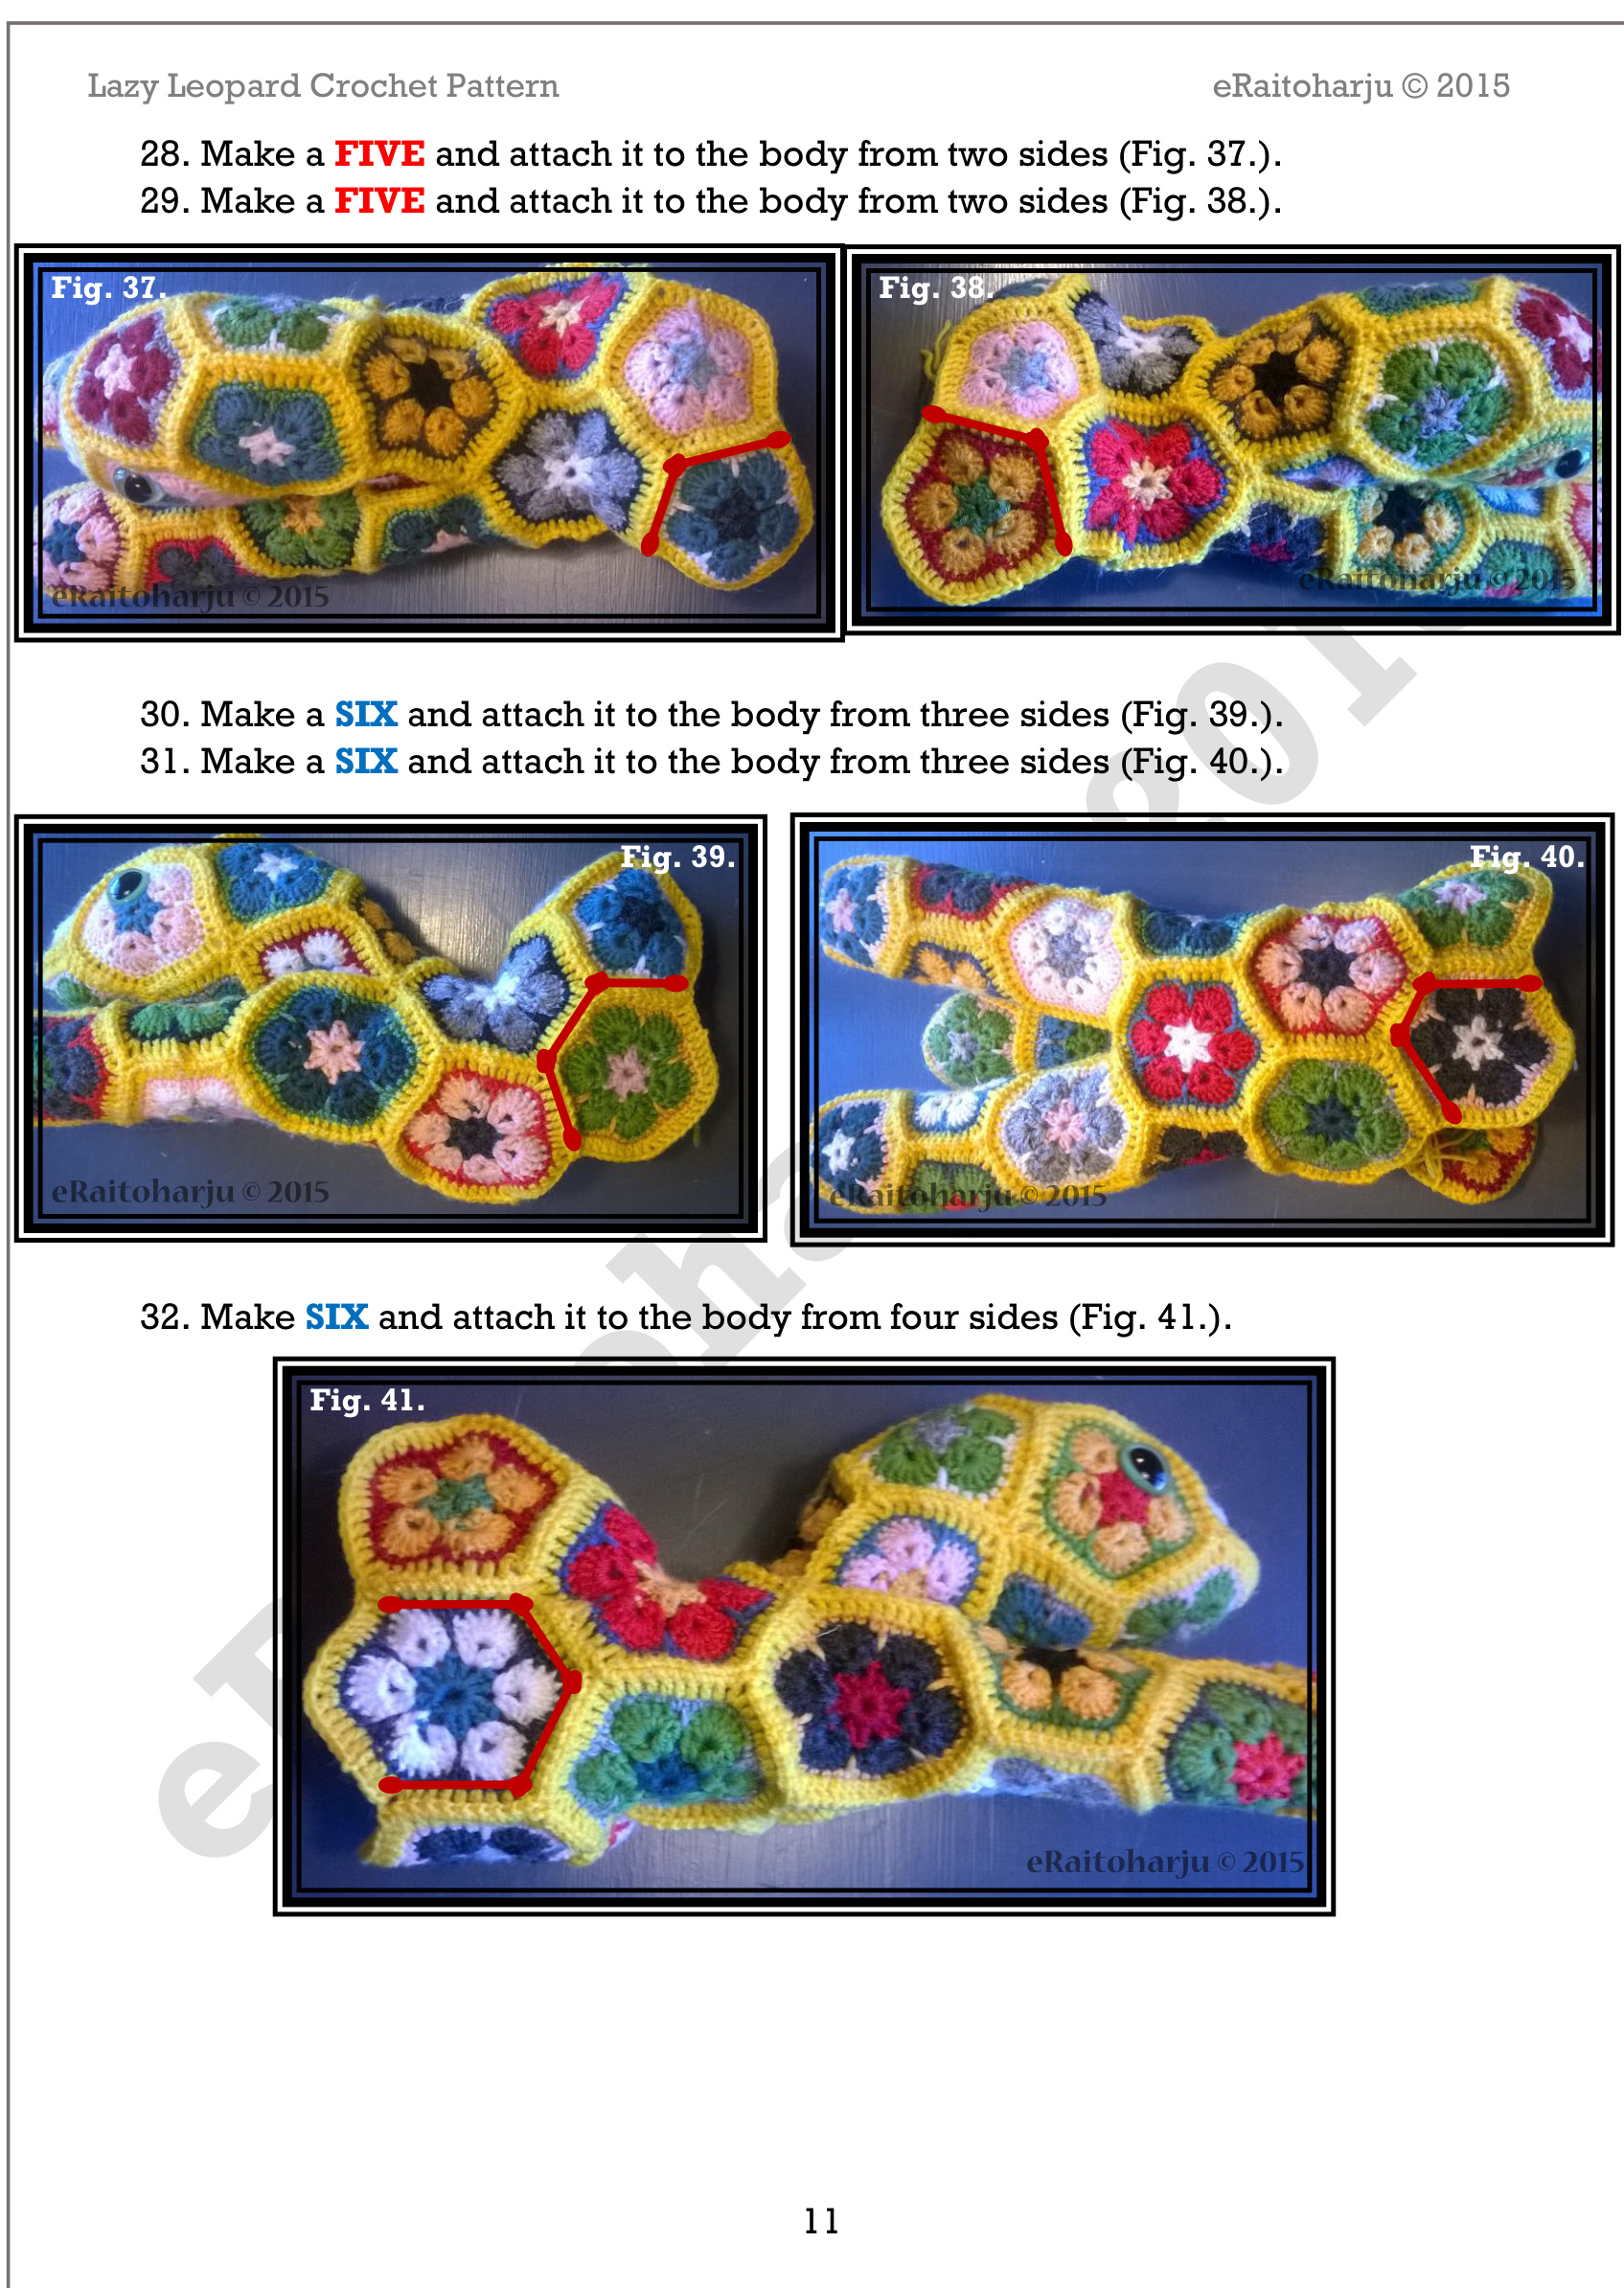
23. Make a SIX and attach it to the body from two sides (Fig. 32.). 24. Make a SIX and attach it to the body from three sides (Fig. 33.). 25. Make a SEVEN and attach it to the body from three sides (Fig. 34.). 26. Make a SEVEN and attach it to the body from four sides (Fig. 35.).
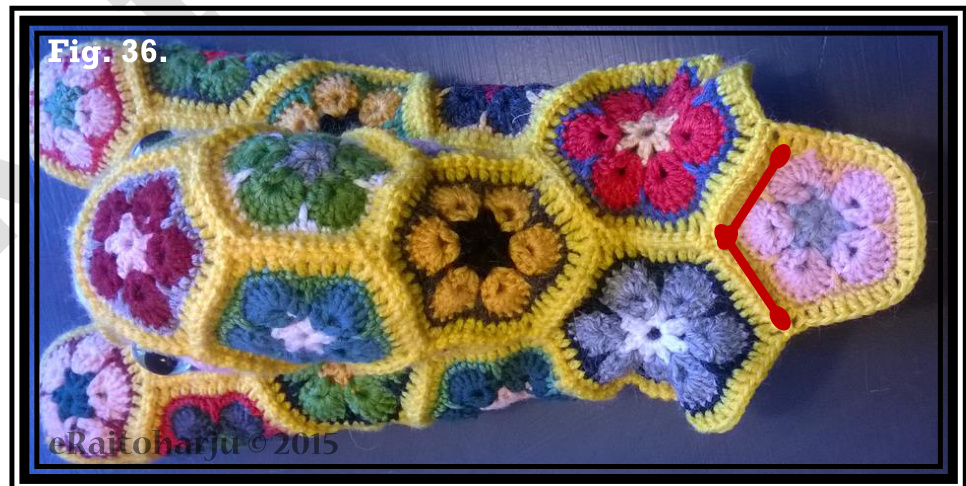
27. Make a FIVE and attach it to the body from two sides (Fig. 36.).
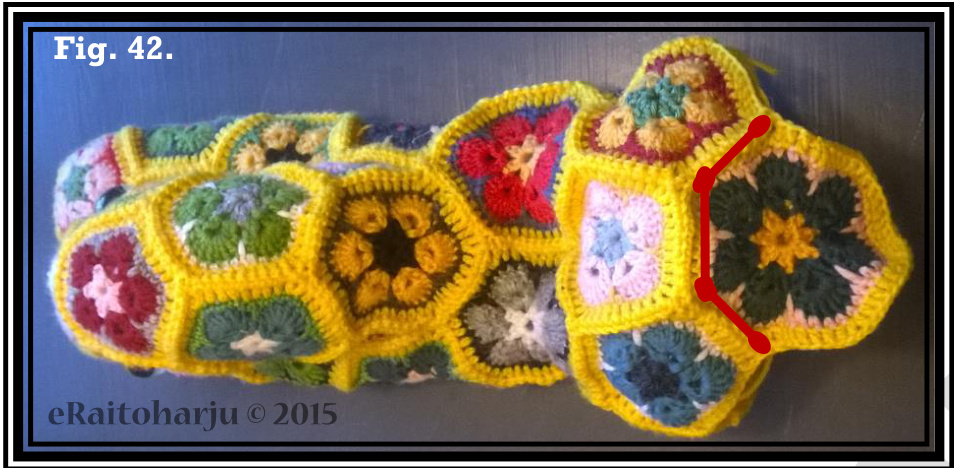
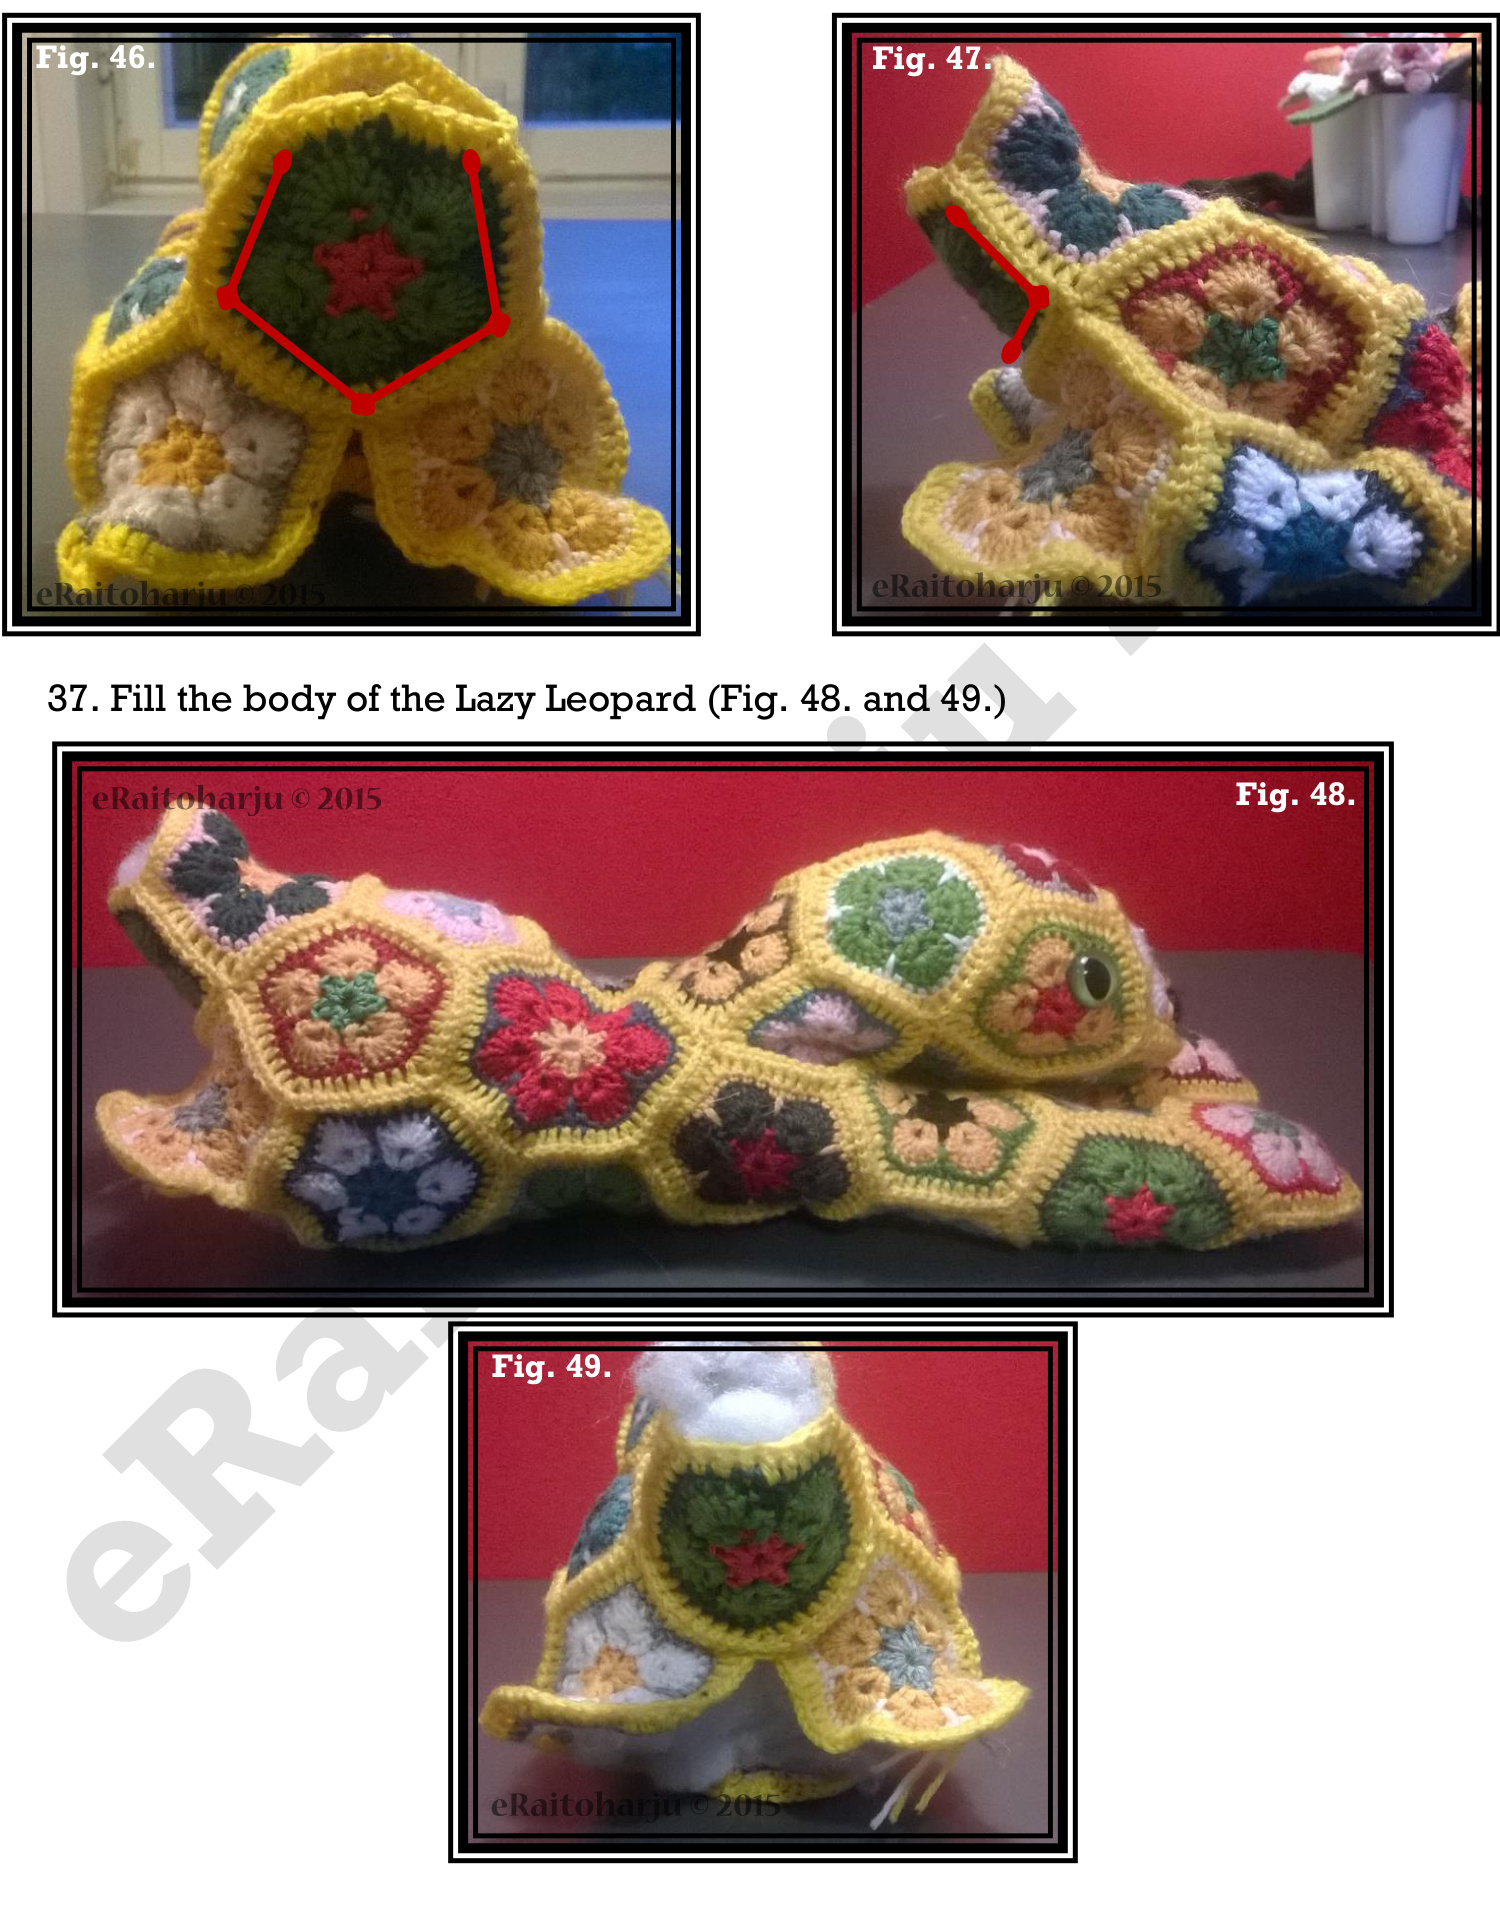
33. Make a SEVEN and attach it from three sides (Fig. 42.). This will be the starting point for the tail.
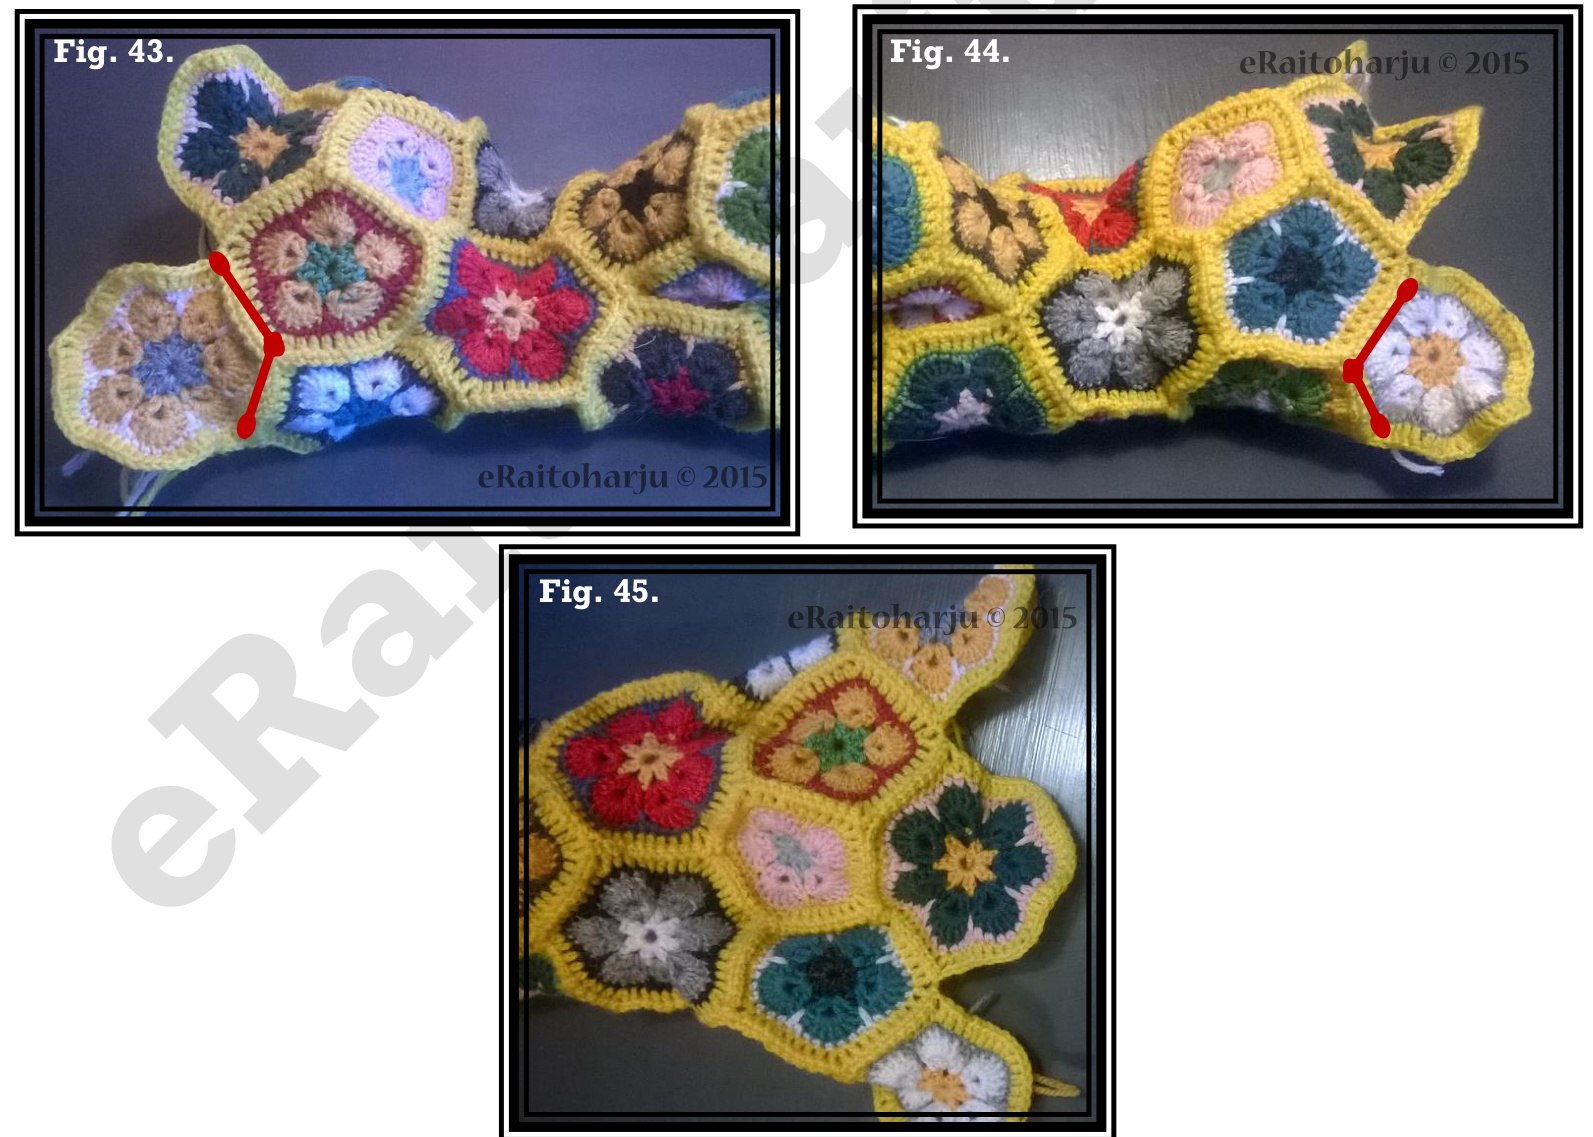
34. Make a SEVEN and attach it from two sides to the body (but not to the SEVEN made in step 33.) (Fig. 43.). This will be the starting point of a back leg. 35. Make a SEVEN and attach it from two sides to the body (but not to the SEVEN made in step 33.) (Fig. 44.). This will be the starting point of the other back leg. Top view of the Leopard now in Fig. 45.
36. Make a FIvE and attach it to the tail motif from two sides (leave one side free between these sides) and to both of the SEVENs starting the back legs (Fig. 46.). Side view in Fig. 47.
Lazy Leopard Crochet Pattern
Back legs
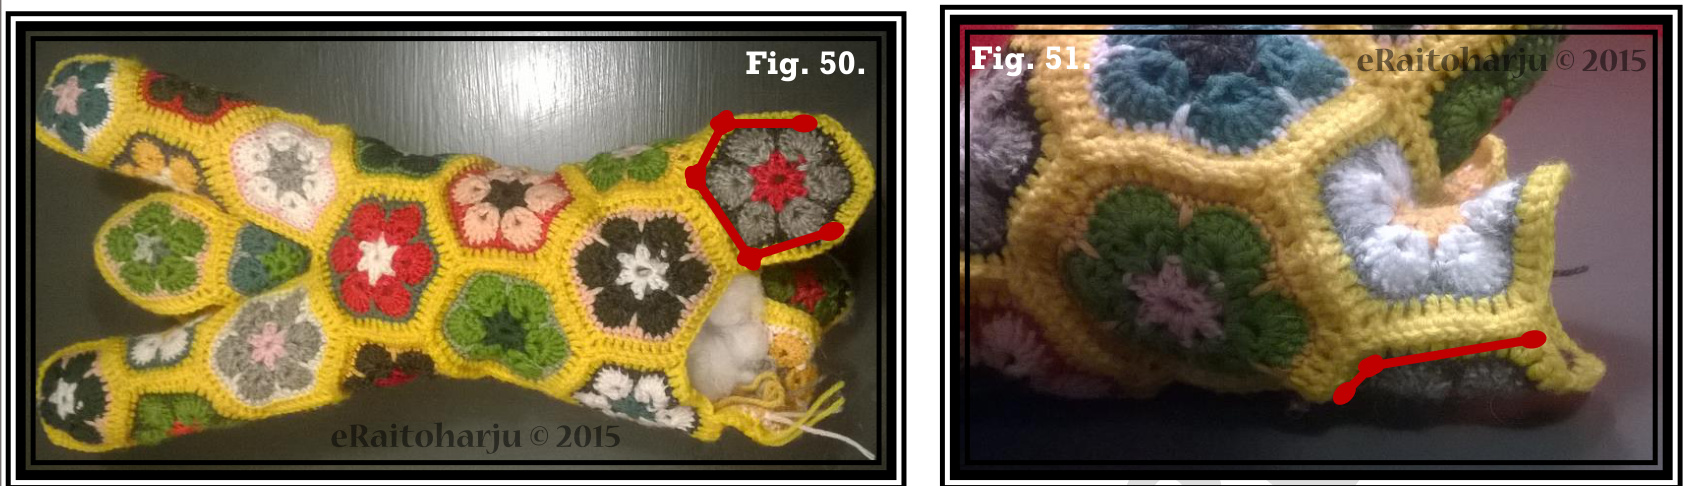
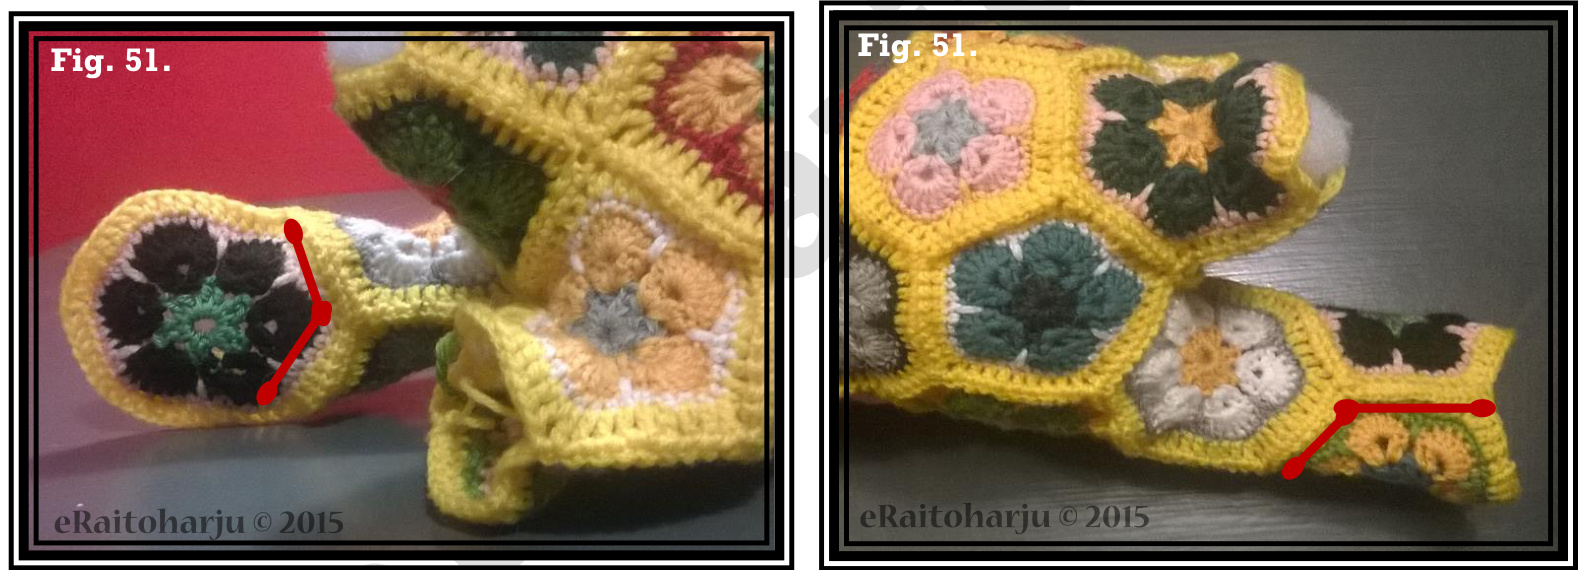
38. Make a SIX and attach it to the body from two sides and to the starting piece of the back leg from two sides (Fig. 50. Side view in Fig. 51.)
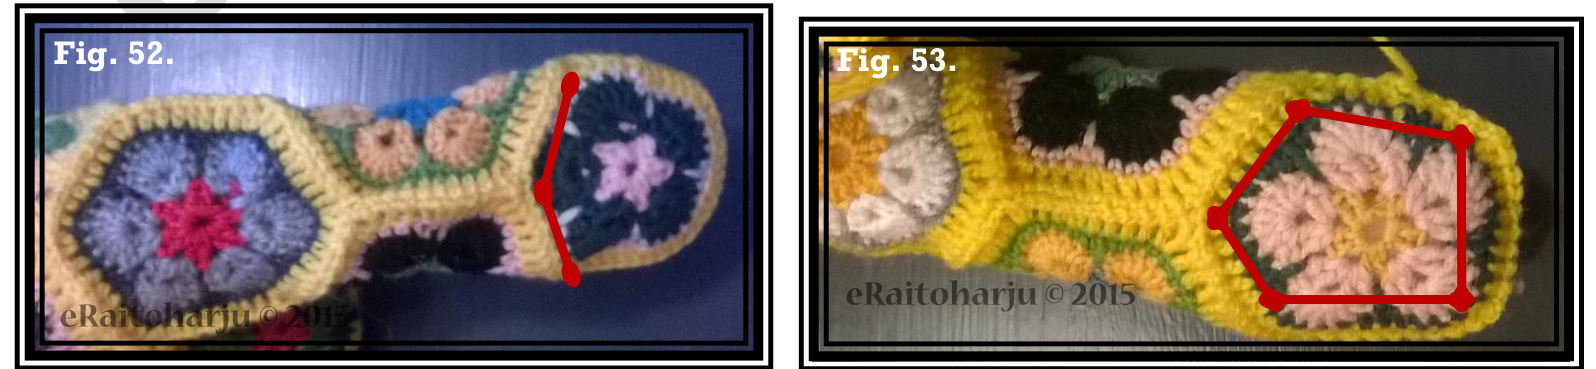
39. Make a SIX and attach it to the growing leg from two sides (Fig. 52.). 40. Make a SIX and attach it to the growing leg from four sides (Only two sides shown in Fig. 53.).
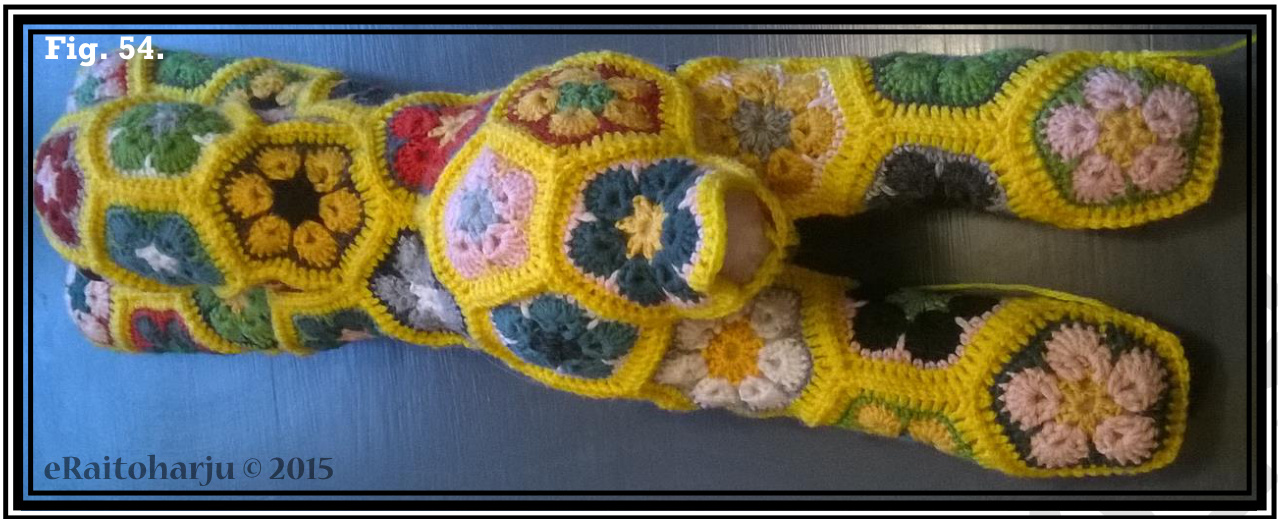
41. Make a FIvE and attach it to the end of the leg from two sides (Fig. 52.). 42. Fill the leg. Make a FIVE and attach it to the end of the leg from all five sides and fast off the yarn (Fig. 53.). 43. Make another back leg just like the first one (Fig. 54.).
14
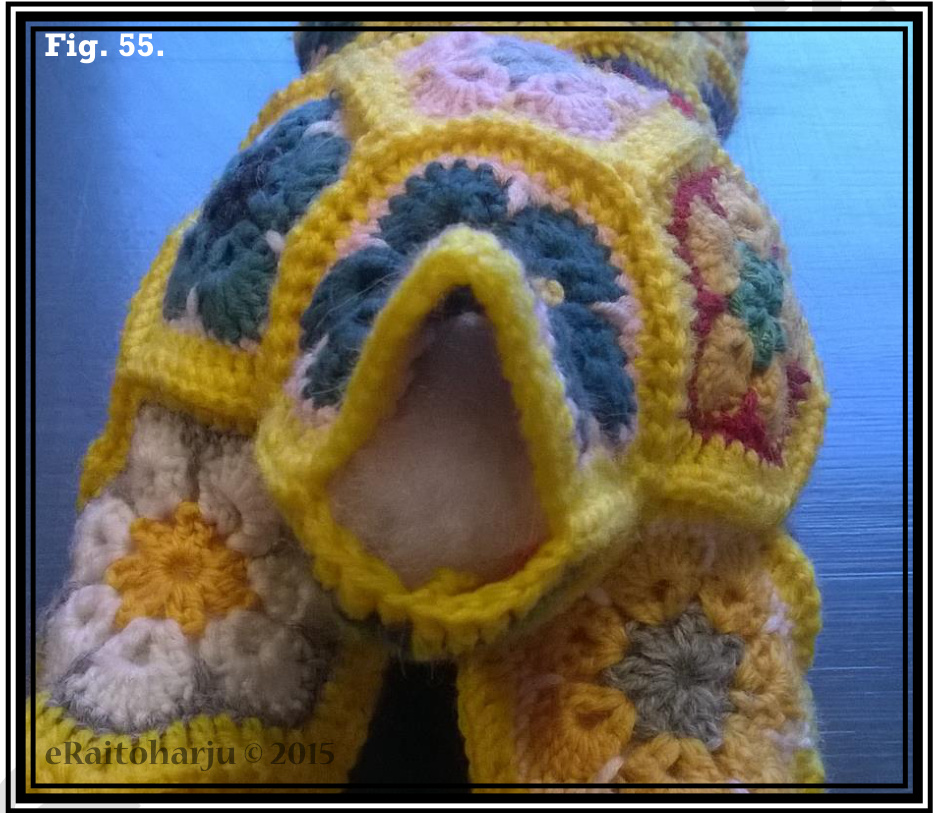
44. You are now left with a triangular hole for the tail (Fig. 55.).
Tail
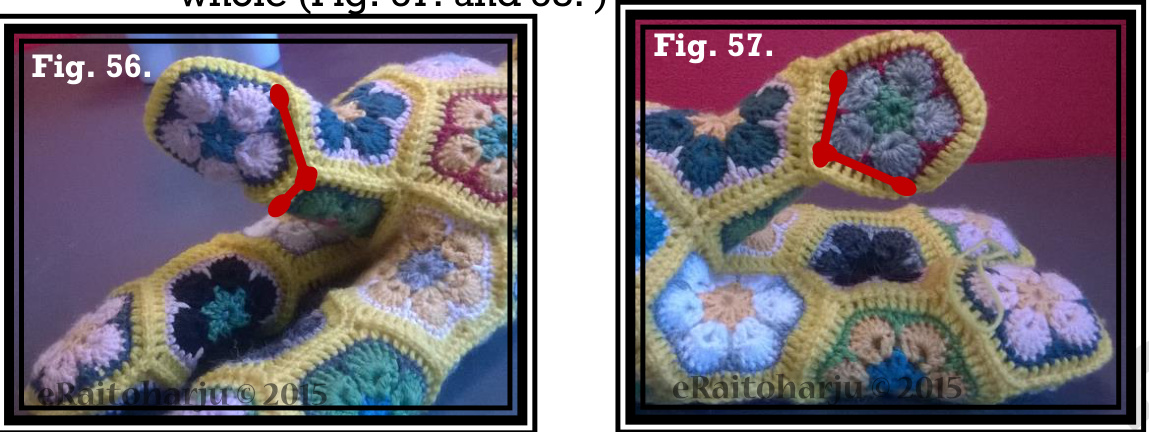
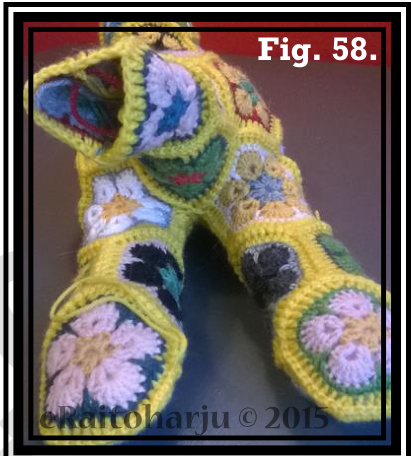
45. Make a FIVE and attach it from two sides to the starting motifs of the tail. One side to the SEVEN and another to the FIVE (Fig. 56.). 46. Make a FIVE and attach it to the starting motif of the tail (SEVEN) from one side and to the FIVE made in step 45. from two sides reforming the triangular whole (Fig.57. and 58. ),
47.Make a FIVE and attach it from two sides to the growing tail (Fig. 59.). 48. Make a FIVE and attach it to the FIVE made in step 45. from one side and to the FIVE made in step 47. from two sides reforming the triangular whole (Fig.
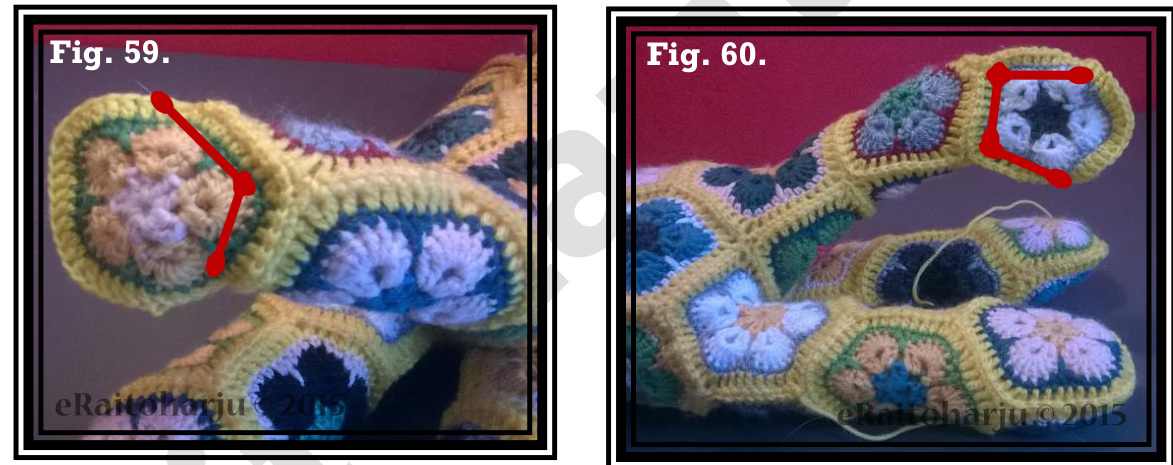
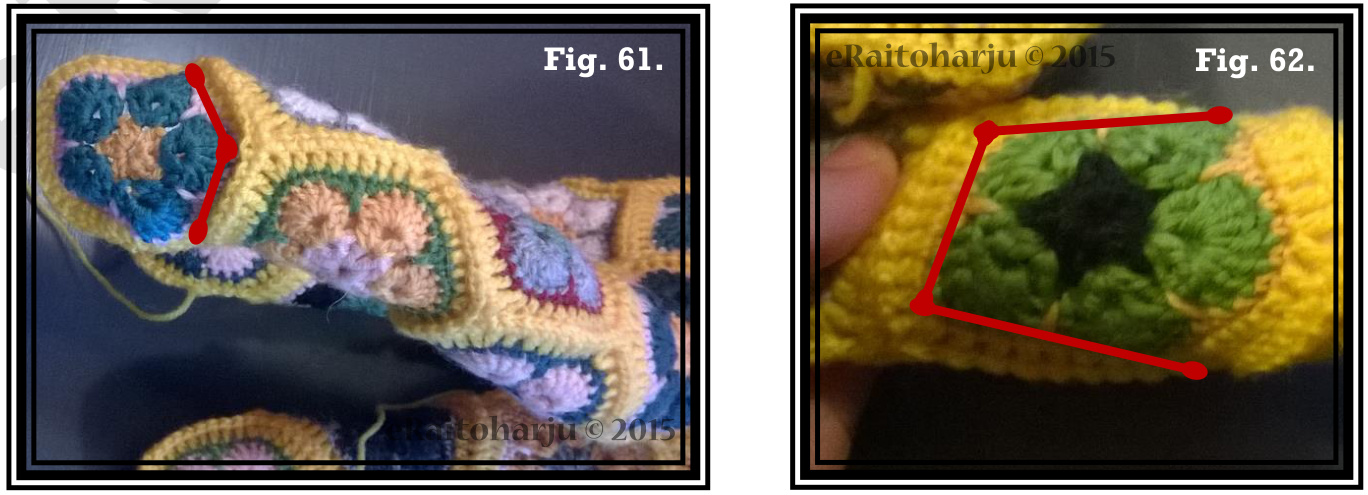
49. Make a FIvE and attach it from two sides to the growing tail (Fig. 61.). 50. Make a FIVE and attach it to the FIVE made in step 47. from one side and to the FIVE made in step 49. from two sides reforming the triangular hole (Fig. 62).
51. Fill the tail. Make a FIVE and attach it to all three free sides of the tail and Lazy Leopard Crochet Pattern
Ears and Face
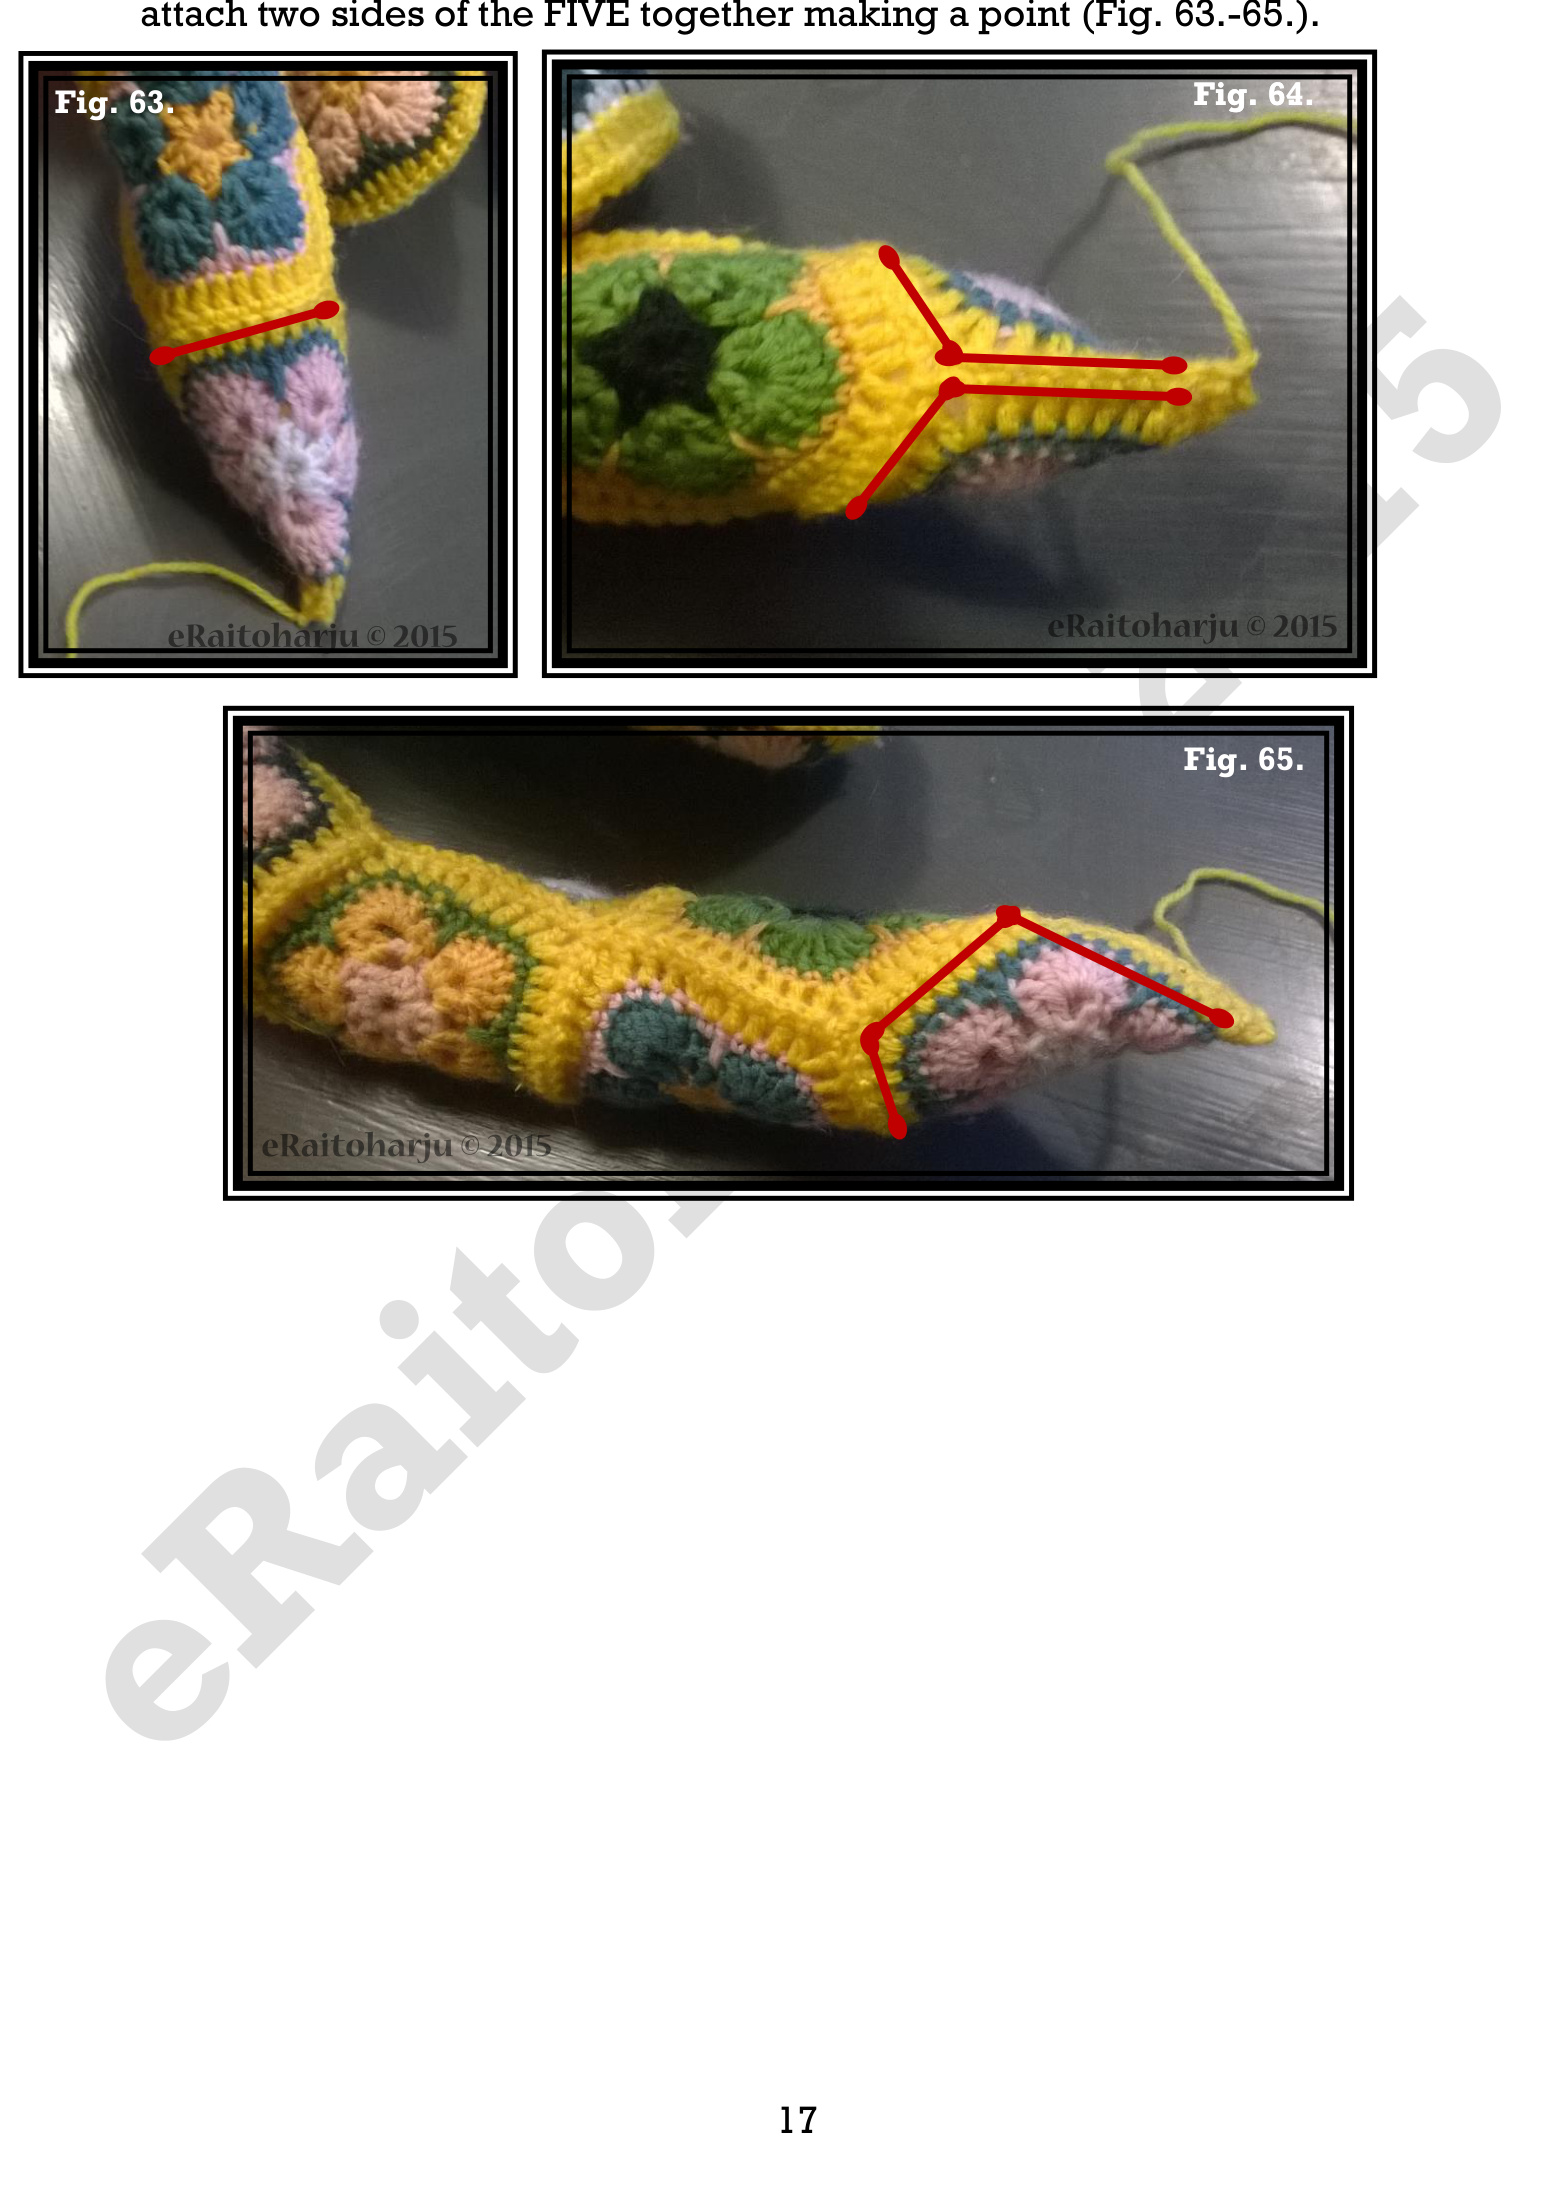
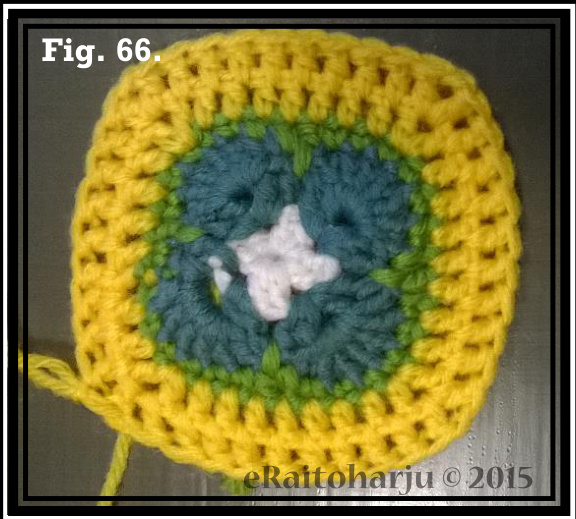
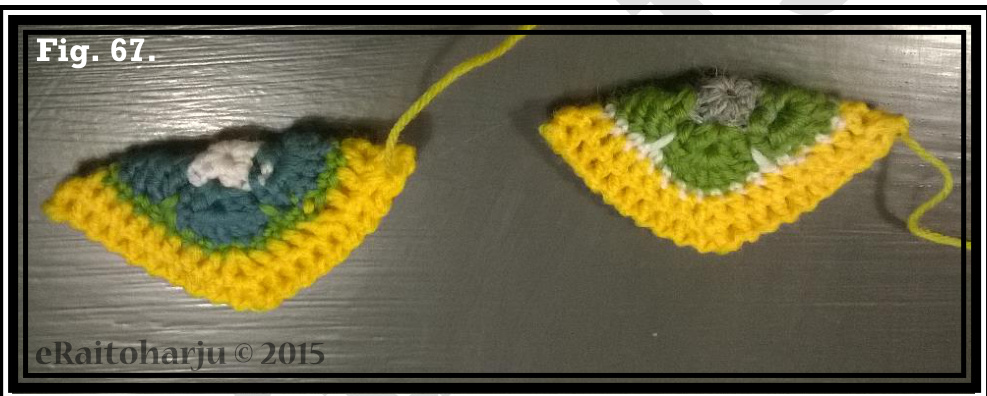
Do not worry if your Lazy Leopard does not look like a feline at this point. Few simple steps left and then the Leopard will look like one. 52. Make two EAR-FOURs. These are regular African flower square motifs, but after the row of double crochets, make three chain stitches and then another round of double crochets (Fig. 66.). Leave enough yarn for stitching the ears to thehead 53. Fold the squares to make triangles (Fig. 67.
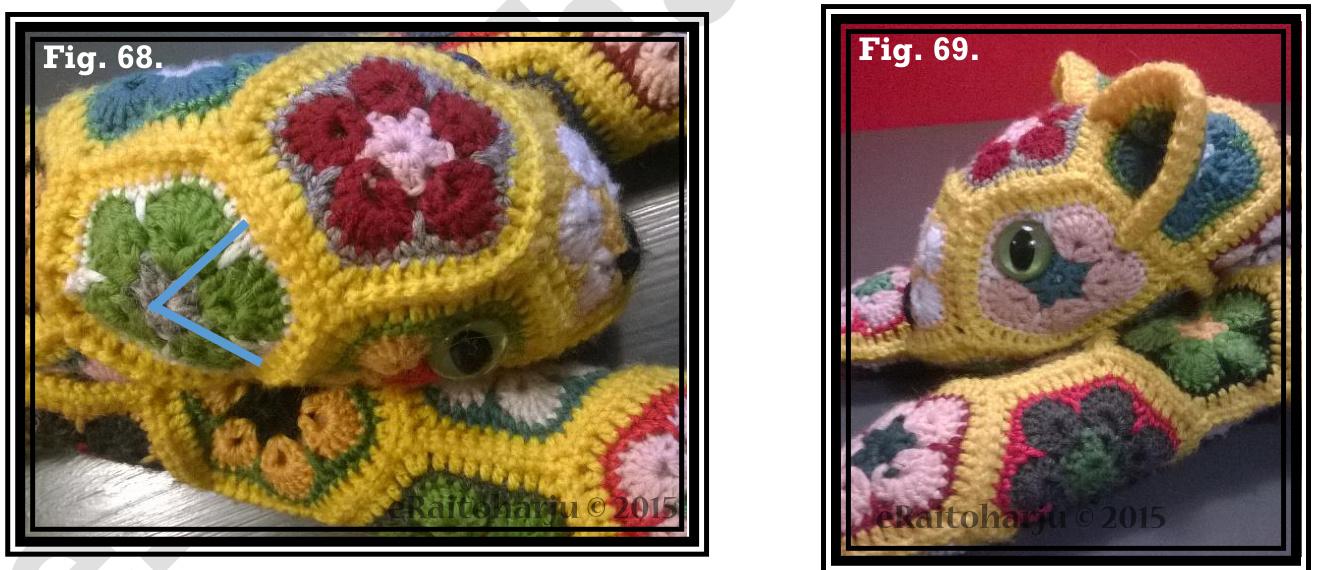
54. Attach the ears to the head to the position marked with blue in Fig. 68. Final ears if Fig.69.
55. If you haven't done the nose yet, do it now. Covering the area of one of the pedals of the face pentagon black or dark brown will do it (Fig. 70.). Lazy Leopard Crochet Pattern

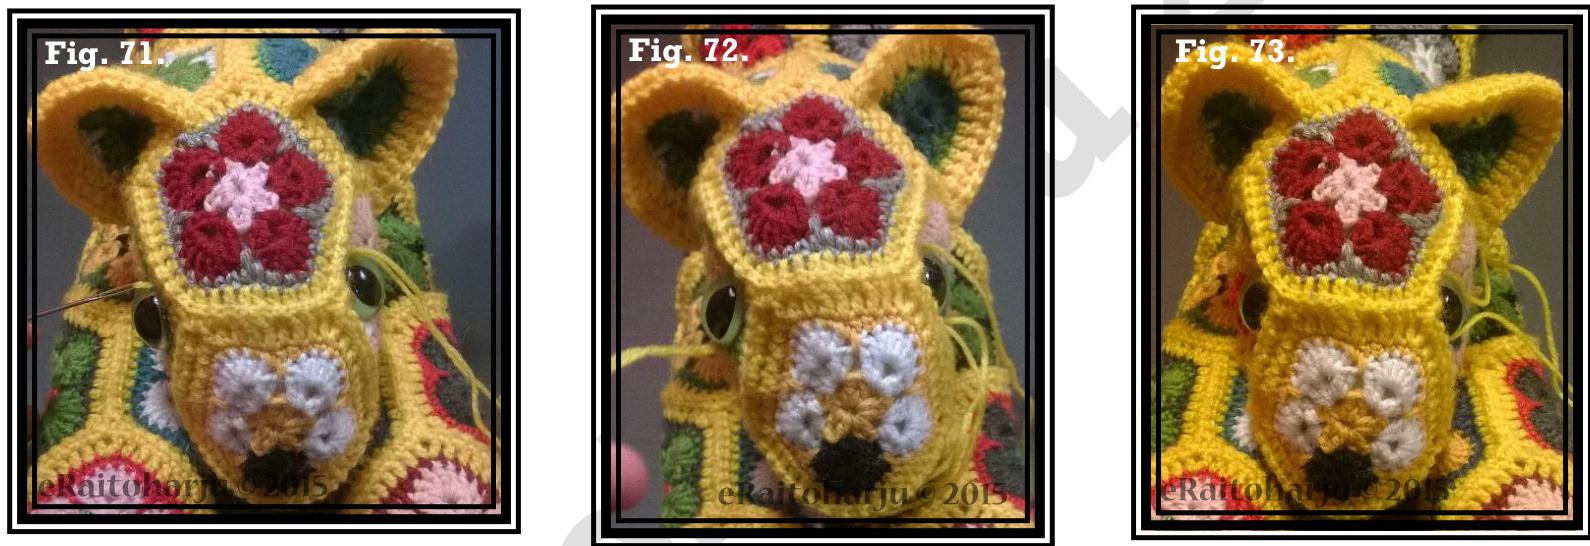
56. If you have not attached the eyes do it now. Then either with the yarn used to attach the eyes or additional yarn make eye sockets (and making the Leopard looking more feline). Pull the yard through the head and make a small stich and the pull the yarn back. Then tighten a little, pulling the eyes just slightly inside the head. I you are using large safety eyes like me, it is better to do another stich tightening both above and under the safety eye (Fig. 7l.-73.).
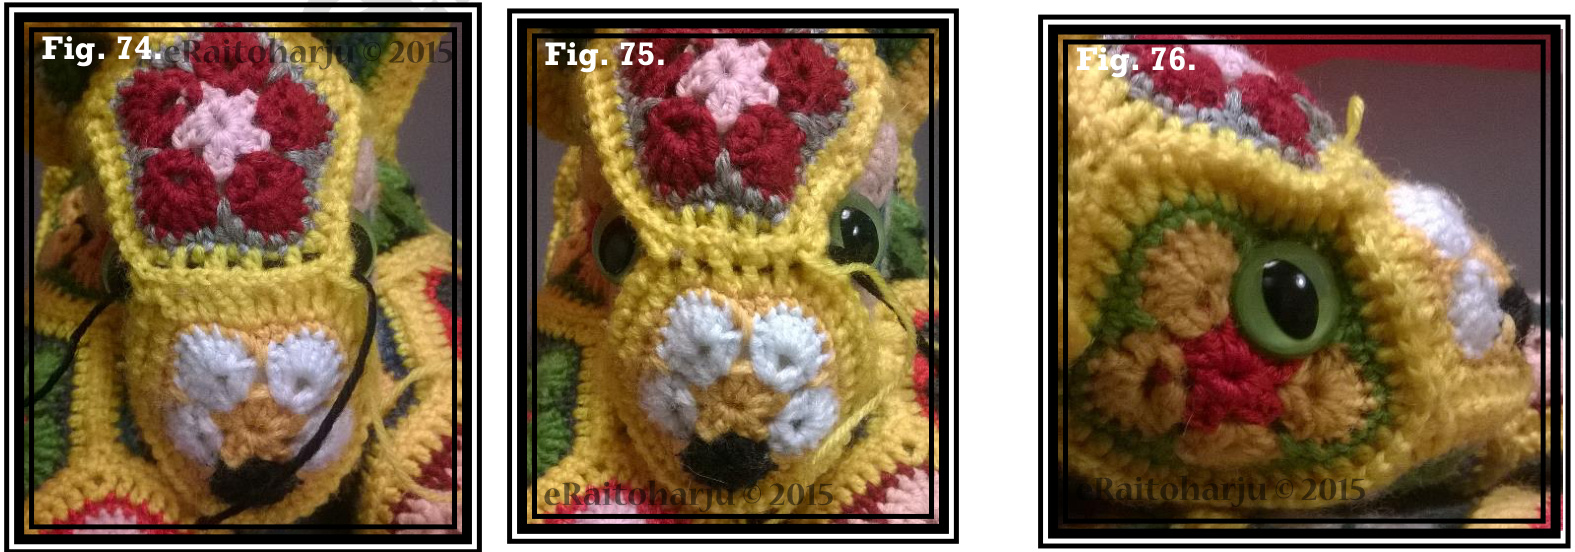
57. To make the muzzle more prominent, pull yarn thought the seam between the muzzle motif and forehead motif and tighten (Fig. 74.-76.) 1 have used black yarn in these figures to show where the yarn is placed.
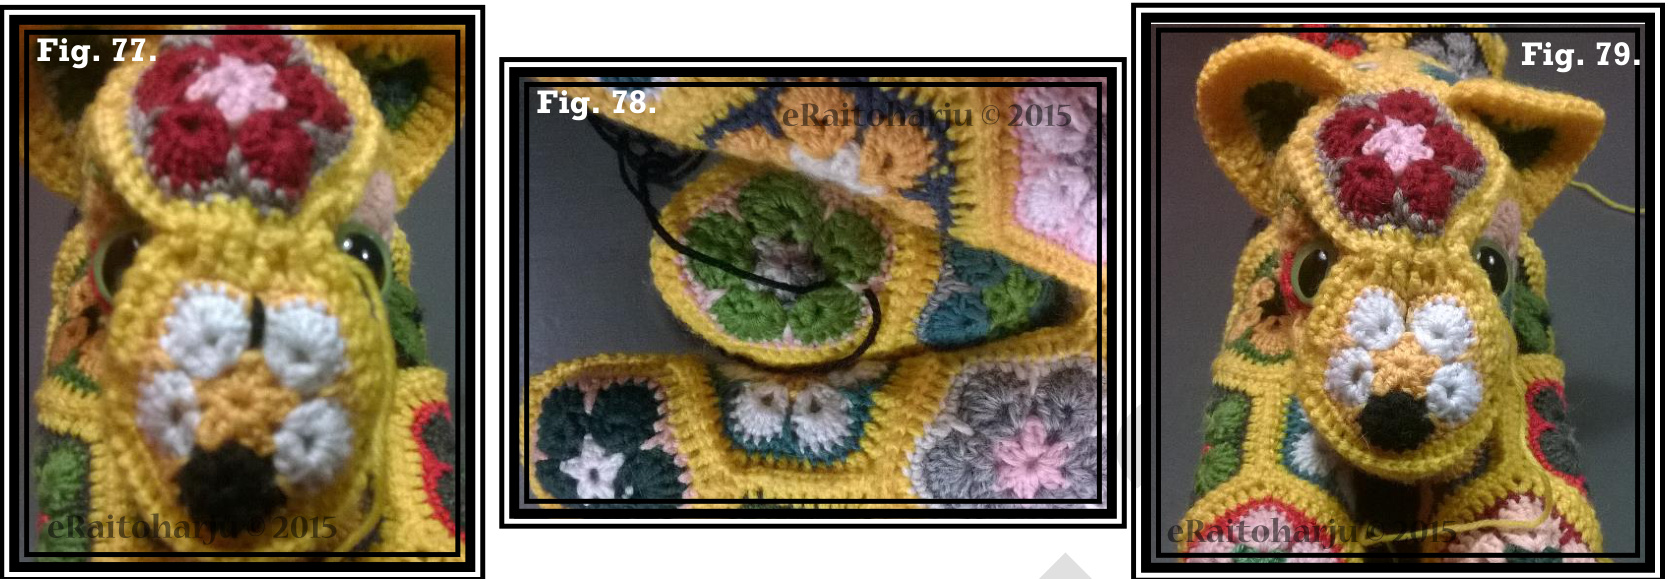
58. For the final adjustment to get the perfect face to Lazy Leopard, make one stich vertically through the muzzle and tighten slightly. The perfect spot for this stich is between the upper pedals of the NOSE-FIVE motifs (Fig. 77.-79.). Again, the placement of the stich is show here using a black yarn. You should use yarn suitable for your Leopards color.
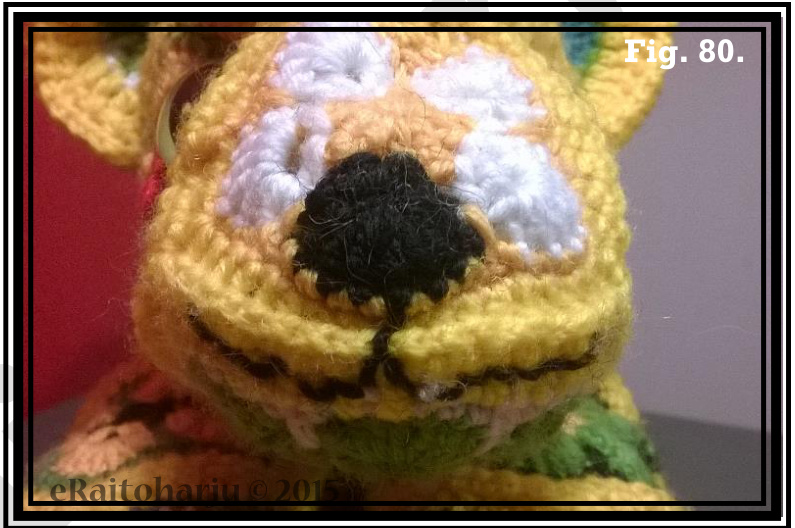
59. Finally, you can make your Lazy Leopard smile. I used black yarn, just a slight smile and the seam between the NOSE-FIVE motifs as a sort of an upper lip (Fig. 80.).
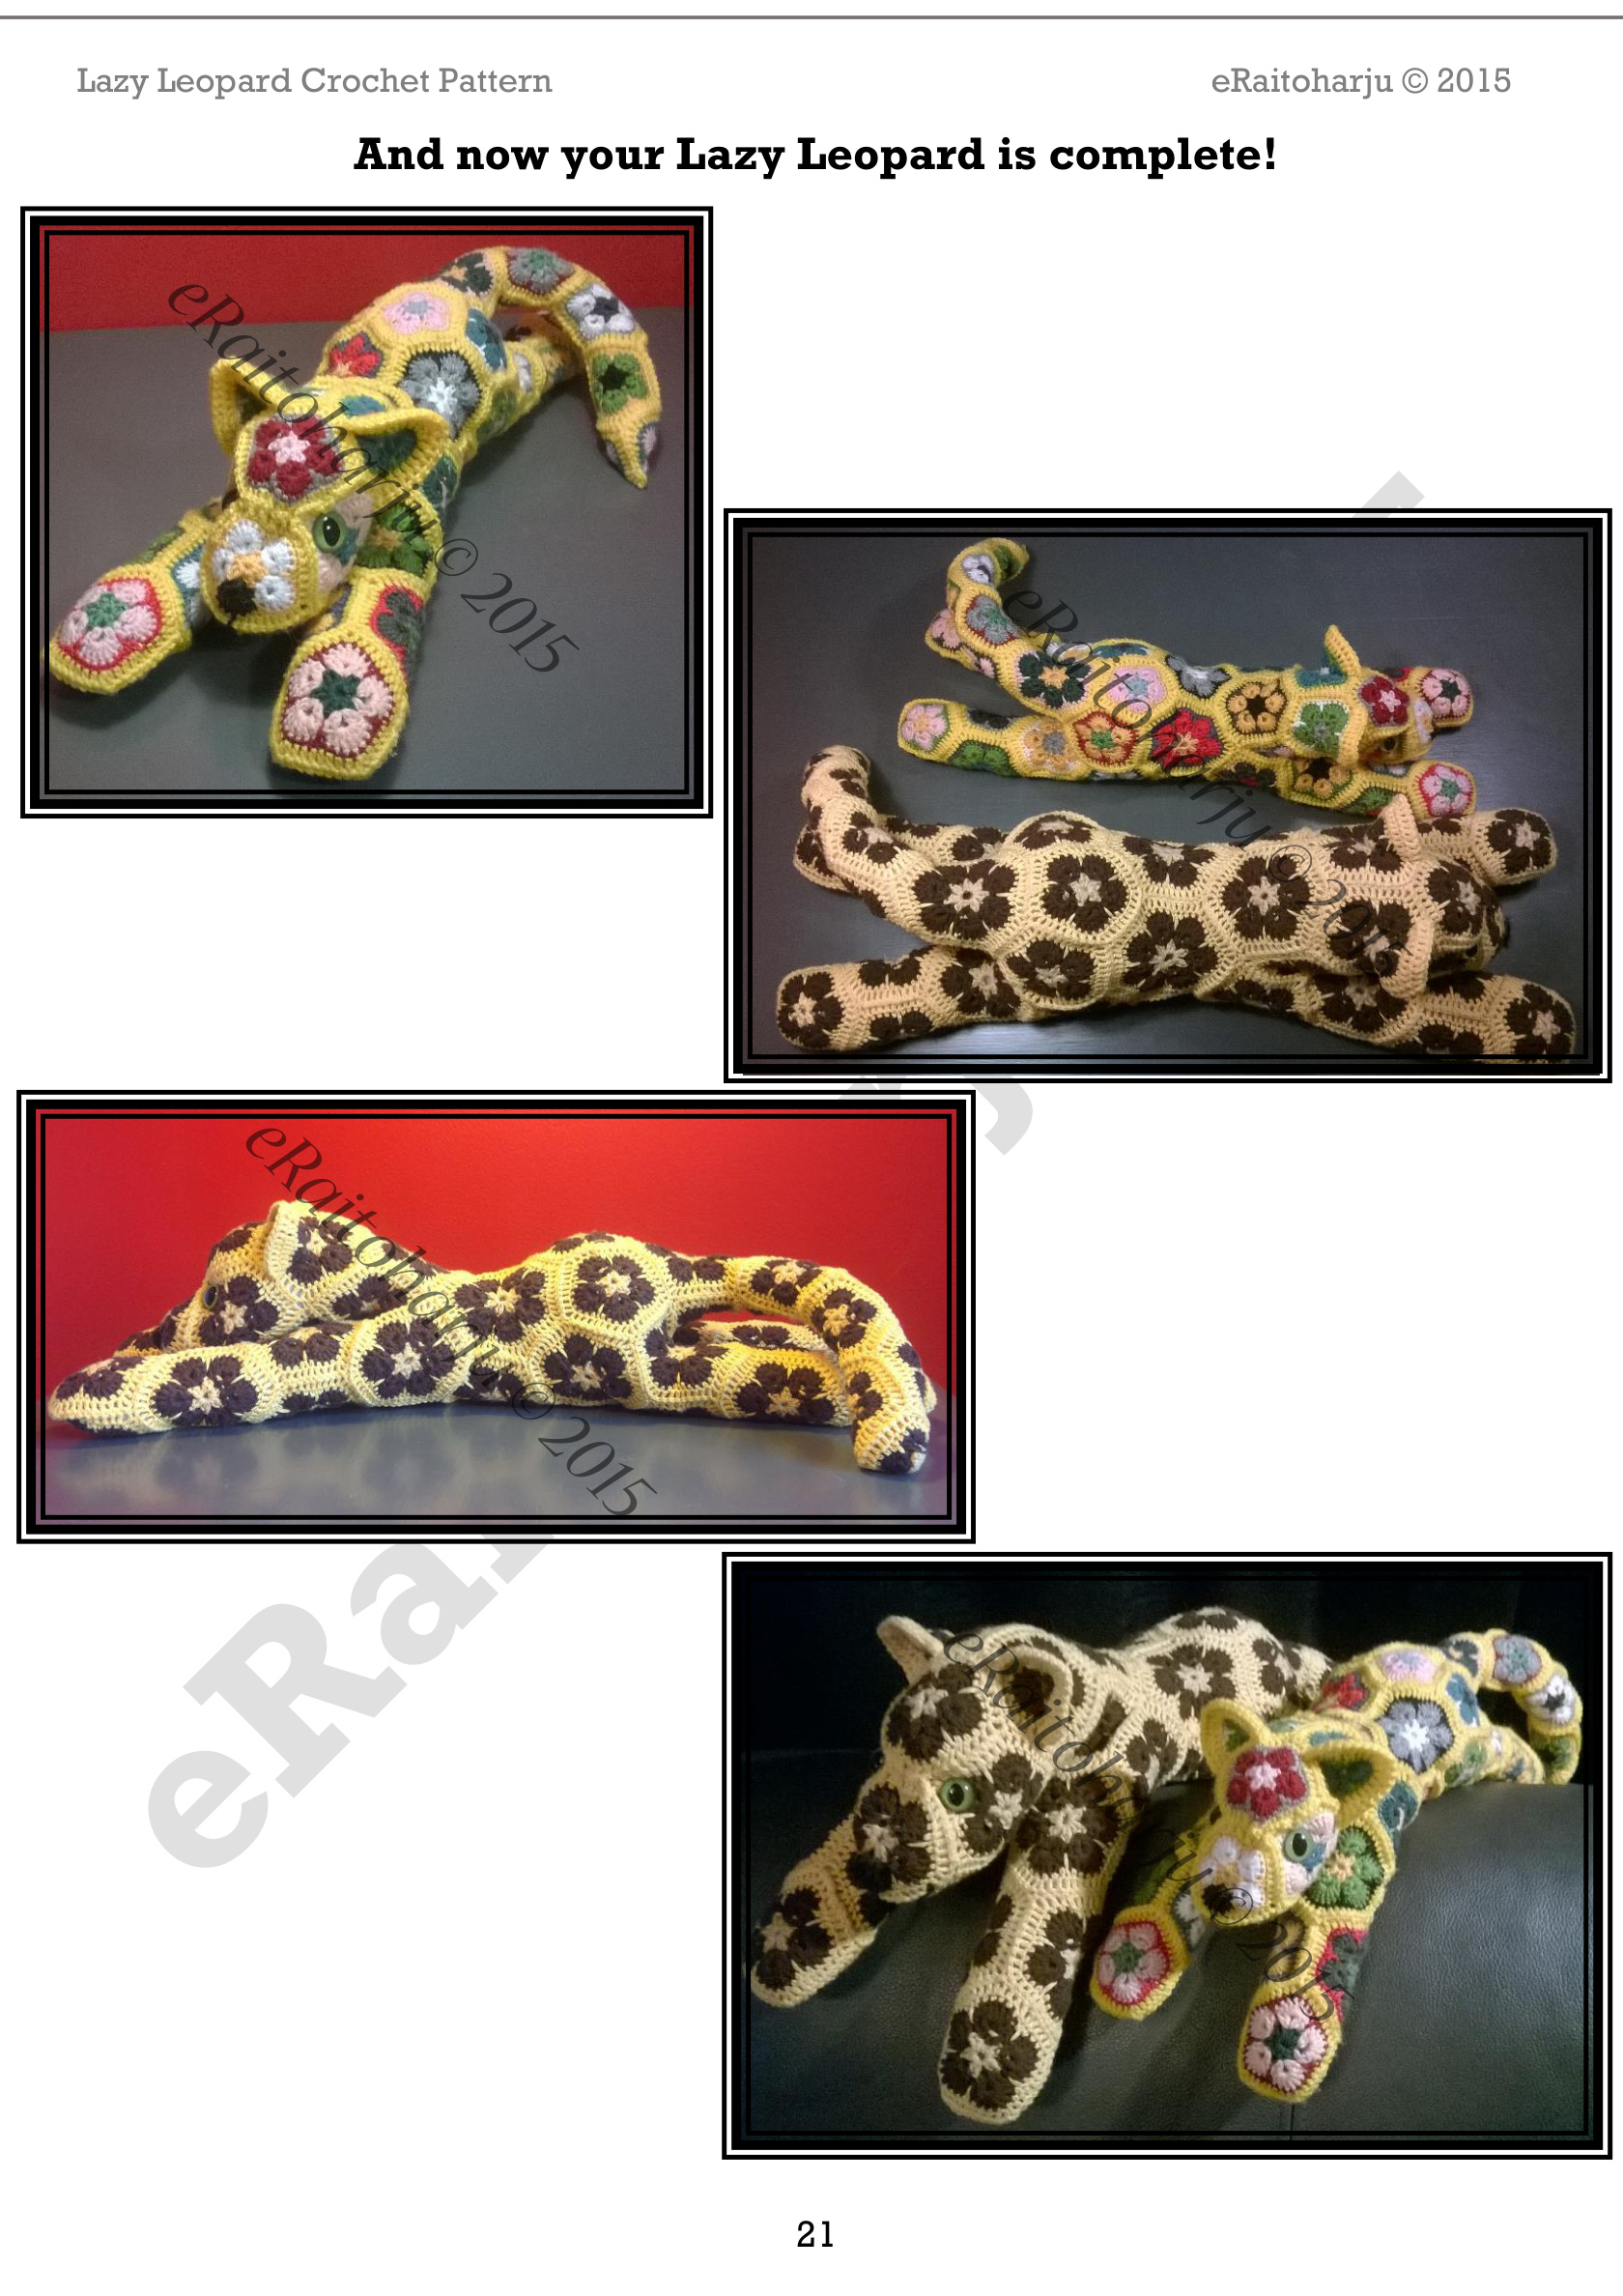
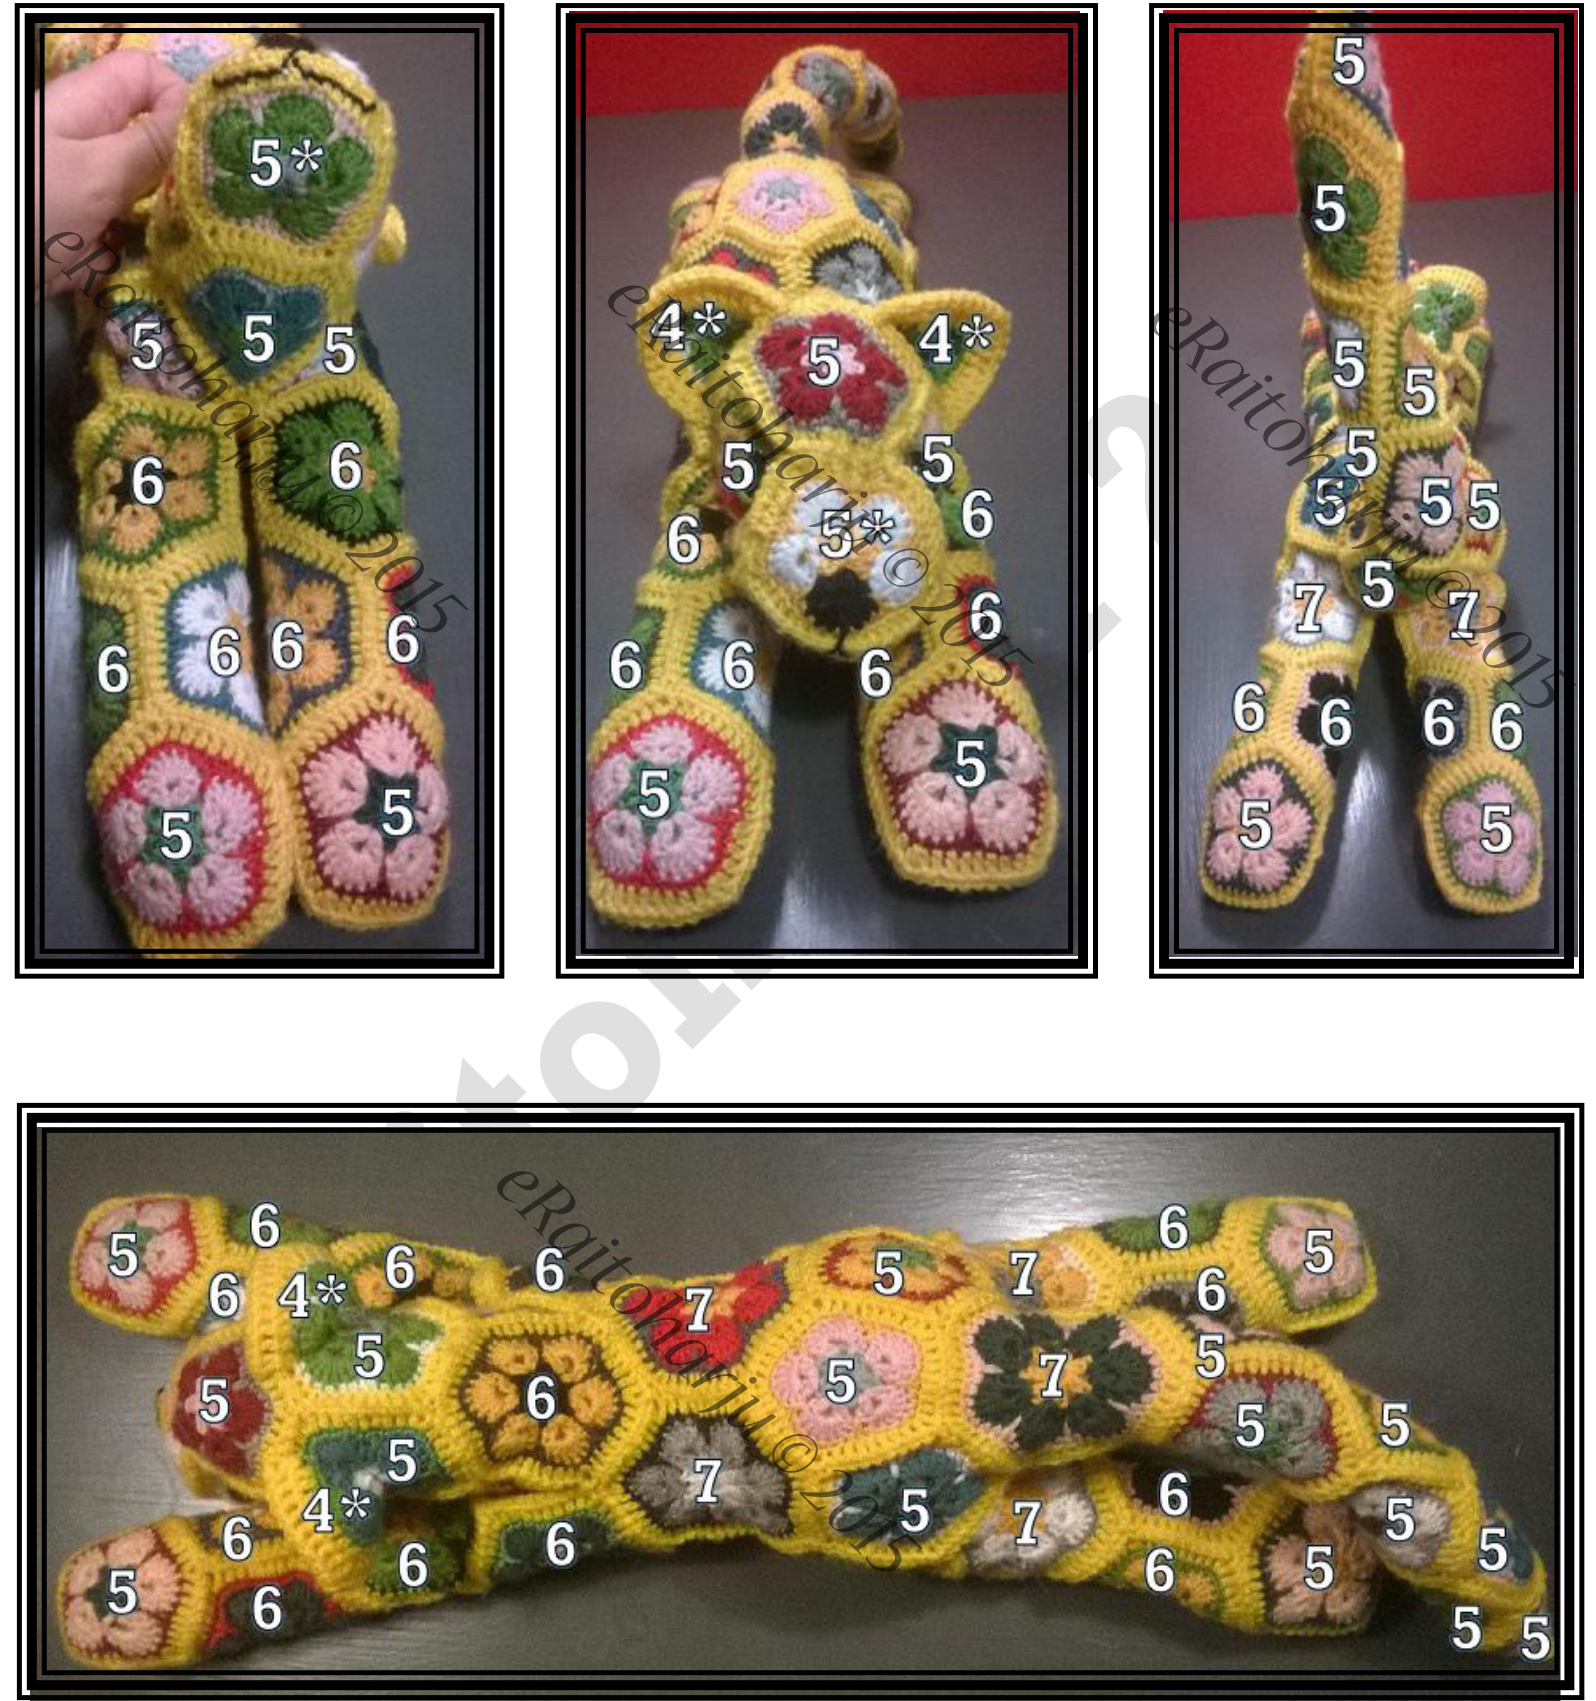
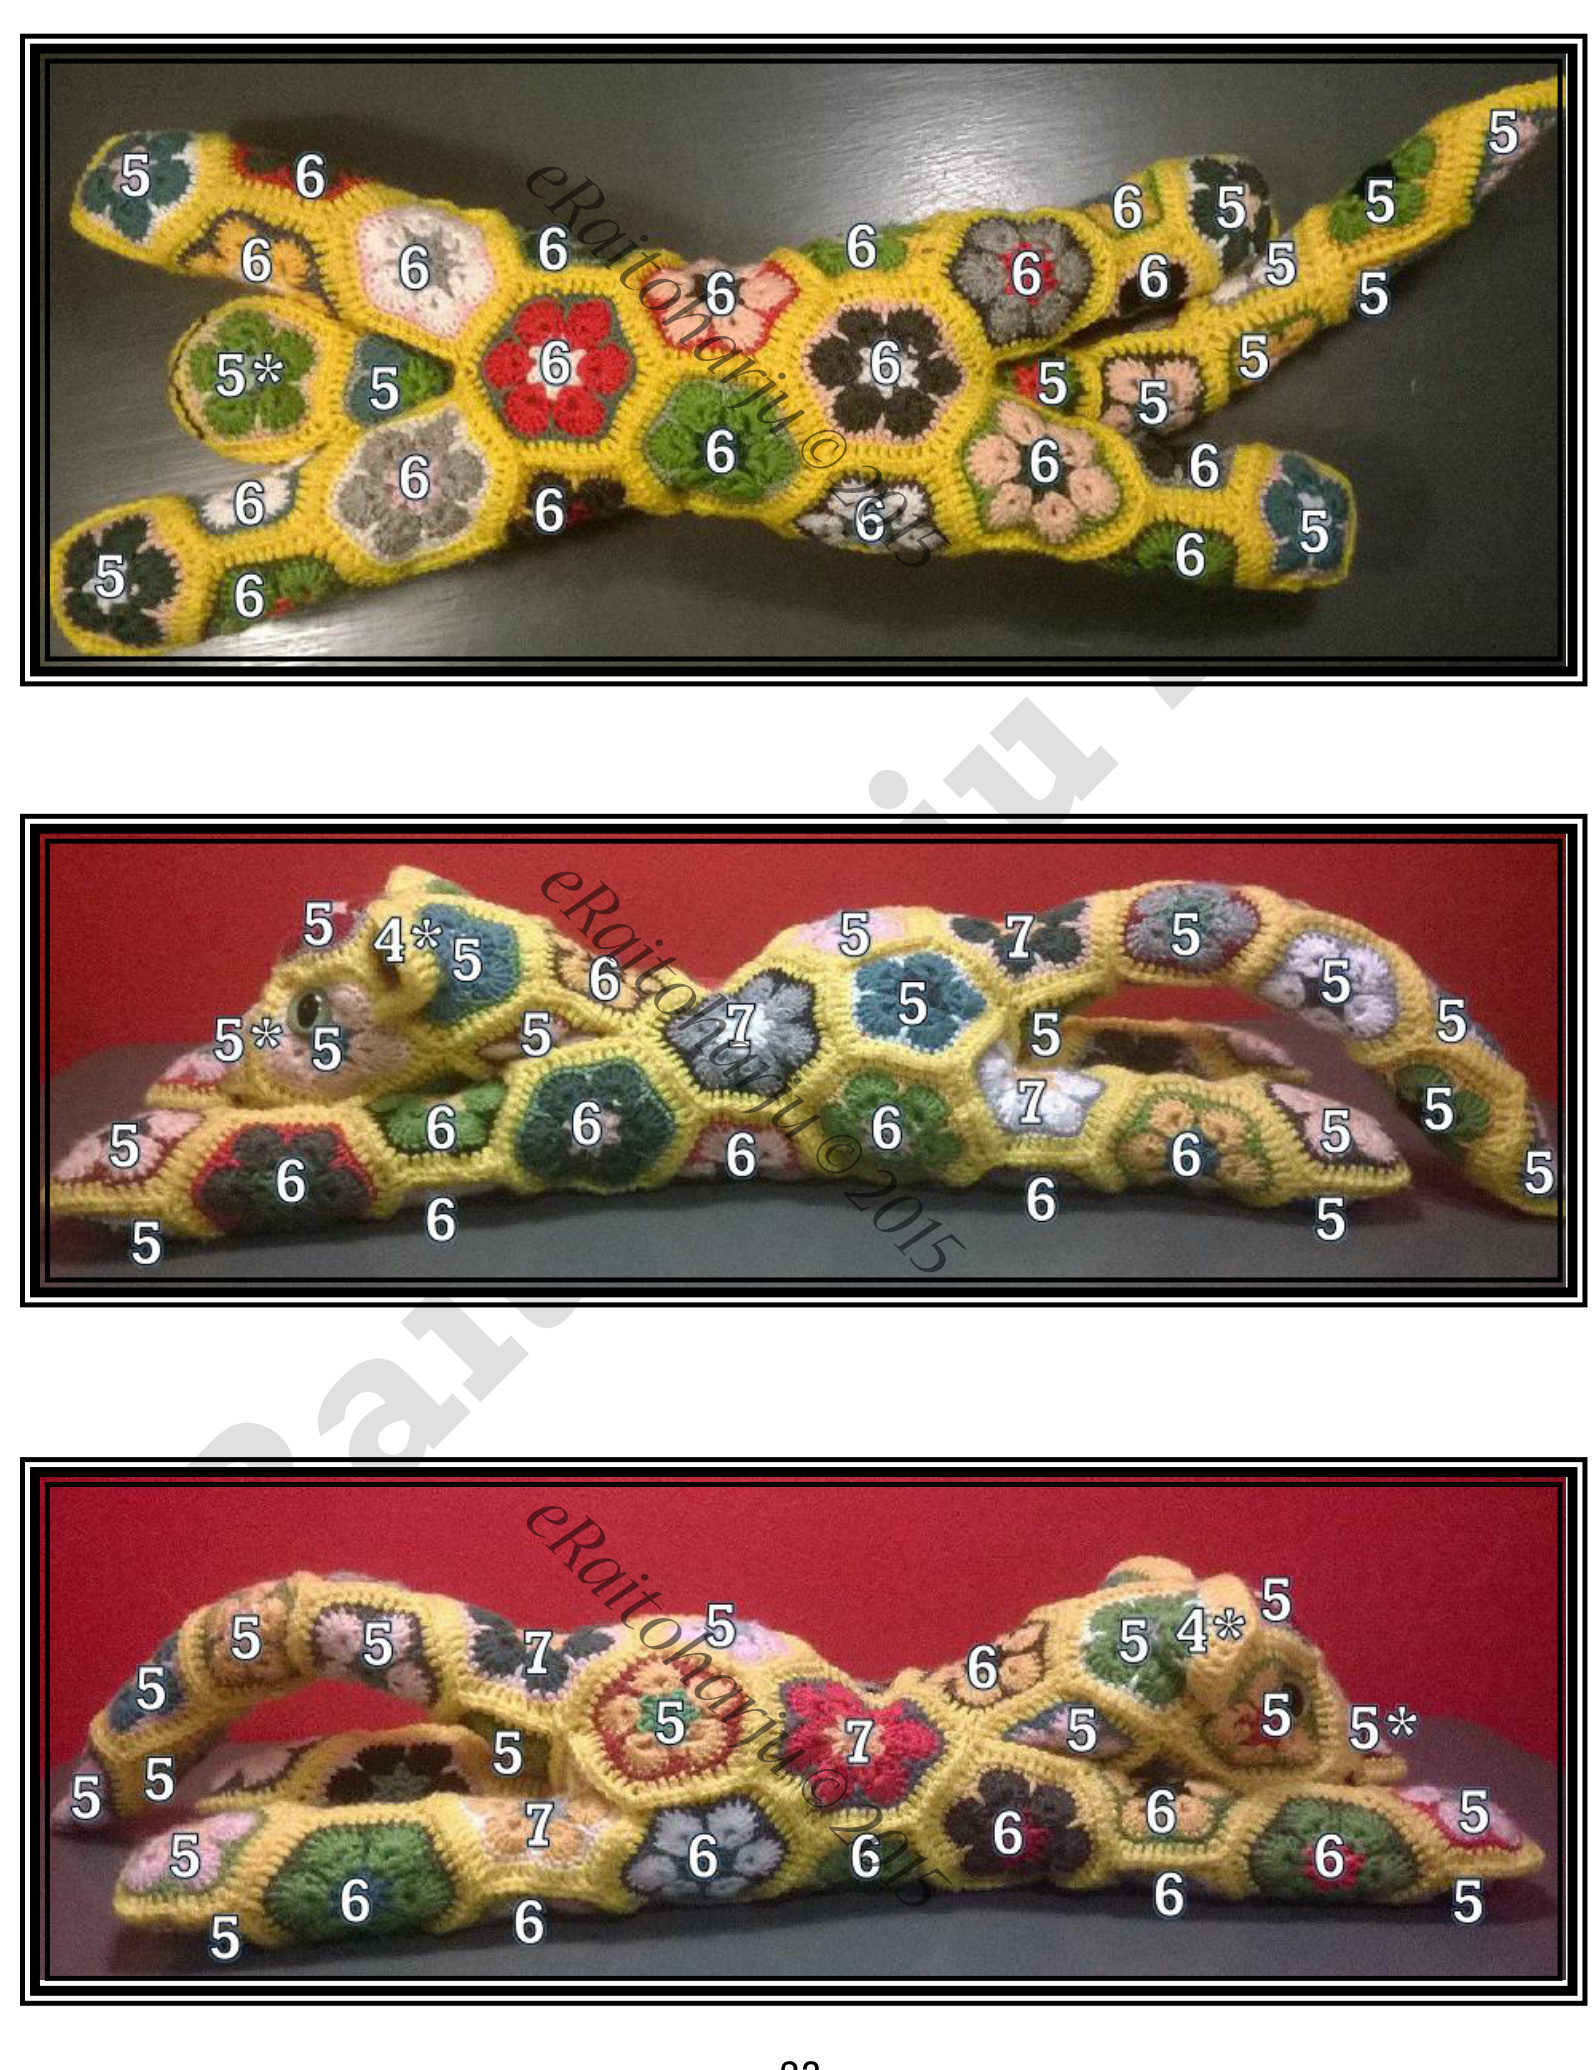
Here are the pictures that can be used as a checklist when making your second or third Lazy Leopard
4\*=EAR-FOUR,5\*= NOSE-FIVE