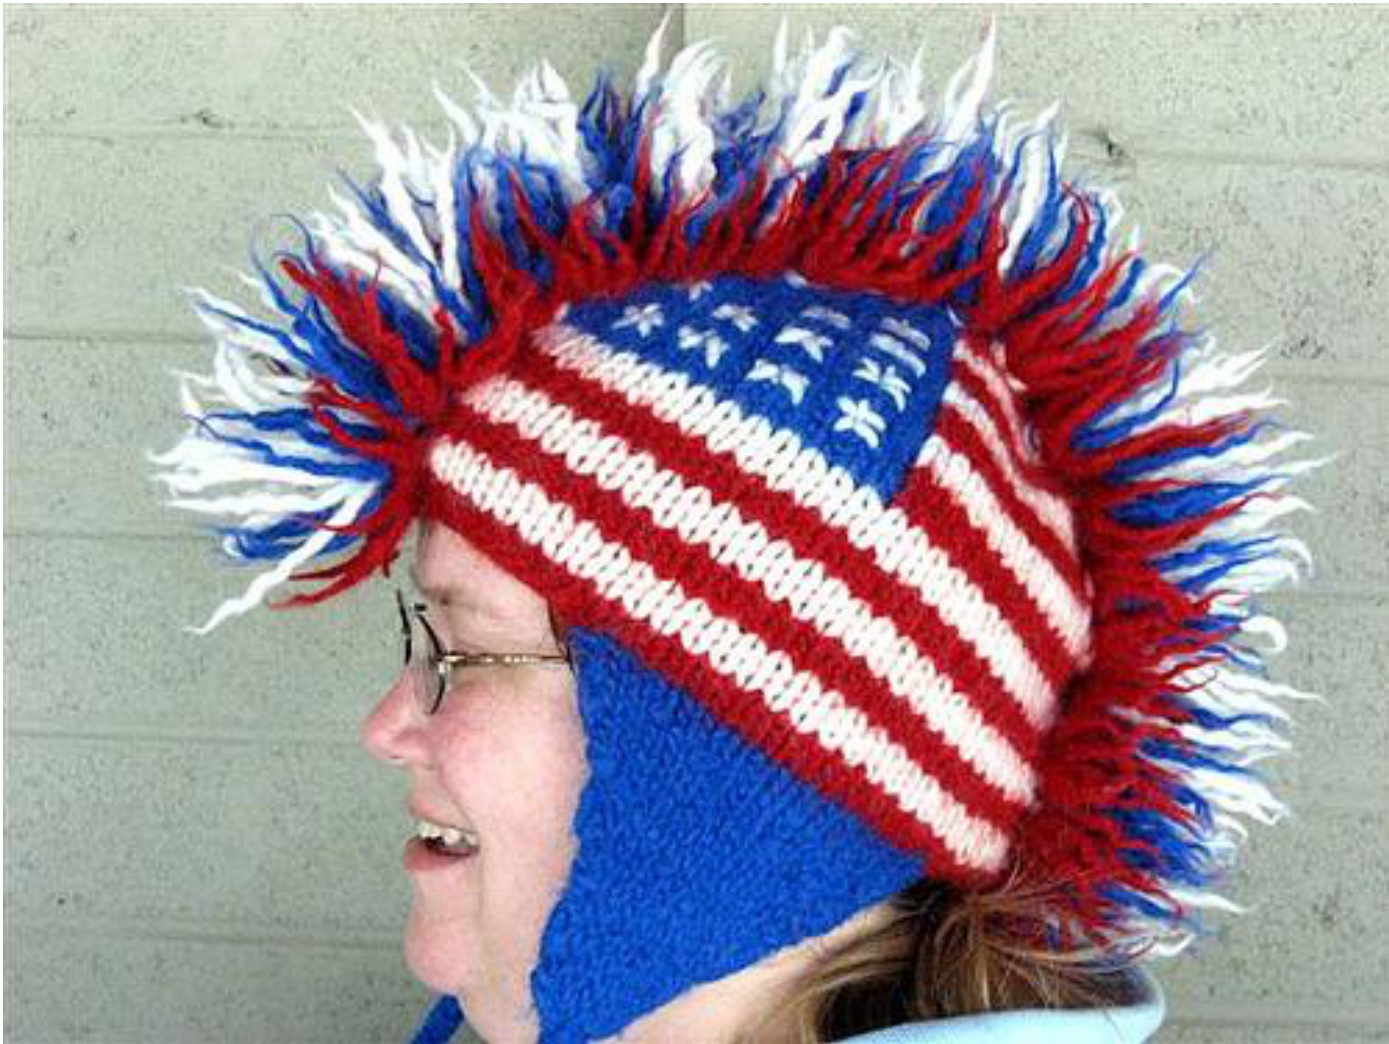
The Betsy Ross Fauxhawk By: Pam Richardson
Materials:
·Size US 10 % needles for small hat (size US 11 needles for a medium hat, size US 13 needles for a large hat) or size required to get the correct gauge Yarn bobbins, optional Row counter, optional Size US 11 double-pointed needles Darning needle Size I crochet hook 1 skein blue bulky weight wool yarn, 125 yards (Brown Sheep Co., Lamb's Pride Bulky, 85% wool, 15% mohair, Blue Boy, M79) 1 skein white bulky weight wool yarn, 125 yards (Brown Sheep Co., Lamb's Pride Bulky, 85% wool, 15% mohair, Creme, M10) 1 skein red bulky weight wool yarn, 125 yards (Brown Sheep Co., Lamb's Pride Bulky, 85% wool, 15% mohair, Ruby Red, M180)
Gauge In Stockinette Stitch:
13 stitches and 17 rows make a 4-inch square on size Us 10 % needles, before felting 12 stitches and 16 rows make a 4-inch square on size US 11 needles, before felting 11 stitches and 15 rows make a 4-inch square on size US 13 needles, before felting
Finished Measurements:
Size small fits 18 - 20 inch head circumference Size medium fits 20 - 22 inch head circumference Size large fits 22 and larger head circumference
Skills and Methods:
Felting Fringe I-cord Intarsia Stockinette stitch
Pattern:
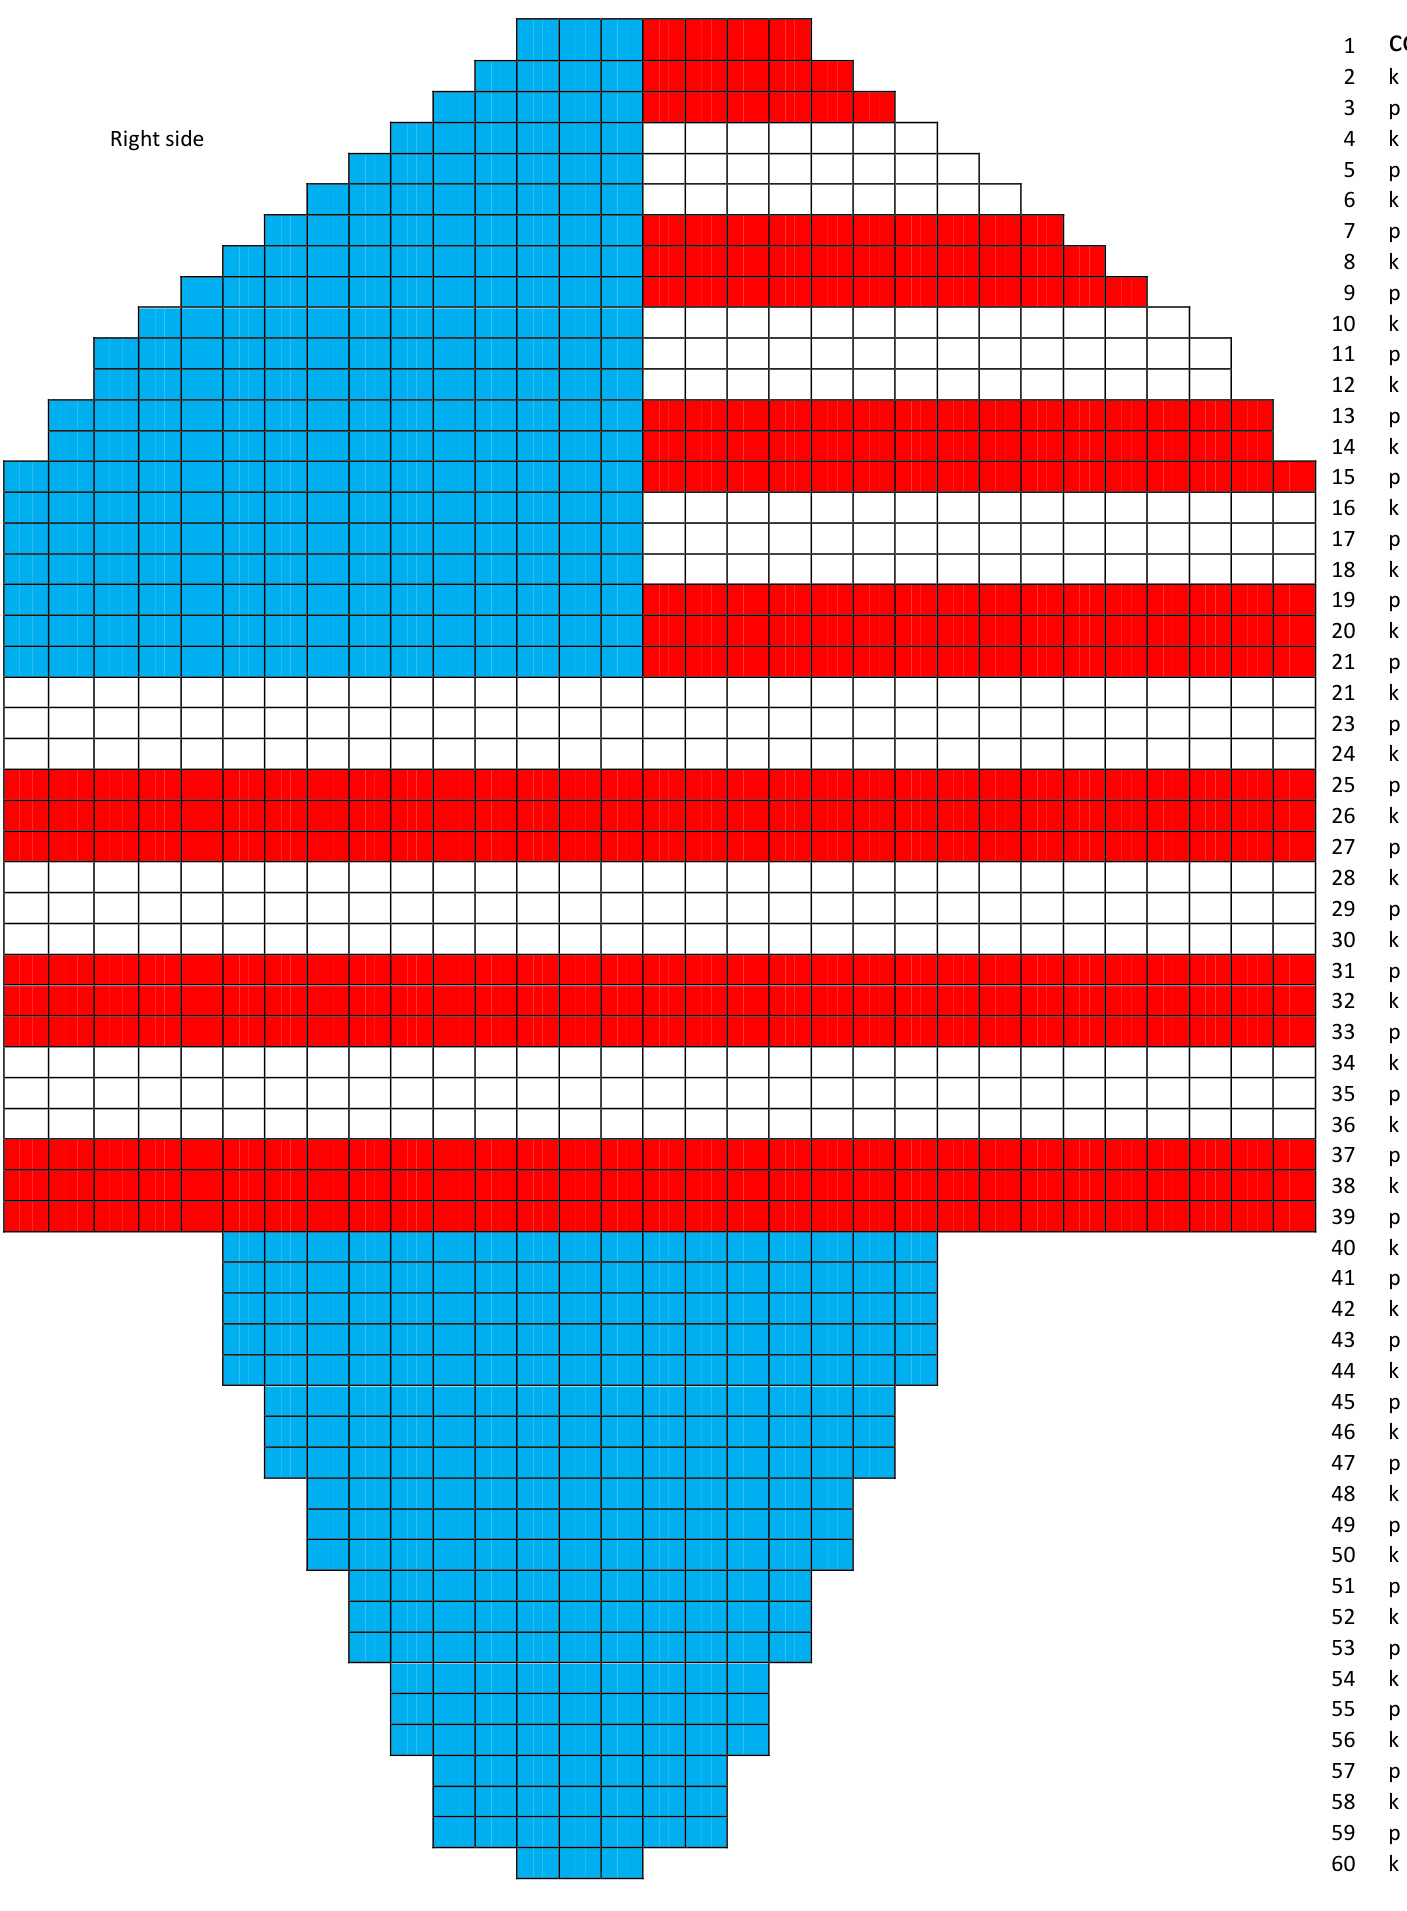
Right side of Fauxhawk:
Cast on 7 sts in the following order: 3 blue and 4 red on the size straight needles needed for gauge. This counts as the first row of the right side intarsia graph. Work rows 2 to 38 in stockinette stitch, following the right intarsia graph. To create the rounded dome, you will increase along the side edges in order to keep the flag design centered on the hat. When increasing, I suggest knitting into the front and back of the stitch on the edges of the row. You will be increasing at the beginning and end of the following rows: 2, 3, 4, 5, 6, 7, 8, 9, 10, 11, 13 and 15. Row 39: Bind off the first 5 sts, purl 17 sts, bind off last 9 sts. Break the yarn. You should have the 17 live stitches on your needle ready to begin the earflap. Row 40: With the blue yarn knit across the 17 live stitches for the earflap. You will continue to knit the earflap in stockinette stitch. To create the tapered shape of the earflap, you will need to decrease along the sides, knitting or purling the second and third stitches together, as well as the second and third to last stitches together on a row to maintain a clean edge. You will need to decrease at the beginning and end of the following rows: 45, 48, 51, 54, and 57. Row 59: Bind off the first 2 sts, purl 3 sts, Bind off the last 2 stitches. Break the yarn. Row 60: Transfer the stitches to one of the double pointed needles, then knit across the 3 sts with blue yarn. From these three remaining stitches you will make an I-cord. Slide all the stitches to the right end of the needle in your left hand. Pull the yarn from the left side of the work across the back, and knit the first stitch on the right side. Knit to the end of the row. Slide your work to the right end of the left needle and repeat until the I-cord measures approximately 12 inches or desired length. Bind off and break the yarn.
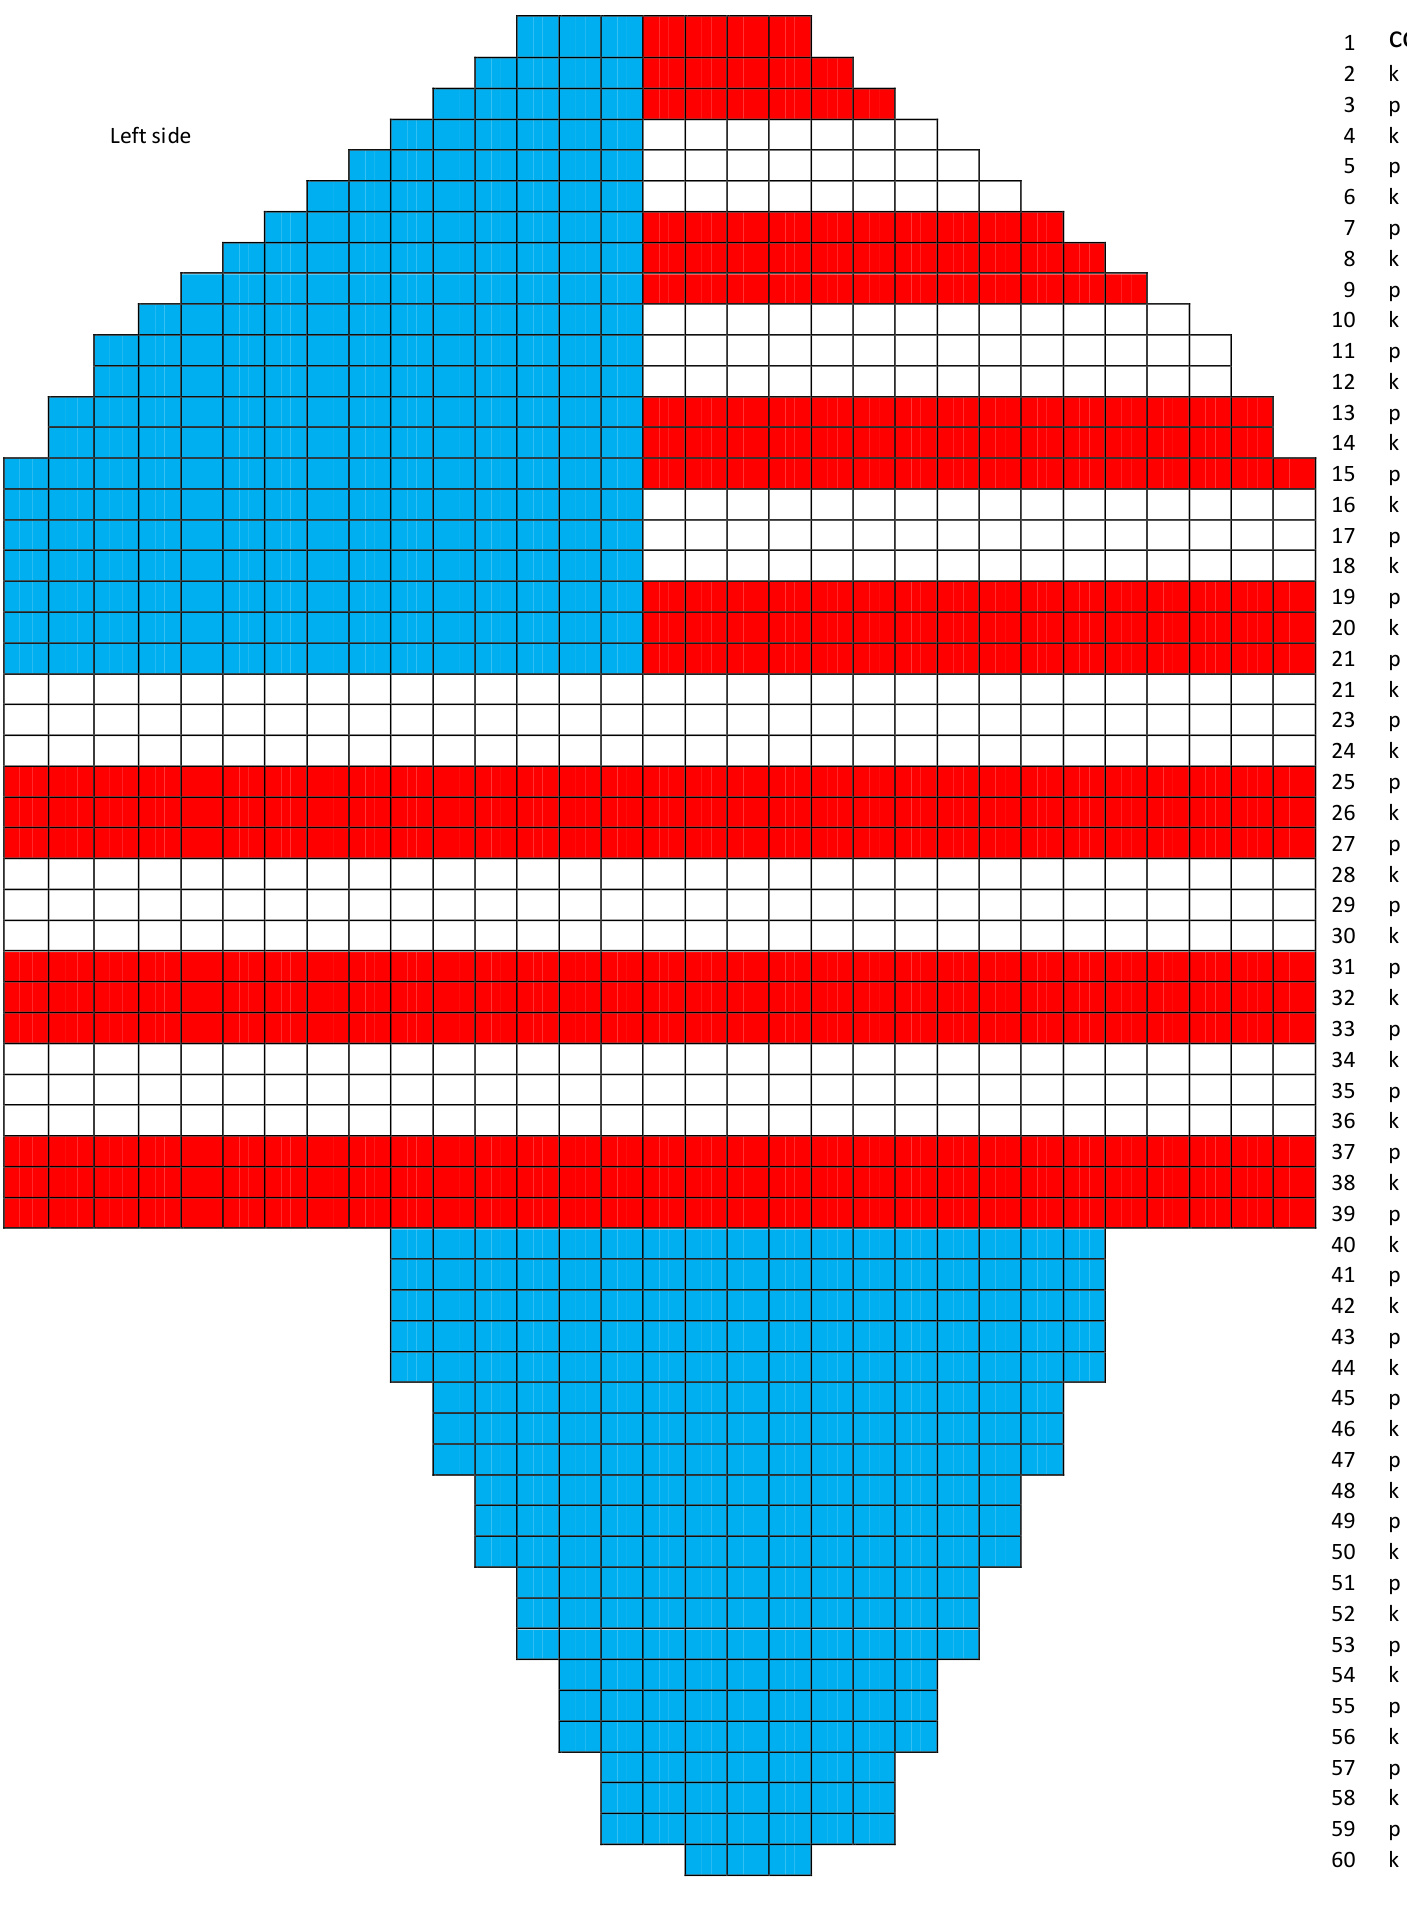
Left Side of Fauxhawk:
Follow directions for the right side of the fauxhawk for rows 1 to 38. Row 39: Bind off the first 9 sts, purl 17 sts, bind off last 5 sts. Break the yarn. You should have the 17 live stitches on your needle ready to begin the earflap. Follow the directions for the right side of the fauxhawk for rows 40 to 60.
Piecing the Fauxhawk together:
With RIGHT SIDES FACING, stitch together along the outer seam, domed edge, with a darning needle and a length of yarn. The color of this yarn will not matter, as it will be on the inside of the hat and not visible once the fauxhawk is in place. When seaming, make sure the edges of each side line up, it is good to line up the stripes in the flags so that they match. One way to keep the pieces in place while you are seaming is to pin the sides together. Weave in all of the loose strands into the back of the knitting. Turn the fauxhawk right-side out.
Creating the stars:
The stars were added to the blue ground by embroidery before felting. The placement and number of stars is up to you. The easiest way to make the stars is to stitch an 'X' where you want a star placed. The stars I created were five stitches meeting in the middle. You could also use beads or buttons to make the stars, but wait until after the hat is felted to add those embellishments.
Creating the fringe:
The fauxhawk as pictured above was created by layering 3 different lengths of fringe in two rows across the entire center seam of the hat. These will be directions to make a fauxhawk that looks like the one in the picture, but you can arrange the colors in any way you want. You will need to cut individual strands of yarn to form the fringe. Including the fringe on the ends of the I-cords, you will need to cut 40 sets of fringe - 1 set for each I-cord end and 19 sets for each side of the hat for the Mohawk. Each set consists of 3 white strands, 3 blue strands, and 3 red strands. For the center fringe, you will need the white strands to measure 8 inches long. For the middle fringe, you will need the blue strands to measure 7 inches long. For the outer fringe, you will need the red strands to measure 6 inches long. To do this quickly and precisely, all you need is 3 different pieces of cardboard: one piece measuring 4-inch-by-4-inch, one piece measuring 3.5-inch-by-3.5-inch, and the last measuring 3-inch-by-3-inch. Take the white yarn and the 4 inch square of cardboard, hold the end of the yarn at the bottom edge of the cardboard, and wrap the yarn around the cardboard three times. Snip the yarn horizontally across the bottom. Next take the blue yarn and the 3.5 inch square cardboard, hold the end of the yarn at the bottom edge of the cardboard, and wrap the yarn around the cardboard three times. Snip the yarn horizontally across the bottom. Then take the red yarn and the 3 inch square cardboard, hold the end of the yarn at the bottom edge of the cardboard, and wrap the yarn around the cardboard three times. Snip the yarn horizontally across the bottom. And the 3 strands of red, white and blue together and you will have your first set of fringe. Repeat 39 more times. For the I-cord, insert your crochet hook through 2 loops at the end of one of the Icords. Fold 1 set of fringe in half. Hook the folded loop with your crochet hook, pull the loop through, and then pull all the fringe ends through the loop to secure. Repeat this step to attach the fringe to the end of the second I-cord. And now to create the Mohawk. To begin the fringe, begin on one side of the hat by inserting your crochet hook through the first stitch next to the seam in the fourth row of knitting. Arrange the fringe so that the longest fringe is toward the seam of the hat and the shortest is facing the outside. Fold this set of fringe by looping it on the crochet hook, then pull it toward you creating a knot with the first set of fringe. Place the next set of fringe on the same face of the hat on the opposite side, putting the crochet hook through the first stitch next to the seam in the fourth row of knitting and make the next knot of fringe. The third knot of fringe should be at the top, center point of the first face. The next two knots should be placed halfway between the center knot and edge knots. Continue adding knots halfway between existing knots until you have placed all 19 knots on the first face of the fauxhawk. Repeat this process on the other face of the fauxhawk, placing 19 knots of fringe.
Felting
Now the hat has to be felted, it will make the fit more snug and will cause the Mohawk part of the hat to stick up and frizz. Place the finished fauxhawk in the washer, and run it through a hot cycle, no detergent. Unlike other felted projects, DO NoT place the fauxhawk into a pillow case or other washable bag. It will cause the Mohawk part of the hat to become too matted. Even without placing the fauxhawk in a bag, the fringe might mat some. You will need to separate each strand by grabbing the strands and tearing them apart, down to the knot. If you have any problems, feel free to contact me on Ravelry at PammieJR or by email at pamela.jean.richardson@gmail.com.