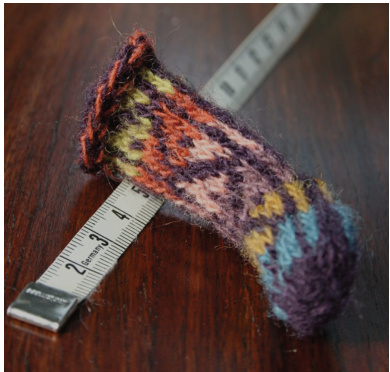
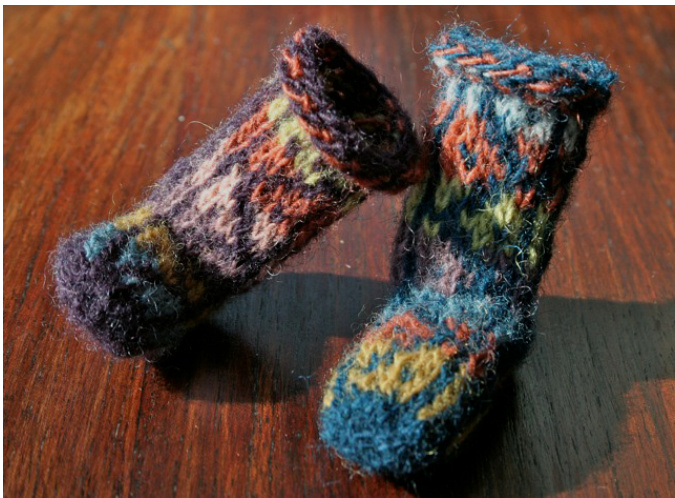
Miniature Turkish Stocking
About
The design motif running up this miniature stocking is based on a traditional Turkish pattern called “written charm, double,” which I have divided in half, vertically. It is also similar to a design called “walnut kernel? Both patterns are charted in Betsy Harrell's excellent book, Anatolian Knitting Designs (Istanbul: Redhouse Press, 1981). This sock pattern accompanies a blog post entitled T is for Turkey, an exploration of Turkish knitting and textile traditions, which can be found online: http://unionpurl.blogspot.com/2oo9/11/t-is-for-turkey.html Materials Odds & ends of lace weight yarn in one main color (MC) and at least two and up to six contrasting colors (CC). Sock yarn would work well. I used Isager Wool 1. Needles to achieve (or approximate) gauge, size oo $\left(1.75\;\mathrm{mm}.\right)$ )t2 $\left(3\:\mathrm{mm}.\right)$ ); either one long circular needl (if you use the magic loop technique), or ive double pointed needles. ince no one is going to wear these, you can knit them at just about any gauge, but mine were 1i stitches to the inch.
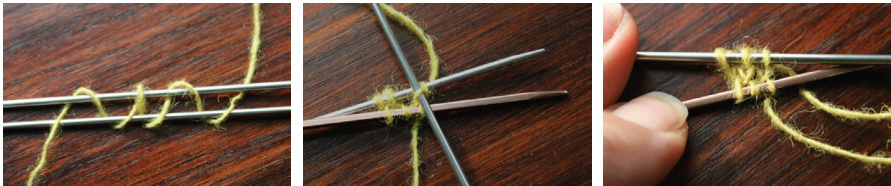
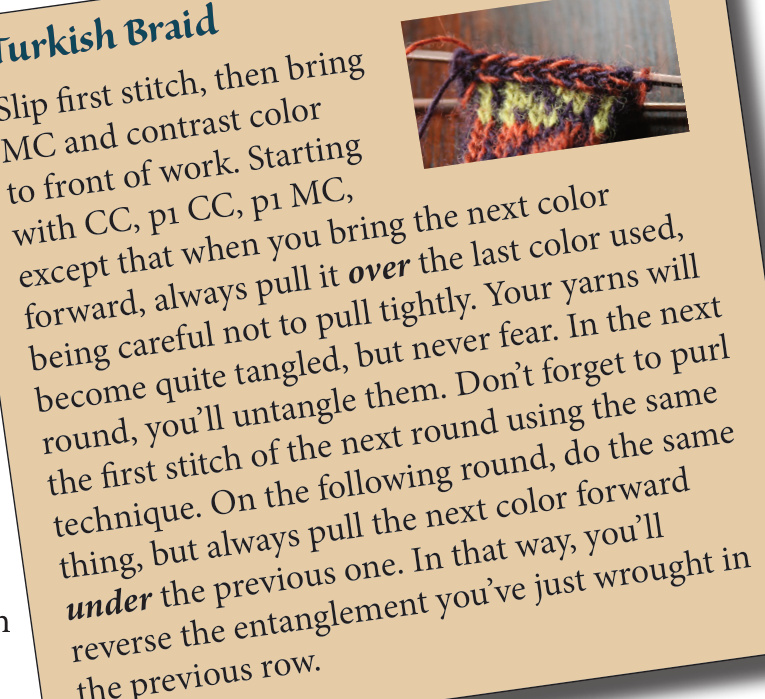
Toe This construction starts with the toe. Use the Turkish cast-on: wrap MC yarn around two needles in a figure eight between the two needles. IMake three complete wraps, so that you can start knitting three stitches on each side. Hold onto the yarn wrapped around the needles fairly firmly as you knit into each of the three upper loops of the figure eights wrapped around the top needle. Turn work and continue knitting into the three loops on the other side. You will now be knitting in two directions. Knit one more round, then begin to pick up stitches between the two rounds, as follows: Round 3: pick up two stitches between the upper and lower rows of stitches. If you are using dpns, use a separate needle for each of these side stitches. 1o stitches (2-3-2-3) Round 4, [k1, m1] 4 times, k2, m1, [k1, m1] 3 times, k1. 18 stitches (4-5-4-5) Round 5, k2, m1, k3, [m1, k1] 3 times, k2, m1, k3, [m1, k1] 2 times, k1. 23 stitches (5-7-5-6) Round 6, begin color chart, adding colors as directed on the chart. The first 12 stitches will form the front, or top, of the stocking, and next 1 will be the sole, and later the back. Mark the beginning of the row. Don't be overly concerned with knitting in ends. I tuck them into the toe as I knit, and do not weave them in later. Follow chart for rounds 6 through 13, changing contrast colors every four rows or as you like. Place 11 sole stitches on holder for heel after row 13, then cast on 12 stitches and continue knitting from chart, being careful not to twist as you re-join the new caston stitches to the front. Continue to follow chart until sock measures $8\;\mathrm{{cm}}$ .or however long you'd like it to be. You can add as many rows as you like, but the last three rows (plain row, then two rows of braid) should stay the same for the Turkish braid. Last three rows: Knit one round in MC, then add Turkish braid in two rounds. Cast off knitwise in MC.
Heel
with MC, pick up and knit 1 stitches on holder, and pick up 11 stitches from cast-on row of back. Divide onto needles and working in MC, decrease as follows: Round 1: k1, ssk, k5, k2tog, k2, ssk, k5, k2tog, k1 (18 stitches) Round 2: k1, ssk, k3, k2tog, k2, ssk, k3, k2tog, k1 (14 stitches) Round 3: k1, ssk, k1, k2tog, k2, ssk, k1, k2tog, k1 (1o stitches) Round 4: k1, ssk, k2tog, k1, ssk, k2tog (6 stitches) Round 5: k3tog, k3tog (2 stitches) Cut yarn and pull end through remaining stitches. The heel should be triangular and pointy. Finishing
If you really want to, you can sew in the ends, but alyou really need do is make sure nothing's sticking out. I sewed the ends for the last few rows and heel and left it at that. Allthose color ends on the inside provide nice stufing, anyway.
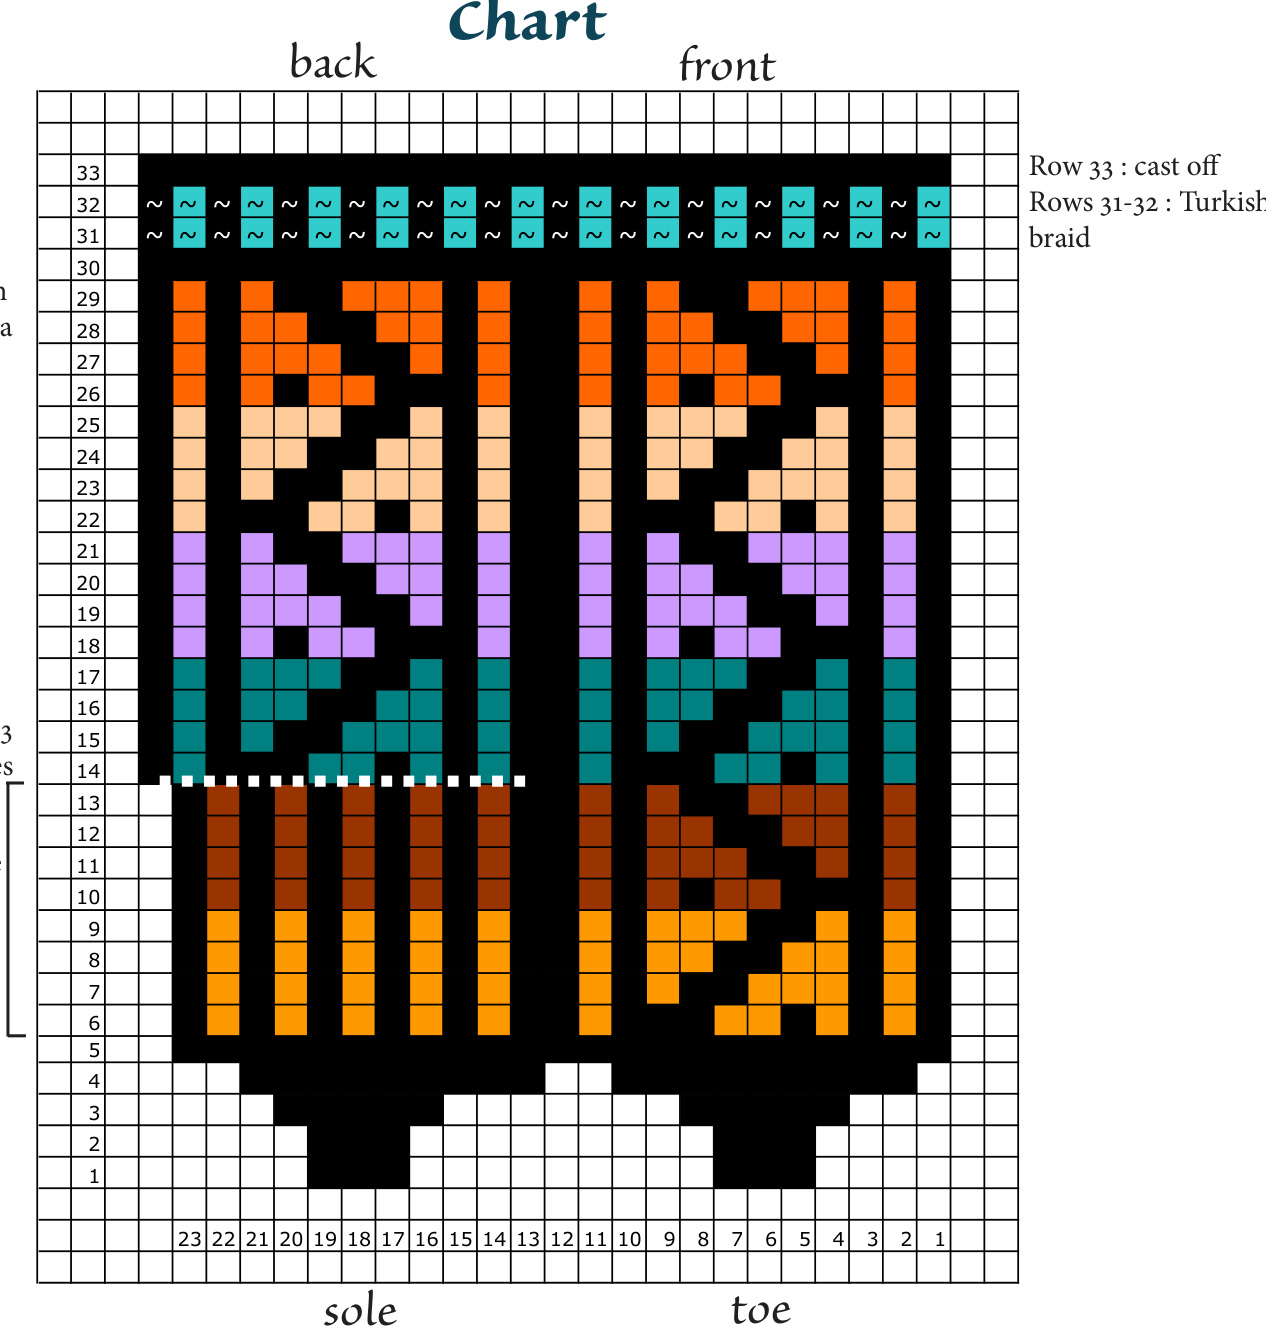
Place sole stitches on holder for heel after row 13 and cast on 12 new stitches Stitches 13 to 23 form sole in rounds 6 to 13


