Brown Betty Sweater
Pattern copyright @ 2008 Barbara Kopacek and Pink Argyle (all rights reserved) See Terms of Use at end of pattern
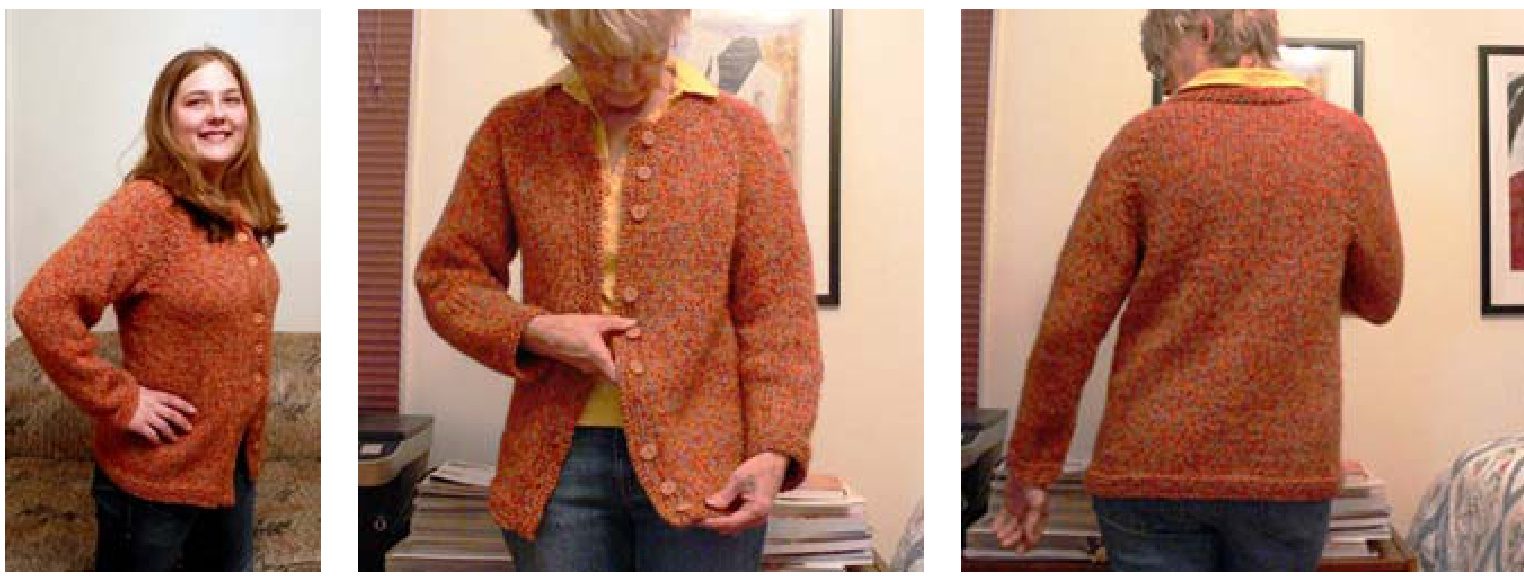
The Brown Betty Sweater has nothing to do with being brown. But it has everything to do with sugar-spicy warmth and coziness. It's knitted in one piece from the neck down, and uses only stockinette stitch and garterstitch. vITmIcuIty level Easy Size S-M Finished measurements Chest size: approx. 36"; 38" with button bands Length: 25" Yarn Use any bulky weight yarn (approx. 7 wpi), approximately 545 yards. Illustrated sweater used 5 skeins of Rowan Plaid (109 yds/skein) Needles 24" circular needles, sizes 11 and 10 16" circular needle size 11 double point needles sizes 11 and 10 (or sizes required to get gauge) Gauge Using the larger size needles, in stockinette stitch, 11 stitches and $15\ \mathsf{r o w s}=4^{\ast}$
Additional materials
Scrap yarn, stitch markers, 9 buttons
Abbreviations
$\mathsf{K}$ -knit st-stitch inc$\cdot{\bf k}$ into the front and back of the next st ssk - slip one st as if to knit, slip one st as if to purl, slip the tip of the left needle into the fronts of these sts and knit them k2tog - knit 2 sts together as if one rep-repeat the directions between the \* \*
Cast on and work sweater from top down
Using the 24" size 11 circular needle, cast on 30 stitches as follows: Cast on 1 st, place a marker (marker 1), cast on 7 sts, place marker 2), cast on 14 sts, place marker 3, cast on 7 sts, place marker 4, cast on 1 st. Work back and forth as follows in stockinette st, slipping markers as you go: Row $1:k$ into the front and back of the first stitch to inc, slip marker, inc., $\star_{\mathsf{K}}$ to within 1 st of next marker, inc, slip marker, inc\*, rep at each marker to last marker, inc in the last st. Row2:p Row 3: inc in first st, $\star_{\sf K}$ to within 1 st of next marker, inc, slip marker, inc\* rep this increasing before and after each marker $\times\,3$ $\mathsf{K}$ to last st, inc in last st. Row4:p Repeat rows 3 and 4 until there are 28 sts between the back section (markers 2 and 3). Next row:p. Next row: k, increasing before and after each marker only, and continue to work as established, increasing before and after each marker on knit rows only, until there are 42 sts between markers 2 and 3. (You should now have the following: 21 stitches, marker 1, 35 stitches, marker 2, 42 stitches, marker 3, 35 stitches, marker 4, 21 stitches.) P 1 row.
Divide for body and sleeves
K to first marker, remove the marker. Using a darning needle and scrap yarn, slip all the sts between here and the next marker (35 stitches) onto the scrap yarn. These stitches will become the left sleeve. Cast 8 sts onto the right needle, join to back sts and k across the back sts to the next marker. Slip all the sts between here and the next marker onto a second piece of scrap yard. These stitches will become the rightsleeve. Cast on 8 sts as before, join to front and k to the end of the row.
Work body
You should have 100 stitches on your needle for the body. Work back and forth in stockinette st until work measures about 24" from shoulder. Change to size 10 24" circular needle and knit 6 rows in garter stitch, making 3 ridges of garter st. Bind off loosely.
Neckband
With the size 10 circular needle, begin with right side of work facing you. Beginning at right front edge of neck, join in yarn and pick up 12 sts on the right front, 6 across top of right sleeve, 14 across back of neck, 6 across left sleeve and 12 across left front (total sts picked up $=50$ sts). Knit 6 rows (3 ridges) of garter st and bind off.
Sleeves
Slip the sleeve sts onto the 16" size 11 needle. Join yarn at the right edge of the armhole and pick up 5 sts along armhole, put a marker in place and pick up another 5 stitches. The marker marks the beginning of round. Total stitches on needle $=45$ K 5 rounds. Begin decreasing: I, Ktuy, K tU will sts ul IllaIKeI, SsK, K1. nepeat ulls iuunu eveiy /ul iuuiu $\times\,6$ (0I st ieillallliy), ullaliyilly tu size II up leeuies wieil wuin is tight on the 16" circular needles. Continue working on 31 stitches until arm measures 16" or desired length from armhole (to wrist bone). Dec an additional 3 stitches evenly in the next row reduce number of stitches to 28. Change to size 10 dp needles and work 6 rows of garter stitch (3 ridges). Bind off loosely.
Front bands
Left band
Using size 10 24”" needle, begin at neck edge of left front, with right side of work facing you, pick up about 3 stitches for every 4 rows (approx. 74 stitches ... the exact number is less important than that both sides have the same number of sts, so write down how many you have on the first side and match it on the otherside). K 6 rows (3 garter st ridges) and bind off. Right band Beginning at lower edge ot right tront, with right side tacing you, pick up the same number ot sts you picked up for the left band. K 1 row. Using safety pins, mark 2 sts for each buttonhole desired, starting 3 sts from the upper and lower edge of band and spacing them about $3^{\circ}$ apart if you want your buttons evenly spaced. (Note: To give the sweater more interest, place buttonholes and buttons in sets of 3 with a little more space between each set ... see photos.) Buttonhole row: $\star_{\mathsf{K}}$ to marked sts, bind them off firmly\*, rep, k to end of row. Nextrow: $\star_{\mathsf{K}}$ to bound off sts, cast on 2 sts firmly\* rep, k to end of row. Continue knitting every row until there are 3 garter st ridges. Bind off.
Finishing
Sew buttons on the left band, opposite buttonholes. Block. Terms of Use This pattern is free for unlimited personal, noncommercial use. You may print it for your own use, but you may not reproduce or sell the pattern, or sell items knitted from the pattern. If you are interested in any other use of the pattern or have questions about these terms, please contact barb at pinkargyle dot com. Your use of this pattern constitutes your agreement to these terms.


