Bumble bee pattern - Large
A Crochet Pattern from Hayley's Crochet Creatures
Please note: this is a FREE pattern. Anyone can use it or share it with friends. But please please please credit Hayley's Crochet Creatures for the pattern, and don't try to pass it off as your own! You can sell things made from this pattern, but please remember to give credit on listings on the internet/catalogues. www.facebook.com/hayleys.crochet.creatures.ivybridge Gague - 4mm hook Wool - 4ply or double knit Colours - Black, yellow, white and silver
You will also need 10mm 2 safety eyes + an embroidery needle.
Key:
R = round Sc = single crochet Ch = chain Sc2tog = single crochet two stiches together to decrease. St = stich
Wings (make 2)
Row 1 - In white, chain 5, in the second stitch from the hook, put 1 single crochet, repeat this for each stitch across (4) Row 2 - ch 1, put 3sc into each st across (12) Row 3 - ch 1, put 3 sc into each st across (36), attach silver/glitter grey yarn Row 4 - Ch 1, sc across in silver/glitter grey When you get to the last sc, cut your yarn so you have about 3 inches of tail, for all bar one of the white tails, which should be longer, and get all 4 of your tails and pull them through the last st to tie them off. They will be secured when you attach the wings to the body.
Body
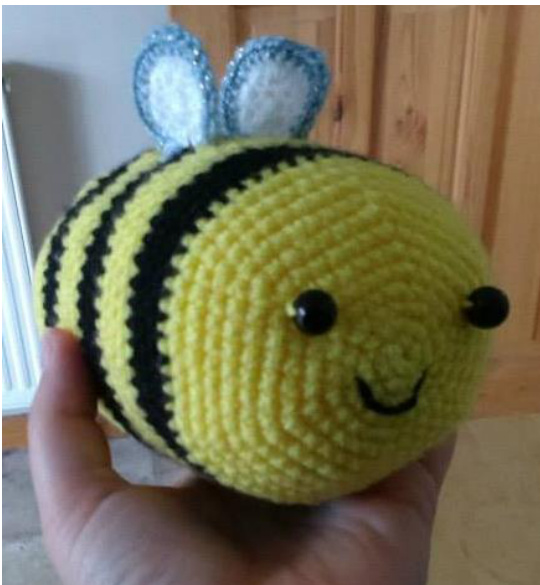
R1 - In Yellow, make a magic loop. 6 sc into the loop. Pull tail to tighten the loop. Slip stitch to join (6) R2 - Chain 1. 2sc into each stitch around. Slip st to join. (12) R3 - Chain 1. \*1sc into the first st, 2sc into the next st\* around. Slip st to join (18) R4 - Chain 1. \*1sc into the first 2 sts, 2sc into the next st\* around. Slip st to join (24) R5 - Chain 1. \*1sc into the first 3 st. 2sc into the next st\* around. Slip st to join. (30) R6 -^ Chain 1. \*1sc into the first 4 sts, 2sc into the next st\* around. Slip st to join (36) R7 - Chain 1. \*1sc into the first 5 sts, 2sc into the next st\* around. Slip st to join (42) R8 - Chain 1. \*1sc into the first 6 sts, 2sc into the next st\* around. Slip st to join (48) R9 - Ch1, sc around. Slip st to join. R10 - Chain 1. \*1sc into the first 7 sts, 2sc into the next st\* around. Slip st to join (54) R11+12 - Chain 1, sc around. Slip st to join (54) (Note: now is a good time to add the safety eyes between R6+ R7, and stitch a smile in black - see photo at the top for reference. Make sure that the slip st join line is on the bottom of the bee. When I made the bee pictured above, I hadn't discovered safety eyes, but I don't have a picture of a large bee with them, so the one with beads will have to do, but I will definitely be using safety eyes for it from now on, and would recommend them!)
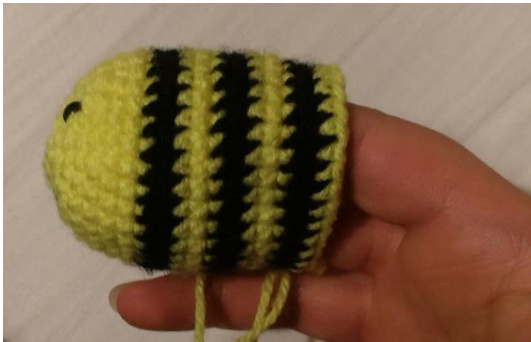
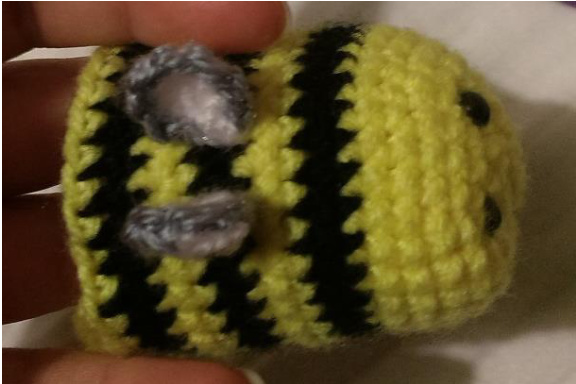
R13-38 Alternate 3 rounds of sc in yellow and then 3 rounds of sc in black to get the bee stripes. (note - see photo left, this is the small bee, but the pattern should look the same when you are done, just larger!) You should end up with 3 yellow at the end. Remember you are going to chain 1 at the beginning of each round and slip st at the end of each round. (54) Now is a good time to attach the wings so that your knots can be hidden on the inside of the bee. They should sit on the middle black stripe on the top of the back, about 4 or 5 st apart. Position your wing where you want it to go, and then use your hook to pull all 4 of your wing tails inside the bee. Tie it in, and then use one of the white tails and a yarn needle to secure the edges of the wing to the back of the bee to hold them in the correct position. Repeat for the other wing. Tuck all your yarn tails into the bee, they can be part of the stuffing, and it hides them easily.
R39 - Ch 1, \*sc into the next 7 st, sc2tog\* around, slip st to join (48) R40 - Ch 1, sc around, slip st to join (48) R41 - Ch 1, \*sc into the next 6 st, sc2tog\* around, slip st to join (42) R42 - Ch 1, \*sc into the next 5 st, sc2tog\* around, slip st to join (36) R43 - Ch 1, \*sc into the next 4 st, sc2tog\* around, slip st to join (30) R44 - Ch 1, \*sc into the next 3 st, sc2tog\* around, slip st to join (24) R45 - Ch 1, \*sc into the next 2 st, sc2tog\* around, slip st to join. (18) Attach your white yarn and cut your tail for the yellow, which can be woven into the next round. Note: Stuff your bee firmly now, otherwise you won't be able to. Make sure you are happy with how it looks before you continue. If you find you want your bee to be flatter at the front, attach a piece of yellow to the inside middle of the bee's face and then once you have stuffed it, tie the two yarn tails together around the stuffing to pull the face in. You might have to add a bit more stuffing once you have done this. R46 - Ch 1, \*sc into the next st, sc2tog\* around. Slip stitch to join. (12 R47 - Ch 1, sc2tog around. Slip st to join (6) Attach your black yarn and cut your white yarn off. Weave it in a bit, and tuck the end inside the bee. R48 - Chain 1, sc2tog around until you have only one st left to work with. Your bee should have a bit of a pointy bit for the sting! Tie off securely and then use a yarn needle to pull the tail into the bee. Viola! One adorable bumble bee! If you need help with anything on this pattern, feel free to contact me on hayleys.crochet.creatures@gmail.com I would also love to see your finished projects! Share them via the above email address or on my Facebook page, /hayleys.crochet.creatures.ivybridge Happy crafting!


