
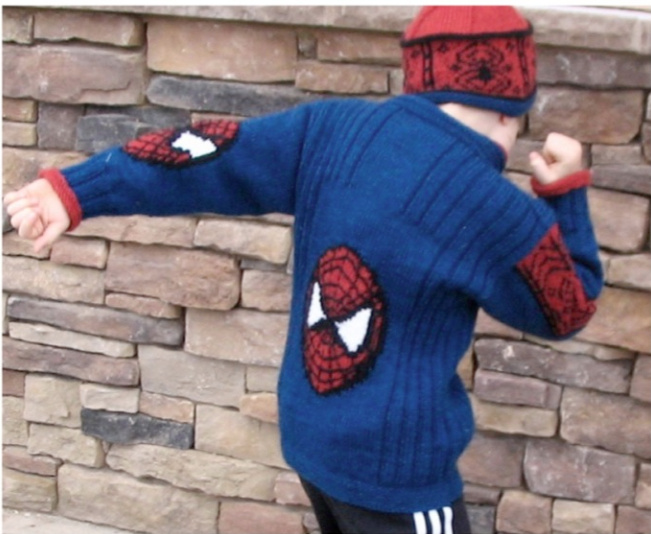
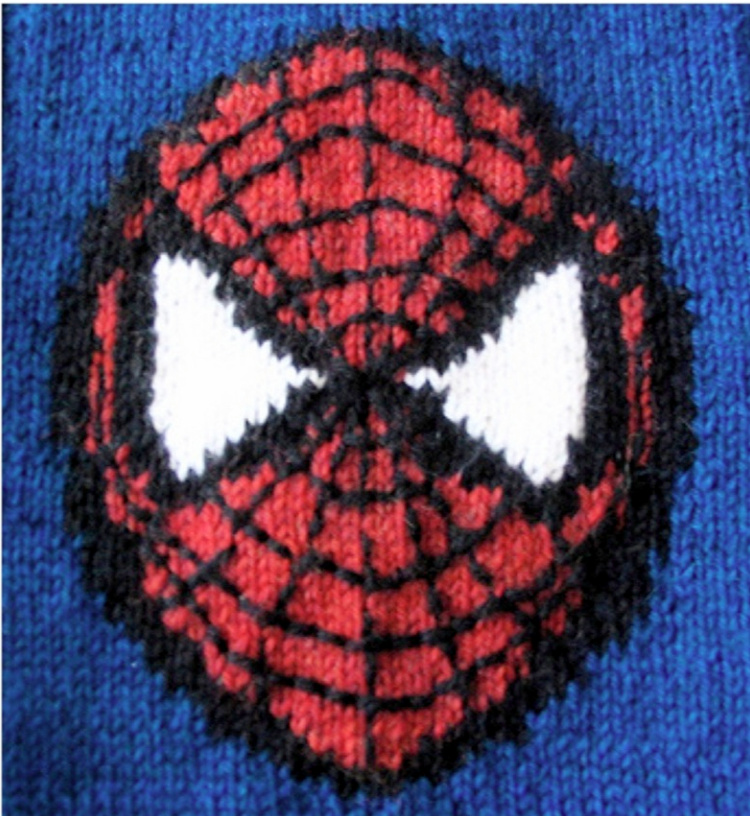
WEB SPINNER A FULLY WOOLLY DESIGN This is a jacketthat I designed for my grandson's 7th birthday.Please keepin mindthatthispattern isforpersonal useonly asthe spiderman image is a copyrighted design and it is illegal to sell any productsusingthislogo.Enjoy!
LEVELOFDIFFICULTY
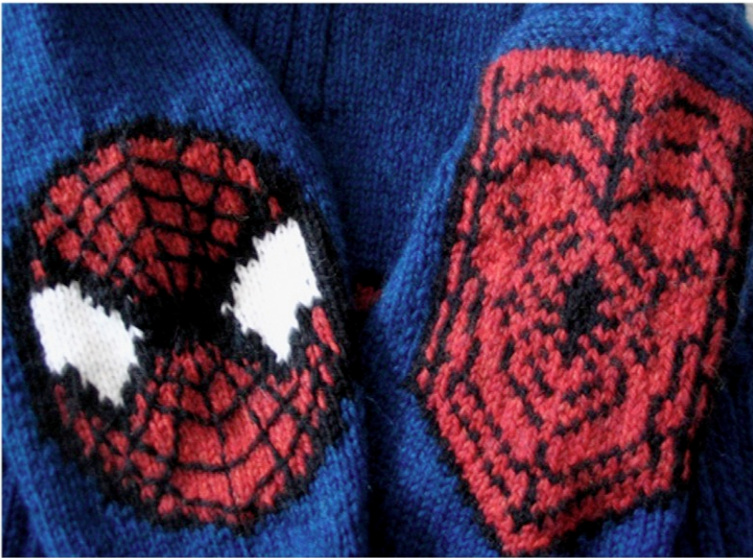
This sweater,without themotifs,isanadventurousadvanced beginner level -with the motifs,and depending upon the patience of theknitter,Iwouldrateitanexperiencedintermediatelevel.The chartsinvolveboththestrandedandintarsiamethod,duplicate stitches (optional)and a simple back stitch to create the web design. Becausethereareessentiallyonly2to3colorsinthechartsIwould encourage an enthusiasticbeginner,withoutany experiencein motif knittingtotakeawalkonthewildsideandknitthespideyonthe back,oreventhesmallerspideyonthesleeve.Justattempt whateveryoucantolerate.Whoknows,you mayhaveaninner intarsiaknitterjustdyingtogetout
SIZES
Thedirectionsaregivenforsizesrangingfrom2yearsofagetoan adult'sextralarge.Theadult'ssizeswereaddedafterseveralpleas fromknitterswhoweredesperatelywantingtoknitonefortheir inner adult spidey.NOTE:Make sure that thefinished jackethas a minimum of 2-3" of ease, so that it will fit comfortably over clothing worn underneath.When indoubt,especially ifyou areknittingfora child,it is far better to make it too large,rather than too small, because it'svery upsetting for a young childto seea grown woman (or man)break intowailing sobs when they discover that they have justwasted hours andhoursoftheirpreciousknittingtime ona sweaterwhichwillonlyfitadollorthetoybear!
FINISHEDDIMENSIONS:
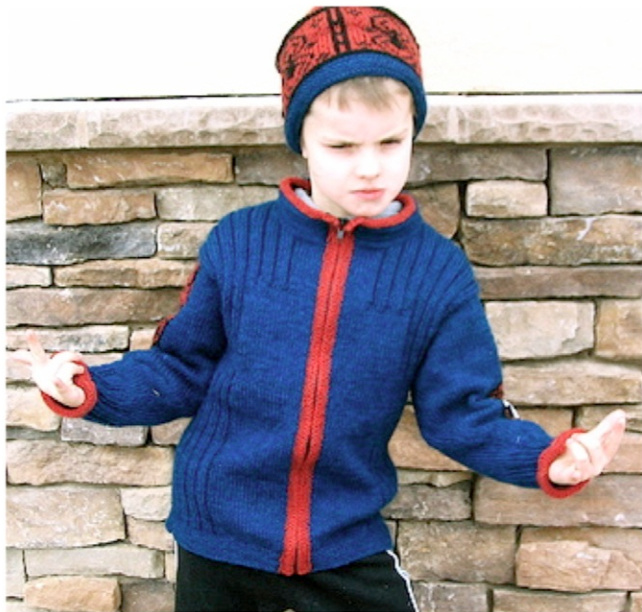
1. CHEST WIDTH:Child Sizes:2-4(5-6,7-8)yrs -13(15,17)" Adult Sizes: small,(medium,large,xlarge) - 19.5(21.5,23.5,25.5)" 2.TOTAL LENGTH:14(16,18)"-25(26,26,27)" 3. NECK WIDTH:5(5.5,6)”-6(6.5,7,7.5)" 4. SHOULDER WIDTH:4(4.75,5.5)"-6.75(7.25,8.25,9)" 5. UPPER SLEEVEWIDTH:12(14,16)"-18(19,20,21)" 6. CUFFWIDTH:7(8,8)"-9(9,10,10)" 7.SLEEVELENGTH:14(15,16)"-18(19,19,20,20)" The model on my grandson is the size 6,7 and wasknit in Knit Picks Wool of the Andes Worsted Weight (110yds to 50gms), but any worstedweightyarnsuchasPatonsClassicWool,ElannPeruvian Highland,Cascade 220,etc.,canbe substituted."NOTE":The followingamountsaremerelyestimatesasIonlyactuallyknitthe size7,8jacket.Ifin doubt,buyMOREandnotLESSofthe estimates. 1.MC:Sapphire Heather: 6(7,8) balls -9(10,11,12) balls 2. A:FirecrackerHeather: 2(3,4)balls-4ballsforALL adultsizes 3. B:Coal:2ballsfor allchildand adult sizes 4.C:White: 1 ball for all child and adult sizes
NEEDLES:
1paireachof3.75mmand4.5mmstraightneedlesorthe sizeneededtheobtainthegaugeasgiven 3.75mmcircularneedleforthecollarandfrontbands-orsize determinedbysampleswatch MISCELLANEOUS: Stitch markers (optional) , stitch holders, and a separating zipper which can be cut to fit /"below thetopof the top of the collar. GAUGE: 20 stitches and 28rows for a 4"square on the 4.5"needles (or sizeneeded to obtain gauge)
ABBREVIATIONS:
BO-Bindoff CO-Castoff K-Knit 。K2tog-Knit2together Pm-Placemarker P-Purl Rs-Right Side Ssk-Slip2stitchesknitwise,one ata time,from theleft needle to theright needle.Place the left needlethrough the front ofboth slipped stitches andknit2together St-Stitch Stst-Stocking stitch Ws-WrongSide DIRECTIONS: \*Please note that the directionsfor thelower bands are notthe same as the band on my grandson's sweater.The directions given are for the samebands as on thebottomof the sleevesand thetopof the collar.If Iweretoknitthis sweaterfora second time,this is thebandthatIwouldchoosetoknit. BACK:
EDGINGPATTERN:
NOTE\* Thispattern,whichformsa widthwisereverse stocking stitch ribbing,is repeated on the lower back and both front pieces,collar,cuffs and front bands.Please refer to the pattern as given below when an edging is required. With4.5mmneedlesandcolorA,C070(80,90)st100(110,120,130)stWork the edging for all sizes as follows: 。Row1(ws)K Row 2(rs)P Row 3 (ws) K 。Row4(rs)K 。Row5(ws) P Row 6 (rs) K FOR ALL SIZES:Work12rowsof thispattern,ending with a wrong siderowfacing.ChangetoMc and Ptothe end of the row(13).Change toPattern #1 which is a 2row repeat. \*\*NOTE\*\* Read through to the end of the directions before workingpattern#i!!! The directionsforcenteringtheSpidermanmotifare given belowpattern #1.Themotif is worked atthe same time as thelargestockingstitchareaofthefollowingpattern: PATTERN #1: Beginson row 14 forALL sizes.\*Note\*The length of the jacketcanbeadjustedbetweenpattern#1andpattern #2 ifdesired.
SIZE 2,3,4
0Row1(rs):(K3,P2)x3,pm,K40,pm,(P2,K3)x3 0Row2(ws):(P3,K2)x3,P40,(K2,P3)x3
SIZE 5,6
0Row 1(rs):(K3,P2)x4,pm,K40,pm(P2,K3)x4
SIZE 7,8
0Row1(rs):(K3,P2)x4,pm,K50,pm,(P2,K3)x4 0Row 2(ws):(P3,K2)x4,P40,(K2,P3)x4
ADULTSIZES
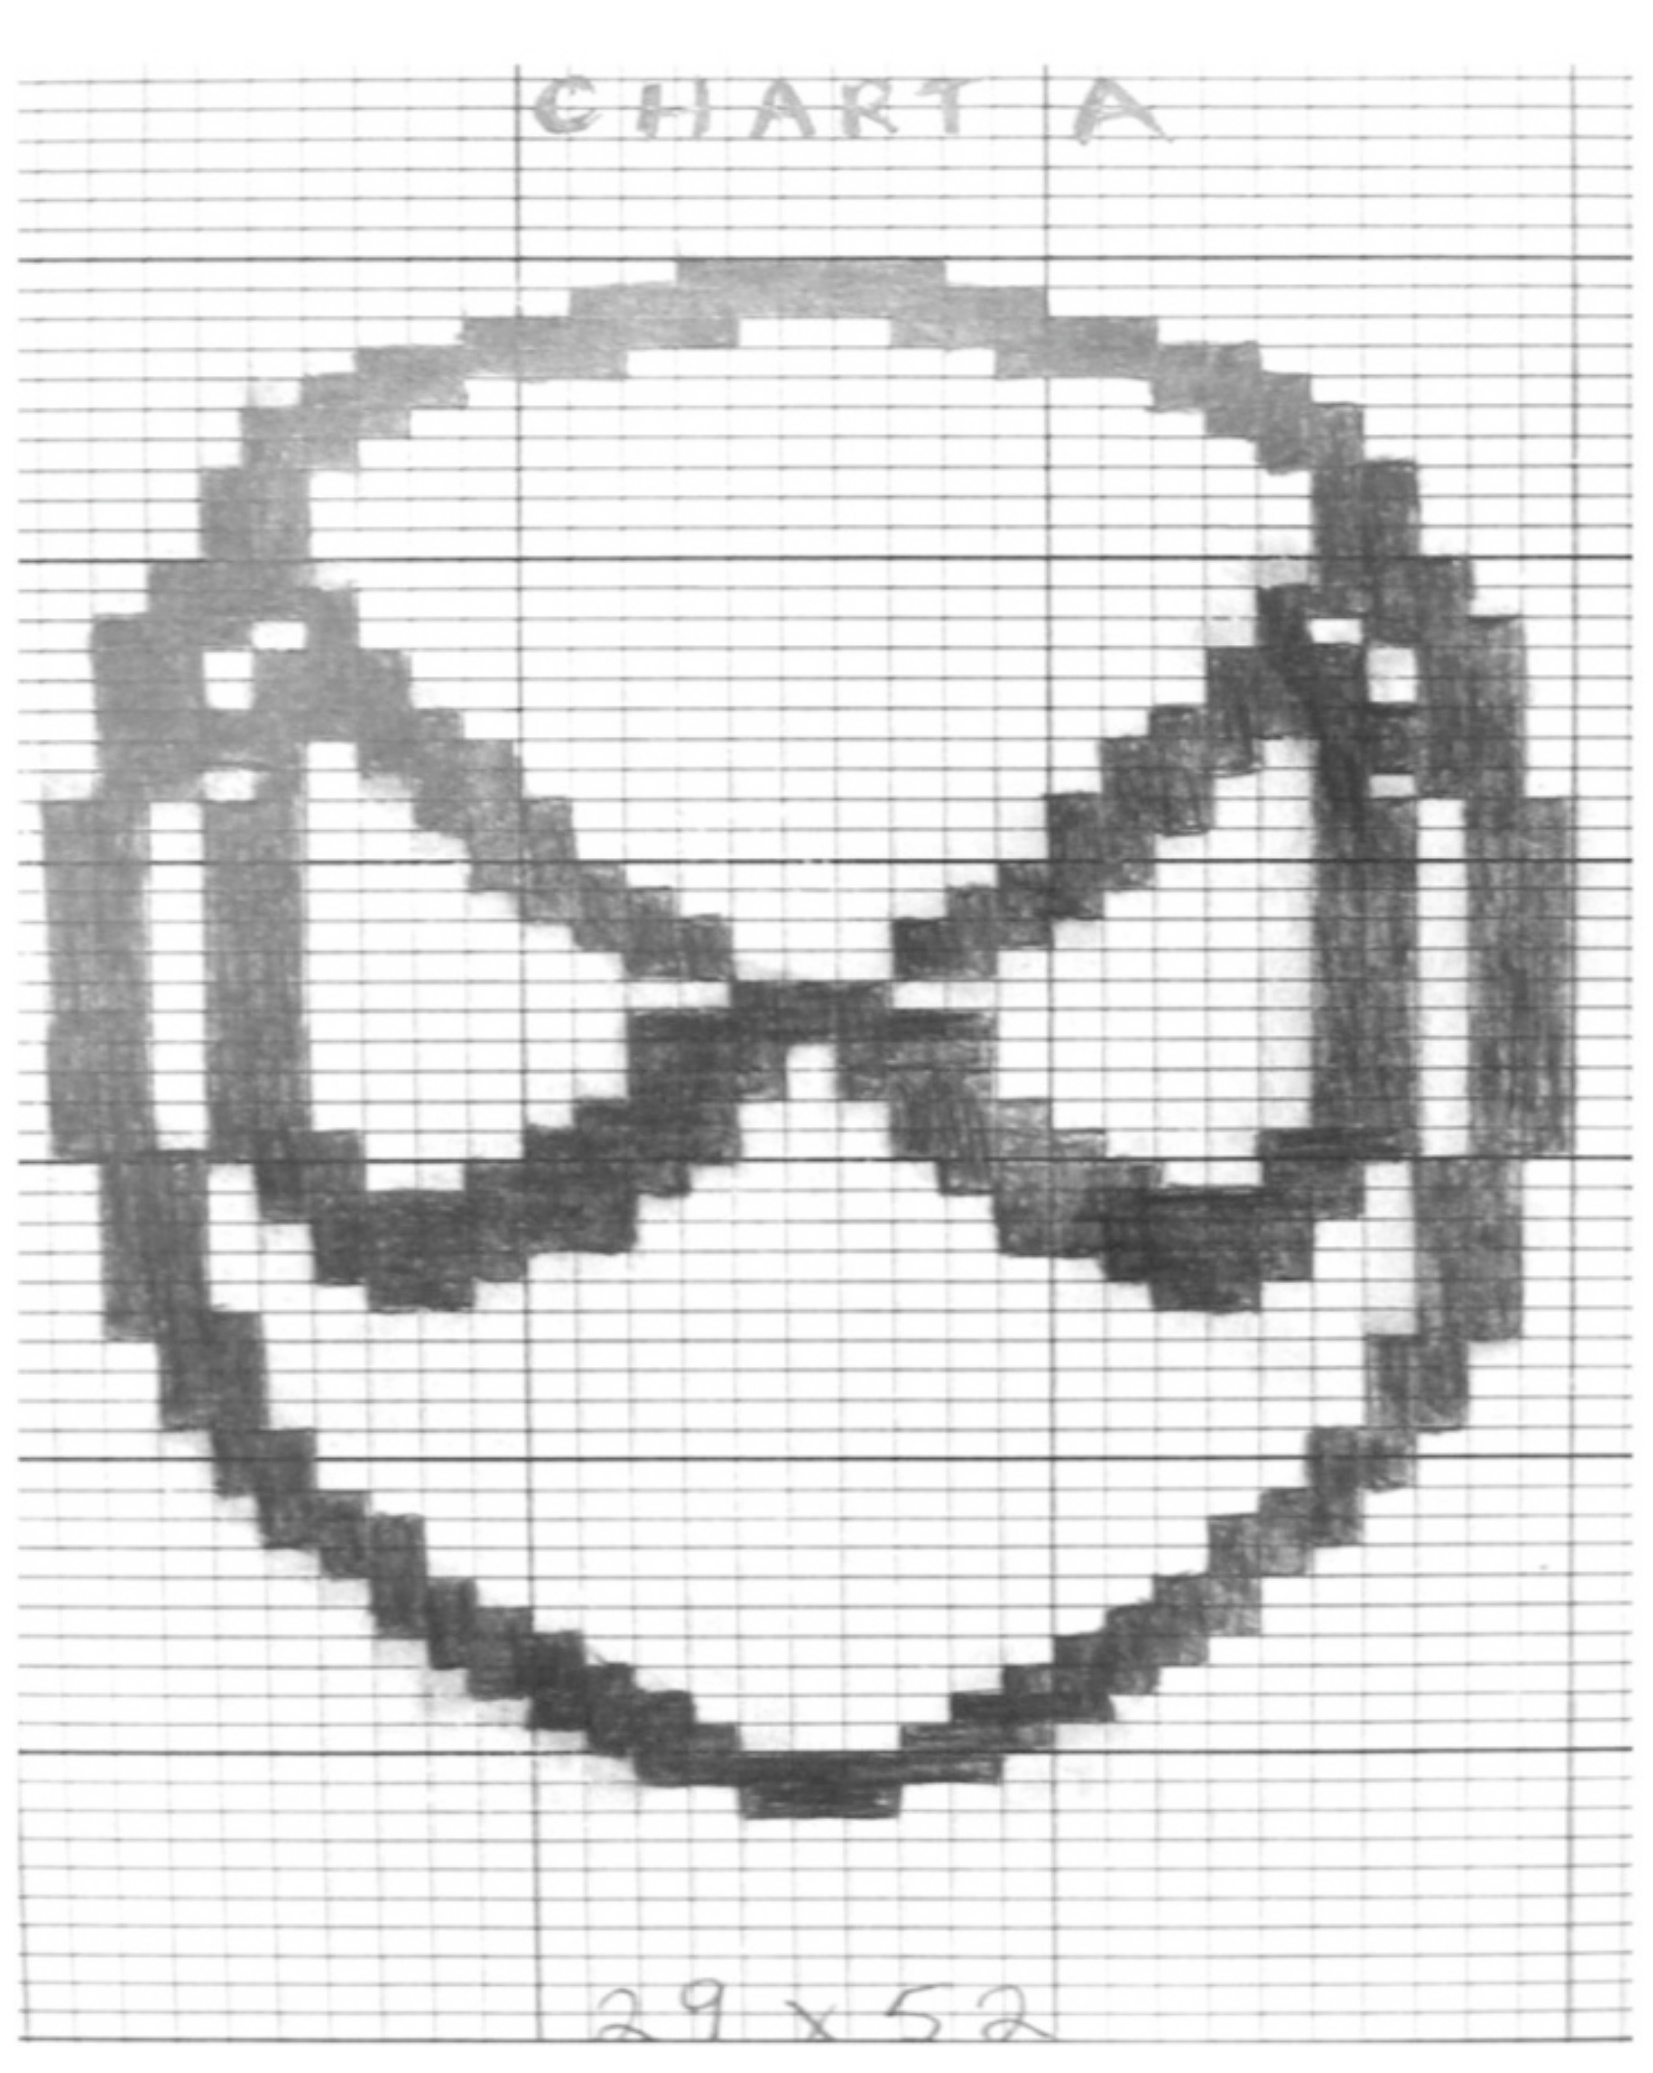
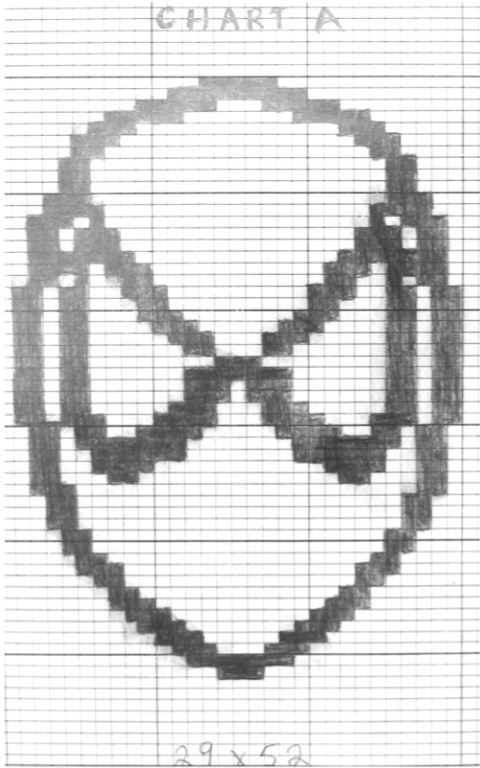
Row 1(rs):(K3,P2)x5(6,7,8),pm,K50(all sizes),pm,(P2,K3)x5(6,7,8) Row 2(ws)(P3,K2)x5(6,7,8),P50(all sizes),(K2,P3)x5(6,7,8) PLACEMENTFOR CHARTA(SPIDEY): Repeat the 2row pattern until4.5(5,5.5)"-5.5(6,6,6.5)" from the Co edge which will end with a rs facing.Continue inpatternassetandbeginthe1ststitchofChartAon stitch 34(39,44)-49(54,59,64).This willensure that the motifiscentered. NOTE:BothChartAandChartCarebestworkedinthe intarsiamethod.i.e.Workthefirst2rowsofthechart with 1bobbinofblack,thenonthe3rdrowworkthe3 stitchesinblack,joinin Aandwork the 3 stitches inred, then join in a second bobbin of black.I worked the eyes withseparatebobbinsofblackandwhiteusingtheintarsia methodbecausestrandingtheblackbehindthewhitewould showthrough.Theeyescanbeaddedonafterwith duplicatestitch butpersonally,I found itmuch easierto knitthemin.
When the back measures 11(12,13)" - 20(21,21,22)" from the C0 edge,(chart will be finished at this point), the 2 row pattern will change as follows, beginning with a right side row: PATTERN 2: SIZES: 2,3,4: Row 1 (rs): (K3,P2)x5,pm,K20,pm(P2,K3)x5 Row 2 (ws):(P3,K2)x5,P20,(K2,P3)x5 SIZES: 5,6: Row 1 (rs): (K3,P2)x6,pm,K20,pm,(P2,K3)x6 Row 2 (ws): (P3,K2)x6,P20,(K2,P3)x6
SIZE 7,8:
0Row 1(rs): (K3,P2)x7,pm,K20,pm,(P2,K3)x7 ORow 2(ws):(P3,K2)x7,P20,(K2,P3)x7
ADULT SIZES:
ORow1(rs): (K3,P2)x7(8,9,10),pm,K30,pm,(P2,K3)x7(8,9,10) ORow 2(ws):(P3,K2)x7(8,9,10),P30,(K2,P3)x7(8,9,10) Continue knitting this 2row patternuntil 14(16,18)" 25(26,26,27)" from the c0 edge and with the rs facing. Pattern across 22(26,30)st-35(39,42,46)st.B0 the following 26(28,30)st -30(32,36,38)st,then work across the last 22(26,30)-35(42,46)stinpattern.Break the yarnandplace thelive shoulderstitches ontoholders.
FRONTS: Cast on 33(38,43)st -48(53,58,63)st with A and 4.5mm needles. Work the 6 row reverse stocking st rib for 12 rows as described for the jacket back edging, ending after a rs row. Change to MC and purl across the ws, then continue working in Pattern #1 as follows, until 11(12,13)" - 20(21,21,22)"from the C0 edge: SIZE 2,3,4: Row 1(rs): (K3,P2)x3,pm,K18 0Row 2(ws): P18(K2,P3)x3
SIZE 5,6:
Row 1(rs): (K3,P2)x4,pm,K18 0Row 2(ws):P18(K2,P3)x4
SIZE 7,8:
Row 1(rs): (K3,P2)x4,pm,K23 0Row 2(ws): P23,(K2,P3)x4
ADULT SIZES:
0 Row 1(rs): (K3,P2)x5(6,7,8),pm,K23 0Row 2(ws): P23,(P3,K2)x5(6,7,8) At 11(12,13)" - 20(21,21,22)" change to Pattern #2 as follows, beginning on a rs row: SIZE 2,3,4 0 Row 1(rs): (K3,P2)x5,pm,K8 0Row 2(ws): P8(P3,K2)x5
SIZE 5,6:
Row 1(rs): (K3,P2)x6,pm,K8 0Row 2(ws): P8,(P3,K2)x6
SIZE 7,8:
0 Row 1(rs): (K3,P2)x7,pm,K8 0 Row 2(ws): P8,(P3,K2)x7
ADULT SIZES:
0Row 1(rs): (K3,P2)x7(8,9,10),pm,K13 0Row 2(ws): P13,(P3,K2)x7 ALL SIZES: Work this pattern until 12(14,16)" - 23(24,24,25)" from the CO edge, ending after completing a rs row. Begin the neck shaping on the "wrong side" row as follows: Row 1(ws): B0 3(4,4)st - 4(4,5,5)st, then continue in pattern to end of the row. There are now 30(34,39) - 44(49,53,58)st remaining. ORow 2(rs): and all following even number rows - 4,6,8,10, work in pattern as set. Row 3(ws): B0 2(3,3) - 3(3,4,4)st and pattern to end of row - 28(31,36) - 41(46,49,54)st remaining. Row 5(ws): B0 2(2,2) - 2(2,3,3)st and pattern to end of row - 26(29,34) -39(44,46,51)st remaining. Row 7(ws): B0 2(1,2) - 2(2,2,2)st and pattern to end of row - 24(28,32) - 37(42,44,49)st remaining. Row 9(ws): B0 1(1,1) - 1(2,1,2)st and pattern to end of row - 23(27,31) - 36(40,43,47)st remaining. Row 11(ws): B0 1(1,1) - 1(1,1,1)st and pattern to end of row - 22(26,30) - 35(39,42,46)st remaining. Continue working in pattern until 14(16,18)" - 25(26,26,27)" from the C0 edge, ending after completing a rs row. \*NOTE: Front and back pieces should have the same number of rows. Place the remaining live shoulder stitches ona holder.
RIGHT FRONT:
Work the same as given for the left front, reversing the patterns and the neck shaping. NOTE: (keep in mind that the neck shaping BO rows are done at the beginning of a rs row and everything will be just fine). After completion, join the back shoulders to the left and right front shoulders using the 3 needle bind off or which ever technique that you normally use. \* For my 3 needle BO, I put the wrong sides facing each other because I like the seam to show on the outside of the sweater as a design element and I also feel that the sweater hangs better from this seam. However, this is entirely a personal choice.
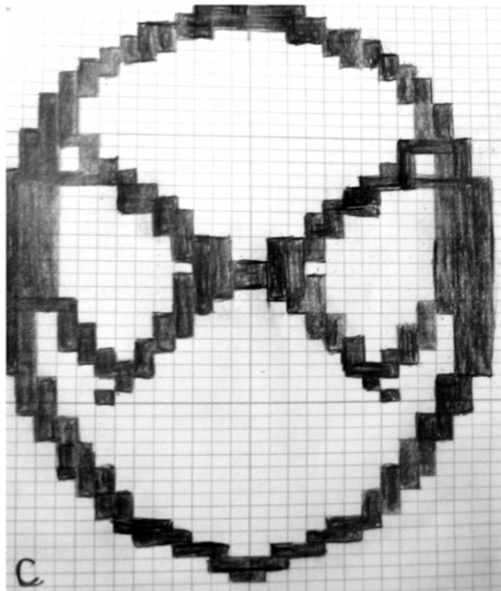
NOTEs \* If your row gauge is not 7 rows to the inch, the number of rows betweeneachsetofdecreaseswill differ from the pattern as written. If this is the case, determine your row gauge and work out the row placement for your decreases, accordingly. Keep in mind that in order for the ribbing and the cuff pattern to work as written, the same number of stitches must be remaining after your final decreaserow. The sleeves are picked up and knit from the top down, so remember that thechartsshouldalsobeworkedfrom top to bottom. If using duplicate stitching the stitches are worked from the opposite direction than usual. Read the directions for the sleeves through to the end before commencing toknit.
SLEEVE 1:
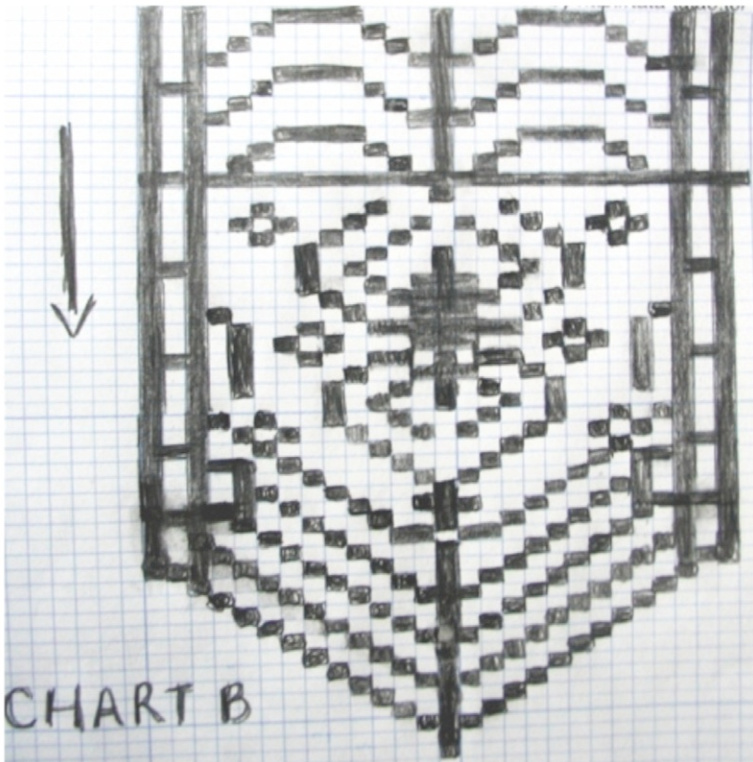
Place a marker 6(7,8)" - 9(9.5,10,10.5)" measured downfromtheshouldersonbothfrontandback side edges. With 4.5mm and MC, pick up and knit 61(71,81) - 91(95,101,105)st between the markers. ROW 1(ws): K across all stitches -NOTE that this will form a ridge on the rs of the upper sleeve and again is only a personal choice. If you don't want this ridge then p across all stitches on the ws. ROW 2(rs): K17(22,27) - 32(34,37,39) stitches with MC, 27 stitches of Chart B using the fair isle or stranded technique and 17(22,27) - 32(34,37,39) stitches with MC. Work the 1st set of decreases with the rs facing on Row 6 for ALL SIZES as follows: K1,K2tog,pattern across row to last 3 stitches, ssk, K1 After working the 1st decrease row work the remaining decrease rows as follows: SIZE 2-4: With rs facing work a decrease every 6th row, 11 more times (37st remain), then P across the ws. The length of the sleeve should measure approx. 10".
SIZE 5,6:
Work a decrease row with rs facing, every 6th row, 9 times, then every 4th row , 4 times - (43stitches remaining). P across the ws row, purling 2 stitches together in the center of the row (42 stitches). The sleeve should now measure approx.11".
SIZE 7,8:
Work a decrease row with rs facing, every 6th row, 3x, then every 4th row 15x - (43 st. rem). P across the ws row, working a P2tog in the center of the row (42 st rem). Sleeve length should now be approx. 12".
ADULTSIZES:
Work a decrease row on the rs every 4th row, 21(23,23,25)x \*ADULT LARGE & EXTRA LARGE size only: On the last decrease row work a K2tog in the center of the row, in addition to the decreases at both ends of the row. ALL SIZES: Work 1 P row after the last decrease. There will be 47(47,52,52) stitches remaining and the sleeve should measure approx. 12(14,14,15)" CUFF RIBBING: Work the following ribbing pattern using the 3.25 needles for all sizes until 2.5"for ALL CHILD sizes and 3.5" for ALL ADULT sizes, or as required to attain the length desired for the sleeve. ROW 1(rs): (K3,P2)x7(8,8),K2 (K3,P2)x9(9,10,10) , K2 ROW 2(ws): P2,(K2,P3)x7(8,8) P2(K2,P3)x9(9,10,10) EDGING: \*ALL SIZES\* When reaching the length of the ribbing as desired and after working Row(rs), change to color A and purl Across the following ws row, the work 9 rows of the EDGING PATTERN as given for the Jacket Back, thus ending after row 3. BO knitwise on the following row.
SLEEVE #2:
CENTERING CHART C:
Measure and mark the midway point between the top of the sleeve and the start of the ribbing on sleeve #1. Begin to knit the 1st row of Chart C about 3.5" above the marker and 2 stitches to the right of the center stitch for all sizes. \*Remember that the chart is worked from the topoftheheaddownwards. At this point you can add the web to spidey's face on the sleeve and the back of the jacket using a backstitch and the black yarn (use the photo of spidey for web placement). I used a few pins to help me with the line placement, but I think that you'll find this pattern fairly simple and doesn't require many guidelines. FINISHING: COLLAR: ALL SIZES: With the rs facing and using the 3.75mm circular needle and MC, pick up and knit 21(22,23) - 23(24,26,27) stitches from the right front neck edge, 26(28,30) - 30(32,36,38) stitches across the back neck edge and 21(22,23) 23(24,26,27) stitches down the left front neck edge. (68,72,76) - (76,80,88,92) stitches. Work the 6 row edging pattern as given for the jacket back, 3 times (18 rows), for ALL SIZES, the work rows 1, 2 and 3. Change to color A and work rows 4,5,6,1 and 2. B0 loosely and evenly in Konrow3. ZIPPER FACINGS: RIGHT FRONT:STARTING AT LOWER EDGE: Using the circular needle, with rs facing and color A, pick up and knit 2 out of every3stitchesandworkasfollows OROw 1(ws): K ROw 2(rs): P ROw 3(ws): K ROw 4(rs): Bind off in K. LEFT FRONT: \* STARTING AT UPPER EDGE ★ Work as given for right front. Stitch together the side and sleeve seams. AFINALSUGGESTIONANDWORDSOF ADVICEFROMONEWHOHASTRAVELLED THISROADBEFOREYE: Take out ALL of your Spidey DVDS and any munchies that will contribute to your peace, happiness and well being, then proceed very calmly and gently, taking deep cleansing breaths when needed, to Sew in the #\*\*\*##\*#\*\*ing zipper@ Keep in mind that if successful in completing this work of wonder, you will surely become the chosen recipient's real-life superhero. CAUTION\* CAUTION\* You may also find that you are now called upon to knit numerous other items such as a Mario scarf, a Batman hat and Superman cape, etc........etc.....etc......


