Merbaby Blanket by Knitti Politi

A mix of the vintage and contemporary in this baby blanket worked in a striking pattern reminiscent of a mermaid's scales, with a modern rolled edging. The blanket is worked flat, in two colours. Stitches are picked up around the edge and joined in the round to make the rolled border. Photo tutorials showing how to work the special stitch are included, for both right and left-handed knitting. Plus bonus instructions for a mermaid washcloth! Edited and tested by Deann Wilson

Yarn
Worsted weight yarn in two colours. Blanket shown uses Lion Brand Martha Stewart Crafts Extra Soft Wool Blend, in MC Gray Pearl 610 yards (558 metres) and CC Celery: 315 yards (288 metres)
Needles
5 mm (US 8) (for main blanket pattern) 4.5 mm (US 7) Long circular needle (for working border in the round) Or size needed to obtain gauge Tapestry needle for weaving in ends. Stitch marker.
Gauge
16.5 stitches and 22 rows to 4 x 4 inches (10 cm x 10 cm) on larger needles in Mermaid Scale pattern.
Size
Stroller/pram size: 27 x 36 inches (size up by adding multiples of 6 sts to the cast on and knitting to desired length)
Abbreviations/special stitches
k: knit p: purl sl: slip sts : stitches wyif: with yarn in front - keeping yarn to front of work wyib: with yarn in back - keeping yarn to back of work MC: main colour CC : contrast colour Lift up loops: Insert the point of working needle under the 2 loose strands, moving the needle up from below the strands, knit the next st, and then lift the 2 strands up over the stitch just worked and off the point of the working needle. (A right-handed photo tutorial is provided on page 4 and a left-handed one on page5).
Instructions
Blanket
(Worked in two colours, MC (gray in photo) is the background colour of the blanket. MC or CC is directed at the start of each row, indicating which colour to work in) With larger needles and MC, cast on 107 sts. Row 1 (Right side): knit Row 2 (Wrong side): purl Next, follow the Mermaid Scale pattern below, starting with Row 1. Mermaid Scale Pattern (multiple of 6 + 5) Row 1: CC. kl, p3, \*wyif sl3 purlwise, p3\*; rep from \* to last st, k1. Row 2: CC. pl, k3, \*wyib sl3 purlwise, k3\*; rep from \* to last st, p1. Row 3: MC. Knit Row 4: MC. Purl Row 5: MC. K5, \*lift up loops, k5\* rep from \* to end. Row 6: MC. Purl Row 7: CC. p1, \*wyif sl3 purlwise, p3\*; rep from \* to last 4 sts, sl 3 purlwise, p1. Row 8: CC. k1, \*wyib sl3 purlwise, k3\*; rep from \* to last 4 sts, sl 3 purlwise, k1. Row 9: MC. Knit Row 10: MC. Purl Row 11: MC. K2, \*lift up loops, k5\* rep from \* to last 3 sts, lift up loops, k2. Row 12: MC. purl. Continue in stitch pattern as established, until work measures approximately 35 inches (90 cm), or desired length, ending on row 6 or 12. Bind off all sts.
Tips for success: Carry the non-working colour up the side ofyour work. To do so, drop the old colour and bring the new colour up under the old colour, being sure not to lift the yarn too tightly, and then work the next row in the new colour. In this particular stitch pattern, a neater look will be achieved if you also lift and carry the CC yarn up theside onrows 5and 1l. When working the rows in which stitches are slipped, spread the work out on the needles after slipping stitches and before working the next stitch, to make sure that the strands being formed are not too tight.
Rolled Border
(Border is worked in the round on a long circular needle) Pick up border Using CC and with the smaller needle size (long circular) start at one corner of the blanket. Pick up and knit 2 sts in this first corner. Then pick up and knit 2 sts every 3 rows along each long side of the blanket (row edges), 1 st for every st along each short side of the blanket (cast on and bound off edges), with 2 sts at each of the remaining 3 corners. Place marker for start of round. With the right side of the work facing you, work the edging as follows. Rounds 1-2: purl Rounds 3-7: knit Bind off all sts using the stretchy bind-off below or other stretchy bind-off of your choice.
Stretchy bind-off
Knit two sts. \*Transfer the 2 sts just worked back onto the non-working needle and knit the two together through the back loops, k1\*; repeat from\* to end. Weave in ends and block the finished blanket to size.
About the stitch pattern
In this pattern I've chosen to name this gorgeous stitch, which uses the mosaic knitting technique, the “Mermaid Scale". My friend's daughter looked at my swatch and decidedit lookedlikethescalesonamermaid'stail! It derives from a slip stitch pattern sometimes called “trellis stitch"; however, in the few firm references I could find for it, it is shown with a reverse stockinette background, whereas here the background is stockinette. The trellis stitch pattern itself appears to be a variant of the “quilted lattice stitch". It could also be worked in a single colour. A long colour change yarn could look great as either the main colour or the contrast colour,lotsofpossibilities! The texture produced by the stitch gives a bit of thickness and warmth to the finished fabric, which really lends itself to a snuggly blanket.
| Working “Lift up loops" for Right-handed knitting | ||
| 1. "Lift up loops" is ready to be worked. The two CC horizontal strands seen below the needles will be lifted in the next step. | ||
| 2. Insert the point of the right needle under the two CC strands, up from below, as shown. | ||
| 3. Keeping the two strands laying over the needle as shown, insert the right needle into the next MC stitch, and knit this stitch. | ||
| 4. The MC stitch is now knitted. The CC strands are still lying over the right needle, behind the stitch just knitted. | ||
| 5. Using the point of the left needle, lift the two strands up and over the MC stitch just worked, as shown, then off over the point of the right needle. | ||
| 6. The “Lift up loops” instruction is now completed. The MC stitch anchors the two CC strands. | ||
| Working “Lift up loops" for Left-handed knitting | |
| 1. “Lift up loops" is ready to be worked. The two CC horizontal strands seen below the needles will be lifted in the next step. | |
| 2. Insert the point of the left needle under the two CC strands, up from below, as shown. | |
| 3. Keeping the two strands laying over the needle as shown, insert the left needle into the next MC stitch, and knit this stitch. | |
| 4. The MC stitch is now knitted. The CC strands are still lying over the left needle, behind the stitch just knitted. | |
| 5. Using the point of the right needle, lift the two strands up and over the MC stitch just worked, as shown, then off over the point of the left needle. | |
| 6. The “Lift up loops" instruction is now completed. The MC stitch anchors the two CC strands. | |
Copyright ? Ellen Kapusniak 2013 For pattern support email: ellen@knittipoliti.com
Use this stitch pattern to make a Mermaid washcloth!
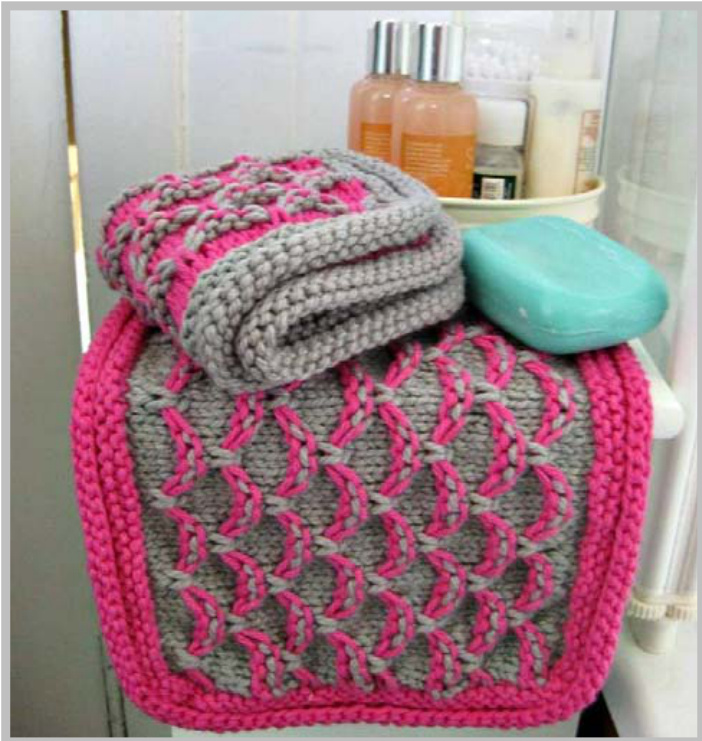
Washcloth, in worsted weight 100%cotton
Cloths shown use Peaches & Creme Solids(pink) and PerformanceWinter Cotton (gray). Size: 9 x 7 inches (23 x 18 cm) Needles: 4.5 mm (US 7) for the cloth, 4 mm (US 6) 60 cm (24 inch) circular needle for the border. Other: Tapestry needle for weaving in ends. Gauge: 18 stitches and 20 rows to 4 x 4 inches (10 cm x 10 cm) on larger needles in Mermaid Scale pattern (or size needed to obtain gauge)
Instructions
Using larger needles and MC, cast on 35 sts. Row 1 (Right side): knit Row 2 (Wrong side): purl Starting with row 1; work the Mermaid Scale pattern (on page 2) 4 times. Bind off all sts.
Border
Using CC and with the smaller needle size (circular), start at one corner of the cloth. Pick up and knit 2 sts in this first corner. Then pick up and knit 30 sts along each short side of the cloth (row edges), 35 sts along each long side of the cloth (cast on and bound off edges), with 2 sts at each of the remaining 3 corners. Work rounds 1-6 only of the rolled border on page 3. Bind off using the stretchy bind off on page 3. Weave in all ends.


